CHRYSLER VOYAGER 1996 Service Manual
Manufacturer: CHRYSLER, Model Year: 1996, Model line: VOYAGER, Model: CHRYSLER VOYAGER 1996Pages: 1938, PDF Size: 55.84 MB
Page 491 of 1938

LAMP SERVICE
INDEX
page page
GENERAL INFORMATION
HEADLAMP DIMMER SWITCH............. 13
HEADLAMP SWITCH.................... 13
REMOVAL AND INSTALLATION
CENTER HIGH MOUNTED STOP LAMP
(CHMSL)............................ 16FOG LAMP............................ 14
HEADLAMP LEVELING MOTOR............ 14
HEADLAMP MODULE................... 13
LICENSE PLATE LAMP.................. 15
SIDE REPEATER LAMP.................. 14
TAIL LAMP............................ 15
GENERAL INFORMATION
HEADLAMP SWITCH
Service procedures for the headlamp switch can be
found in Group 8E, Instrument Panel and Gauges.
More information can be found in Group 8W, Wiring
Diagrams.
HEADLAMP DIMMER SWITCH
The headlamp dimmer switch is incorporated into
the multi-function (turn signal) switch. Proper proce-
dures can be found in Group 8J, Turn Signal and
Flashers. More information can be found in Group
8W, Wiring Diagrams.
REMOVAL AND INSTALLATION
HEADLAMP MODULE
REMOVAL
(1) Release hood latch and open hood.
(2) Remove bolt holding headlamp module to radi-
ator closure panel (Fig. 1).
(3) From behind the radiator closure panel, remove
the nuts holding the headlamp module to the radia-
tor closure panel.
(4) Separate headlamp module from radiator clo-
sure panel.
(5) Disengage wire connector from headlamp bulb.
(6) Disengage wire connector from headlamp level-
ing motor.
(7) Disengage wire connector for front turn signal
and citylight lamps.(8) Separate headlamp module from vehicle.
INSTALLATION
(1) Position headlamp module to vehicle.
(2) Engage wire connector for front turn signal and
citylight lamps.
(3) Engage wire connector to headlamp leveling
motor.
(4) Engage wire connector to headlamp bulb.
(5) Position headlamp module to radiator closure
panel.
(6) Press headlamp module rearward until module
is fully seated onto mounting studs.
(7) Install nuts to hold headlamp module to radia-
tor closure panel.
(8) Verify lamp operation.
Fig. 1 Headlamp Module
NS/GSLAMPS 8L - 13
Page 492 of 1938
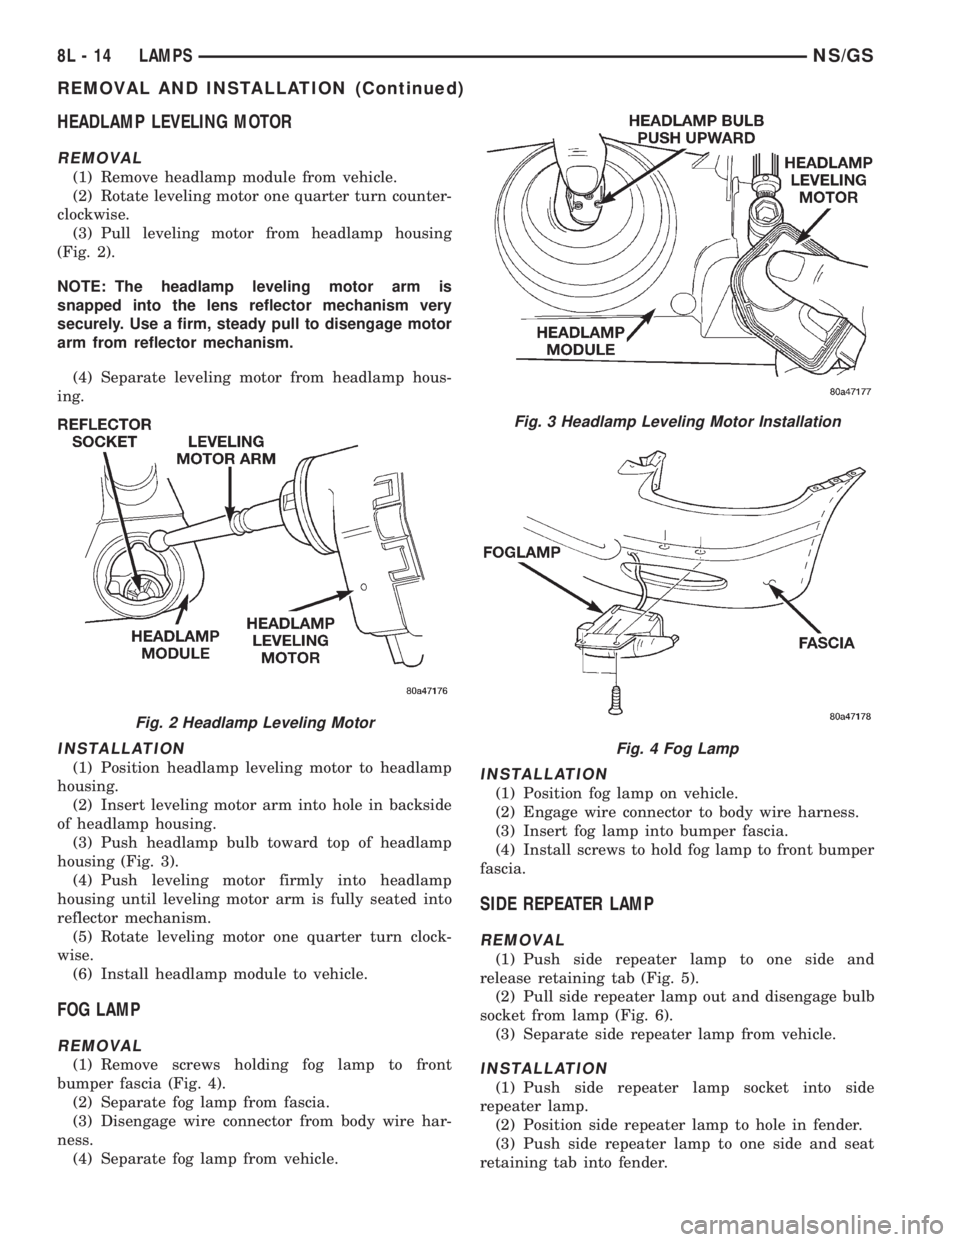
HEADLAMP LEVELING MOTOR
REMOVAL
(1) Remove headlamp module from vehicle.
(2) Rotate leveling motor one quarter turn counter-
clockwise.
(3) Pull leveling motor from headlamp housing
(Fig. 2).
NOTE: The headlamp leveling motor arm is
snapped into the lens reflector mechanism very
securely. Use a firm, steady pull to disengage motor
arm from reflector mechanism.
(4) Separate leveling motor from headlamp hous-
ing.
INSTALLATION
(1) Position headlamp leveling motor to headlamp
housing.
(2) Insert leveling motor arm into hole in backside
of headlamp housing.
(3) Push headlamp bulb toward top of headlamp
housing (Fig. 3).
(4) Push leveling motor firmly into headlamp
housing until leveling motor arm is fully seated into
reflector mechanism.
(5) Rotate leveling motor one quarter turn clock-
wise.
(6) Install headlamp module to vehicle.
FOG LAMP
REMOVAL
(1) Remove screws holding fog lamp to front
bumper fascia (Fig. 4).
(2) Separate fog lamp from fascia.
(3) Disengage wire connector from body wire har-
ness.
(4) Separate fog lamp from vehicle.
INSTALLATION
(1) Position fog lamp on vehicle.
(2) Engage wire connector to body wire harness.
(3) Insert fog lamp into bumper fascia.
(4) Install screws to hold fog lamp to front bumper
fascia.
SIDE REPEATER LAMP
REMOVAL
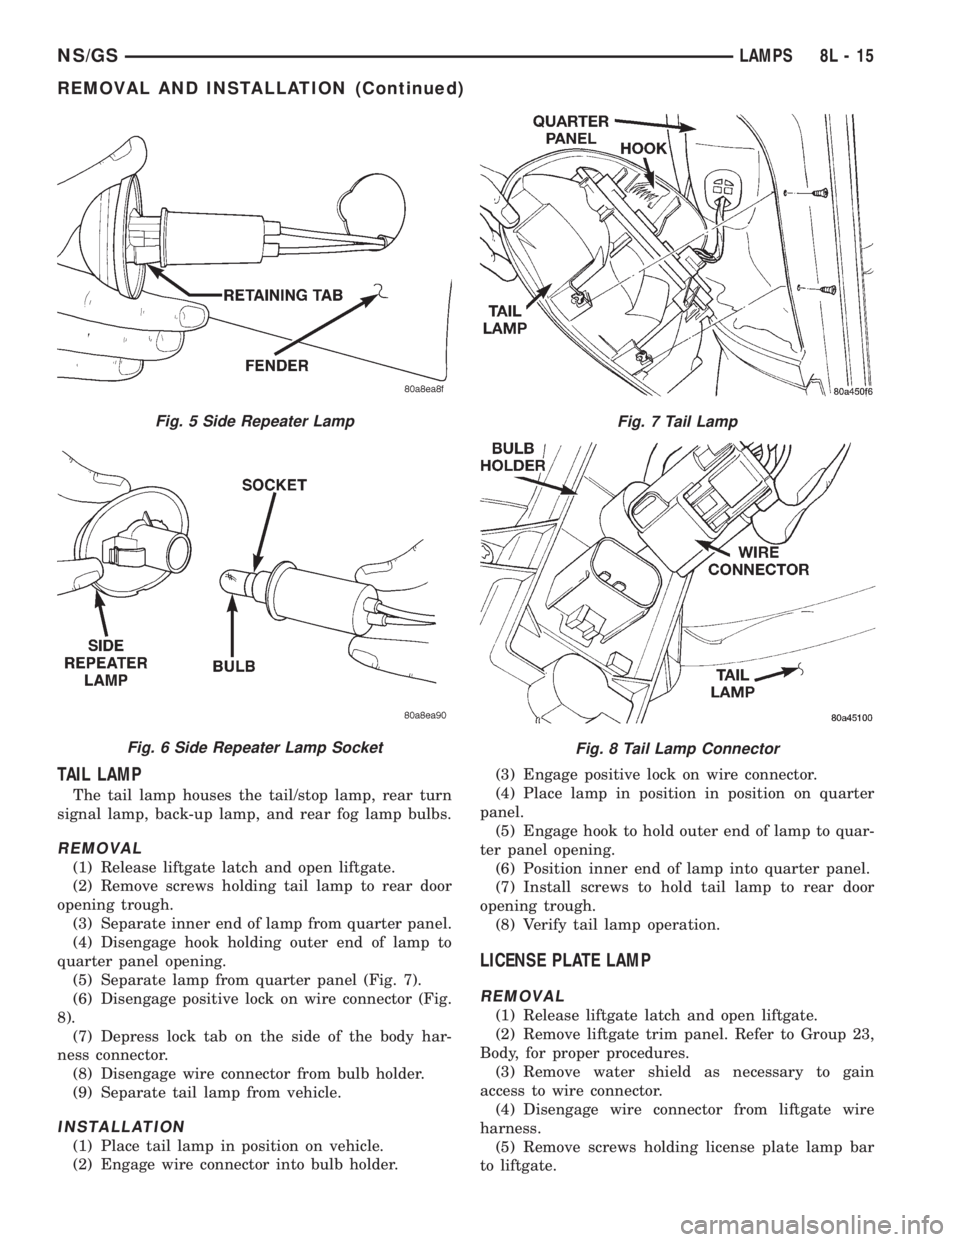
(1) Push side repeater lamp to one side and
release retaining tab (Fig. 5).
(2) Pull side repeater lamp out and disengage bulb
socket from lamp (Fig. 6).
(3) Separate side repeater lamp from vehicle.
INSTALLATION
(1) Push side repeater lamp socket into side
repeater lamp.
(2) Position side repeater lamp to hole in fender.
(3) Push side repeater lamp to one side and seat
retaining tab into fender.
Fig. 2 Headlamp Leveling Motor
Fig. 3 Headlamp Leveling Motor Installation
Fig. 4 Fog Lamp
8L - 14 LAMPSNS/GS
REMOVAL AND INSTALLATION (Continued)
Page 493 of 1938
TAIL LAMP
The tail lamp houses the tail/stop lamp, rear turn
signal lamp, back-up lamp, and rear fog lamp bulbs.
REMOVAL
(1) Release liftgate latch and open liftgate.
(2) Remove screws holding tail lamp to rear door
opening trough.
(3) Separate inner end of lamp from quarter panel.
(4) Disengage hook holding outer end of lamp to
quarter panel opening.
(5) Separate lamp from quarter panel (Fig. 7).
(6) Disengage positive lock on wire connector (Fig.
8).
(7) Depress lock tab on the side of the body har-
ness connector.
(8) Disengage wire connector from bulb holder.
(9) Separate tail lamp from vehicle.
INSTALLATION
(1) Place tail lamp in position on vehicle.
(2) Engage wire connector into bulb holder.(3) Engage positive lock on wire connector.
(4) Place lamp in position in position on quarter
panel.
(5) Engage hook to hold outer end of lamp to quar-
ter panel opening.
(6) Position inner end of lamp into quarter panel.
(7) Install screws to hold tail lamp to rear door
opening trough.
(8) Verify tail lamp operation.
LICENSE PLATE LAMP
REMOVAL
(1) Release liftgate latch and open liftgate.
(2) Remove liftgate trim panel. Refer to Group 23,
Body, for proper procedures.
(3) Remove water shield as necessary to gain
access to wire connector.
(4) Disengage wire connector from liftgate wire
harness.
(5) Remove screws holding license plate lamp bar
to liftgate.
Fig. 5 Side Repeater Lamp
Fig. 6 Side Repeater Lamp Socket
Fig. 7 Tail Lamp
Fig. 8 Tail Lamp Connector
NS/GSLAMPS 8L - 15
REMOVAL AND INSTALLATION (Continued)
Page 494 of 1938
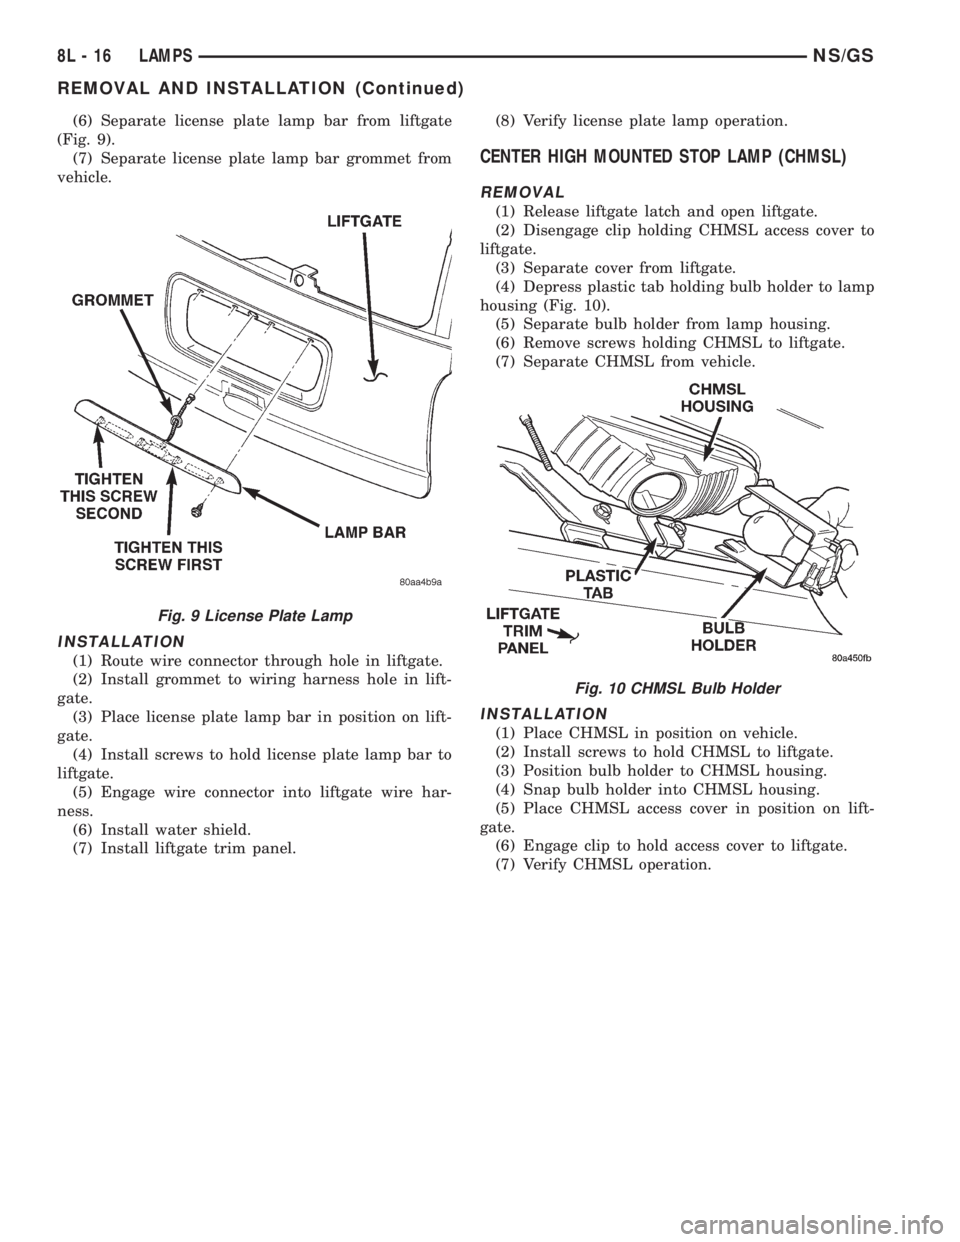
(6) Separate license plate lamp bar from liftgate
(Fig. 9).
(7) Separate license plate lamp bar grommet from
vehicle.
INSTALLATION
(1) Route wire connector through hole in liftgate.
(2) Install grommet to wiring harness hole in lift-
gate.
(3) Place license plate lamp bar in position on lift-
gate.
(4) Install screws to hold license plate lamp bar to
liftgate.
(5) Engage wire connector into liftgate wire har-
ness.
(6) Install water shield.
(7) Install liftgate trim panel.(8) Verify license plate lamp operation.
CENTER HIGH MOUNTED STOP LAMP (CHMSL)
REMOVAL
(1) Release liftgate latch and open liftgate.
(2) Disengage clip holding CHMSL access cover to
liftgate.
(3) Separate cover from liftgate.
(4) Depress plastic tab holding bulb holder to lamp
housing (Fig. 10).
(5) Separate bulb holder from lamp housing.
(6) Remove screws holding CHMSL to liftgate.
(7) Separate CHMSL from vehicle.
INSTALLATION
(1) Place CHMSL in position on vehicle.
(2) Install screws to hold CHMSL to liftgate.
(3) Position bulb holder to CHMSL housing.
(4) Snap bulb holder into CHMSL housing.
(5) Place CHMSL access cover in position on lift-
gate.
(6) Engage clip to hold access cover to liftgate.
(7) Verify CHMSL operation.
Fig. 9 License Plate Lamp
Fig. 10 CHMSL Bulb Holder
8L - 16 LAMPSNS/GS
REMOVAL AND INSTALLATION (Continued)
Page 495 of 1938
BULB APPLICATION
INDEX
page page
GENERAL INFORMATION
INTRODUCTION....................... 17
CLEANING AND INSPECTION
HEADLAMP CLEANING.................. 17SPECIFICATIONS
EXTERIOR LAMP BULBS................. 17
INTERIOR LAMP BULBS................. 17
GENERAL INFORMATION
INTRODUCTION
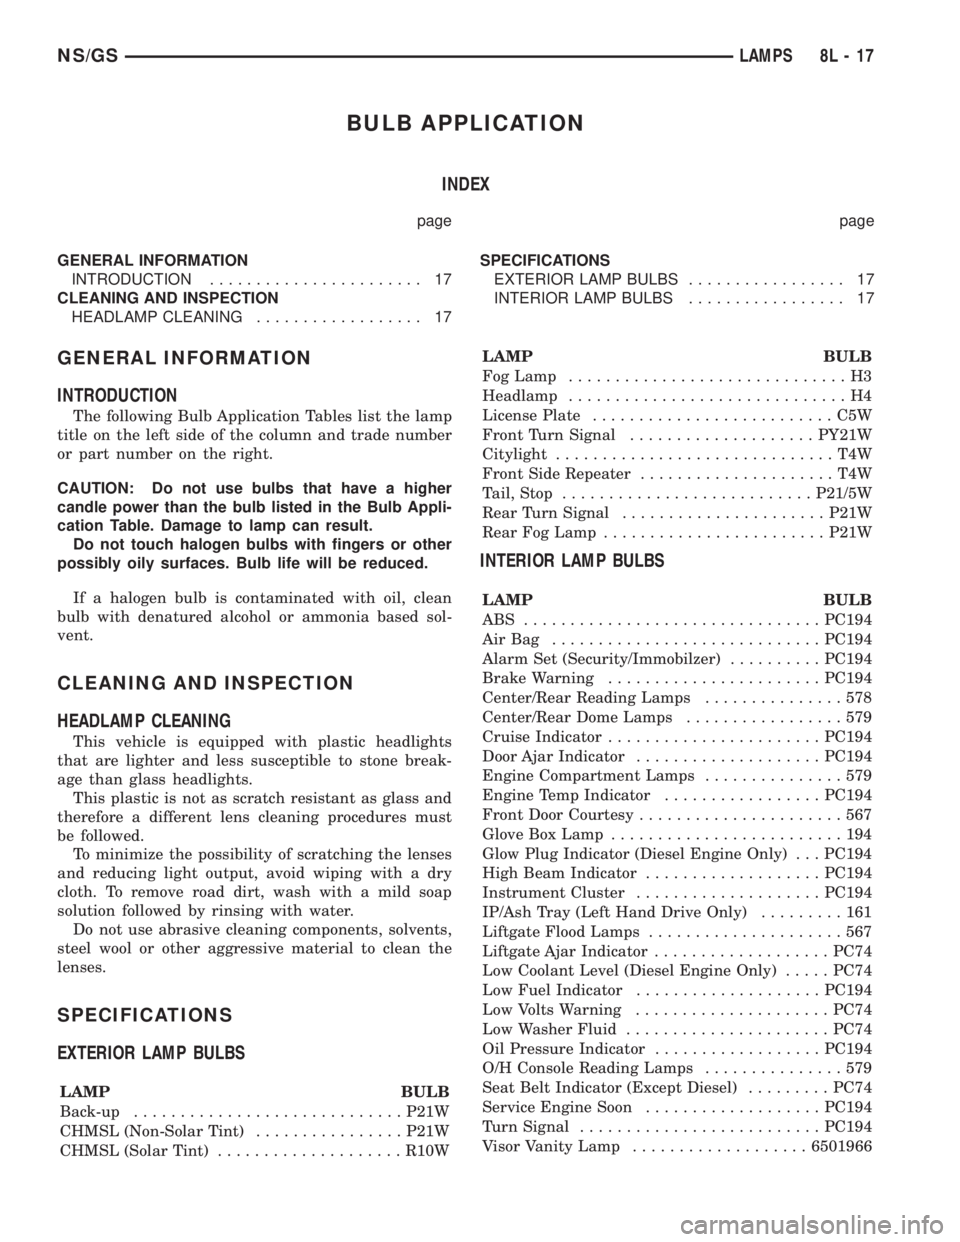
The following Bulb Application Tables list the lamp
title on the left side of the column and trade number
or part number on the right.
CAUTION: Do not use bulbs that have a higher
candle power than the bulb listed in the Bulb Appli-
cation Table. Damage to lamp can result.
Do not touch halogen bulbs with fingers or other
possibly oily surfaces. Bulb life will be reduced.
If a halogen bulb is contaminated with oil, clean
bulb with denatured alcohol or ammonia based sol-
vent.
CLEANING AND INSPECTION
HEADLAMP CLEANING
This vehicle is equipped with plastic headlights
that are lighter and less susceptible to stone break-
age than glass headlights.
This plastic is not as scratch resistant as glass and
therefore a different lens cleaning procedures must
be followed.
To minimize the possibility of scratching the lenses
and reducing light output, avoid wiping with a dry
cloth. To remove road dirt, wash with a mild soap
solution followed by rinsing with water.
Do not use abrasive cleaning components, solvents,
steel wool or other aggressive material to clean the
lenses.
SPECIFICATIONS
EXTERIOR LAMP BULBS
LAMP BULB
Back-up.............................P21W
CHMSL (Non-Solar Tint)................P21W
CHMSL (Solar Tint)....................R10WLAMP BULB
Fog Lamp..............................H3
Headlamp..............................H4
License Plate..........................C5W
Front Turn Signal....................PY21W
Citylight..............................T4W
Front Side Repeater.....................T4W
Tail, Stop...........................P21/5W
Rear Turn Signal......................P21W
Rear Fog Lamp........................P21W
INTERIOR LAMP BULBS
LAMP BULB
ABS ................................PC194
AirBag .............................PC194
Alarm Set (Security/Immobilzer)..........PC194
Brake Warning.......................PC194
Center/Rear Reading Lamps...............578
Center/Rear Dome Lamps.................579
Cruise Indicator.......................PC194
Door Ajar Indicator....................PC194
Engine Compartment Lamps...............579
Engine Temp Indicator.................PC194
Front Door Courtesy......................567
Glove Box Lamp.........................194
Glow Plug Indicator (Diesel Engine Only) . . . PC194
High Beam Indicator...................PC194
Instrument Cluster....................PC194
IP/Ash Tray (Left Hand Drive Only).........161
Liftgate Flood Lamps.....................567
Liftgate Ajar Indicator...................PC74
Low Coolant Level (Diesel Engine Only).....PC74
Low Fuel Indicator....................PC194
Low Volts Warning.....................PC74
Low Washer Fluid......................PC74
Oil Pressure Indicator..................PC194
O/H Console Reading Lamps...............579
Seat Belt Indicator (Except Diesel).........PC74
Service Engine Soon...................PC194
Turn Signal..........................PC194
Visor Vanity Lamp...................6501966
NS/GSLAMPS 8L - 17
Page 496 of 1938

Page 497 of 1938

RESTRAINT SYSTEM
CONTENTS
page page
GENERAL INFORMATION
WARNINGS AND PRECAUTIONS............ 1
DESCRIPTION AND OPERATION
AIRBAG CONTROL MODULE (ACM)......... 1
CLOCKSPRING.......................... 2
DRIVER AND PASSENGER
AIRBAG MODULES..................... 2
DIAGNOSIS AND TESTING
AIRBAG SYSTEM TEST................... 2
SERVICE PROCEDURES
CLEANUP PROCEDURE................... 3HANDLING AIRBAG MODULE.............. 3
REMOVAL AND INSTALLATION
AIRBAG CONTROL MODULE............... 3
CLOCKSPRING.......................... 5
DRIVER AIRBAG MODULE................. 5
PASSENGER AIRBAG..................... 6
ADJUSTMENTS
CLOCKSPRING CENTERING PROCEDURE..... 7
GENERAL INFORMATION
WARNINGS AND PRECAUTIONS
WARNING: THIS SYSTEM IS A SENSITIVE, COM-
PLEX ELECTRO±MECHANICAL UNIT. DISCONNECT
AND ISOLATE THE BATTERY NEGATIVE CABLE
BEFORE BEGINNING AIRBAG SYSTEM COMPO-
NENT REMOVAL OR INSTALLATION PROCEDURES.
THIS WILL DISABLE THE AIRBAG SYSTEM. FAIL-
URE TO DISCONNECT THE BATTERY COULD
RESULT IN ACCIDENTAL AIRBAG DEPLOYMENT
AND POSSIBLE PERSONAL INJURY.
ALLOW SYSTEM CAPACITOR TO DISCHARGE
FOR TWO MINUTES BEFORE REMOVING AIRBAG
COMPONENTS.
DO NOT PLACE AN INTACT UNDEPLOYED AIR-
BAG FACE DOWN ON A SOLID SURFACE, THE AIR-
BAG WILL PROPEL INTO THE AIR IF
ACCIDENTALLY DEPLOYED AND COULD RESULT
IN PERSONAL INJURY. WHEN CARRYING OR HAN-
DLING AN UNDEPLOYED AIRBAG MODULE, THE
TRIM SIDE OF THE AIRBAG SHOULD BE POINTING
AWAY FROM THE BODY TO MINIMIZE POSSIBILITY
OF INJURY IF ACCIDENTAL DEPLOYMENT
OCCURS.
REPLACE AIRBAG SYSTEM COMPONENTS WITH
MOPARTREPLACEMENT PARTS. SUBSTITUTE
PARTS MAY APPEAR INTERCHANGEABLE, BUT
INTERNAL DIFFERENCES MAY RESULT IN INFE-
RIOR OCCUPANT PROTECTION.
WEAR SAFETY GLASSES, RUBBER GLOVES,
AND LONG SLEEVED CLOTHING WHEN CLEANING
POWDER RESIDUE FROM VEHICLE AFTER AIRBAG
DEPLOYMENT. SODIUM HYDROXIDE POWDERRESIDUE EMITTED FROM A DEPLOYED AIRBAG
CAN CAUSE SKIN IRRITATION. FLUSH AFFECTED
AREA WITH COOL WATER IF IRRITATION IS EXPE-
RIENCED. IF NASAL OR THROAT IRRITATION IS
EXPERIENCED, EXIT THE VEHICLE FOR FRESH AIR
UNTIL THE IRRITATION CEASES. IF IRRITATION
CONTINUES, SEE A PHYSICIAN.
DO NOT USE A REPLACEMENT AIRBAG THAT IS
NOT IN THE ORIGINAL PACKAGING, IMPROPER
DEPLOYMENT AND PERSONAL INJURY CAN
RESULT.
THE FACTORY INSTALLED FASTENERS,
SCREWS AND BOLTS USED TO FASTEN AIRBAG
COMPONENTS HAVE A SPECIAL COATING AND
ARE SPECIFICALLY DESIGNED FOR THE AIRBAG
SYSTEM. DO NOT USE SUBSTITUTE FASTENERS,
USE ONLY ORIGINAL EQUIPMENT FASTENERS
LISTED IN THE PARTS CATALOG WHEN FASTENER
REPLACEMENT IS REQUIRED.
NOTE: Airbags should be stored in a cool dry loca-
tion away from excessive heat and static electrical
activity with the fabric airbag facing UP, or a prema-
ture deployment can result.
If the Driver/Passenger Airbag Module is defective
and not deployed, refer to Chrysler Corporation cur-
rent return list for proper handling procedures.
DESCRIPTION AND OPERATION
AIRBAG CONTROL MODULE (ACM)
The Airbag Control Module (ACM) contains the
impact sensor and energy reserve capacitor. The
NSRESTRAINT SYSTEM 8M - 1
Page 498 of 1938

ACM monitors the system to determine the system
readiness. The ACM contains on-board diagnostics
and will light the AIRBAG warning lamp in the mes-
sage center when a problem occurs.
The driver and passenger airbag system is a safety
device designed to reduce the risk of fatality or seri-
ous injury, caused by a frontal impact of the vehicle.
The impact sensor provides verification of the
direction and severity of the impact. One impact sen-
sor is used. It is located inside the Airbag Control
Module (ACM) which is mounted on a bracket, just
forward of the center console. The impact sensor is
an accelerometer that senses deceleration. The decel-
eration pulses are sent to a microprocessor which
contains a decision algorithm. When an impact is
severe enough to require airbag protection, the ACM
micro processor sends a signal that completes the
electrical circuit to the driver and passenger airbags.
The sensor is calibrated for the specific vehicle and
reacts to the severity and direction of the impact.
CLOCKSPRING
The clockspring is snapped into a plastic mounting
platform on the steering column behind the steering
wheel. The clockspring is used to maintain a contin-
uous electrical circuit between the wiring harness
and the driver's airbag module. This assembly con-
sists of a flat ribbon like electrically conductive tape
which winds and unwinds with the steering wheel
rotation.
DRIVER AND PASSENGER AIRBAG MODULES
The Driver Airbag Module is located in the center
of the steering wheel. The Passenger Airbag Module
is located in the instrument panel above the glove
box (Fig. 1). The Driver Airbag Module cover contains
the horn switch, inflator device, and a fabric bag. The
airbag cover/horn switch is serviced separately from
the inflator and bag components. Refer to Group 8G,
Horns for proper service procedure for horn switch.
The Passenger Airbag Module is serviced as an
assembly.
WARNING: WHEN THE AIRBAG SYSTEM IS
DEPLOYED BECAUSE OF A COLLISION, THE FOL-
LOWING MUST BE REPLACED:
²COMPLETE STEERING COLUMN ASSEMBLY
²LOWER STEERING COUPLER
²STEERING WHEEL
²STEERING COLUMN CLOCKSPRING
²DRIVER AIRBAG COVER/HORN SWITCH
²DRIVER AIRBAG MODULE
²PASSENGER AIRBAG MODULE
²UPPER INSTRUMENT PANEL WITH PAD
DIAGNOSIS AND TESTING
AIRBAG SYSTEM TEST
(1) Disconnect and isolate the battery negative
cable.
WARNING: DISCONNECT AND ISOLATE THE BAT-
TERY NEGATIVE CABLE BEFORE BEGINNING AIR-
BAG SYSTEM COMPONENT SERVICE
PROCEDURES. THIS WILL DISABLE THE AIRBAG
SYSTEM. FAILURE TO DISCONNECT THE BATTERY
COULD RESULT IN ACCIDENTAL AIRBAG DEPLOY-
MENT AND POSSIBLE PERSONAL INJURY. ALLOW
SYSTEM CAPACITOR TO DISCHARGE FOR TWO
MINUTES BEFORE REMOVING AIRBAG COMPO-
NENTS.
(2) Connect scan tool (DRB) to Data Link connec-
tor, located at left side of the steering column and at
the lower edge of the lower instrument panel.
(3) Turn the ignition key to ON position. Exit vehi-
cle with scan tool. Use the latest version of the
proper cartridge.
(4) After checking that no one is inside the vehicle,
connect the battery negative terminal.
(5) Using the scan tool, read and record active
diagnostic code data.
(6) Read and record any stored diagnostic codes.
(7) Refer to the proper Body Diagnostic Procedures
Manual if any diagnostic codes are found in Step 5 or
Step 6.
(8) Erase stored diagnostic codes if there are no
active diagnostic codes. If problems remain, diagnos-
tic codes will not erase. Refer to the Passive
Restraint Diagnostic Test Manual to diagnose the
problem.If airbag warning lamp either fails to
light, or goes on and stays on, there is a system
malfunction. Refer to the proper Body Diagnos-
tic Procedures Manual to diagnose the problem.
Fig. 1 Airbag Module Locations
8M - 2 RESTRAINT SYSTEMNS
DESCRIPTION AND OPERATION (Continued)
Page 499 of 1938

SERVICE PROCEDURES
CLEANUP PROCEDURE
Roll or fold the passenger airbag towards the
instrument panel surface and close the door over the
folded bag. Then tape the door shut.
Use a vacuum cleaner to remove any residual pow-
der from the vehicle interior. Work from the outside
in to avoid kneeling or sitting in a contaminated
area. Vacuum the heater and A/C outlets as well (Fig.
2). If HVAC was in RECIRC mode at time of airbag
deployment, operate HVAC blower on low speed/heat
and vacuum powder residue expelled from the heat
outlets. Multiple vacuum cleaning may to necessary
to decontaminate the interior of the vehicle.
NOTE: Dispose deployed airbag properly, contact
dealer or government agency for disposal recom-
mendations.
SERVICE OF DEPLOYED AIRBAG MODULE
DRIVER AIRBAG
If a Driver Airbag Module has been deployed, but
not due to a collision, replace the following:
²Driver Airbag Module
²Clockspring assembly
²Driver airbag cover/horn switch
The components above must be replaced because
they cannot be reused. Replace any other driver air-
bag system components if damaged.
PASSENGER AIRBAG
If a Passenger Airbag Module has been deployed,
but not due to a collision, replace the following:
²Passenger Airbag Module
²Upper instrument panel with pad
The component above must be replaced because
they cannot be reused. Inspect the heat duct near the
passenger airbag for any damage replace as neces-sary. Replace any other passenger airbag system
components if damaged.
HANDLING AIRBAG MODULE
DEPLOYED MODULE
The vehicle interior may contain a very small
amount of sodium hydroxide powder, a by-product of
airbag deployment. Sodium hydroxide powder can
irritate the skin, eyes, nose and throat. Wear safety
glasses, rubber gloves, and long sleeved clothing
when cleaning any of the powder residue from the
vehicle.
If you find that the cleanup is irritating your skin,
run cool water over the affected area. Also, if you
experience nasal or throat irritation, exit the vehicle
for fresh air until the irritation ceases. If irritation
continues, see a physician.
UNDEPLOYED
The airbag modules must be stored in its original
special container until used for service. At no time
should a source of electricity be permitted near the
inflator on the back of an airbag module. When car-
rying or handling an undeployed airbag module, the
trim side of the airbag should be pointing away from
the body to minimize possibility of injury if acciden-
tal deployment occurs. Do not place undeployed air-
bag face down on a solid surface, the airbag will
propel into the air if accidentally deployment occurs.
REMOVAL AND INSTALLATION
AIRBAG CONTROL MODULE
WARNING: THE ACM CONTAINS THE IMPACT
SENSOR WHICH ENABLES THE SYSTEM TO
DEPLOY THE AIRBAGS. TO AVOID ACCIDENTAL
DEPLOYMENT, NEVER CONNECT ACM ELECTRI-
CALLY TO THE SYSTEM WHILE VEHICLE BATTERY
IS CONNECTED. DISCONNECT AND ISOLATE THE
BATTERY NEGATIVE CABLE BEFORE BEGINNING
ANY AIRBAG SYSTEM COMPONENT SERVICE PRO-
CEDURES. THIS WILL DISABLE THE AIRBAG SYS-
TEM. FAILURE TO DISCONNECT THE BATTERY
COULD RESULT IN ACCIDENTAL AIRBAG DEPLOY-
MENT AND POSSIBLE PERSONAL INJURY. ALLOW
SYSTEM CAPACITOR TO DISCHARGE FOR TWO
MINUTES BEFORE REMOVING AIRBAG COMPO-
NENTS.
REMOVAL
(1) Disconnect and isolate battery negative cable.
Allow at least two minutes for the reserve capacitor
in the Airbag Control Module (ACM) to discharge.
Fig. 2 Vacuum Heater and A/C Outlets
NSRESTRAINT SYSTEM 8M - 3
Page 500 of 1938
(2) Remove forward lower console from instrument
panel, refer to Group 8E, Instrument Panel and Sys-
tems for proper procedures.
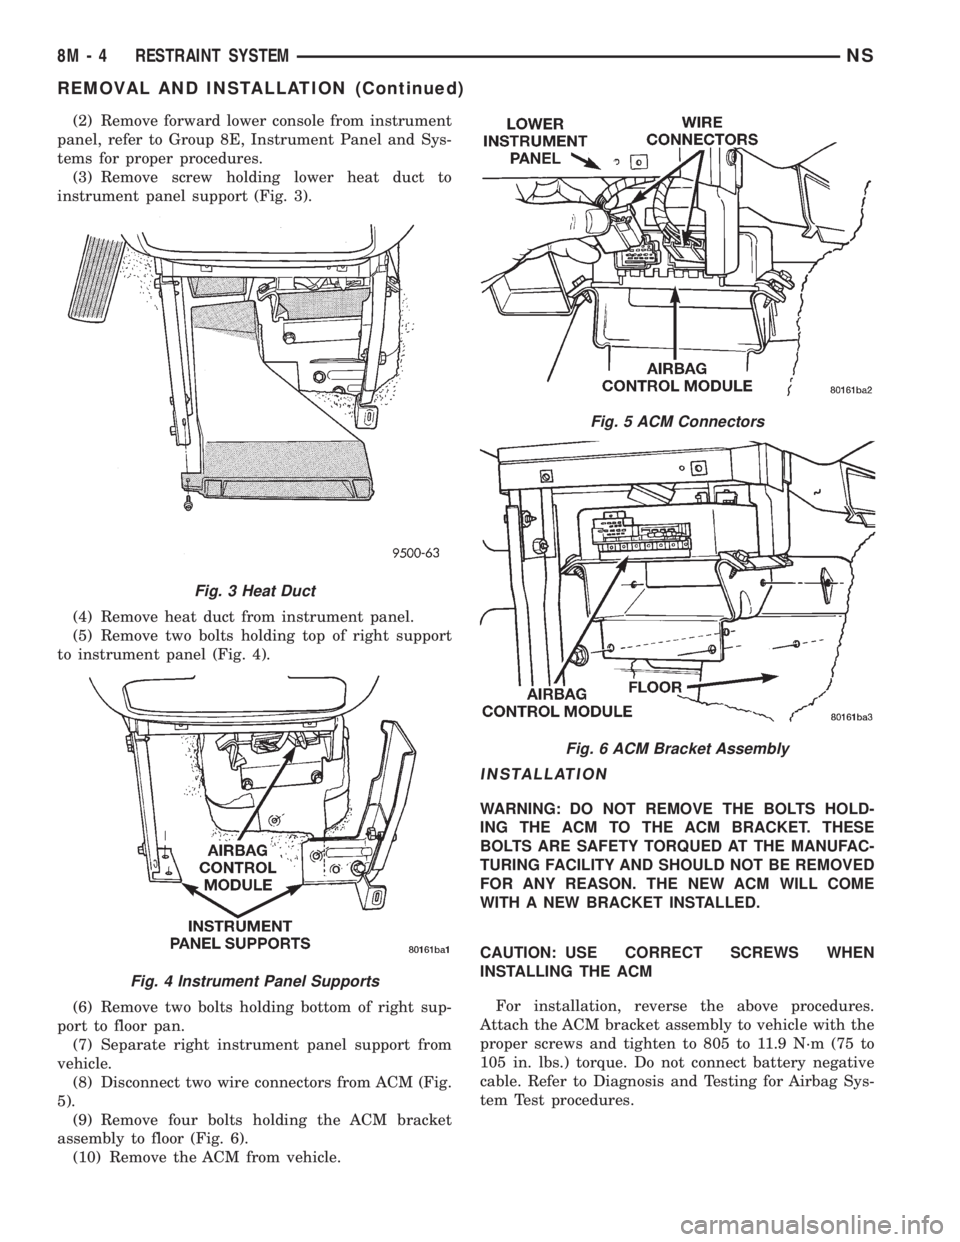
(3) Remove screw holding lower heat duct to
instrument panel support (Fig. 3).
(4) Remove heat duct from instrument panel.
(5) Remove two bolts holding top of right support
to instrument panel (Fig. 4).
(6) Remove two bolts holding bottom of right sup-
port to floor pan.
(7) Separate right instrument panel support from
vehicle.
(8) Disconnect two wire connectors from ACM (Fig.
5).
(9) Remove four bolts holding the ACM bracket
assembly to floor (Fig. 6).
(10) Remove the ACM from vehicle.
INSTALLATION
WARNING: DO NOT REMOVE THE BOLTS HOLD-
ING THE ACM TO THE ACM BRACKET. THESE
BOLTS ARE SAFETY TORQUED AT THE MANUFAC-
TURING FACILITY AND SHOULD NOT BE REMOVED
FOR ANY REASON. THE NEW ACM WILL COME
WITH A NEW BRACKET INSTALLED.
CAUTION: USE CORRECT SCREWS WHEN
INSTALLING THE ACM
For installation, reverse the above procedures.
Attach the ACM bracket assembly to vehicle with the
proper screws and tighten to 805 to 11.9 N´m (75 to
105 in. lbs.) torque. Do not connect battery negative
cable. Refer to Diagnosis and Testing for Airbag Sys-
tem Test procedures.
Fig. 3 Heat Duct
Fig. 4 Instrument Panel Supports
Fig. 5 ACM Connectors
Fig. 6 ACM Bracket Assembly
8M - 4 RESTRAINT SYSTEMNS
REMOVAL AND INSTALLATION (Continued)