CHRYSLER VOYAGER 1996 Service Manual
Manufacturer: CHRYSLER, Model Year: 1996, Model line: VOYAGER, Model: CHRYSLER VOYAGER 1996Pages: 1938, PDF Size: 55.84 MB
Page 501 of 1938

CLOCKSPRING
WARNING: DISCONNECT AND ISOLATE THE BAT-
TERY NEGATIVE CABLE BEFORE BEGINNING AIR-
BAG SYSTEM COMPONENT SERVICE
PROCEDURES. THIS WILL DISABLE THE AIRBAG
SYSTEM. FAILURE TO DISCONNECT THE BATTERY
COULD RESULT IN ACCIDENTAL AIRBAG DEPLOY-
MENT AND POSSIBLE PERSONAL INJURY. ALLOW
SYSTEM CAPACITOR TO DISCHARGE FOR TWO
MINUTES BEFORE REMOVING AIRBAG COMPO-
NENTS.
REMOVAL
(1) Position steering wheel and front wheels
straight ahead.
(2) Release hood latch and open hood.
(3) Disconnect and isolate battery negative cable.
Allow at least two minutes for the reserve capacitor
in the ACM to discharge.
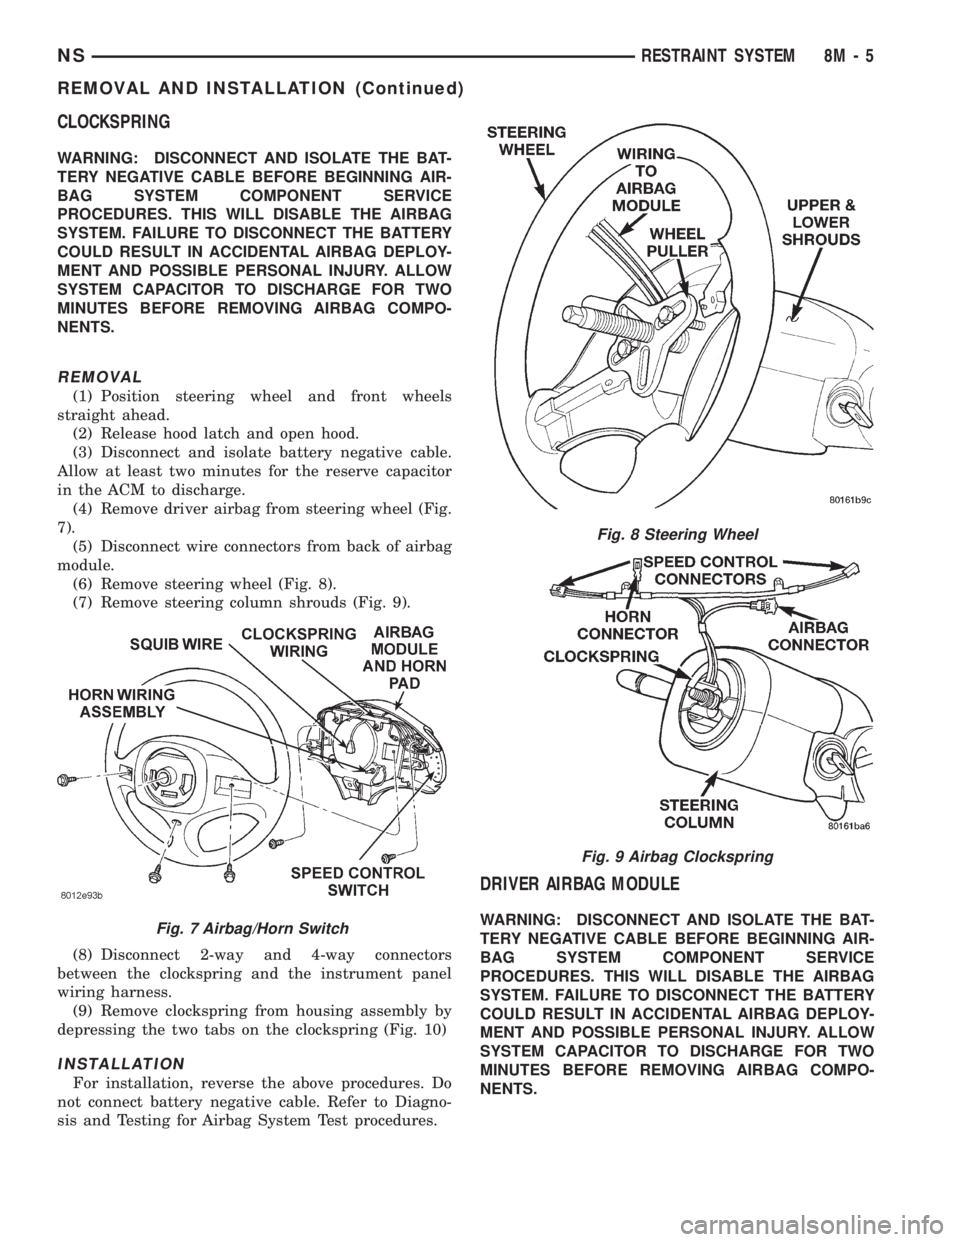
(4) Remove driver airbag from steering wheel (Fig.
7).
(5) Disconnect wire connectors from back of airbag
module.
(6) Remove steering wheel (Fig. 8).
(7) Remove steering column shrouds (Fig. 9).
(8) Disconnect 2-way and 4-way connectors
between the clockspring and the instrument panel
wiring harness.
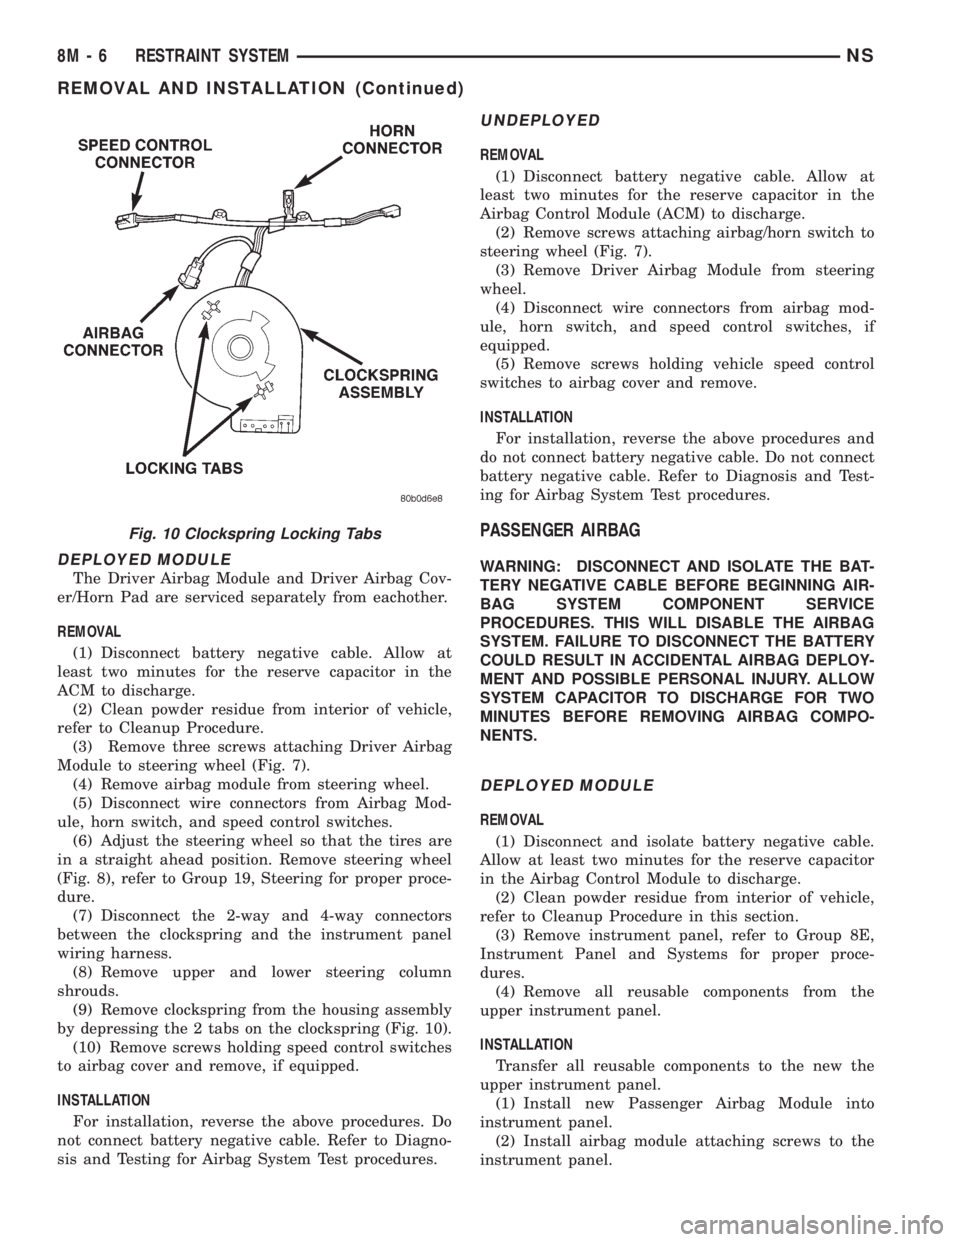
(9) Remove clockspring from housing assembly by
depressing the two tabs on the clockspring (Fig. 10)
INSTALLATION
For installation, reverse the above procedures. Do
not connect battery negative cable. Refer to Diagno-
sis and Testing for Airbag System Test procedures.
DRIVER AIRBAG MODULE
WARNING: DISCONNECT AND ISOLATE THE BAT-
TERY NEGATIVE CABLE BEFORE BEGINNING AIR-
BAG SYSTEM COMPONENT SERVICE
PROCEDURES. THIS WILL DISABLE THE AIRBAG
SYSTEM. FAILURE TO DISCONNECT THE BATTERY
COULD RESULT IN ACCIDENTAL AIRBAG DEPLOY-
MENT AND POSSIBLE PERSONAL INJURY. ALLOW
SYSTEM CAPACITOR TO DISCHARGE FOR TWO
MINUTES BEFORE REMOVING AIRBAG COMPO-
NENTS.Fig. 7 Airbag/Horn Switch
Fig. 8 Steering Wheel
Fig. 9 Airbag Clockspring
NSRESTRAINT SYSTEM 8M - 5
REMOVAL AND INSTALLATION (Continued)
Page 502 of 1938

DEPLOYED MODULE
The Driver Airbag Module and Driver Airbag Cov-
er/Horn Pad are serviced separately from eachother.
REMOVAL
(1) Disconnect battery negative cable. Allow at
least two minutes for the reserve capacitor in the
ACM to discharge.
(2) Clean powder residue from interior of vehicle,
refer to Cleanup Procedure.
(3) Remove three screws attaching Driver Airbag
Module to steering wheel (Fig. 7).
(4) Remove airbag module from steering wheel.
(5) Disconnect wire connectors from Airbag Mod-
ule, horn switch, and speed control switches.
(6) Adjust the steering wheel so that the tires are
in a straight ahead position. Remove steering wheel
(Fig. 8), refer to Group 19, Steering for proper proce-
dure.
(7) Disconnect the 2-way and 4-way connectors
between the clockspring and the instrument panel
wiring harness.
(8) Remove upper and lower steering column
shrouds.
(9) Remove clockspring from the housing assembly
by depressing the 2 tabs on the clockspring (Fig. 10).
(10) Remove screws holding speed control switches
to airbag cover and remove, if equipped.
INSTALLATION
For installation, reverse the above procedures. Do
not connect battery negative cable. Refer to Diagno-
sis and Testing for Airbag System Test procedures.
UNDEPLOYED
REMOVAL
(1) Disconnect battery negative cable. Allow at
least two minutes for the reserve capacitor in the
Airbag Control Module (ACM) to discharge.
(2) Remove screws attaching airbag/horn switch to
steering wheel (Fig. 7).
(3) Remove Driver Airbag Module from steering
wheel.
(4) Disconnect wire connectors from airbag mod-
ule, horn switch, and speed control switches, if
equipped.
(5) Remove screws holding vehicle speed control
switches to airbag cover and remove.
INSTALLATION
For installation, reverse the above procedures and
do not connect battery negative cable. Do not connect
battery negative cable. Refer to Diagnosis and Test-
ing for Airbag System Test procedures.
PASSENGER AIRBAG
WARNING: DISCONNECT AND ISOLATE THE BAT-
TERY NEGATIVE CABLE BEFORE BEGINNING AIR-
BAG SYSTEM COMPONENT SERVICE
PROCEDURES. THIS WILL DISABLE THE AIRBAG
SYSTEM. FAILURE TO DISCONNECT THE BATTERY
COULD RESULT IN ACCIDENTAL AIRBAG DEPLOY-
MENT AND POSSIBLE PERSONAL INJURY. ALLOW
SYSTEM CAPACITOR TO DISCHARGE FOR TWO
MINUTES BEFORE REMOVING AIRBAG COMPO-
NENTS.
DEPLOYED MODULE
REMOVAL
(1) Disconnect and isolate battery negative cable.
Allow at least two minutes for the reserve capacitor
in the Airbag Control Module to discharge.
(2) Clean powder residue from interior of vehicle,
refer to Cleanup Procedure in this section.
(3) Remove instrument panel, refer to Group 8E,
Instrument Panel and Systems for proper proce-
dures.
(4) Remove all reusable components from the
upper instrument panel.
INSTALLATION
Transfer all reusable components to the new the
upper instrument panel.
(1) Install new Passenger Airbag Module into
instrument panel.
(2) Install airbag module attaching screws to the
instrument panel.
Fig. 10 Clockspring Locking Tabs
8M - 6 RESTRAINT SYSTEMNS
REMOVAL AND INSTALLATION (Continued)
Page 503 of 1938

(3) Install Instrument panel. Refer to Group 8E,
Instrument Panel and Systems for installation proce-
dures.
(4) Through access holes in instrument panel
above glove box opening, install screws holding air-
bag to back of panel.
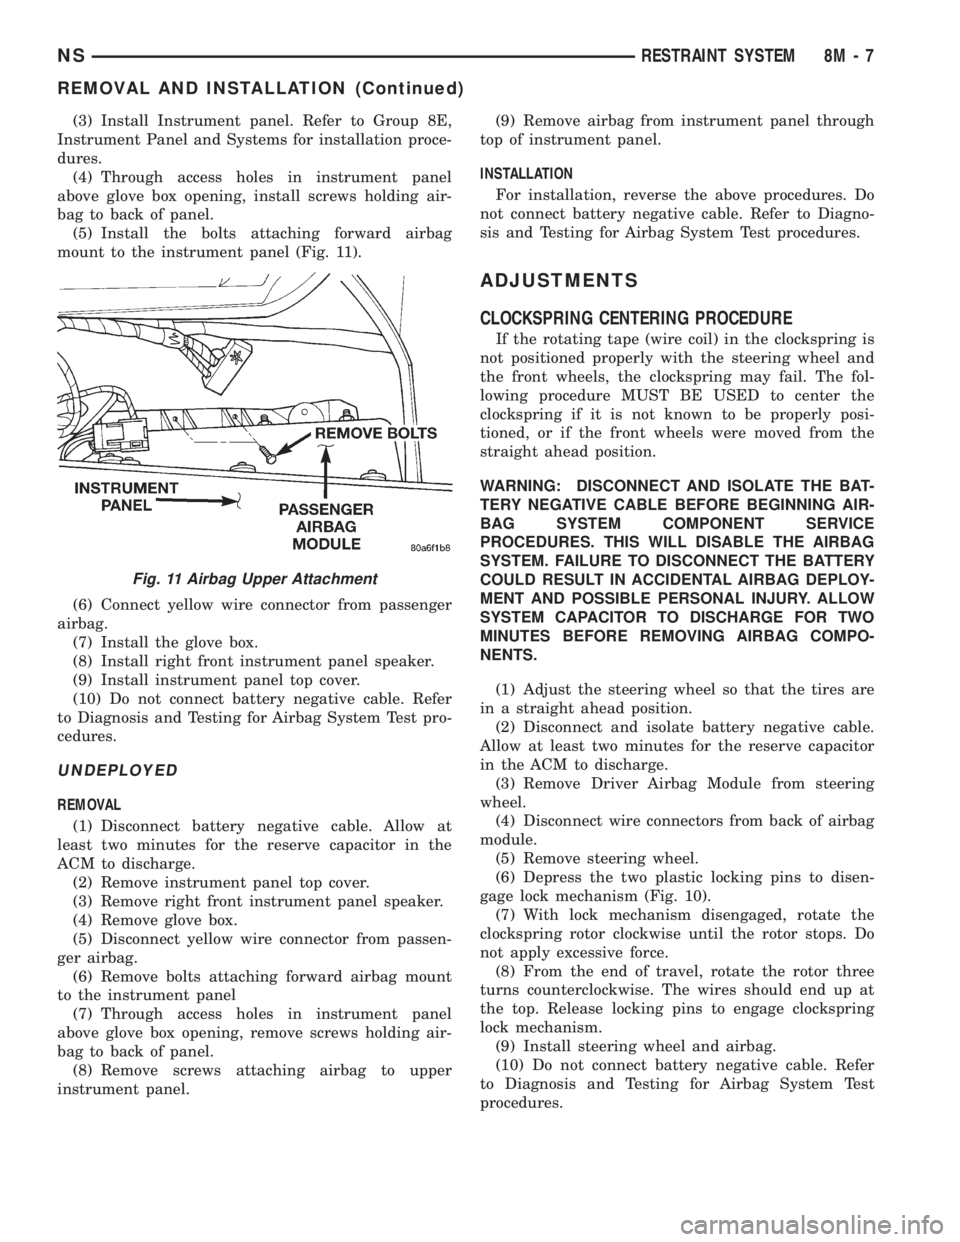
(5) Install the bolts attaching forward airbag
mount to the instrument panel (Fig. 11).
(6) Connect yellow wire connector from passenger
airbag.
(7) Install the glove box.
(8) Install right front instrument panel speaker.
(9) Install instrument panel top cover.
(10) Do not connect battery negative cable. Refer
to Diagnosis and Testing for Airbag System Test pro-
cedures.
UNDEPLOYED
REMOVAL
(1) Disconnect battery negative cable. Allow at
least two minutes for the reserve capacitor in the
ACM to discharge.
(2) Remove instrument panel top cover.
(3) Remove right front instrument panel speaker.
(4) Remove glove box.
(5) Disconnect yellow wire connector from passen-
ger airbag.
(6) Remove bolts attaching forward airbag mount
to the instrument panel
(7) Through access holes in instrument panel
above glove box opening, remove screws holding air-
bag to back of panel.
(8) Remove screws attaching airbag to upper
instrument panel.(9) Remove airbag from instrument panel through
top of instrument panel.
INSTALLATION
For installation, reverse the above procedures. Do
not connect battery negative cable. Refer to Diagno-
sis and Testing for Airbag System Test procedures.
ADJUSTMENTS
CLOCKSPRING CENTERING PROCEDURE
If the rotating tape (wire coil) in the clockspring is
not positioned properly with the steering wheel and
the front wheels, the clockspring may fail. The fol-
lowing procedure MUST BE USED to center the
clockspring if it is not known to be properly posi-
tioned, or if the front wheels were moved from the
straight ahead position.
WARNING: DISCONNECT AND ISOLATE THE BAT-
TERY NEGATIVE CABLE BEFORE BEGINNING AIR-
BAG SYSTEM COMPONENT SERVICE
PROCEDURES. THIS WILL DISABLE THE AIRBAG
SYSTEM. FAILURE TO DISCONNECT THE BATTERY
COULD RESULT IN ACCIDENTAL AIRBAG DEPLOY-
MENT AND POSSIBLE PERSONAL INJURY. ALLOW
SYSTEM CAPACITOR TO DISCHARGE FOR TWO
MINUTES BEFORE REMOVING AIRBAG COMPO-
NENTS.
(1) Adjust the steering wheel so that the tires are
in a straight ahead position.
(2) Disconnect and isolate battery negative cable.
Allow at least two minutes for the reserve capacitor
in the ACM to discharge.
(3) Remove Driver Airbag Module from steering
wheel.
(4) Disconnect wire connectors from back of airbag
module.
(5) Remove steering wheel.
(6) Depress the two plastic locking pins to disen-
gage lock mechanism (Fig. 10).
(7) With lock mechanism disengaged, rotate the
clockspring rotor clockwise until the rotor stops. Do
not apply excessive force.
(8) From the end of travel, rotate the rotor three
turns counterclockwise. The wires should end up at
the top. Release locking pins to engage clockspring
lock mechanism.
(9) Install steering wheel and airbag.
(10) Do not connect battery negative cable. Refer
to Diagnosis and Testing for Airbag System Test
procedures.
Fig. 11 Airbag Upper Attachment
NSRESTRAINT SYSTEM 8M - 7
REMOVAL AND INSTALLATION (Continued)
Page 504 of 1938

Page 505 of 1938

ELECTRICALLY HEATED SYSTEMS
CONTENTS
page page
DESCRIPTION AND OPERATION
HVAC MOUNTED SWITCH................. 1
INTRODUCTION......................... 1
DIAGNOSIS AND TESTING
GRID LINE TEST......................... 2SYSTEM TEST.......................... 2
SERVICE PROCEDURES
GRID LINE AND TERMINAL REPAIR......... 3
DESCRIPTION AND OPERATION
INTRODUCTION
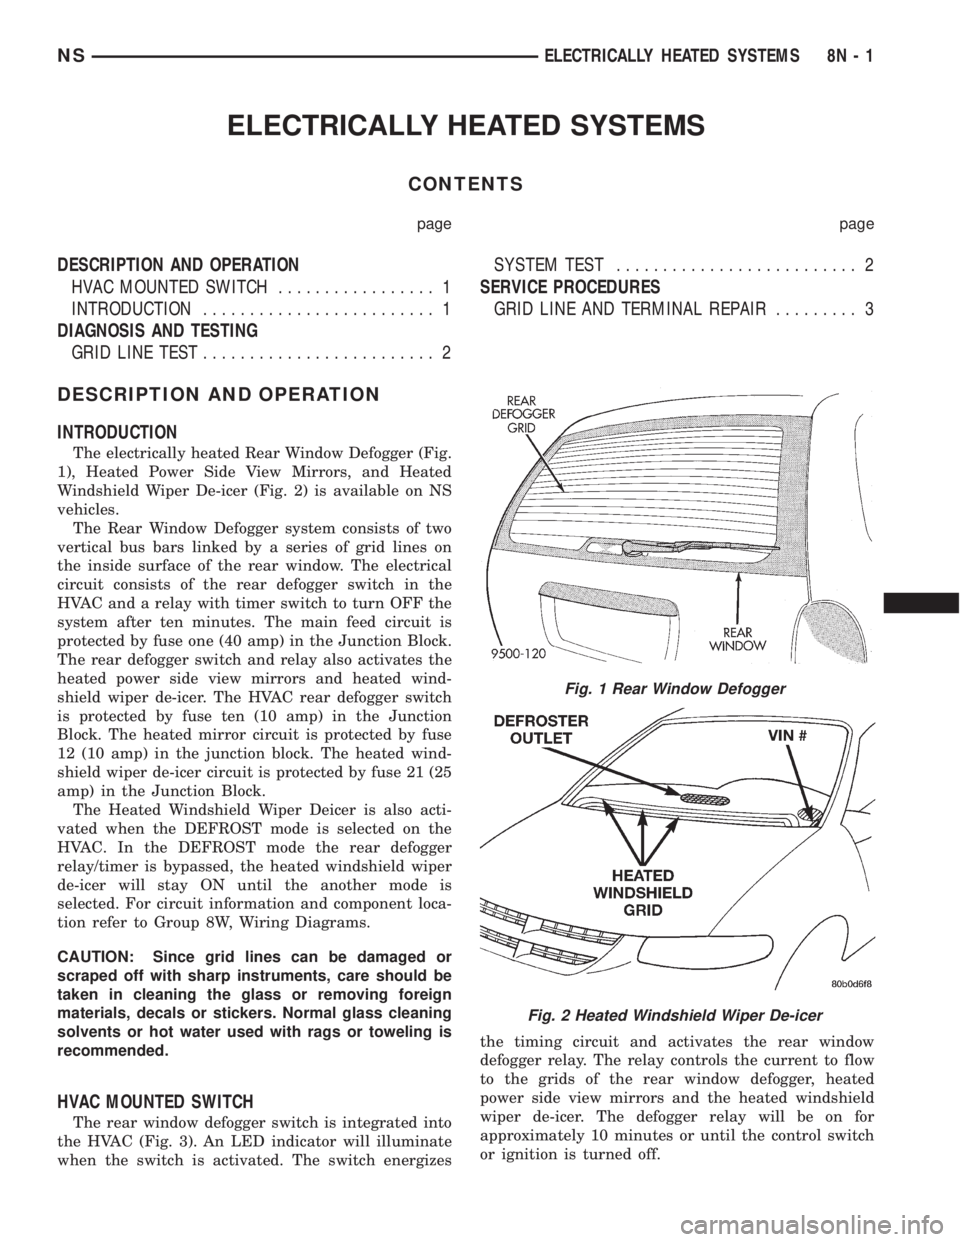
The electrically heated Rear Window Defogger (Fig.
1), Heated Power Side View Mirrors, and Heated
Windshield Wiper De-icer (Fig. 2) is available on NS
vehicles.
The Rear Window Defogger system consists of two
vertical bus bars linked by a series of grid lines on
the inside surface of the rear window. The electrical
circuit consists of the rear defogger switch in the
HVAC and a relay with timer switch to turn OFF the
system after ten minutes. The main feed circuit is
protected by fuse one (40 amp) in the Junction Block.
The rear defogger switch and relay also activates the
heated power side view mirrors and heated wind-
shield wiper de-icer. The HVAC rear defogger switch
is protected by fuse ten (10 amp) in the Junction
Block. The heated mirror circuit is protected by fuse
12 (10 amp) in the junction block. The heated wind-
shield wiper de-icer circuit is protected by fuse 21 (25
amp) in the Junction Block.
The Heated Windshield Wiper Deicer is also acti-
vated when the DEFROST mode is selected on the
HVAC. In the DEFROST mode the rear defogger
relay/timer is bypassed, the heated windshield wiper
de-icer will stay ON until the another mode is
selected. For circuit information and component loca-
tion refer to Group 8W, Wiring Diagrams.
CAUTION: Since grid lines can be damaged or
scraped off with sharp instruments, care should be
taken in cleaning the glass or removing foreign
materials, decals or stickers. Normal glass cleaning
solvents or hot water used with rags or toweling is
recommended.
HVAC MOUNTED SWITCH
The rear window defogger switch is integrated into
the HVAC (Fig. 3). An LED indicator will illuminate
when the switch is activated. The switch energizesthe timing circuit and activates the rear window
defogger relay. The relay controls the current to flow
to the grids of the rear window defogger, heated
power side view mirrors and the heated windshield
wiper de-icer. The defogger relay will be on for
approximately 10 minutes or until the control switch
or ignition is turned off.
Fig. 1 Rear Window Defogger
Fig. 2 Heated Windshield Wiper De-icer
NSELECTRICALLY HEATED SYSTEMS 8N - 1
Page 506 of 1938

DIAGNOSIS AND TESTING
SYSTEM TEST
Electrically heated rear window defogger or the
heated windshield wiper deicer operation can be
checked on the vehicle in the following manner:
(1) Turn the ignition switch to the ON position.
(2) Using a ammeter on the battery, turn the rear
defogger control switch to the ON position, a distinct
increase in amperage draw should be noted.
(3) The rear window defogger or the heated wind-
shield wiper deicer operation can be checked by feel-
ing the glass. A distinct difference in temperature
between the grid lines and adjacent clear glass can
be detected in 3 to 4 minutes of operation.
(4) Using a DC voltmeter (Fig. 4) contact terminal
B with the negative lead, and terminal A with the
positive lead. The voltmeter should read 10-14 volts.
(5) Indicator light illumination means that there is
power available at the switch only and does not nec-
essarily verify system operation.
(6) If turning the defogger switch ON, no distinct
current draw on the ammeter the problem should be
isolated in the following manner:
²Confirm that ignition switch is ON.
²Ensure that the heated rear window or the
heated windshield wiper deicer feed pigtail is con-
nected to the wiring harness and that the ground
pigtail is in fact grounded.
²Ensure that the proper fuse in the Junction
Block is OK.(7) When the above steps have been completed and
the system is still inoperative, one or more of the fol-
lowing is defective:
²HVAC switch
²Rear window defogger relay in the relay bank.
²Check for loose connector or a wire pushed out
of connector.
²Rear window or the windshield grid lines (all
grid lines would have to be broken, or one of the feed
pigtails not connected to the bus bar, for no ammeter
deflection).
(8) If turning the switch ON produces severe volt-
meter deflection, the circuit should be closely checked
for a shorting condition.
(9) If the system operation has been verified but
indicator LED does not light, replace switch.
(10) For detailed wiring information, refer to
Group 8W, Wiring Diagrams.
GRID LINE TEST
The horizontal grid lines and vertical bus bar lines
printed and baked on inside surface of the window
glass makes up an electrical parallel circuit. The
electrically conductive lines are composed of a silver
ceramic material which when baked on glass
becomes bonded to the glass and is highly resistant
to abrasion. It is possible, however, that a break may
exist or occur in an individual grid line resulting in
no current flow through the line. To detect breaks in
grid lines, the following procedure is required:
(1) Turn ignition and rear window defogger control
switch ON. The indicator light should come on.
(2) Using a DC voltmeter with 0-15 volt range,
contact vertical bus bar connecting grid lines on pas-
senger side of vehicle at terminal A with negative
lead of voltmeter (Fig. 4). With positive lead of volt-
meter, contact vertical bus bar on driver side of vehi-
cle at terminal B. The voltmeter should read 10-14
volts.
Fig. 3 HVAC Rear Window Defogger Switch
Fig. 4 Grid Line Test
8N - 2 ELECTRICALLY HEATED SYSTEMSNS
DIAGNOSIS AND TESTING (Continued)
Page 507 of 1938

(3) With negative lead of voltmeter, contact a good
body ground point. The voltage reading should not
change. A different reading indicates a poor ground
connection.
(4) Connect negative lead of voltmeter to terminal
A on passenger side bus bar and touch each grid line
at Mid-Point with positive lead. A reading of approx-
imately 6 volts indicates a line is good. A reading of 0
volts indicates a break in line between Mid-Point C
and terminal B. A reading of 10-14 volts indicates a
break between Mid-Point C and ground terminal A.
Move toward break and voltage will change as soon
as break is crossed.
SERVICE PROCEDURES
GRID LINE AND TERMINAL REPAIR
WARNING: REPAIR KIT MAY CAUSE SKIN OR EYE
IRRITATION. CONTAINS EPOXY RESIN AND AMINE
TYPE HARDENER, HARMFUL IF SWALLOWED.
AVOID CONTACT WITH SKIN AND EYES. FOR SKIN,
WASH AFFECTED AREAS WITH SOAP AND WATER.
DO NOT TAKE INTERNALLY. IF TAKEN INTER-
NALLY, INDUCE VOMITING; CALL A PHYSICIAN
IMMEDIATELY. IF IN CONTACT WITH EYES, FLUSH
WITH PLENTY OF WATER. USE WITH ADEQUATE
VENTILATION. DO NOT USE NEAR FIRE OR FLAME.
CONTENTS CONTAINS 3% FLAMMABLE SOL-
VENTS. KEEP OUT OF REACH OF CHILDREN.
The repair for the front windshield or the rear win-
dow grids are the same.
The repair of grid lines and replacement of the ter-
minal is possible using the MopartRepair Package
or equivalent.
(1) Clean area surrounding grid line or terminal
by gently rubbing area with steel wool.
(2) Wipe area with clean cloth soaked in alcohol or
similar solvent. It is necessary that all contaminants
be removed from repair area.(3) Remove package separator clamp and mix plas-
tic conductive epoxy thoroughly.
(4) For grid line, mark off area to be repaired with
masking tape (Fig. 5).
(5) Apply conductive epoxy through slit in masking
tape. Overlap both ends of the break.
(6) For a terminal replacement, apply a thin layer
of epoxy to area where terminal was fastened.
(7) Apply a thin layer of epoxy on terminal and
place terminal on desired location. To prevent termi-
nal from falling off use a wooden wedge to secure it.
(8) Carefully remove masking tape from grid line.
CAUTION: Do not allow the laminated windshield
glass surface to exceed 82É C (180É F) or the glass
may fracture. The rear window glass surface should
not exceed 204É C (400É F).
(9) Allow epoxy to cure 24 hours at room tempera-
ture.
(10) After epoxy is properly cured remove wedge
from terminal and check the operation of the rear
window defogger.
Fig. 5 Grid Line Repair
NSELECTRICALLY HEATED SYSTEMS 8N - 3
DIAGNOSIS AND TESTING (Continued)
Page 508 of 1938

Page 509 of 1938

POWER DOOR LOCKS
CONTENTS
page page
POWER DOOR LOCKS..................... 1REMOTE KEYLESS ENTRY.................. 5
POWER DOOR LOCKS
INDEX
page page
GENERAL INFORMATION
INTRODUCTION......................... 1
DESCRIPTION AND OPERATION
AUTOMATIC DOOR LOCK FEATURE.......... 1
DOOR LOCK CIRCUIT PROTECTION......... 1
DOOR LOCK INHIBIT FEATURE............. 2
SLIDING DOOR LOCK MEMORY FEATURE..... 2
DIAGNOSIS AND TESTING
AUTOMATIC DOOR LOCK SYSTEM TEST...... 2
DOOR LOCK MOTOR..................... 2DOOR LOCK SWITCH TEST................ 2
SERVICE PROCEDURES
AUTOMATIC DOOR LOCKS
DISABLE OR ENABLE.................... 3
REMOVAL AND INSTALLATION
FRONT DOOR LOCK MOTOR/LATCH......... 3
LIFTGATE LOCK MOTOR................... 3
SLIDING DOOR LOCK CONTACTS........... 3
SLIDING DOOR LOCK MOTOR.............. 4
SLIDING DOOR LOCK PLUNGER............ 4
GENERAL INFORMATION
INTRODUCTION
The Body Control Module (BCM) locks or unlocks
the doors when an actuation input signal from a door
lock switch or Remote Keyless Entry Module (RKE)
is received. The BCM signals lock and unlock relays
in the Junction Block to actuate the door lock motors.
The front doors, sliding door(s) and liftgate are
equipped with actuator motors to lock or unlock the
latch mechanisms. The front door lock actuator motor
is not serviced separately from the door latch. The
BCM locks the doors and liftgate automatically when
the vehicle is driven beyond the speed of 25.7 Km/h
(16 mph). The automatic door lock feature can be dis-
abled if desired. All doors and liftgate can be locked
or unlocked using mechanical button or key cylinder
methods.
DESCRIPTION AND OPERATION
AUTOMATIC DOOR LOCK FEATURE
The vehicle comes with two options for power door
locks:
²Rolling automatic lock (ENABLE), doors auto-
matically lock at approximately at 25.7 Km/h (16
mph).
²No rolling automatic lock (DISABLE), doors do
not automatically lock when the vehicle is moving.
The BCM is equipped with a disable feature to
stop the speed sensitive automatic door locks from
functioning. The DISABLE feature can be switched
ON or OFF as desired. When the system is DIS-
ABLED the door locks will operate normally, but will
not lock automatically when the vehicle is rolling.
When the door locks are ENABLED the door locks
will automatically lock when the vehicle is moving at
about 25.7 Km/h (16 mph).
DOOR LOCK CIRCUIT PROTECTION
The BCM controls the door lock relay's operation.
If the door lock switch is actuated continuously for
more than one second the BCM will interrupt the
relay circuit. The door lock system is protected by a
40 amp fuse located in the Power Distribution Center
(PDC). The LOCK and UNLOCK relays are located
in the Junction Block. The Power Distribution Center
is located along side of the battery. The lock motors
are protected with Positive Temperature Coefficient
(PTC) device that prevents motor burn out.
NSPOWER DOOR LOCKS 8P - 1
Page 510 of 1938

DOOR LOCK INHIBIT FEATURE
The BCM cancels out the door lock switch actua-
tion, when the key is in the Ignition Switch and a
door is open. After the key is removed from the Igni-
tion Switch, or the doors are closed, the power door
locks will operate normally.
SLIDING DOOR LOCK MEMORY FEATURE
The door locks on the sliding door(s) can be actu-
ated when the door(s) are closed. If the sliding
door(s) are open when the door locks are actuated,
the BCM will hold the lock command in memory
until the door(s) is closed. When the door is closed
and the door jamb terminals make contact, signaling
the BCM to lock the sliding door(s) automatically.
Actuating the door lock switch to the unlock position
before the sliding door(s) are closed will cancel the
lock request.
DIAGNOSIS AND TESTING
AUTOMATIC DOOR LOCK SYSTEM TEST
When using a scan tool (DRB) for testing the auto-
matic door lock system, refer to the Body Diagnostic
Procedures Manual. Refer to Group 8W, Wiring Dia-
grams for circuit information and component loca-
tions.
DOOR LOCK MOTOR
Verify battery condition before testing door lock
motor(s), refer to Group 8A, Battery for proper diag-
nosis procedures.
To determine which motor is faulty, check each
individual door for electrical lock and unlock or dis-
connect the motor connectors one at a time, while
operating the door lock switch. In the event that
none of the motors work, the problem may be caused
by a shorted motor, a relay or a bad switch. Discon-
necting the defective motor will allow the others to
work.
To test an individual door lock motor, disconnect
the electrical connector from the motor. To lock the
door, connect a 12 volt power source to the positive
pin of the lock motor and a ground wire to the other
pin (Fig. 1), (Fig. 2), (Fig. 3) and refer to Group 8W,
Wiring Diagrams for pin locations. To unlock the door
reverse the wire connections at the motor pin termi-
nals. If these results are NOT obtained, replace the
motor.
DOOR LOCK SWITCH TEST
(1) Remove door lock switch bezel assembly from
door. Refer to Group 23, Body for removal proce-
dures.
(2) Disconnect wire connector from back of door
lock switch.(3) Depress switch to LOCK position.
(4) Using an ohmmeter, test switch resistance
between Pins 2 and 3. Refer to Door Lock Switch
Test and (Fig. 4).
(5) Depress switch to UNLOCK position.
(6) Test resistance between Pins 2 and 3.
(7) If resistance values are not within the param-
eters shown replace the door lock switch.
Fig. 1 Sliding Door Lock Motor±Typical
Fig. 2 Front Door Lock Motor
8P - 2 POWER DOOR LOCKSNS
DESCRIPTION AND OPERATION (Continued)