key CHRYSLER VOYAGER 2000 Diagnostic Manual
[x] Cancel search | Manufacturer: CHRYSLER, Model Year: 2000, Model line: VOYAGER, Model: CHRYSLER VOYAGER 2000Pages: 364, PDF Size: 2.17 MB
Page 216 of 364

TEST ACTION APPLICABILITY
4 Check the freeze frame data to determine the conditions when code was set.
Attempt duplication of 'freeze frame' conditions for added diagnostics.
If there are no other possible causes remaining there is assumed to be an9intermit-
tent9problem with a Wiring Harness Connector or Wire.
View repair options.All
Repair
Visually inspect related Wire Harness Connectors and Harnesses.
Look for broken, bent, pushed out, or corroded terminals and for
chafed, pierced, or partiallly broken wire, respectively. Refer to
any hotlines or technical service bulletins that apply.
5 Ignition Off
Disconnect the LDP Solenoid.
Note: Check connectors - Clean/repair as necessary.
Key on.
Using a Voltmeter, measure the voltage of the Fused Ignition Switch Output Circuit
at the Solenoid Connector.
Is the voltage above 10.0 volts?All
Ye s®Go To 6
No®Repair the open Fused Ignition Switch Output Circuit.
Perform Powertrain Verification Test VER-6A.
6 Ignition Off
Disconnect the LDP Solenoid.
Note: Check connectors - Clean/repair as necessary.
Disconnect the PCM.
Note: Check connectors - Clean/repair as necessary.
Using an Ohmmeter, measure the resistance of the LDP Solenoid Control Circuit at
the PCM Connector to ground.
Is the resistance below 5.0 ohms?All
Ye s®Repair the LDP Solenoid Circuit for a short to ground.
Perform Powertrain Verification Test VER-6A.
No®Go To 7
7 Ignition Off
Disconnect the LDP Solenoid.
Note: Check connectors - Clean/repair as necessary.
Disconnect the PCM.
Note: Check connectors - Clean/repair as necessary.
With an Ohmmeter, measure the resistance of the LDP Solenoid Control Circuit from
the PCM Connector to the LDP Connector.
Is the resistance below 5.0 ohms?All
Ye s®Go To 8
No®Repair the open LDP Solenoid Control Circuit.
Perform Powertrain Verification Test VER-6A.
210
DRIVEABILITY
P-1495 LEAK DETECTION PUMP SOLENOID CIRCUIT ÐContinued
ProCarManuals.com
Page 217 of 364
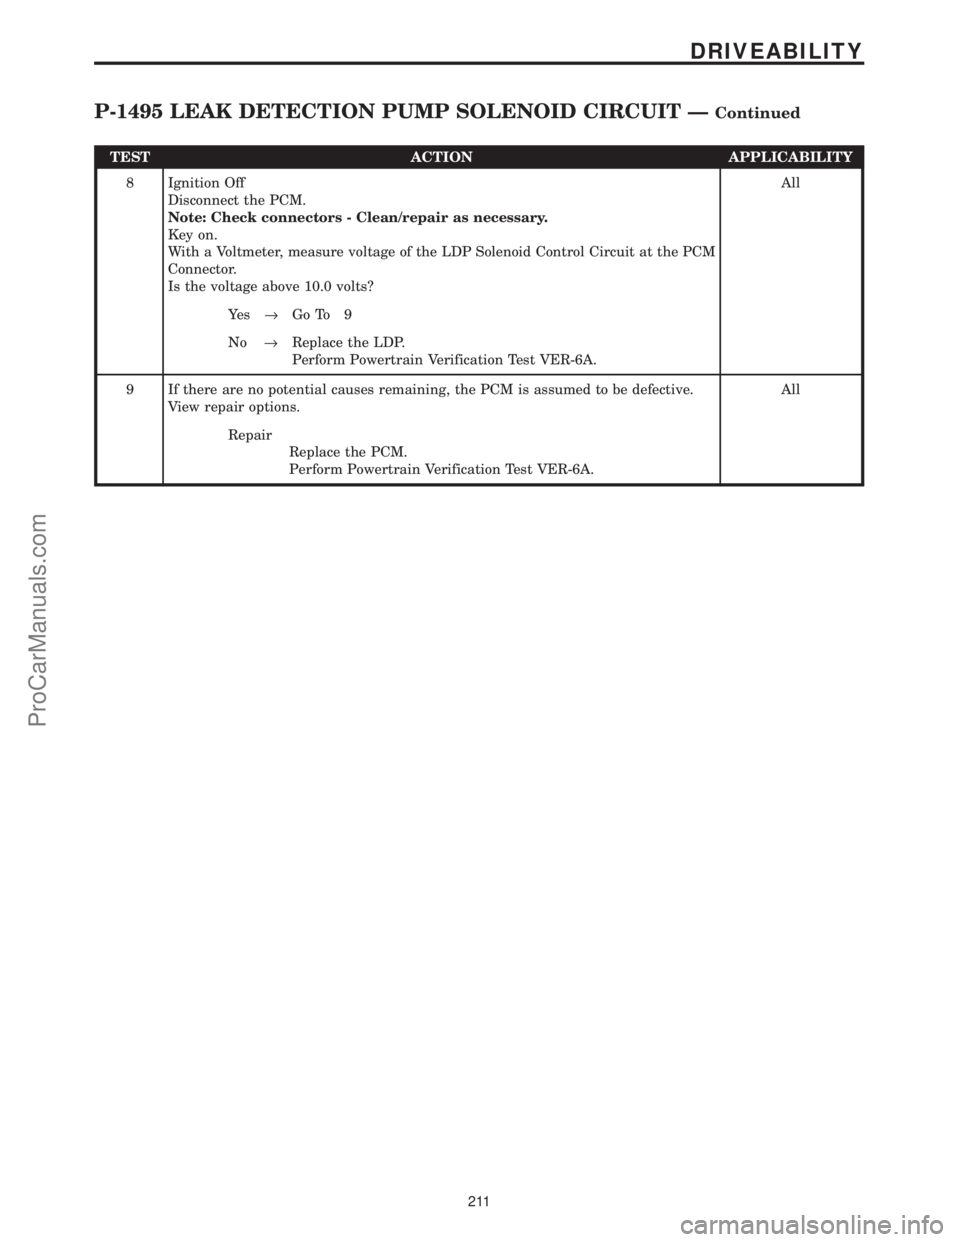
TEST ACTION APPLICABILITY
8 Ignition Off
Disconnect the PCM.
Note: Check connectors - Clean/repair as necessary.
Key on.
With a Voltmeter, measure voltage of the LDP Solenoid Control Circuit at the PCM
Connector.
Is the voltage above 10.0 volts?All
Ye s®Go To 9
No®Replace the LDP.
Perform Powertrain Verification Test VER-6A.
9 If there are no potential causes remaining, the PCM is assumed to be defective.
View repair options.All
Repair
Replace the PCM.
Perform Powertrain Verification Test VER-6A.
211
DRIVEABILITY
P-1495 LEAK DETECTION PUMP SOLENOID CIRCUIT ÐContinued
ProCarManuals.com
Page 231 of 364
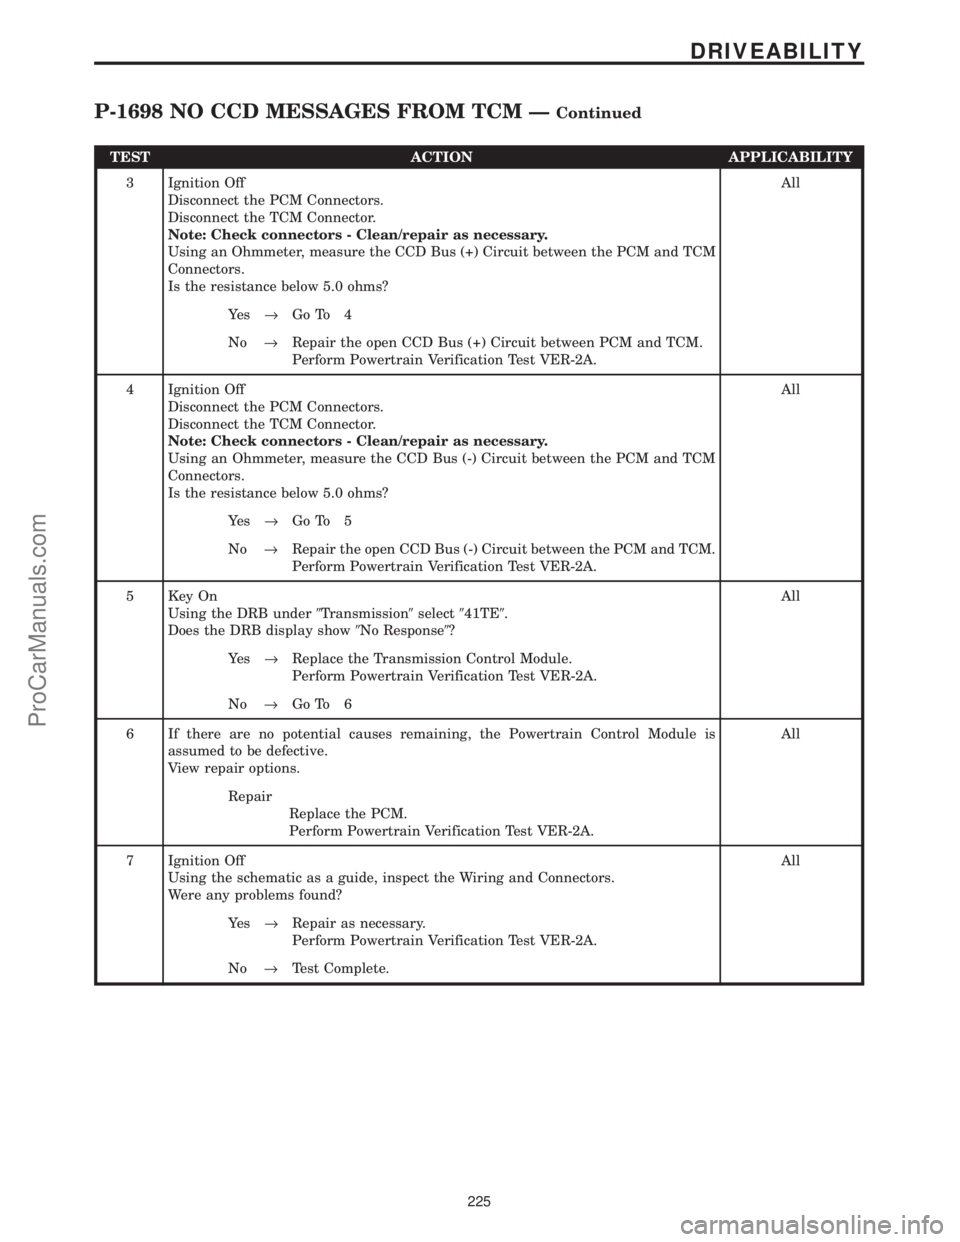
TEST ACTION APPLICABILITY
3 Ignition Off
Disconnect the PCM Connectors.
Disconnect the TCM Connector.
Note: Check connectors - Clean/repair as necessary.
Using an Ohmmeter, measure the CCD Bus (+) Circuit between the PCM and TCM
Connectors.
Is the resistance below 5.0 ohms?All
Ye s®Go To 4
No®Repair the open CCD Bus (+) Circuit between PCM and TCM.
Perform Powertrain Verification Test VER-2A.
4 Ignition Off
Disconnect the PCM Connectors.
Disconnect the TCM Connector.
Note: Check connectors - Clean/repair as necessary.
Using an Ohmmeter, measure the CCD Bus (-) Circuit between the PCM and TCM
Connectors.
Is the resistance below 5.0 ohms?All
Ye s®Go To 5
No®Repair the open CCD Bus (-) Circuit between the PCM and TCM.
Perform Powertrain Verification Test VER-2A.
5 Key On
Using the DRB under9Transmission9select941TE9.
Does the DRB display show9No Response9?All
Ye s®Replace the Transmission Control Module.
Perform Powertrain Verification Test VER-2A.
No®Go To 6
6 If there are no potential causes remaining, the Powertrain Control Module is
assumed to be defective.
View repair options.All
Repair
Replace the PCM.
Perform Powertrain Verification Test VER-2A.
7 Ignition Off
Using the schematic as a guide, inspect the Wiring and Connectors.
Were any problems found?All
Ye s®Repair as necessary.
Perform Powertrain Verification Test VER-2A.
No®Test Complete.
225
DRIVEABILITY
P-1698 NO CCD MESSAGES FROM TCM ÐContinued
ProCarManuals.com
Page 247 of 364

TEST ACTION APPLICABILITY
18 Ignition Off
Inspect the Chassis Fuel Supply Line to engine for a kink or restriction.
Is the Fuel Line kinked or restricted?ENGINE - 3.0L V6
Ye s®Release the Fuel Pressure. Repair the Fuel Line as necessary.
Perform Powertrain Verification Test VER-2A.
No®Go To 19
19 Ignition Off
Warning: The Fuel System must be opened and may be under high pressure.
Release the fuel pressure.
Install Fuel Pressure Gauge between Fuel Tank and Fuel Filter.
Key on.
With the DRB, actuate the ASD Fuel System test.
Is fuel pressure at least 5 psi higher than the previously recorded pressure?ENGINE - 3.0L V6
Ye s®Release the Fuel Pressure. Replace the Fuel Filter.
Perform Powertrain Verification Test VER-2A.
No®Go To 20
20 Ignition Off
Warning: The Fuel System must be opened and may be under high pressure.
Release the fuel pressure.
Install Fuel Pressure Gauge between Fuel Tank and Fuel Filter.
Key on.
With the DRB, actuate the ASD Fuel System test.
Is fuel pressure at least 5 psi higher than the previously recorded pressure?ENGINE - 3.0L V6
Ye s®Test Complete.
No®Release the Fuel Pressure. Replace the Fuel Pump and Regulator
Assembly.
Perform Powertrain Verification Test VER-2A.
241
DRIVEABILITY
* CHECKING FUEL DELIVERY ÐContinued
ProCarManuals.com
Page 253 of 364

Symptom:
* CHECKING OXYGEN SENSOR HEATER
POSSIBLE CAUSES
1/2 O2 SENSOR VOLTAGE BTWN 0.4 V & 0.6 V
1/1 O2 SENSOR DEFECTIVE
1/2 O2 SENSOR DEFECTIVE
ASD RELAY OUTPUT CIRCUIT OPEN (1/1 O2 SEN)
ASD RELAY OUTPUT CIRCUIT OPEN (1/2 O2 SEN)
HEATER GROUND CIRCUIT OPEN (1/1 O2 SEN)
HEATER GROUND CIRCUIT OPEN (1/2 O2 SEN)
TEST ACTION APPLICABILITY
1 Ignition On, Engine Not Running
With the DRB, actuate the ASD O2 Sensor Heater test.
Wait two minutes for O2 Sensor voltage to stabilize.
Read the Upstream O2 Sensor voltage.
Is the voltage of the Upstream O2 Sensor between 0.4 and 0.6 volts?All
Ye s®Go To 2
No®Go To 5
2Note: The O2 Sensor voltage staying between 0.4 V and 0.6 V indicates a
problem with that Sensor Circuit.
Ignition Off
Disconnect the Upstream O2 Sensor Connector.
Note: Check connectors - Clean/repair as necessary.
Turn key on.
With the DRB, actuate the O2 Sensor Heater test.
Using a Voltmeter, measure the ASD Relay Output Circuit at Sensor Connector.
Is the voltage above 10.0 volts?All
Ye s®Go To 3
No®Repair the open ASD Relay Output Circuit from O2 sensor
connector back to splice.
Perform Powertrain Verification Test VER-2A.
3 Ignition Off
Disconnect the Upstream O2 Sensor Connector.
Note: Check connectors - Clean/repair as necessary.
Using an Ohmmeter, measure the resistance between the Heater Ground Circuit and
a good ground.
Is the resistance below 5.0 ohms?All
Ye s®Go To 4
No®Repair the open Heater Ground Circuit to the Upstream O2
Sensor.
Perform Powertrain Verification Test VER-2A.
247
DRIVEABILITY
ProCarManuals.com
Page 254 of 364

TEST ACTION APPLICABILITY
4 If there are no potential causes remaining, the Upstream O2 Sensor is assumed to be
defective.
View repair options.All
Repair
Replace the Upstream O2 Sensor.
Perform Powertrain Verification Test VER-2A.
5 Ignition Off
Turn key on.
With the DRB, actuate the O2 Sensor Heater test.
Wait two minutes for O2 Sensor voltage to stabilize.
With the DRB, read the Downstream O2 Sensor voltage.
Is the voltage of the Downstream O2 Sensor between 0.4 and 0.6 volts?All
Ye s®Go To 6
No®Test complete.
6Note: The O2 Sensor voltage staying between 0.4 and 0.6 V indicates a
problem with that Sensor Circuit.
Ignition Off
Disconnect the Downstream O2 Sensor Connector.
Note: Check connectors - Clean/repair as necessary.
Turn key on.
With the DRB, actuate the O2 Sensor Heater test.
Using a Voltmeter, measure the ASD Relay Output Circuit in Sensor Connector.
Is the voltage above 10.0 volts?All
Ye s®Go To 7
No®Repair the open ASD Relay Output Circuit from O2 Sensor
Connector back to splice.
Perform Powertrain Verification Test VER-2A.
7 Ignition Off
Disconnect the Downstream O2 Sensor Connector.
Note: Check connectors - Clean/repair as necessary.
Using an Ohmmeter, measure the resistance between the Heater Ground Circuit and
a good ground.
Is the resistance below 5.0 ohms?All
Ye s®Go To 8
No®Repair the open Heater Ground Circuit to the Downstream O2
Sensor.
Perform Powertrain Verification Test VER-2A.
8 If there are no potential causes remaining, the Downstream O2 Sensor is assumed to
be defective.
View repair options.All
Repair
Replace the Downstream O2 Sensor.
Perform Powertrain Verification Test VER-2A.
248
DRIVEABILITY
* CHECKING OXYGEN SENSOR HEATER ÐContinued
ProCarManuals.com
Page 263 of 364

TEST ACTION APPLICABILITY
1 Ignition Off
Note: A misadjusted Brake Switch can cause this code to set.
Does the Brake Switch need to be adjusted?All
Ye s®Adjust Brake Switch as necessary.
No®Go To 2
2 Ignition Off
Disconnect the Speed Control Servo 4-Way Connector.
Note: Check connectors - Clean/repair as necessary.
Note: Ensure the Brake pedal is not depressed during the following steps.
Engine off. Ignition key on and S/C On/Off Switch ON.
Using a Voltmeter, measure the voltage of the S/C Brake Switch Output Circuit at
Speed Control Servo Connector.
Is the voltage above 10.0 volts?All
Ye s®Go To 3
No®Go To 10
3 Ignition off.
Disconnect the Speed Control Servo Connector.
Note: Check connectors - Clean/repair as necessary.
Using an Ohmmeter, measure resistance of the Gnd Circuit at Servo Connector.
Is the resistance below 5.0 ohms?All
Ye s®Go To 4
No®Repair the open Ground Circuit.
Perform Powertrain Verification Test VER-4A.
4 Ignition off
Disconnect the Powertrain Control Module.
Note: Check connectors - Clean/repair as necessary.
Note: Ensure the Brake pedal is not depressed during the following steps.
With an ohmmeter, test the resistance from the S/C Power Supply Circuit to the S/C
Vent Solenoid at PCM.
Is the resistance between 35 ohms and 55 ohms?All
Ye s®Go To 5
No®Go To 7
5 Ignition off
Disconnect Powertrain Control Module.
Note: Check connectors - Clean/repair as necessary.
Note: Ensure the Brake Pedal is not depressed during the following steps.
With an ohmmeter, test the resistance from the S/C Power Supply Circuit to the S/C
Vacuum Solenoid Control at PCM.
Is the resistance between 35 ohms and 55 ohms?All
Ye s®Go To 6
No®Go To 7
257
SPEED CONTROL
P-1595 SPEED CONTROL SOLENOID CIRCUITS ÐContinued
ProCarManuals.com
Page 264 of 364
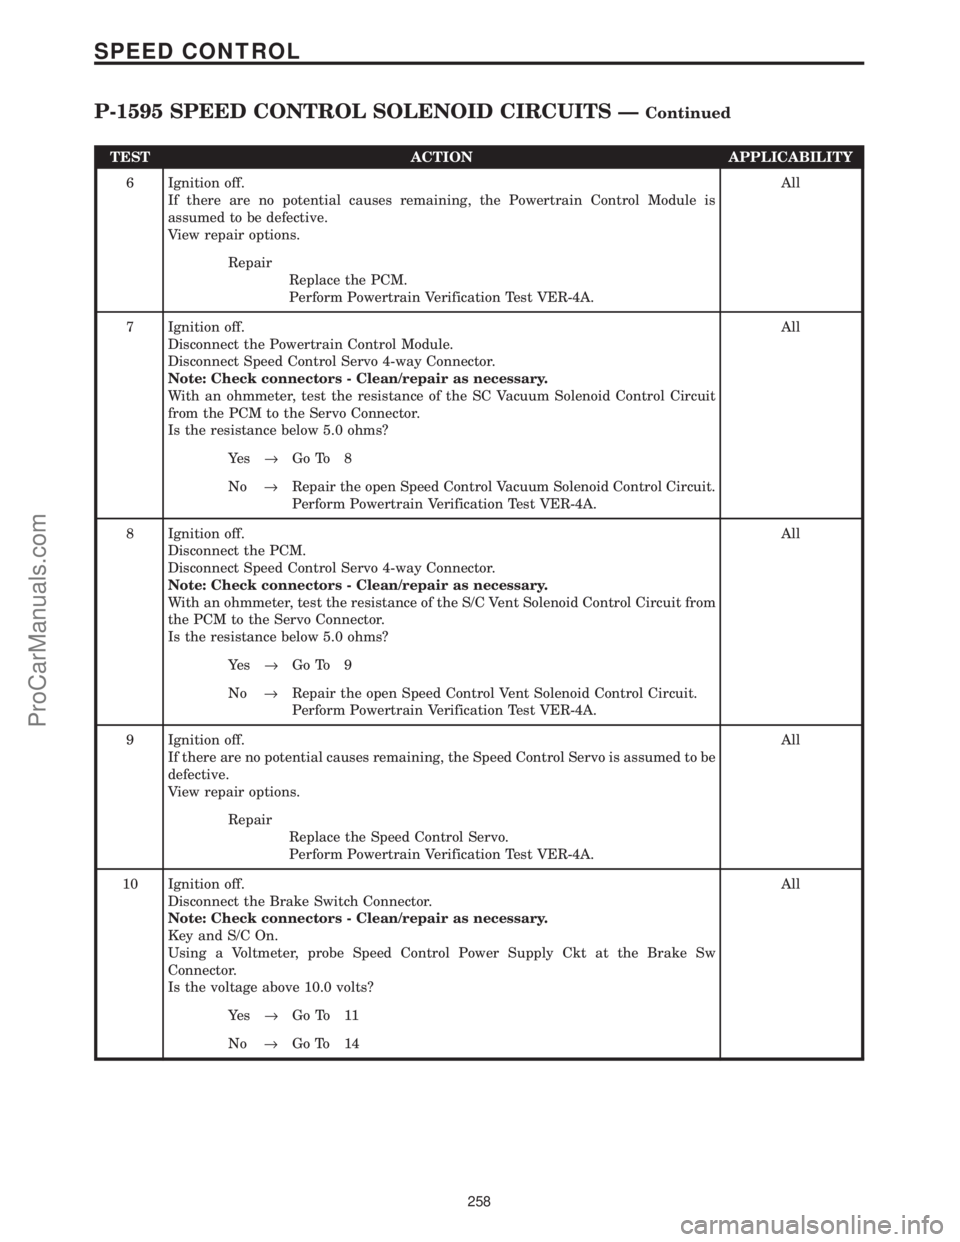
TEST ACTION APPLICABILITY
6 Ignition off.
If there are no potential causes remaining, the Powertrain Control Module is
assumed to be defective.
View repair options.All
Repair
Replace the PCM.
Perform Powertrain Verification Test VER-4A.
7 Ignition off.
Disconnect the Powertrain Control Module.
Disconnect Speed Control Servo 4-way Connector.
Note: Check connectors - Clean/repair as necessary.
With an ohmmeter, test the resistance of the SC Vacuum Solenoid Control Circuit
from the PCM to the Servo Connector.
Is the resistance below 5.0 ohms?All
Ye s®Go To 8
No®Repair the open Speed Control Vacuum Solenoid Control Circuit.
Perform Powertrain Verification Test VER-4A.
8 Ignition off.
Disconnect the PCM.
Disconnect Speed Control Servo 4-way Connector.
Note: Check connectors - Clean/repair as necessary.
With an ohmmeter, test the resistance of the S/C Vent Solenoid Control Circuit from
the PCM to the Servo Connector.
Is the resistance below 5.0 ohms?All
Ye s®Go To 9
No®Repair the open Speed Control Vent Solenoid Control Circuit.
Perform Powertrain Verification Test VER-4A.
9 Ignition off.
If there are no potential causes remaining, the Speed Control Servo is assumed to be
defective.
View repair options.All
Repair
Replace the Speed Control Servo.
Perform Powertrain Verification Test VER-4A.
10 Ignition off.
Disconnect the Brake Switch Connector.
Note: Check connectors - Clean/repair as necessary.
Key and S/C On.
Using a Voltmeter, probe Speed Control Power Supply Ckt at the Brake Sw
Connector.
Is the voltage above 10.0 volts?All
Ye s®Go To 11
No®Go To 14
258
SPEED CONTROL
P-1595 SPEED CONTROL SOLENOID CIRCUITS ÐContinued
ProCarManuals.com
Page 267 of 364
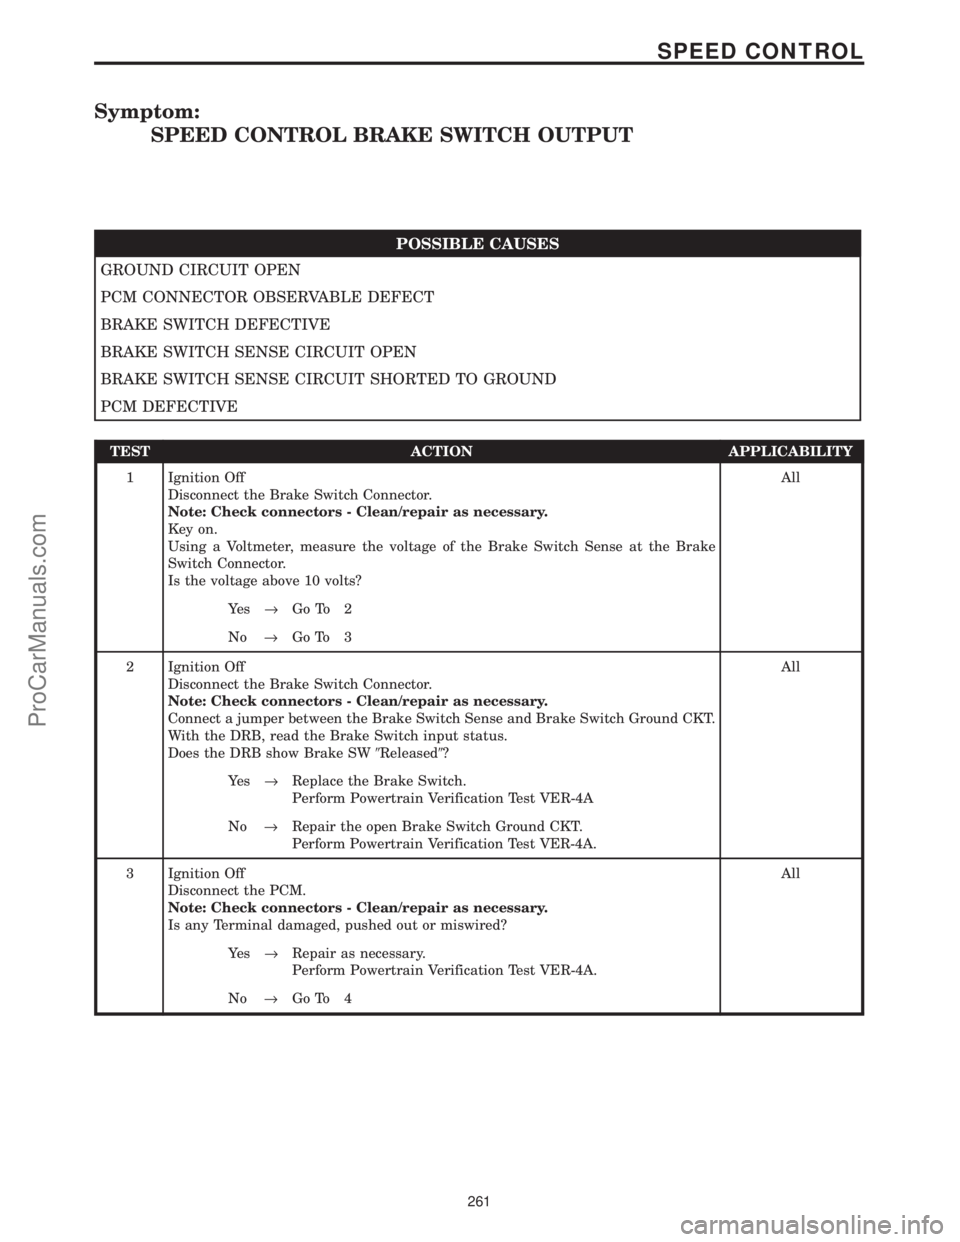
Symptom:
SPEED CONTROL BRAKE SWITCH OUTPUT
POSSIBLE CAUSES
GROUND CIRCUIT OPEN
PCM CONNECTOR OBSERVABLE DEFECT
BRAKE SWITCH DEFECTIVE
BRAKE SWITCH SENSE CIRCUIT OPEN
BRAKE SWITCH SENSE CIRCUIT SHORTED TO GROUND
PCM DEFECTIVE
TEST ACTION APPLICABILITY
1 Ignition Off
Disconnect the Brake Switch Connector.
Note: Check connectors - Clean/repair as necessary.
Key on.
Using a Voltmeter, measure the voltage of the Brake Switch Sense at the Brake
Switch Connector.
Is the voltage above 10 volts?All
Ye s®Go To 2
No®Go To 3
2 Ignition Off
Disconnect the Brake Switch Connector.
Note: Check connectors - Clean/repair as necessary.
Connect a jumper between the Brake Switch Sense and Brake Switch Ground CKT.
With the DRB, read the Brake Switch input status.
Does the DRB show Brake SW9Released9?All
Ye s®Replace the Brake Switch.
Perform Powertrain Verification Test VER-4A
No®Repair the open Brake Switch Ground CKT.
Perform Powertrain Verification Test VER-4A.
3 Ignition Off
Disconnect the PCM.
Note: Check connectors - Clean/repair as necessary.
Is any Terminal damaged, pushed out or miswired?All
Ye s®Repair as necessary.
Perform Powertrain Verification Test VER-4A.
No®Go To 4
261
SPEED CONTROL
ProCarManuals.com
Page 276 of 364
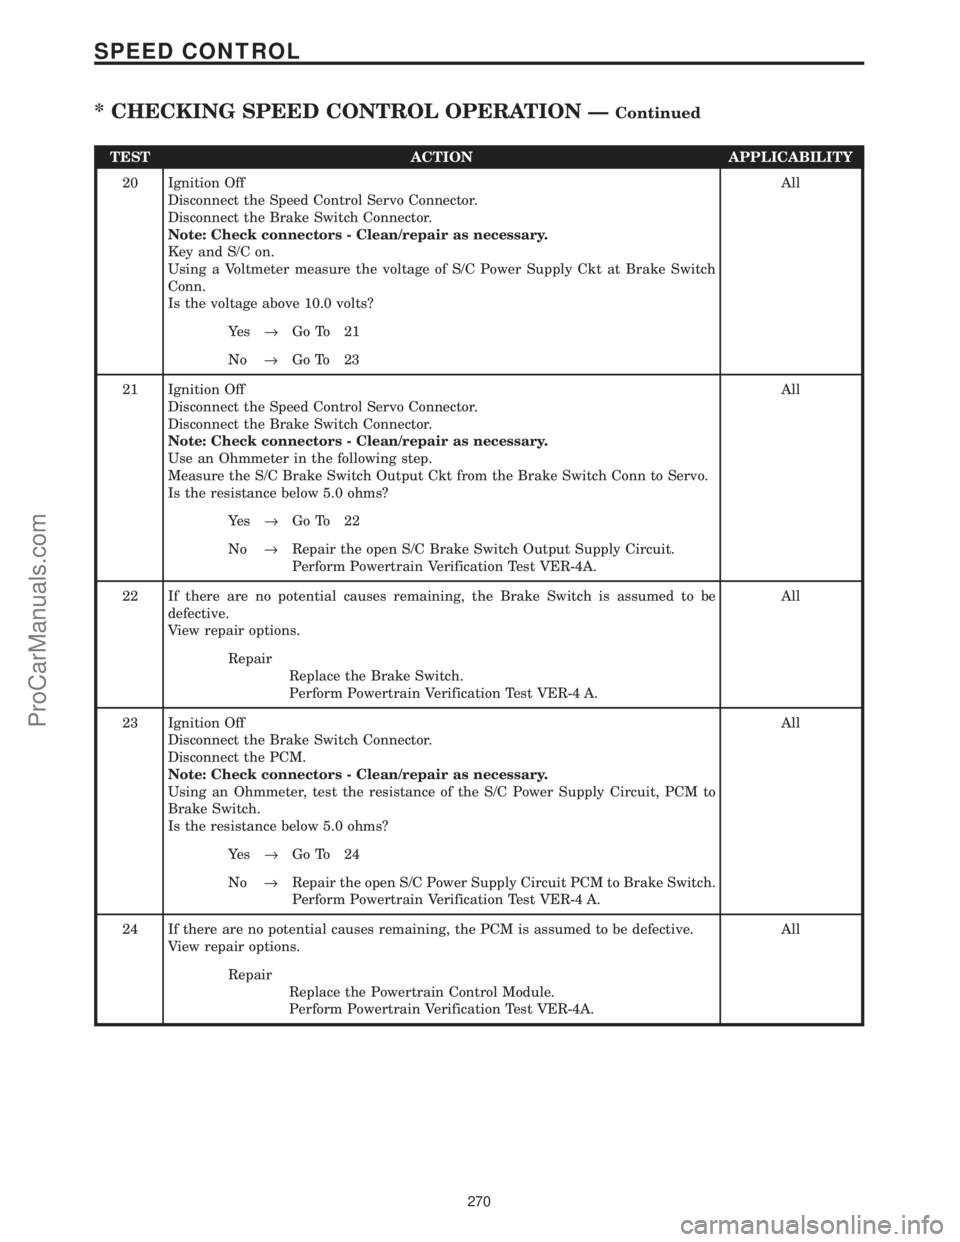
TEST ACTION APPLICABILITY
20 Ignition Off
Disconnect the Speed Control Servo Connector.
Disconnect the Brake Switch Connector.
Note: Check connectors - Clean/repair as necessary.
Key and S/C on.
Using a Voltmeter measure the voltage of S/C Power Supply Ckt at Brake Switch
Conn.
Is the voltage above 10.0 volts?All
Ye s®Go To 21
No®Go To 23
21 Ignition Off
Disconnect the Speed Control Servo Connector.
Disconnect the Brake Switch Connector.
Note: Check connectors - Clean/repair as necessary.
Use an Ohmmeter in the following step.
Measure the S/C Brake Switch Output Ckt from the Brake Switch Conn to Servo.
Is the resistance below 5.0 ohms?All
Ye s®Go To 22
No®Repair the open S/C Brake Switch Output Supply Circuit.
Perform Powertrain Verification Test VER-4A.
22 If there are no potential causes remaining, the Brake Switch is assumed to be
defective.
View repair options.All
Repair
Replace the Brake Switch.
Perform Powertrain Verification Test VER-4 A.
23 Ignition Off
Disconnect the Brake Switch Connector.
Disconnect the PCM.
Note: Check connectors - Clean/repair as necessary.
Using an Ohmmeter, test the resistance of the S/C Power Supply Circuit, PCM to
Brake Switch.
Is the resistance below 5.0 ohms?All
Ye s®Go To 24
No®Repair the open S/C Power Supply Circuit PCM to Brake Switch.
Perform Powertrain Verification Test VER-4 A.
24 If there are no potential causes remaining, the PCM is assumed to be defective.
View repair options.All
Repair
Replace the Powertrain Control Module.
Perform Powertrain Verification Test VER-4A.
270
SPEED CONTROL
* CHECKING SPEED CONTROL OPERATION ÐContinued
ProCarManuals.com