low beam CHRYSLER VOYAGER 2004 User Guide
[x] Cancel search | Manufacturer: CHRYSLER, Model Year: 2004, Model line: VOYAGER, Model: CHRYSLER VOYAGER 2004Pages: 2585, PDF Size: 62.54 MB
Page 550 of 2585

(3) Verify proper tire inflation.
(4) Clean headlamp lenses.
(5) Verify that luggage area is loaded as the vehi-
cle is routinely used.
(6) Vehicles equipped with automatic load leveling
suspension should be driven normally for approxi-
mately 5 km (3 miles) before attempting a proper
headlamp unit alignment.
(7) Fuel tank should be FULL. Add 2.94 kg (6.5
lbs.) of weight over the fuel tank for each estimated
gallon of missing fuel.
ALIGNMENT SCREEN PREPARATION
(1) Position vehicle on a level surface perpendicu-
lar to a flat wall 10 meters (32.8 ft.) away from front
of headlamp lens (Fig. 15).
(2) If necessary, tape a line on the floor 10 meters
(32.8 ft.) away from and parallel to the wall.
(3) Rock vehicle side-to-side three times and allow
suspension to stabilize.
(4) Jounce front suspension three times by pushing
downward on front bumper and releasing.
(5) Measure the distance from the center of head-
lamp lens to the floor. Transfer measurement to the
alignment screen (with tape). Use this line for
up/down adjustment reference.
HEADLAMP UNIT ADJUSTMENT
The low beam headlamp will project on the screen
upper edge of the beam (cut-off) at the horizontal
lamp cut-off line 20 mm (0.75 in.). The high beam
pattern should be correct when the low beams are
aligned properly (Fig. 15). To adjust headlamp align-
ment, rotate adjustment screws (Fig. 16) to achieve
the specified low beam cut-off location.
REMOVAL
(1) Disconnect and isolate the battery negative
cable.
(2) Remove the three retaining screws (Fig. 17).
(3) Disconnect the wiring harness from the bulbs
(Fig. 18).
(4) Remove wire harness retainer from back of
headlamp unit.
(5) Remove the headlamp unit.
Fig. 14 HEADLAMP UNIT ADJUSTMENT
1 - ADJUSTMENT LOCATION
2 - HEADLAMP UNIT
RSLAMPS/LIGHTING - EXTERIOR8L-15
HEADLAMP UNIT (Continued)
Page 553 of 2585

OPERATION - TURN SIGNAL SYSTEM
Lane change signaling is actuated by applying par-
tial turn signal stalk movement toward the direction
desired until the indicator lamps flashes in the
instrument cluster. When the switch stalk is released
the stalk will spring back into the neutral position
turning OFF the turn signal.
With the ignition switch ON and the turn signal
switch stalk actuated left or right, current flows
through the:
²Multi-function switch
²Body Control Module
²Integrated Power Module (IPM)
²Turn indicator lamp
²Front and rear turn signal bulbs.
A chime will sound after the vehicle has traveled a
distance of approximately 1.0 mile and a speed of 15
mph, with the turn signal ON.
DIAGNOSIS AND TESTING - MULTI-FUNCTION
SWITCH
To test turn signal, headlamp beam select and opti-
cal horn portion of the multi-function switch:
(1) Remove the multi-function switch, refer to
Electrical, Lamps/Lighting - Exterior, Multi-Function
Switch, Removal, and Installation.
(2) Using an ohmmeter check the resistance read-
ings between multi-function switch pins. Refer to
Wiring Diagrams for proper pin numbers and the
MULTI-FUNCTION SWITCH RESISTANCE table.
MULTI-FUNCTION SWITCH RESISTANCE
SWITCH
POSITIONPIN NUMBER RESISTANCE
LEFT 2 AND 3 2.7V 5%
RIGHT 2 AND 3 1KV 5%
OPTICAL
HORN2 AND 4 1.7KV 5%
HI BEAM 2 AND 4 2.32KV 5%
REMOVAL
(1) Disconnect and isolate battery negative cable.
(2) Remove upper and lower steering column
shrouds. Refer to Steering, Column, Shroud,
Removal.
(3) Disconnect wire connector from back of multi-
function switch.
(4) Remove screws holding multi-function switch to
steering column adapter collar.
(5) Remove the multi-function switch.
INSTALLATION
(1) Position the switch on to the steering column.
(2) Install the two retaining screws.(3) Connect the wire harness connector.
(4) Install the upper and lower steering column
shrouds. Refer to Steering, Column, Shroud, Installa-
tion.
(5) Connect the battery negative cable.
PARK/TURN SIGNAL LAMP
REMOVAL
(1) Disconnect and isolate battery negative cable.
(2) Remove headlamp retaining screws.
(3) Twist socket counter - clockwise and remove
(Fig. 21).
(4) Pull bulb from socket.
INSTALLATION
(1) Push bulb into socket.
(2) Twist socket into headlamp.
(3) Install headlamp retaining screws.
(4) Reconnect battery negative cable.
TAIL LAMP
REMOVAL
(1) Disconnect and isolate the battery negative
cable.
(2) Remove the tail lamp unit. (Refer to 8 - ELEC-
TRICAL/LAMPS/LIGHTING - EXTERIOR/TAIL
LAMP UNIT - REMOVAL).
(3) Squeeze the tabs on the bulb socket and
remove from tail lamp unit (Fig. 22).
(4) Pull bulb from lamp socket.
Fig. 21 PARK/TURN SIGNAL LAMP
1 - PARK/TURN SIGNAL LAMP
2 - LAMP SOCKET
8L - 18 LAMPS/LIGHTING - EXTERIORRS
MULTI-FUNCTION SWITCH (Continued)
Page 555 of 2585
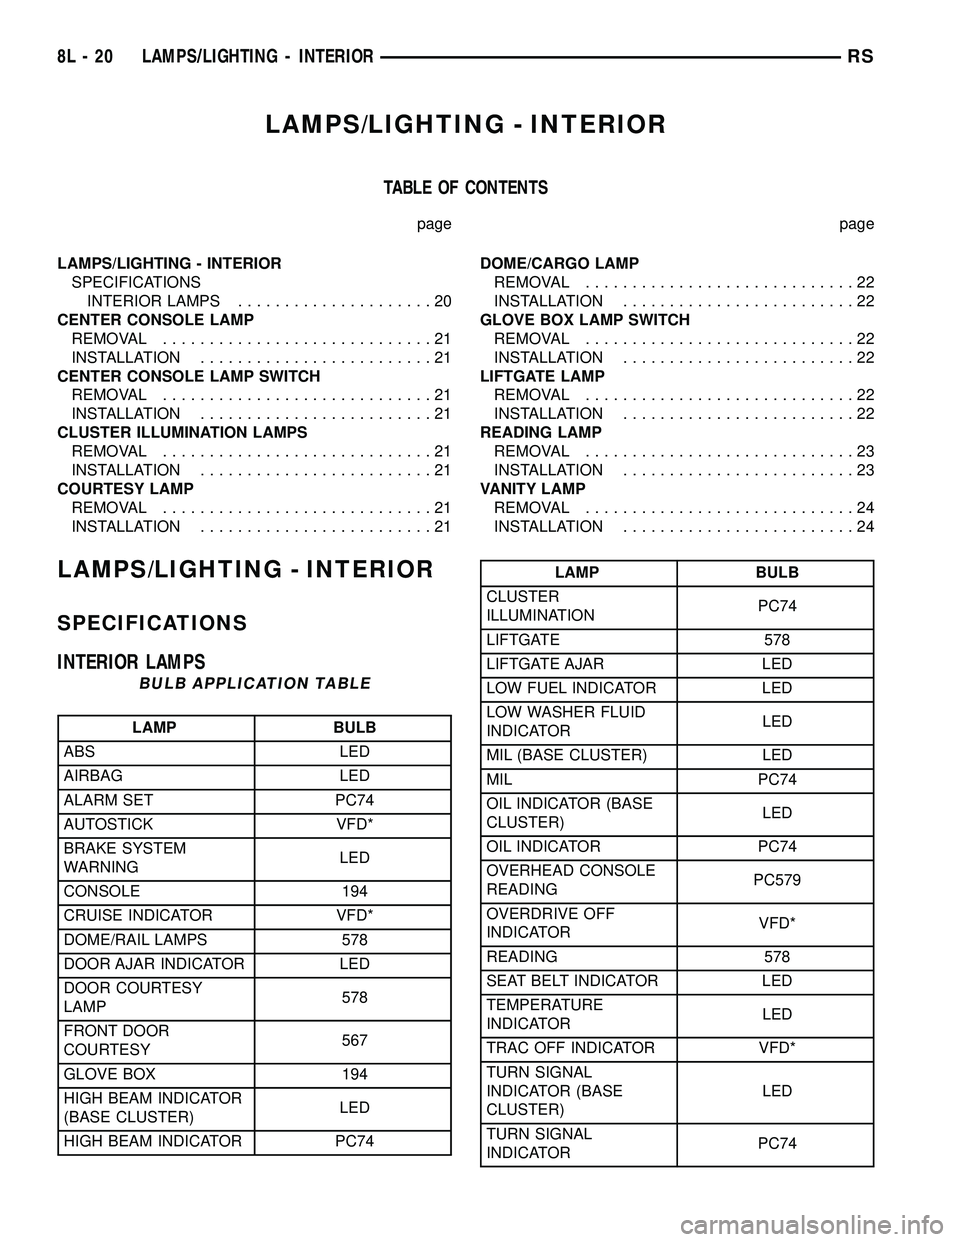
LAMPS/LIGHTING - INTERIOR
TABLE OF CONTENTS
page page
LAMPS/LIGHTING - INTERIOR
SPECIFICATIONS
INTERIOR LAMPS.....................20
CENTER CONSOLE LAMP
REMOVAL.............................21
INSTALLATION.........................21
CENTER CONSOLE LAMP SWITCH
REMOVAL.............................21
INSTALLATION.........................21
CLUSTER ILLUMINATION LAMPS
REMOVAL.............................21
INSTALLATION.........................21
COURTESY LAMP
REMOVAL.............................21
INSTALLATION.........................21DOME/CARGO LAMP
REMOVAL.............................22
INSTALLATION.........................22
GLOVE BOX LAMP SWITCH
REMOVAL.............................22
INSTALLATION.........................22
LIFTGATE LAMP
REMOVAL.............................22
INSTALLATION.........................22
READING LAMP
REMOVAL.............................23
INSTALLATION.........................23
VANITY LAMP
REMOVAL.............................24
INSTALLATION.........................24
LAMPS/LIGHTING - INTERIOR
SPECIFICATIONS
INTERIOR LAMPS
BULB APPLICATION TABLE
LAMP BULB
ABS LED
AIRBAG LED
ALARM SET PC74
AUTOSTICK VFD*
BRAKE SYSTEM
WARNINGLED
CONSOLE 194
CRUISE INDICATOR VFD*
DOME/RAIL LAMPS 578
DOOR AJAR INDICATOR LED
DOOR COURTESY
LAMP578
FRONT DOOR
COURTESY567
GLOVE BOX 194
HIGH BEAM INDICATOR
(BASE CLUSTER)LED
HIGH BEAM INDICATOR PC74
LAMP BULB
CLUSTER
ILLUMINATIONPC74
LIFTGATE 578
LIFTGATE AJAR LED
LOW FUEL INDICATOR LED
LOW WASHER FLUID
INDICATORLED
MIL (BASE CLUSTER) LED
MIL PC74
OIL INDICATOR (BASE
CLUSTER)LED
OIL INDICATOR PC74
OVERHEAD CONSOLE
READINGPC579
OVERDRIVE OFF
INDICATORVFD*
READING 578
SEAT BELT INDICATOR LED
TEMPERATURE
INDICATORLED
TRAC OFF INDICATOR VFD*
TURN SIGNAL
INDICATOR (BASE
CLUSTER)LED
TURN SIGNAL
INDICATORPC74
8L - 20 LAMPS/LIGHTING - INTERIORRS
Page 612 of 2585
CAUTION: Do not disconnect the switch from the
rear of the door key cylinder. This switch is a one
time use switch. Once it is removed from the rear of
the switch, it is not reusable and must be replaced.
Test the switch at the harness connector.
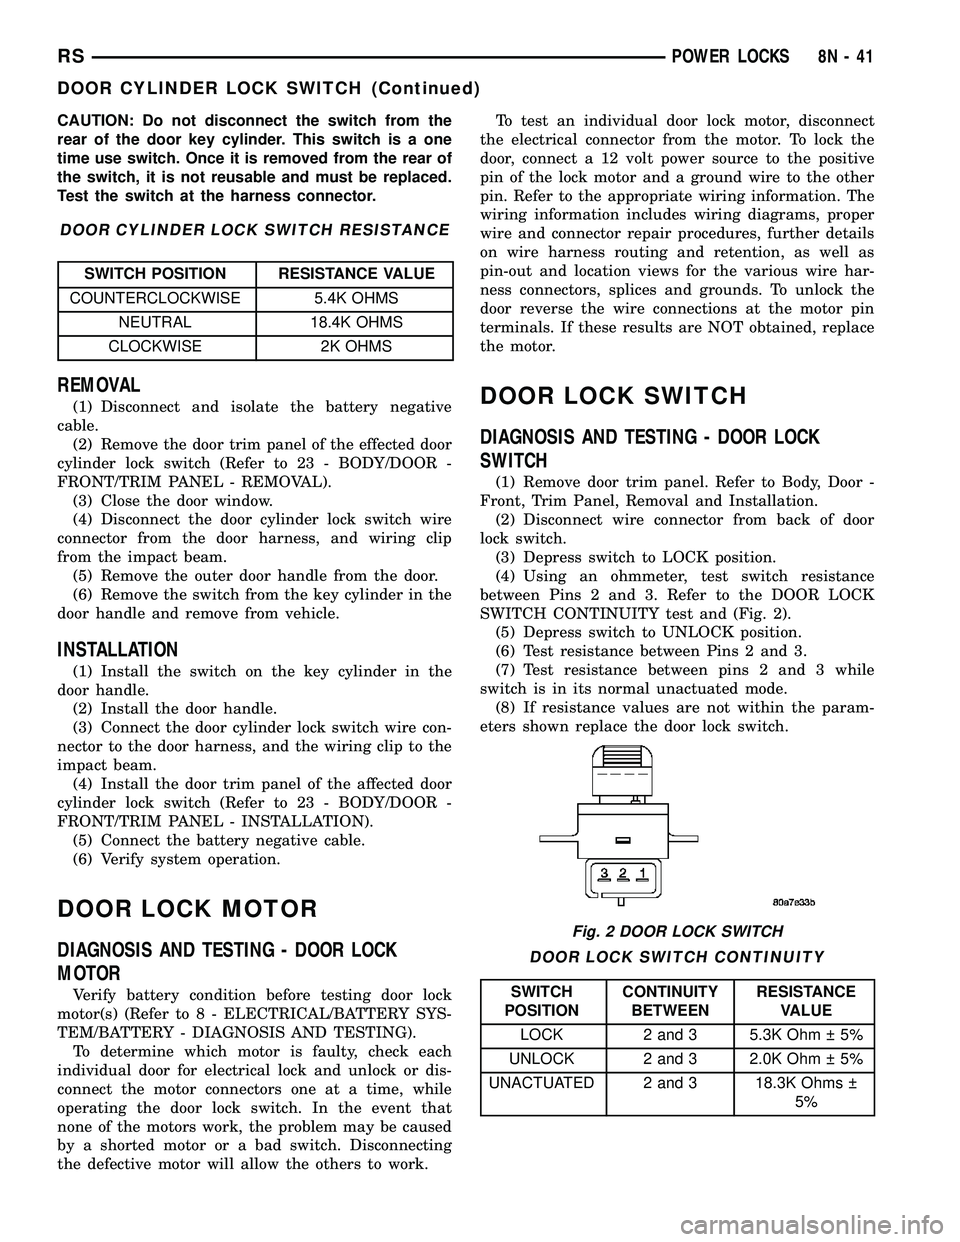
DOOR CYLINDER LOCK SWITCH RESISTANCE
SWITCH POSITION RESISTANCE VALUE
COUNTERCLOCKWISE 5.4K OHMS
NEUTRAL 18.4K OHMS
CLOCKWISE 2K OHMS
REMOVAL
(1) Disconnect and isolate the battery negative
cable.
(2) Remove the door trim panel of the effected door
cylinder lock switch (Refer to 23 - BODY/DOOR -
FRONT/TRIM PANEL - REMOVAL).
(3) Close the door window.
(4) Disconnect the door cylinder lock switch wire
connector from the door harness, and wiring clip
from the impact beam.
(5) Remove the outer door handle from the door.
(6) Remove the switch from the key cylinder in the
door handle and remove from vehicle.
INSTALLATION
(1) Install the switch on the key cylinder in the
door handle.
(2) Install the door handle.
(3) Connect the door cylinder lock switch wire con-
nector to the door harness, and the wiring clip to the
impact beam.
(4) Install the door trim panel of the affected door
cylinder lock switch (Refer to 23 - BODY/DOOR -
FRONT/TRIM PANEL - INSTALLATION).
(5) Connect the battery negative cable.
(6) Verify system operation.
DOOR LOCK MOTOR
DIAGNOSIS AND TESTING - DOOR LOCK
MOTOR
Verify battery condition before testing door lock
motor(s) (Refer to 8 - ELECTRICAL/BATTERY SYS-
TEM/BATTERY - DIAGNOSIS AND TESTING).
To determine which motor is faulty, check each
individual door for electrical lock and unlock or dis-
connect the motor connectors one at a time, while
operating the door lock switch. In the event that
none of the motors work, the problem may be caused
by a shorted motor or a bad switch. Disconnecting
the defective motor will allow the others to work.To test an individual door lock motor, disconnect
the electrical connector from the motor. To lock the
door, connect a 12 volt power source to the positive
pin of the lock motor and a ground wire to the other
pin. Refer to the appropriate wiring information. The
wiring information includes wiring diagrams, proper
wire and connector repair procedures, further details
on wire harness routing and retention, as well as
pin-out and location views for the various wire har-
ness connectors, splices and grounds. To unlock the
door reverse the wire connections at the motor pin
terminals. If these results are NOT obtained, replace
the motor.
DOOR LOCK SWITCH
DIAGNOSIS AND TESTING - DOOR LOCK
SWITCH
(1) Remove door trim panel. Refer to Body, Door -
Front, Trim Panel, Removal and Installation.
(2) Disconnect wire connector from back of door
lock switch.
(3) Depress switch to LOCK position.
(4) Using an ohmmeter, test switch resistance
between Pins 2 and 3. Refer to the DOOR LOCK
SWITCH CONTINUITY test and (Fig. 2).
(5) Depress switch to UNLOCK position.
(6) Test resistance between Pins 2 and 3.
(7) Test resistance between pins 2 and 3 while
switch is in its normal unactuated mode.
(8) If resistance values are not within the param-
eters shown replace the door lock switch.
DOOR LOCK SWITCH CONTINUITY
SWITCH
POSITIONCONTINUITY
BETWEENRESISTANCE
VALUE
LOCK 2 and 3 5.3K Ohm 5%
UNLOCK 2 and 3 2.0K Ohm 5%
UNACTUATED 2 and 3 18.3K Ohms
5%
Fig. 2 DOOR LOCK SWITCH
RSPOWER LOCKS8N-41
DOOR CYLINDER LOCK SWITCH (Continued)
Page 641 of 2585
(6) Remove the switch from the key cylinder in the
door handle and remove from vehicle.
INSTALLATION
(1) Install the switch on the key cylinder in the
door handle. (2) Install the door handle.
(3) Connect the door cylinder lock switch wire con-
nector to the door harness, and the wiring clip to the
impact beam. (4) Install the door trim panel of the affected door
cylinder lock switch (Refer to 23 - BODY/DOOR -
FRONT/TRIM PANEL - INSTALLATION). (5) Connect the battery negative cable.
(6) Verify system operation.
DOOR LOCK MOTOR
DIAGNOSIS AND TESTING - DOOR LOCK
MOTOR
Any diagnosis of the power lock system
should begin with the use of the DRB III tdiag-
nostic tool. For information on the use of the
DRB III t, refer to the appropriate Diagnostic
Service Manual. For complete circuit diagrams, refer to the appro-
priate wiring information. Verify battery condition before testing door lock
motor(s). To determine which motor is faulty, check each
individual door for electrical lock and unlock or dis-
connect the motor connectors one at a time, while
operating the door lock switch. In the event that
none of the motors work, the problem may be caused
by a shorted motor or a faulty switch. Disconnecting
the faulty motor will allow the others to work. To test an individual door lock motor, disconnect
the electrical connector from the motor. To lock the
door, connect a fused 12 volt power source to the pos-
itive pin of the lock motor and a ground wire to the
other pin. To unlock the door reverse the wire con-
nections at the motor pin terminals. If these results
are not obtained, replace the door latch.
DOOR LOCK SWITCH
DIAGNOSIS AND TESTING - DOOR LOCK
SWITCH
(1) Remove door trim panel. Refer to Body, Door -
Front, Trim Panel, Removal and Installation. (2) Disconnect wire connector from back of door
lock switch. (3) Depress switch to LOCK position.
(4) Using an ohmmeter, test switch resistance
between Pins 2 and 3. Refer to the DOOR LOCK
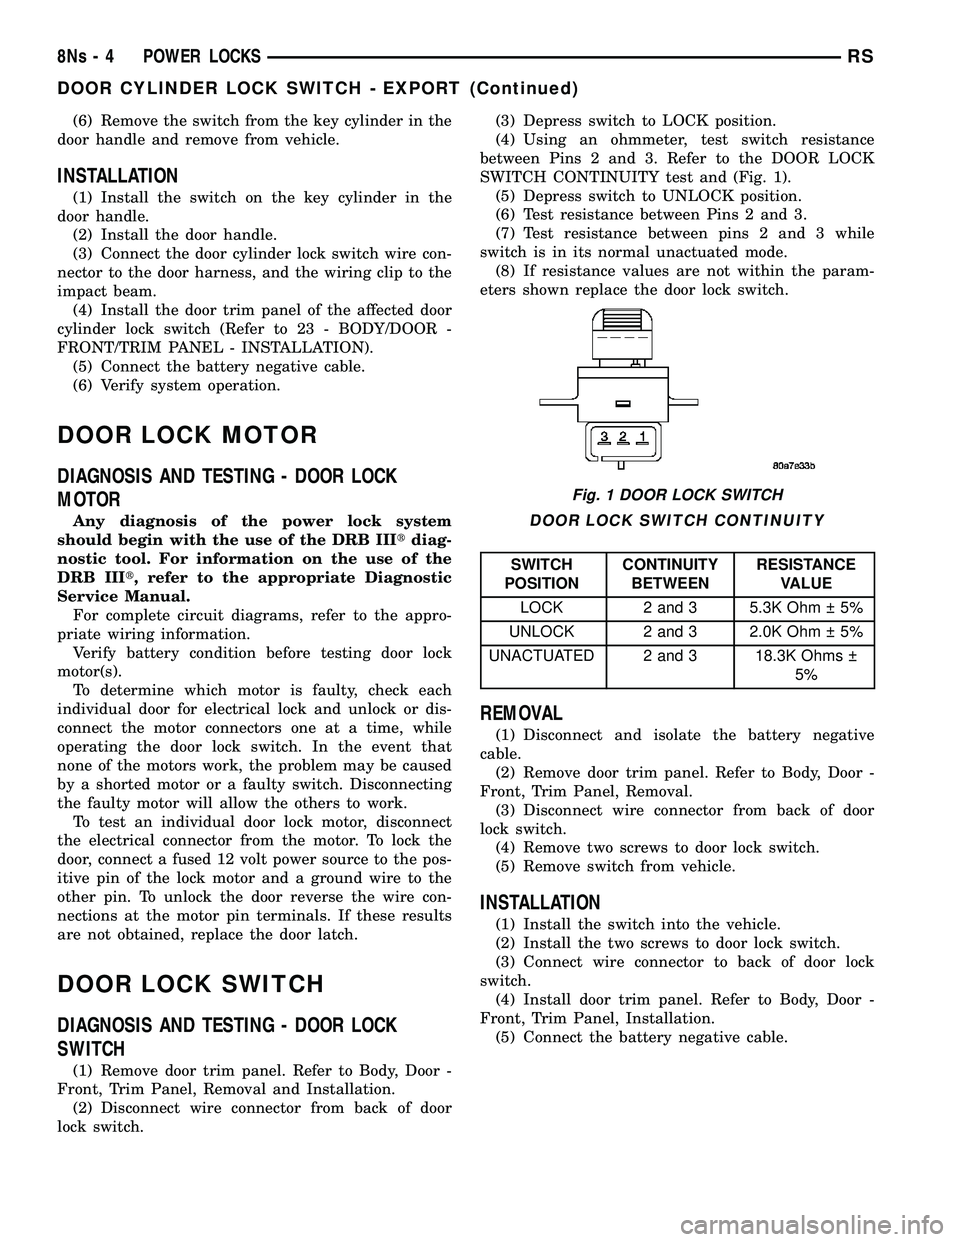
SWITCH CONTINUITY test and (Fig. 1). (5) Depress switch to UNLOCK position.
(6) Test resistance between Pins 2 and 3.
(7) Test resistance between pins 2 and 3 while
switch is in its normal unactuated mode. (8) If resistance values are not within the param-
eters shown replace the door lock switch.
DOOR LOCK SWITCH CONTINUITY
SWITCH
POSITION CONTINUITY
BETWEEN RESISTANCE
VALUE
LOCK 2 and 3 5.3K Ohm 5%
UNLOCK 2 and 3 2.0K Ohm 5%
UNACTUATED 2 and 3 18.3K Ohms 5%
REMOVAL
(1) Disconnect and isolate the battery negative
cable. (2) Remove door trim panel. Refer to Body, Door -
Front, Trim Panel, Removal. (3) Disconnect wire connector from back of door
lock switch. (4) Remove two screws to door lock switch.
(5) Remove switch from vehicle.
INSTALLATION
(1) Install the switch into the vehicle.
(2) Install the two screws to door lock switch.
(3) Connect wire connector to back of door lock
switch. (4) Install door trim panel. Refer to Body, Door -
Front, Trim Panel, Installation. (5) Connect the battery negative cable.
Fig. 1 DOOR LOCK SWITCH
8Ns - 4 POWER LOCKSRS
DOOR CYLINDER LOCK SWITCH - EXPORT (Continued)
Page 665 of 2585
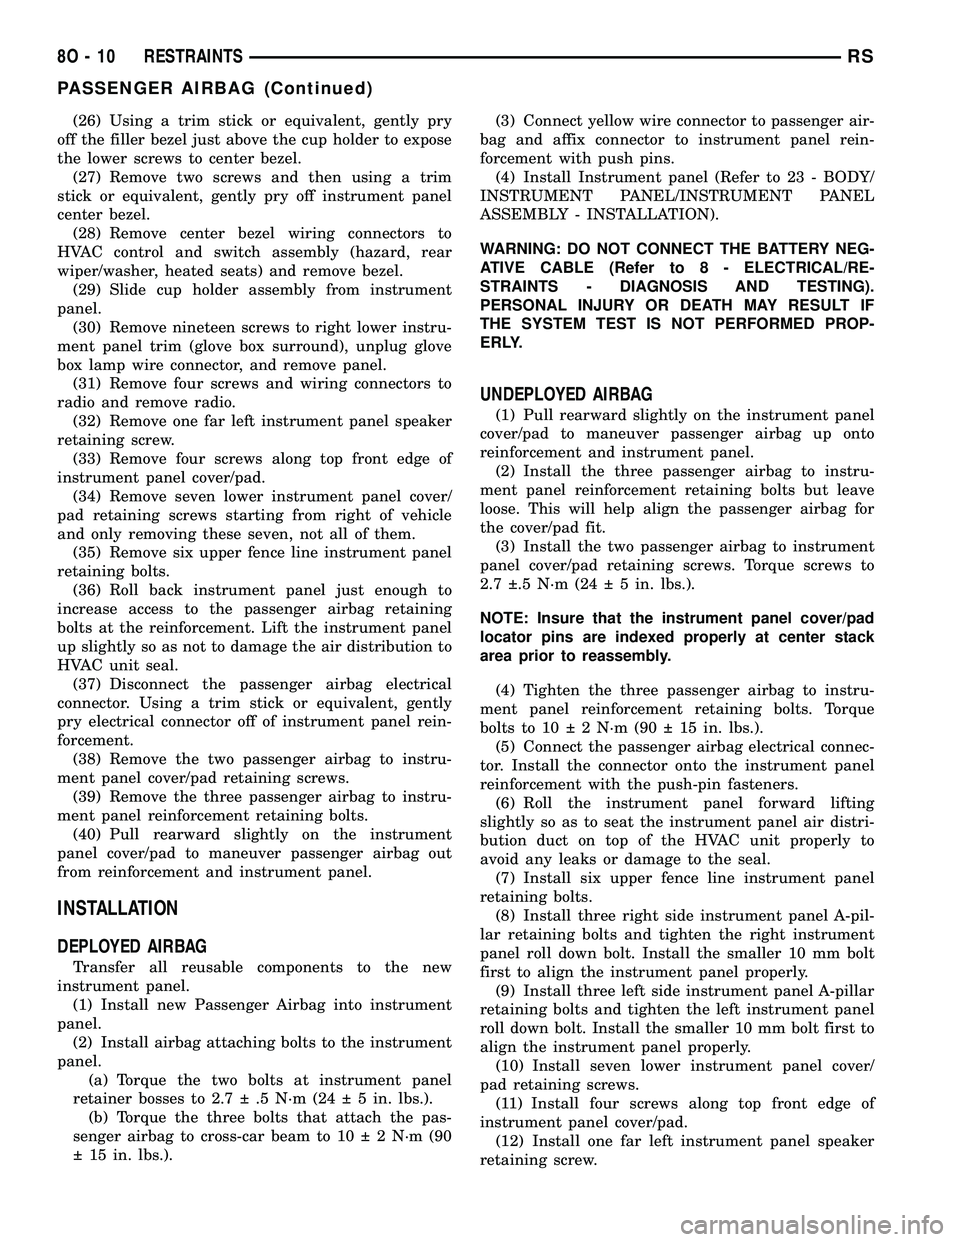
(26) Using a trim stick or equivalent, gently pry
off the filler bezel just above the cup holder to expose
the lower screws to center bezel.
(27) Remove two screws and then using a trim
stick or equivalent, gently pry off instrument panel
center bezel.
(28) Remove center bezel wiring connectors to
HVAC control and switch assembly (hazard, rear
wiper/washer, heated seats) and remove bezel.
(29) Slide cup holder assembly from instrument
panel.
(30) Remove nineteen screws to right lower instru-
ment panel trim (glove box surround), unplug glove
box lamp wire connector, and remove panel.
(31) Remove four screws and wiring connectors to
radio and remove radio.
(32) Remove one far left instrument panel speaker
retaining screw.
(33) Remove four screws along top front edge of
instrument panel cover/pad.
(34) Remove seven lower instrument panel cover/
pad retaining screws starting from right of vehicle
and only removing these seven, not all of them.
(35) Remove six upper fence line instrument panel
retaining bolts.
(36) Roll back instrument panel just enough to
increase access to the passenger airbag retaining
bolts at the reinforcement. Lift the instrument panel
up slightly so as not to damage the air distribution to
HVAC unit seal.
(37) Disconnect the passenger airbag electrical
connector. Using a trim stick or equivalent, gently
pry electrical connector off of instrument panel rein-
forcement.
(38) Remove the two passenger airbag to instru-
ment panel cover/pad retaining screws.
(39) Remove the three passenger airbag to instru-
ment panel reinforcement retaining bolts.
(40) Pull rearward slightly on the instrument
panel cover/pad to maneuver passenger airbag out
from reinforcement and instrument panel.
INSTALLATION
DEPLOYED AIRBAG
Transfer all reusable components to the new
instrument panel.
(1) Install new Passenger Airbag into instrument
panel.
(2) Install airbag attaching bolts to the instrument
panel.
(a) Torque the two bolts at instrument panel
retainer bosses to 2.7 .5 N´m (24 5 in. lbs.).
(b) Torque the three bolts that attach the pas-
senger airbag to cross-car beam to 10 2 N´m (90
15 in. lbs.).(3) Connect yellow wire connector to passenger air-
bag and affix connector to instrument panel rein-
forcement with push pins.
(4) Install Instrument panel (Refer to 23 - BODY/
INSTRUMENT PANEL/INSTRUMENT PANEL
ASSEMBLY - INSTALLATION).
WARNING: DO NOT CONNECT THE BATTERY NEG-
ATIVE CABLE (Refer to 8 - ELECTRICAL/RE-
STRAINTS - DIAGNOSIS AND TESTING).
PERSONAL INJURY OR DEATH MAY RESULT IF
THE SYSTEM TEST IS NOT PERFORMED PROP-
ERLY.
UNDEPLOYED AIRBAG
(1) Pull rearward slightly on the instrument panel
cover/pad to maneuver passenger airbag up onto
reinforcement and instrument panel.
(2) Install the three passenger airbag to instru-
ment panel reinforcement retaining bolts but leave
loose. This will help align the passenger airbag for
the cover/pad fit.
(3) Install the two passenger airbag to instrument
panel cover/pad retaining screws. Torque screws to
2.7 .5 N´m (24 5 in. lbs.).
NOTE: Insure that the instrument panel cover/pad
locator pins are indexed properly at center stack
area prior to reassembly.
(4) Tighten the three passenger airbag to instru-
ment panel reinforcement retaining bolts. Torque
bolts to 10 2 N´m (90 15 in. lbs.).
(5) Connect the passenger airbag electrical connec-
tor. Install the connector onto the instrument panel
reinforcement with the push-pin fasteners.
(6) Roll the instrument panel forward lifting
slightly so as to seat the instrument panel air distri-
bution duct on top of the HVAC unit properly to
avoid any leaks or damage to the seal.
(7) Install six upper fence line instrument panel
retaining bolts.
(8) Install three right side instrument panel A-pil-
lar retaining bolts and tighten the right instrument
panel roll down bolt. Install the smaller 10 mm bolt
first to align the instrument panel properly.
(9) Install three left side instrument panel A-pillar
retaining bolts and tighten the left instrument panel
roll down bolt. Install the smaller 10 mm bolt first to
align the instrument panel properly.
(10) Install seven lower instrument panel cover/
pad retaining screws.
(11) Install four screws along top front edge of
instrument panel cover/pad.
(12) Install one far left instrument panel speaker
retaining screw.
8O - 10 RESTRAINTSRS
PASSENGER AIRBAG (Continued)
Page 722 of 2585

8W-02 COMPONENT INDEX
Component Page
A/C Compressor Clutch................. 8W-42
A/C Compressor Clutch Relay............ 8W-42
A/C Pressure Sensor................... 8W-42
A/C-Heater Control.................... 8W-42
Accelerator Pedal Position Sensor......... 8W-30
Accessory Relay....................... 8W-10
Adjustable Pedals Module............... 8W-30
Adjustable Pedals Motor................ 8W-30
Adjustable Pedals Relay................ 8W-30
Adjustable Pedals Sensor............... 8W-30
Adjustable Pedals Switch............... 8W-30
Airbags............................. 8W-43
Airbag Control Module................. 8W-43
Airbag Squibs........................ 8W-43
Ambient Temperature Sensor............ 8W-49
Antenna............................ 8W-47
ATC Remote Sensor.................... 8W-42
Auto Shut Down Relay................. 8W-30
Auto Temp Control.................... 8W-42
Automatic Day/Night Mirror............. 8W-49
B-Pillar Switches...................... 8W-61
Back-Up Lamp Switch.................. 8W-51
Battery............................. 8W-20
Battery Temperature Sensor............. 8W-20
Blend Door Actuators.................. 8W-42
Blower Motors........................ 8W-42
Blower Motor Relays................... 8W-42
Blower Motor Resistor.................. 8W-42
Body Control Module................... 8W-45
Boost Pressure Sensor.................. 8W-30
Brake Fluid Level Switch............... 8W-40
Brake Lamp Switch................. 8W-30, 51
Brake Transmission Shift Interlock
Solenoid........................... 8W-31
Cabin Heater Assist................... 8W-30
Camshaft Position Sensor............... 8W-30
CD Changer......................... 8W-47
Center High Mounted Stop Lamp......... 8W-51
Cinch/Release Motors.................. 8W-61
Clockspring................. 8W-33, 41, 43, 47
Clutch Pedal Interlock Switch......... 8W-10, 30
Clutch Pedal Upstop Switch............. 8W-30
Controller Antilock Brake............... 8W-35
Crank Case Ventilation Heater........... 8W-30
Crankshaft Position Sensor.............. 8W-30
Cylinder Lock Switches................. 8W-39
Data Link Connector................... 8W-18
Defogger Relay....................... 8W-48
Door Ajar Switches.................... 8W-39
Door Courtesy Lamps.................. 8W-44
Door Lock Switches.................... 8W-61
Dosing Pump......................... 8W-30Component Page
DVD Screen.......................... 8W-47
DVD/CD Changer..................... 8W-47
ECM/PCM Relay...................... 8W-30
EGR Solenoid........................ 8W-30
Electronic Control Unit................. 8W-64
Engine Control Module................. 8W-30
Engine Coolant Temp Sensor............. 8W-30
Engine Oil Pressure Sensor.............. 8W-30
Engine Oil Pressure Switch.............. 8W-30
EVAP/Purge Solenoid.................. 8W-30
Evaporator Temperature Sensor.......... 8W-42
Floor Console Lamp................... 8W-44
Floor Console Power Outlet.............. 8W-41
Fog Lamps.......................... 8W-50
Folding Mirror Relay................... 8W-62
Front Blower Module.................. 8W-42
Front Cigar Lighter.................... 8W-41
Front Control Module.................. 8W-10
Front Fog Lamp Relay................. 8W-50
Front Reading Lamps/Switch............ 8W-44
Front Wiper High/Low Relay............. 8W-53
Front Wiper On/Off Relay............... 8W-53
Fuel Heater.......................... 8W-30
Fuel Heater Relay..................... 8W-30
Fuel Injectors........................ 8W-30
Fuel Pressure Sensor.................. 8W-30
Fuel Pressure Solenoid................. 8W-30
Fuel Pump Module.................... 8W-30
Fuel Pump Relay...................... 8W-30
Full Open Switches.................... 8W-61
Fuselink............................ 8W-10
Fuses............................... 8W-10
Generator........................... 8W-20
Glow Plug Relay...................... 8W-30
Glow Plugs.......................... 8W-30
Grounds............................ 8W-15
Headlamp Leveling Motors.............. 8W-50
Headlamp Switch..................... 8W-50
Headlamp Washer Pump Motor.......... 8W-53
Headlamp Washer Relay................ 8W-53
Headlamps.......................... 8W-50
Heated Seat Backs.................... 8W-63
Heated Seat Cushions.................. 8W-63
Heated Seat Modules.................. 8W-63
High Beam Lamps..................... 8W-50
High Note Horn....................... 8W-41
Hood Ajar Switch..................... 8W-39
Horn Relay.......................... 8W-41
Horn Switch......................... 8W-41
Idle Air Control Motor.................. 8W-30
Ignition Coil......................... 8W-30
Ignition Switch....................... 8W-10
RS8W-02 COMPONENT INDEX8W-02-1
Page 723 of 2585
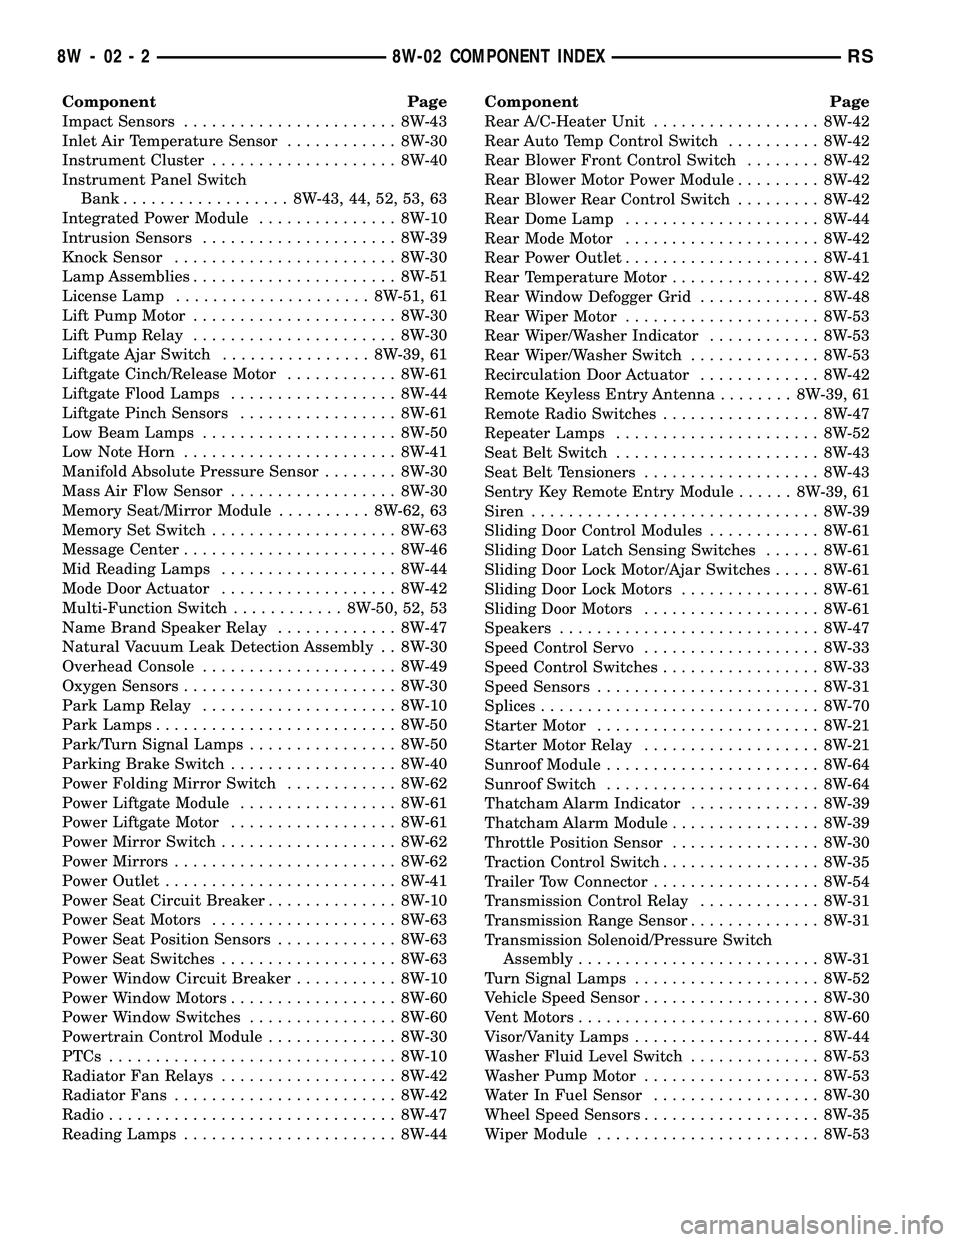
Component Page
Impact Sensors....................... 8W-43
Inlet Air Temperature Sensor............ 8W-30
Instrument Cluster.................... 8W-40
Instrument Panel Switch
Bank.................. 8W-43, 44, 52, 53, 63
Integrated Power Module............... 8W-10
Intrusion Sensors..................... 8W-39
Knock Sensor........................ 8W-30
Lamp Assemblies...................... 8W-51
License Lamp..................... 8W-51, 61
Lift Pump Motor...................... 8W-30
Lift Pump Relay...................... 8W-30
Liftgate Ajar Switch................ 8W-39, 61
Liftgate Cinch/Release Motor............ 8W-61
Liftgate Flood Lamps.................. 8W-44
Liftgate Pinch Sensors................. 8W-61
Low Beam Lamps..................... 8W-50
Low Note Horn....................... 8W-41
Manifold Absolute Pressure Sensor........ 8W-30
Mass Air Flow Sensor.................. 8W-30
Memory Seat/Mirror Module.......... 8W-62, 63
Memory Set Switch.................... 8W-63
Message Center....................... 8W-46
Mid Reading Lamps................... 8W-44
Mode Door Actuator................... 8W-42
Multi-Function Switch............ 8W-50, 52, 53
Name Brand Speaker Relay............. 8W-47
Natural Vacuum Leak Detection Assembly . . 8W-30
Overhead Console..................... 8W-49
Oxygen Sensors....................... 8W-30
Park Lamp Relay..................... 8W-10
Park Lamps.......................... 8W-50
Park/Turn Signal Lamps................ 8W-50
Parking Brake Switch.................. 8W-40
Power Folding Mirror Switch............ 8W-62
Power Liftgate Module................. 8W-61
Power Liftgate Motor.................. 8W-61
Power Mirror Switch................... 8W-62
Power Mirrors........................ 8W-62
Power Outlet......................... 8W-41
Power Seat Circuit Breaker.............. 8W-10
Power Seat Motors.................... 8W-63
Power Seat Position Sensors............. 8W-63
Power Seat Switches................... 8W-63
Power Window Circuit Breaker........... 8W-10
Power Window Motors.................. 8W-60
Power Window Switches................ 8W-60
Powertrain Control Module.............. 8W-30
PTCs............................... 8W-10
Radiator Fan Relays................... 8W-42
Radiator Fans........................ 8W-42
Radio............................... 8W-47
Reading Lamps....................... 8W-44Component Page
Rear A/C-Heater Unit.................. 8W-42
Rear Auto Temp Control Switch.......... 8W-42
Rear Blower Front Control Switch........ 8W-42
Rear Blower Motor Power Module......... 8W-42
Rear Blower Rear Control Switch......... 8W-42
Rear Dome Lamp..................... 8W-44
Rear Mode Motor..................... 8W-42
Rear Power Outlet..................... 8W-41
Rear Temperature Motor................ 8W-42
Rear Window Defogger Grid............. 8W-48
Rear Wiper Motor..................... 8W-53
Rear Wiper/Washer Indicator............ 8W-53
Rear Wiper/Washer Switch.............. 8W-53
Recirculation Door Actuator............. 8W-42
Remote Keyless Entry Antenna........ 8W-39, 61
Remote Radio Switches................. 8W-47
Repeater Lamps...................... 8W-52
Seat Belt Switch...................... 8W-43
Seat Belt Tensioners................... 8W-43
Sentry Key Remote Entry Module...... 8W-39, 61
Siren............................... 8W-39
Sliding Door Control Modules............ 8W-61
Sliding Door Latch Sensing Switches...... 8W-61
Sliding Door Lock Motor/Ajar Switches..... 8W-61
Sliding Door Lock Motors............... 8W-61
Sliding Door Motors................... 8W-61
Speakers............................ 8W-47
Speed Control Servo................... 8W-33
Speed Control Switches................. 8W-33
Speed Sensors........................ 8W-31
Splices.............................. 8W-70
Starter Motor........................ 8W-21
Starter Motor Relay................... 8W-21
Sunroof Module....................... 8W-64
Sunroof Switch....................... 8W-64
Thatcham Alarm Indicator.............. 8W-39
Thatcham Alarm Module................ 8W-39
Throttle Position Sensor................ 8W-30
Traction Control Switch................. 8W-35
Trailer Tow Connector.................. 8W-54
Transmission Control Relay............. 8W-31
Transmission Range Sensor.............. 8W-31
Transmission Solenoid/Pressure Switch
Assembly.......................... 8W-31
Turn Signal Lamps.................... 8W-52
Vehicle Speed Sensor................... 8W-30
Vent Motors.......................... 8W-60
Visor/Vanity Lamps.................... 8W-44
Washer Fluid Level Switch.............. 8W-53
Washer Pump Motor................... 8W-53
Water In Fuel Sensor.................. 8W-30
Wheel Speed Sensors................... 8W-35
Wiper Module........................ 8W-53
8W - 02 - 2 8W-02 COMPONENT INDEXRS
Page 725 of 2585

Component Page
Horn Relay.................. 8W-10-17, 35, 60
Ignition Coil....................... 8W-10-42
Ignition Switch . . . 8W-10-18, 25, 36, 37, 45, 46, 49,
54, 55, 61
Instrument Cluster............... 8W-10-25, 52
Instrument Panel Switch Bank........ 8W-10-68
Integrated Power Module....... 8W-10-3, 4, 5, 13,
15, 16, 17, 18, 19, 20, 21,
22, 23, 24, 25, 26, 27, 28,
29, 30, 31, 32, 35, 36, 37,
38, 39, 40, 41, 42, 43, 44,
45, 47, 48, 49, 50, 52, 53,
54, 55, 56, 57, 58, 59, 60,
61, 62, 63, 64, 65, 66, 67, 68
Left Door Speaker.................. 8W-10-39
Left Fog Lamp.................. 8W-10-15, 27
Left Front Park/Turn
Signal Lamp............ 8W-10-15, 28, 57, 66
Left Headlamp..................... 8W-10-58
Left Headlamp Leveling Motor . . . 8W-10-29, 63, 66
Left High Beam Lamp............... 8W-10-59
Left Low Beam Lamp................ 8W-10-59
Left Park Lamp................. 8W-10-29, 66
Left Power Mirror................... 8W-10-39
Left Rear Lamp Assembly....... 8W-10-28, 29, 66
Left Rear Speaker.................. 8W-10-39
Left Repeater Lamp................. 8W-10-52
Left Sliding Door Control Module....... 8W-10-53
Left Turn Signal Lamp............... 8W-10-57
License Lamp................ 8W-10-28, 29, 66
Lift Pump Motor................. 8W-10-23, 43
Lift Pump Relay................. 8W-10-23, 43
Low Note Horn..................... 8W-10-35
Mass Air Flow Sensor................ 8W-10-44
Memory Seat/Mirror Module.......... 8W-10-50
Message Center.................... 8W-10-52
Name Brand Speaker Relay..... 8W-10-20, 39, 60
Overhead Console................... 8W-10-40
Park Lamp Relay.......... 8W-10-15, 28, 29, 60
Passenger Folding Mirror
Relay.................. 8W-10-22, 24, 45, 48
Passenger Heated Seat Module........ 8W-10-51
Passenger Power Seat Switch.......... 8W-10-51
Passenger Power Window Switch....... 8W-10-31
Power Liftgate Module............... 8W-10-53
Power Mirror Switch........ 8W-10-22, 24, 47, 48
Power Outlet...................... 8W-10-35
Power Seat Circuit Breaker........ 8W-10-25, 50Component Page
Power Window Circuit Breaker...... 8W-10-16, 31
Power Window Switch............... 8W-10-33
Powertrain Control Module..... 8W-10-18, 21, 22,
36, 41, 42, 45, 56, 62, 63, 68
PTC4 ......................... 8W-10-20, 39
PTC7 ................... 8W-10-16, 17, 18, 35
Radiator Fan Relay............ 8W-10-26, 52, 56
Radiator Fan Relay No. 1.......... 8W-10-13, 44
Radiator Fan Relay No. 2....... 8W-10-26, 44, 52
Radiator Fan Relay No. 3............. 8W-10-44
Radio......................... 8W-10-32, 40
Rear A/C-Heater Unit............. 8W-10-19, 38
Rear Blower Motor Power Module . . . 8W-10-19, 38
Rear Blower Motor Relay.... 8W-10-19, 20, 38, 64
Rear Power Outlet............ 8W-10-16, 31, 32
Rear Window Defogger Grid........ 8W-10-20, 39
Rear Wiper Motor................... 8W-10-31
Right Door Speaker................. 8W-10-39
Right Fog Lamp................. 8W-10-15, 27
Right Front Park/Turn
Signal Lamp............ 8W-10-15, 28, 57, 61
Right Headlamp.................... 8W-10-58
Right Headlamp Leveling Motor . . 8W-10-29, 61, 63
Right High Beam Lamp.............. 8W-10-59
Right Low Beam Lamp............... 8W-10-59
Right Park Lamp................ 8W-10-29, 61
Right Power Mirror................. 8W-10-39
Right Rear Lamp
Assembly............ 8W-10-15, 28, 29, 61, 67
Right Rear Speaker................. 8W-10-39
Right Repeater Lamp................ 8W-10-52
Right Sliding Door Control Module..... 8W-10-53
Right Turn Signal Lamp.............. 8W-10-57
Sentry Key Remote Entry
Module.............. 8W-10-40, 46, 49, 54, 55
Siren............................. 8W-10-40
Starter Motor.......... 8W-10-13, 14, 18, 36, 37
Starter Motor Relay...... 8W-10-18, 36, 37, 54, 55
Sunroof Module.................. 8W-10-31, 53
Thatcham Alarm Module . . 8W-10-40, 46, 49, 55, 68
Trailer Tow Connector............ 8W-10-28, 66
Transmission Control Relay........ 8W-10-21, 41
Transmission Solenoid/Pressure Switch
Assembly....................... 8W-10-41
Vehicle Speed Sensor................ 8W-10-43
Washer Fluid Level Switch............ 8W-10-61
Washer Pump Motor................. 8W-10-68
Wiper Module................ 8W-10-16, 30, 60
8W - 10 - 2 8W-10 POWER DISTRIBUTIONRS
Page 792 of 2585
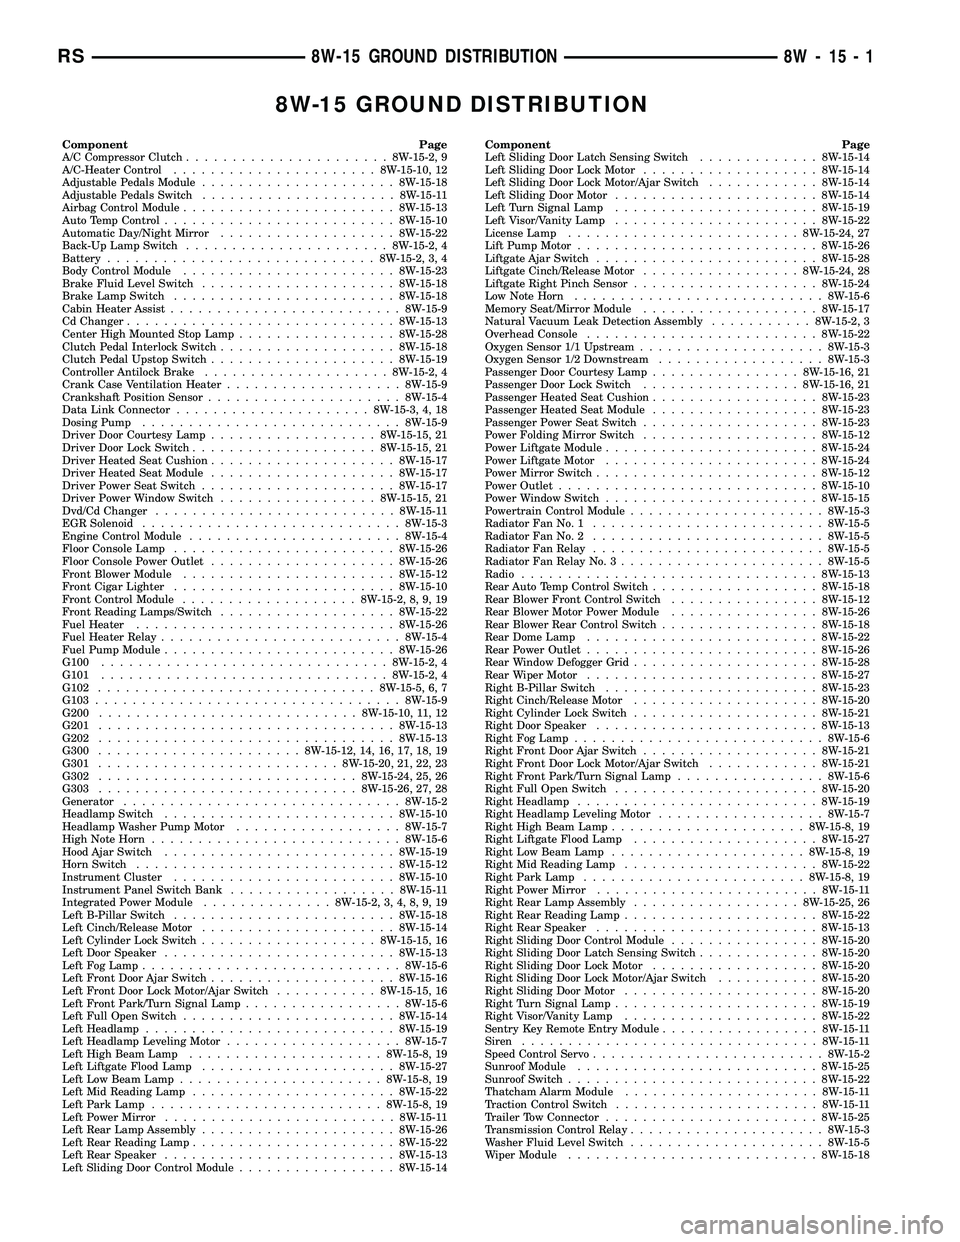
8W-15 GROUND DISTRIBUTION
Component Page
A/C Compressor Clutch......................8W-15-2, 9
A/C-Heater Control......................8W-15-10, 12
Adjustable Pedals Module.....................8W-15-18
Adjustable Pedals Switch.....................8W-15-11
Airbag Control Module.......................8W-15-13
Auto Temp Control.........................8W-15-10
Automatic Day/Night Mirror...................8W-15-22
Back-Up Lamp Switch......................8W-15-2, 4
Battery.............................8W-15-2, 3, 4
Body Control Module.......................8W-15-23
Brake Fluid Level Switch.....................8W-15-18
Brake Lamp Switch........................8W-15-18
Cabin Heater Assist.........................8W-15-9
Cd Changer.............................8W-15-13
Center High Mounted Stop Lamp.................8W-15-28
Clutch Pedal Interlock Switch...................8W-15-18
Clutch Pedal Upstop Switch....................8W-15-19
Controller Antilock Brake....................8W-15-2, 4
Crank Case Ventilation Heater...................8W-15-9
Crankshaft Position Sensor.....................8W-15-4
Data Link Connector.....................8W-15-3, 4, 18
Dosing Pump............................8W-15-9
Driver Door Courtesy Lamp..................8W-15-15, 21
Driver Door Lock Switch....................8W-15-15, 21
Driver Heated Seat Cushion....................8W-15-17
Driver Heated Seat Module....................8W-15-17
Driver Power Seat Switch.....................8W-15-17
Driver Power Window Switch.................8W-15-15, 21
Dvd/Cd Changer..........................8W-15-11
EGR Solenoid............................8W-15-3
Engine Control Module.......................8W-15-4
Floor Console Lamp........................8W-15-26
Floor Console Power Outlet....................8W-15-26
Front Blower Module.......................8W-15-12
Front Cigar Lighter........................8W-15-10
Front Control Module...................8W-15-2, 8, 9, 19
Front Reading Lamps/Switch...................8W-15-22
Fuel Heater............................8W-15-26
Fuel Heater Relay..........................8W-15-4
Fuel Pump Module.........................8W-15-26
G100...............................8W-15-2, 4
G101...............................8W-15-2, 4
G102..............................8W-15-5, 6, 7
G103.................................8W-15-9
G200............................8W-15-10, 11, 12
G201................................8W-15-13
G202................................8W-15-13
G300......................8W-15-12, 14, 16, 17, 18, 19
G301..........................8W-15-20, 21, 22, 23
G302............................8W-15-24, 25, 26
G303............................8W-15-26, 27, 28
Generator..............................8W-15-2
Headlamp Switch.........................8W-15-10
Headlamp Washer Pump Motor..................8W-15-7
High Note Horn...........................8W-15-6
Hood Ajar Switch.........................8W-15-19
Horn Switch............................8W-15-12
Instrument Cluster........................8W-15-10
Instrument Panel Switch Bank..................8W-15-11
Integrated Power Module..............8W-15-2, 3, 4, 8, 9, 19
Left B-Pillar Switch........................8W-15-18
Left Cinch/Release Motor.....................8W-15-14
Left Cylinder Lock Switch...................8W-15-15, 16
Left Door Speaker.........................8W-15-13
Left Fog Lamp............................8W-15-6
Left Front Door Ajar Switch....................8W-15-16
Left Front Door Lock Motor/Ajar Switch...........8W-15-15, 16
Left Front Park/Turn Signal Lamp.................8W-15-6
Left Full Open Switch.......................8W-15-14
Left Headlamp...........................8W-15-19
Left Headlamp Leveling Motor...................8W-15-7
Left High Beam Lamp.....................8W-15-8, 19
Left Liftgate Flood Lamp.....................8W-15-27
Left Low Beam Lamp......................8W-15-8, 19
Left Mid Reading Lamp......................8W-15-22
Left Park Lamp.........................8W-15-8, 19
Left Power Mirror.........................8W-15-11
Left Rear Lamp Assembly.....................8W-15-26
Left Rear Reading Lamp......................8W-15-22
Left Rear Speaker.........................8W-15-13
Left Sliding Door Control Module.................8W-15-14Component Page
Left Sliding Door Latch Sensing Switch.............8W-15-14
Left Sliding Door Lock Motor...................8W-15-14
Left Sliding Door Lock Motor/Ajar Switch............8W-15-14
Left Sliding Door Motor......................8W-15-14
Left Turn Signal Lamp......................8W-15-19
Left Visor/Vanity Lamp......................8W-15-22
License Lamp.........................8W-15-24, 27
Lift Pump Motor..........................8W-15-26
Liftgate Ajar Switch........................8W-15-28
Liftgate Cinch/Release Motor.................8W-15-24, 28
Liftgate Right Pinch Sensor....................8W-15-24
Low Note Horn...........................8W-15-6
Memory Seat/Mirror Module...................8W-15-17
Natural Vacuum Leak Detection Assembly...........8W-15-2, 3
Overhead Console.........................8W-15-22
Oxygen Sensor 1/1 Upstream....................8W-15-3
Oxygen Sensor 1/2 Downstream..................8W-15-3
Passenger Door Courtesy Lamp................8W-15-16, 21
Passenger Door Lock Switch.................8W-15-16, 21
Passenger Heated Seat Cushion..................8W-15-23
Passenger Heated Seat Module..................8W-15-23
Passenger Power Seat Switch...................8W-15-23
Power Folding Mirror Switch...................8W-15-12
Power Liftgate Module.......................8W-15-24
Power Liftgate Motor.......................8W-15-24
Power Mirror Switch........................8W-15-12
Power Outlet............................8W-15-10
Power Window Switch.......................8W-15-15
Powertrain Control Module.....................8W-15-3
Radiator Fan No. 1.........................8W-15-5
Radiator Fan No. 2.........................8W-15-5
Radiator Fan Relay.........................8W-15-5
Radiator Fan Relay No. 3......................8W-15-5
Radio................................8W-15-13
Rear Auto Temp Control Switch..................8W-15-18
Rear Blower Front Control Switch................8W-15-12
Rear Blower Motor Power Module................8W-15-26
Rear Blower Rear Control Switch.................8W-15-18
Rear Dome Lamp.........................8W-15-22
Rear Power Outlet.........................8W-15-26
Rear Window Defogger Grid....................8W-15-28
Rear Wiper Motor.........................8W-15-27
Right B-Pillar Switch.......................8W-15-23
Right Cinch/Release Motor....................8W-15-20
Right Cylinder Lock Switch....................8W-15-21
Right Door Speaker........................8W-15-13
Right Fog Lamp...........................8W-15-6
Right Front Door Ajar Switch...................8W-15-21
Right Front Door Lock Motor/Ajar Switch............8W-15-21
Right Front Park/Turn Signal Lamp................8W-15-6
Right Full Open Switch......................8W-15-20
Right Headlamp..........................8W-15-19
Right Headlamp Leveling Motor..................8W-15-7
Right High Beam Lamp.....................8W-15-8, 19
Right Liftgate Flood Lamp....................8W-15-27
Right Low Beam Lamp.....................8W-15-8, 19
Right Mid Reading Lamp.....................8W-15-22
Right Park Lamp........................8W-15-8, 19
Right Power Mirror........................8W-15-11
Right Rear Lamp Assembly..................8W-15-25, 26
Right Rear Reading Lamp.....................8W-15-22
Right Rear Speaker........................8W-15-13
Right Sliding Door Control Module................8W-15-20
Right Sliding Door Latch Sensing Switch.............8W-15-20
Right Sliding Door Lock Motor..................8W-15-20
Right Sliding Door Lock Motor/Ajar Switch...........8W-15-20
Right Sliding Door Motor.....................8W-15-20
Right Turn Signal Lamp......................8W-15-19
Right Visor/Vanity Lamp.....................8W-15-22
Sentry Key Remote Entry Module.................8W-15-11
Siren................................8W-15-11
Speed Control Servo.........................8W-15-2
Sunroof Module..........................8W-15-25
Sunroof Switch...........................8W-15-22
Thatcham Alarm Module.....................8W-15-11
Traction Control Switch......................8W-15-11
Trailer Tow Connector.......................8W-15-25
Transmission Control Relay.....................8W-15-3
Washer Fluid Level Switch.....................8W-15-5
Wiper Module...........................8W-15-18
RS8W-15 GROUND DISTRIBUTION8W-15-1