3 row CHRYSLER VOYAGER 2005 Manual PDF
[x] Cancel search | Manufacturer: CHRYSLER, Model Year: 2005, Model line: VOYAGER, Model: CHRYSLER VOYAGER 2005Pages: 2339, PDF Size: 59.69 MB
Page 1919 of 2339
INSTALLATION
(1) Place prop rod into position.
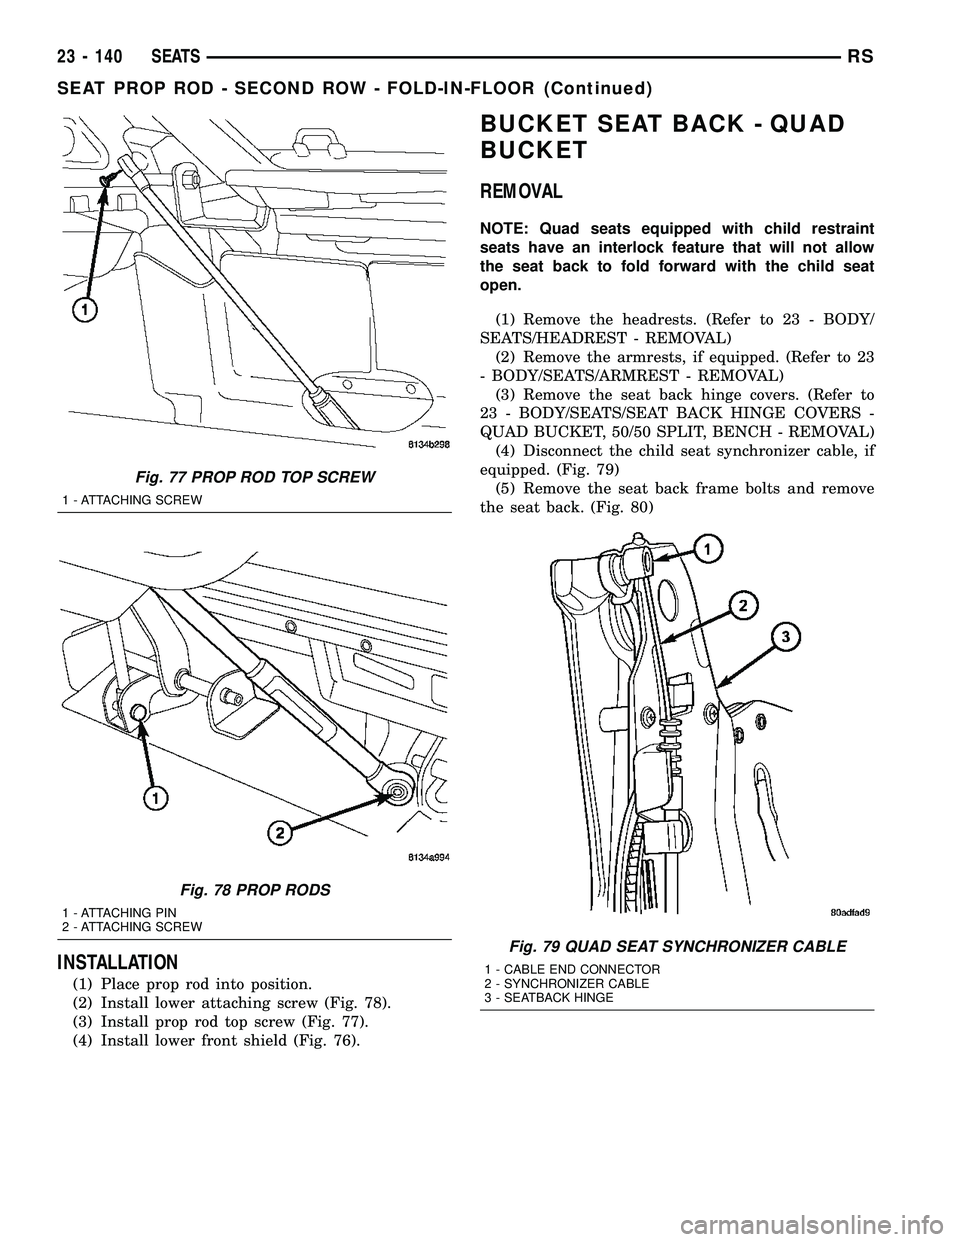
(2) Install lower attaching screw (Fig. 78).
(3) Install prop rod top screw (Fig. 77).
(4) Install lower front shield (Fig. 76).
BUCKET SEAT BACK - QUAD
BUCKET
REMOVAL
NOTE: Quad seats equipped with child restraint
seats have an interlock feature that will not allow
the seat back to fold forward with the child seat
open.
(1) Remove the headrests. (Refer to 23 - BODY/
SEATS/HEADREST - REMOVAL)
(2) Remove the armrests, if equipped. (Refer to 23
- BODY/SEATS/ARMREST - REMOVAL)
(3) Remove the seat back hinge covers. (Refer to
23 - BODY/SEATS/SEAT BACK HINGE COVERS -
QUAD BUCKET, 50/50 SPLIT, BENCH - REMOVAL)
(4) Disconnect the child seat synchronizer cable, if
equipped. (Fig. 79)
(5) Remove the seat back frame bolts and remove
the seat back. (Fig. 80)
Fig. 77 PROP ROD TOP SCREW
1 - ATTACHING SCREW
Fig. 78 PROP RODS
1 - ATTACHING PIN
2 - ATTACHING SCREW
Fig. 79 QUAD SEAT SYNCHRONIZER CABLE
1 - CABLE END CONNECTOR
2 - SYNCHRONIZER CABLE
3 - SEATBACK HINGE
23 - 140 SEATSRS
SEAT PROP ROD - SECOND ROW - FOLD-IN-FLOOR (Continued)
Page 1922 of 2339
QUAD BUCKET SEAT SIDE
SHIELD - NO CUP HOLDER
REMOVAL
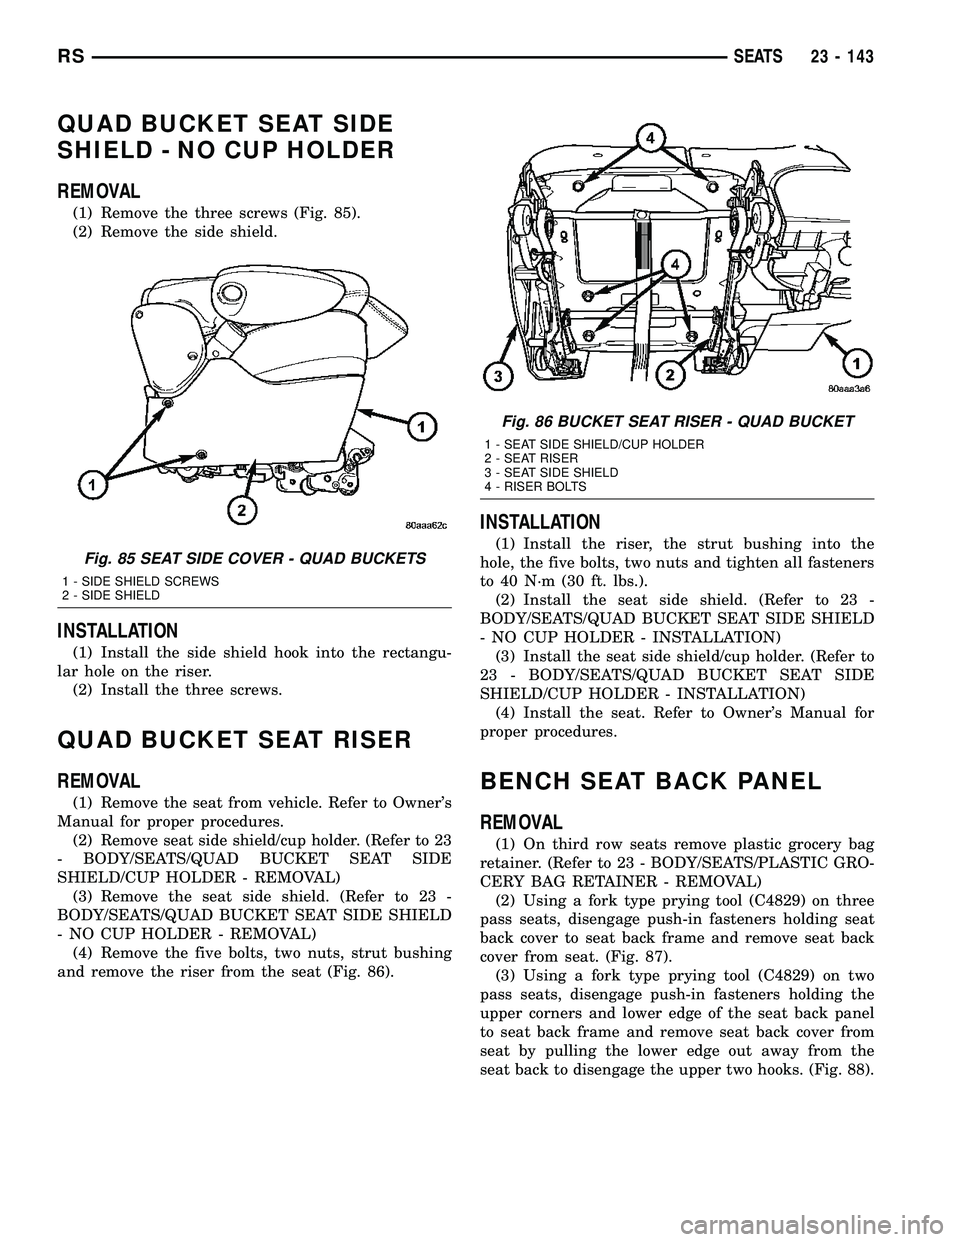
(1) Remove the three screws (Fig. 85).
(2) Remove the side shield.
INSTALLATION
(1) Install the side shield hook into the rectangu-
lar hole on the riser.
(2) Install the three screws.
QUAD BUCKET SEAT RISER
REMOVAL
(1) Remove the seat from vehicle. Refer to Owner's
Manual for proper procedures.
(2) Remove seat side shield/cup holder. (Refer to 23
- BODY/SEATS/QUAD BUCKET SEAT SIDE
SHIELD/CUP HOLDER - REMOVAL)
(3) Remove the seat side shield. (Refer to 23 -
BODY/SEATS/QUAD BUCKET SEAT SIDE SHIELD
- NO CUP HOLDER - REMOVAL)
(4) Remove the five bolts, two nuts, strut bushing
and remove the riser from the seat (Fig. 86).
INSTALLATION
(1) Install the riser, the strut bushing into the
hole, the five bolts, two nuts and tighten all fasteners
to 40 N´m (30 ft. lbs.).
(2) Install the seat side shield. (Refer to 23 -
BODY/SEATS/QUAD BUCKET SEAT SIDE SHIELD
- NO CUP HOLDER - INSTALLATION)
(3) Install the seat side shield/cup holder. (Refer to
23 - BODY/SEATS/QUAD BUCKET SEAT SIDE
SHIELD/CUP HOLDER - INSTALLATION)
(4) Install the seat. Refer to Owner's Manual for
proper procedures.
BENCH SEAT BACK PANEL
REMOVAL
(1) On third row seats remove plastic grocery bag
retainer. (Refer to 23 - BODY/SEATS/PLASTIC GRO-
CERY BAG RETAINER - REMOVAL)
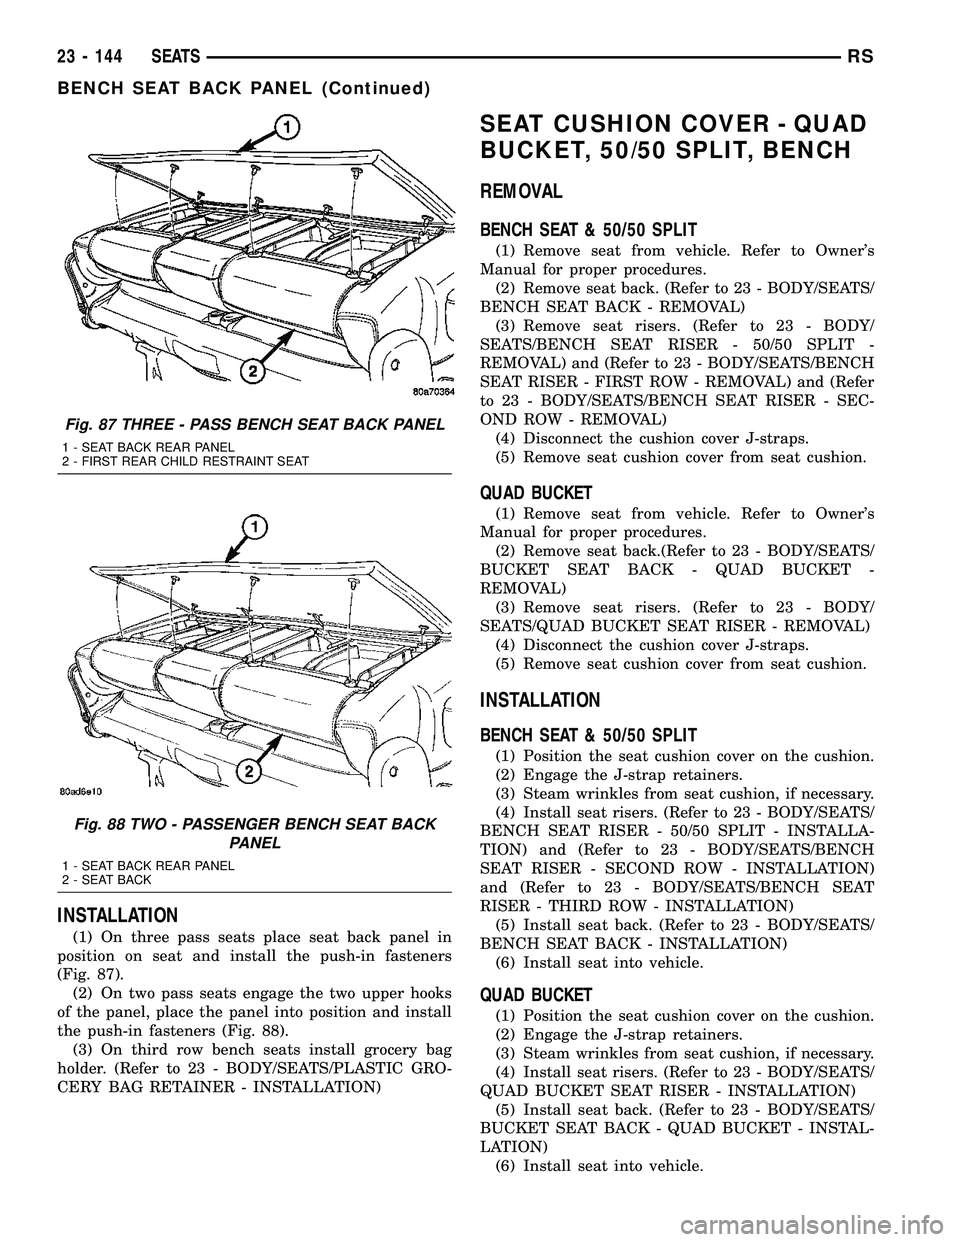
(2) Using a fork type prying tool (C4829) on three
pass seats, disengage push-in fasteners holding seat
back cover to seat back frame and remove seat back
cover from seat. (Fig. 87).
(3) Using a fork type prying tool (C4829) on two
pass seats, disengage push-in fasteners holding the
upper corners and lower edge of the seat back panel
to seat back frame and remove seat back cover from
seat by pulling the lower edge out away from the
seat back to disengage the upper two hooks. (Fig. 88).
Fig. 85 SEAT SIDE COVER - QUAD BUCKETS
1 - SIDE SHIELD SCREWS
2 - SIDE SHIELD
Fig. 86 BUCKET SEAT RISER - QUAD BUCKET
1 - SEAT SIDE SHIELD/CUP HOLDER
2 - SEAT RISER
3 - SEAT SIDE SHIELD
4 - RISER BOLTS
RSSEATS23 - 143
Page 1923 of 2339
INSTALLATION
(1) On three pass seats place seat back panel in
position on seat and install the push-in fasteners
(Fig. 87).
(2) On two pass seats engage the two upper hooks
of the panel, place the panel into position and install
the push-in fasteners (Fig. 88).
(3) On third row bench seats install grocery bag
holder. (Refer to 23 - BODY/SEATS/PLASTIC GRO-
CERY BAG RETAINER - INSTALLATION)
SEAT CUSHION COVER - QUAD
BUCKET, 50/50 SPLIT, BENCH
REMOVAL
BENCH SEAT & 50/50 SPLIT
(1) Remove seat from vehicle. Refer to Owner's
Manual for proper procedures.
(2) Remove seat back. (Refer to 23 - BODY/SEATS/
BENCH SEAT BACK - REMOVAL)
(3) Remove seat risers. (Refer to 23 - BODY/
SEATS/BENCH SEAT RISER - 50/50 SPLIT -
REMOVAL) and (Refer to 23 - BODY/SEATS/BENCH
SEAT RISER - FIRST ROW - REMOVAL) and (Refer
to 23 - BODY/SEATS/BENCH SEAT RISER - SEC-
OND ROW - REMOVAL)
(4) Disconnect the cushion cover J-straps.
(5) Remove seat cushion cover from seat cushion.
QUAD BUCKET
(1) Remove seat from vehicle. Refer to Owner's
Manual for proper procedures.
(2) Remove seat back.(Refer to 23 - BODY/SEATS/
BUCKET SEAT BACK - QUAD BUCKET -
REMOVAL)
(3) Remove seat risers. (Refer to 23 - BODY/
SEATS/QUAD BUCKET SEAT RISER - REMOVAL)
(4) Disconnect the cushion cover J-straps.
(5) Remove seat cushion cover from seat cushion.
INSTALLATION
BENCH SEAT & 50/50 SPLIT
(1) Position the seat cushion cover on the cushion.
(2) Engage the J-strap retainers.
(3) Steam wrinkles from seat cushion, if necessary.
(4) Install seat risers. (Refer to 23 - BODY/SEATS/
BENCH SEAT RISER - 50/50 SPLIT - INSTALLA-
TION) and (Refer to 23 - BODY/SEATS/BENCH
SEAT RISER - SECOND ROW - INSTALLATION)
and (Refer to 23 - BODY/SEATS/BENCH SEAT
RISER - THIRD ROW - INSTALLATION)
(5) Install seat back. (Refer to 23 - BODY/SEATS/
BENCH SEAT BACK - INSTALLATION)
(6) Install seat into vehicle.
QUAD BUCKET
(1) Position the seat cushion cover on the cushion.
(2) Engage the J-strap retainers.
(3) Steam wrinkles from seat cushion, if necessary.
(4) Install seat risers. (Refer to 23 - BODY/SEATS/
QUAD BUCKET SEAT RISER - INSTALLATION)
(5) Install seat back. (Refer to 23 - BODY/SEATS/
BUCKET SEAT BACK - QUAD BUCKET - INSTAL-
LATION)
(6) Install seat into vehicle.
Fig. 87 THREE - PASS BENCH SEAT BACK PANEL
1 - SEAT BACK REAR PANEL
2 - FIRST REAR CHILD RESTRAINT SEAT
Fig. 88 TWO - PASSENGER BENCH SEAT BACK
PANEL
1 - SEAT BACK REAR PANEL
2 - SEAT BACK
23 - 144 SEATSRS
BENCH SEAT BACK PANEL (Continued)
Page 1924 of 2339

BENCH SEAT RISER - 50/50
SPLIT
REMOVAL
(1) Remove the seat from the vehicle. Refer to the
Owners Manual for proper procedures.
(2) Unclip the seat cushion cover J-strap. (Fig. 89).
(3) Remove the six bolts and remove the riser.
INSTALLATION
(1) Place the riser onto the seat install the bolts
and tighten to 48 N´m (35 ft. lbs.) torque.
(2) Clip seat cushion cover J-strap onto the riser.
(3) Install the seat into the vehicle. Refer to the
Owner's Manual for proper procedure.
BENCH SEAT RISER - SECOND
ROW
REMOVAL
(1) Remove seat from vehicle. Refer to Owner's
Manual for proper procedures.
(2) Place seat bottom side up on a clean covered
work surface.
(3) Remove bolts attaching seat riser to seat cush-
ion frame (Fig. 90).
(4) Remove riser from seat.
INSTALLATION
(1) Place riser in position on seat.
(2) Install bolts attaching seat riser to seat cush-
ion frame (Fig. 90). Tighten bolts to 48 N´m (35 ft.
lbs.) torque.
(3) Install seat into vehicle.
BENCH SEAT RISER - THIRD
ROW
REMOVAL
(1) Remove seat track. (Refer to 23 - BODY/
SEATS/BENCH SEAT TRACK - REMOVAL)
(2) Remove bolts attaching riser to seat cushion
frame and remove the riser. (Fig. 95).
INSTALLATION
(1) Place riser in position on seat.
(2) Install bolts attaching riser to seat cushion
frame (Fig. 95). Tighten bolts to 48 N´m (35 ft. lbs.)
torque.
(3) Install seat track. (Refer to 23 - BODY/SEATS/
BENCH SEAT TRACK - INSTALLATION)
Fig. 89 BENCH SEAT RISER - 50/50 SPLIT
1 - SEAT CUSHION COVER CLIP
2 - SEAT RISER BOLTS
3 - SEAT RISER
Fig. 90 BENCH SEAT RISER - SECOND ROW
1 - RISER
2 - FIRST ROW BENCH SEAT
3 - RISER BOLTS
RSSEATS23 - 145
Page 1927 of 2339

(1) Install the seat back.
(2) Install the shoulder bolts attaching the seat
back hinge to the seat back frame and tighten to 34
N´m (25 ft. lbs.) torque.
(3) Connect the synchronizing cable end from (clip
on left side) hinge latch release arm, if equipped.
(4) Connect the synchronizing cable housing to the
seat back hinge, if equipped.
(5) Install the upper hinge cover. (Refer to 23 -
BODY/SEATS/SEAT BACK HINGE - INSTALLA-
TION)
(6) Install the armrests, if equipped. (Refer to 23 -
BODY/SEATS/ARMREST - INSTALLATION)
(7) Install the headrest sleeves. (Refer to 23 -
BODY/SEATS/HEADREST SLEEVE - INSTALLA-
TION)
(8) Adjust synchronizing cable, if equipped. (Refer
to 23 - BODY/SEATS/SYNCHRONIZING CABLE
ADJUSTMENT)
BENCH SEAT BACK COVER
REMOVAL
(1) Remove the bench seat back. (Refer to 23 -
BODY/SEATS/BENCH SEAT BACK - REMOVAL)
(2) Remove the bench seat back panel. (Refer to 23
- BODY/SEATS/BENCH SEAT BACK PANEL -
REMOVAL)
(3) Disconnect the cover J-straps.
(4) Remove the seat back cover from the seat back
assembly.
INSTALLATION
(1) Install seat back cover onto the seat back
frame and cushion assembly.
(2) Connect the J-straps.
(3) Install the bench seat back panel. (Refer to 23 -
BODY/SEATS/BENCH SEAT BACK PANEL -
INSTALLATION)
(4) Install the seat back. (Refer to 23 - BODY/
SEATS/BENCH SEAT BACK - INSTALLATION)
BENCH SEAT TRACK
REMOVAL
(1) Remove second row seat from vehicle. Refer to
Owner's Manual for proper procedure.
(2) Place seat on clean covered work surface.
(3) Disengage seat track adjuster link wire from
track being removed.
(4) Remove nuts attaching track to seat riser (Fig.
95).
(5) Remove track from seat riser.
INSTALLATION
(1) Place track in position on seat riser.
(2) Install nuts attaching track to seat riser. (Fig.
95). Tighten nuts to 48 N´m (35 ft. lbs.) torque.
(3) Engage seat track adjuster link wire onto track
being installed.
(4) Install second row seat into vehicle.
Fig. 95 BENCH SEAT TRACK
1 - SEAT TRACK ADJUSTER LINK
2 - RISER
3 - SEAT TRACK NUTS
4 - SEAT TRACK
5 - RISER BOLTS
23 - 148 SEATSRS
BENCH SEAT BACK (Continued)
Page 1931 of 2339

BOTTOM OF SEAT CUSHION
PAN PANEL-THIRD ROW -
FOLD-IN-FLOOR
REMOVAL
(1) Fold the third row seat with back down.
(2) Remove handle from cushion.
(3) Using a trim tool, remove bottom side of the
cushion pan panel (Fig. 105).
INSTALLATION
(1) Place bottom side of the cushion pan panel into
position (Fig. 106).
(2) Press on back of cushion pan panel to seat the
fasteners.
(3) Install handle on cushion.
(4) Place seat in the up right position.
HEADREST SLEEVE - THIRD
ROW - FOLD-IN-FLOOR
REMOVAL
(1) Remove headrest (Fig. 107).
(2) Using a trim tool remove sleeve by prying
sleeve away from the seat back frame to unlock it
(Fig. 108)
(3) Pull headrest sleeve upward and out the top of
the seat back frame and remove from seat.
Fig. 105 THIRD ROW CUSHION PAN & COVER
Fig. 106 THIRD ROW CUSHION PAN & COVER
Fig. 107 HEADREST
1 - HEADREST
2 - DEPRESS TAB
Fig. 108 REMOVING HEADREST SLEEVES
1 - HEADREST SLEEVES
2 - TRIM TOOL
23 - 152 SEATSRS
Page 1932 of 2339

INSTALLATION
(1) Place headrest sleeve into position and push
downward until sleeve locks into position (Fig. 109).
(2) Install headrest (Fig. 107).
SEAT - THIRD ROW - FOLD-IN-
FLOOR
REMOVAL
(1) Fold third row seat into floor well.
(2) Using a trim stick, unclip anchor molding (Fig.
110).
(3) Remove third row seat attaching bolts (Fig.
111).
(4) Raise seats to the upright position.
(5) Remove the rear seat lower trim cover (Fig.
112).
(6) Remove rear attaching bolts (Fig. 113).
(7) Remove rear seat from vehicle.
Fig. 109 HEADREST SLEEVES
1 - SLEEVES
Fig. 110 ANCHOR MOLDING
1 - 2-WAY CLIPS INTO SEAT FRAME
2 - 4-WAY LOCATING PINS (2)
3 - FRONT SEAT ANCHOR MOLDING
Fig. 111 THIRD ROW SEATS
1 - ATTACHING BOLTS
RSSEATS23 - 153
HEADREST SLEEVE - THIRD ROW - FOLD-IN-FLOOR (Continued)
Page 1933 of 2339

INSTALLATION
(1) Place rear seat into position (Fig. 114).
(2) Install rear attaching bolts to seat (Fig. 115).
Tighten bolts to 54 N´m (40 ft. lbs.) torque and follow
tightening sequence.
Fig. 112 REAR SEAT TRIM COVER
1 - PLASTIC NUTS ON WELD STUDS
2 - LOWER TRIM COVER
Fig. 113 THIRD ROW SEAT
1 - ATTACHING BOLTS
Fig. 114 THIRD ROW SEAT INSTALLED
1 - ALIGN SEAT BRACKETS WITH REAR EDGE OF TUB
Fig. 115 THIRD ROW SEAT
1 - ATTACHING BOLTS
23 - 154 SEATSRS
SEAT - THIRD ROW - FOLD-IN-FLOOR (Continued)
Page 1934 of 2339

(3) Fold the rear seat into the floor well.
(4) Install attaching bolts (Fig. 116). Tighten bolts
to 54 N´m (40 ft. lbs.) torque.
(5) Place the rear seat lower trim cover into posi-
tion and press clips into the lock position (Fig. 117).
(6) Raise third row seat into upright position.
(7) Install lower trim cover with plastic nuts and
tighten them in sequence (Fig. 118).
SEAT BACK COVER/FOAM -
THIRD ROW - FOLD-IN-FLOOR
REMOVAL
(1) Remove seat back panel.
(2) Disengage J-straps (Fig. 119).
(3) Remove seat cover and foam from seat back
frame (Fig. 120).
(4) Separate cover and foam.
Fig. 116 THIRD ROW SEATS
1 - ATTACHING BOLTS
Fig. 117 ANCHOR MOLDING
1 - 2-WAY CLIPS INTO SEAT FRAME
2 - 4-WAY LOCATING PINS (2)
3 - FRONT SEAT ANCHOR MOLDING
Fig. 118 REAR SEAT TRIM COVER
1 - PLASTIC NUTS ON WELD STUDS
2 - LOWER TRIM COVER
Fig. 119 THIRD ROW SEAT BACK
1 - J-STRAPS
RSSEATS23 - 155
SEAT - THIRD ROW - FOLD-IN-FLOOR (Continued)
Page 1935 of 2339

INSTALLATION
(1) Place seat back foam into cover.
(2) Install seat cover and foam onto seat back
frame (Fig. 121).
(3) Engage J-straps (Fig. 122).
(4) Install seat back panel. (Refer to 23 - BODY/
SEATS/SEAT BACK - INSTALLATION).
SEAT BACK FRAME - THIRD
ROW - FOLD-IN-FLOOR
REMOVAL
(1) Remove seat back cover and foam. (Refer to 23
- BODY/SEATS/SEAT BACK COVER/FOAM -
REMOVAL).
(2) Remove strap at top of frame (Fig. 123).
(3) Remove two bolts on each side of frame.
(4) Remove seat back frame from seat.
Fig. 120 THIRD ROW SEAT BACK COVER & FOAM
1 - SEAT BACK COVER
2 - FOAM
3 - SEAT BACK FRAME
Fig. 121 THIRD ROW SEAT BACK COVER & FOAM
1 - SEAT BACK COVER
2 - FOAM
3 - SEAT BACK FRAME
Fig. 122 THIRD ROW SEAT BACK
1 - J-STRAPS
Fig. 123 THIRD ROW SEAT BACK COVER & FOAM
1 - SEAT BACK COVER
2 - FOAM
3 - SEAT BACK FRAME
23 - 156 SEATSRS
SEAT BACK COVER/FOAM - THIRD ROW - FOLD-IN-FLOOR (Continued)