torque CHRYSLER VOYAGER 2005 Service Manual
[x] Cancel search | Manufacturer: CHRYSLER, Model Year: 2005, Model line: VOYAGER, Model: CHRYSLER VOYAGER 2005Pages: 2339, PDF Size: 59.69 MB
Page 2 of 2339
INTRODUCTION
TABLE OF CONTENTS
page page
BODY CODE PLATE
DESCRIPTION..........................1
FASTENER IDENTIFICATION
DESCRIPTION..........................2
FASTENER USAGE
DESCRIPTION
FASTENER USAGE.....................5
THREADED HOLE REPAIR...............5
INTERNATIONAL SYMBOLS
DESCRIPTION..........................5
METRIC SYSTEM
DESCRIPTION..........................6TORQUE REFERENCES
DESCRIPTION..........................8
VEHICLE IDENTIFICATION NUMBER
DESCRIPTION..........................9
VEHICLE CERTIFICATION LABEL
DESCRIPTION.........................11
E-MARK LABEL
DESCRIPTION.........................11
VECI LABEL
DESCRIPTION.........................11
MANUFACTURER PLATE
DESCRIPTION.........................11
BODY CODE PLATE
DESCRIPTION
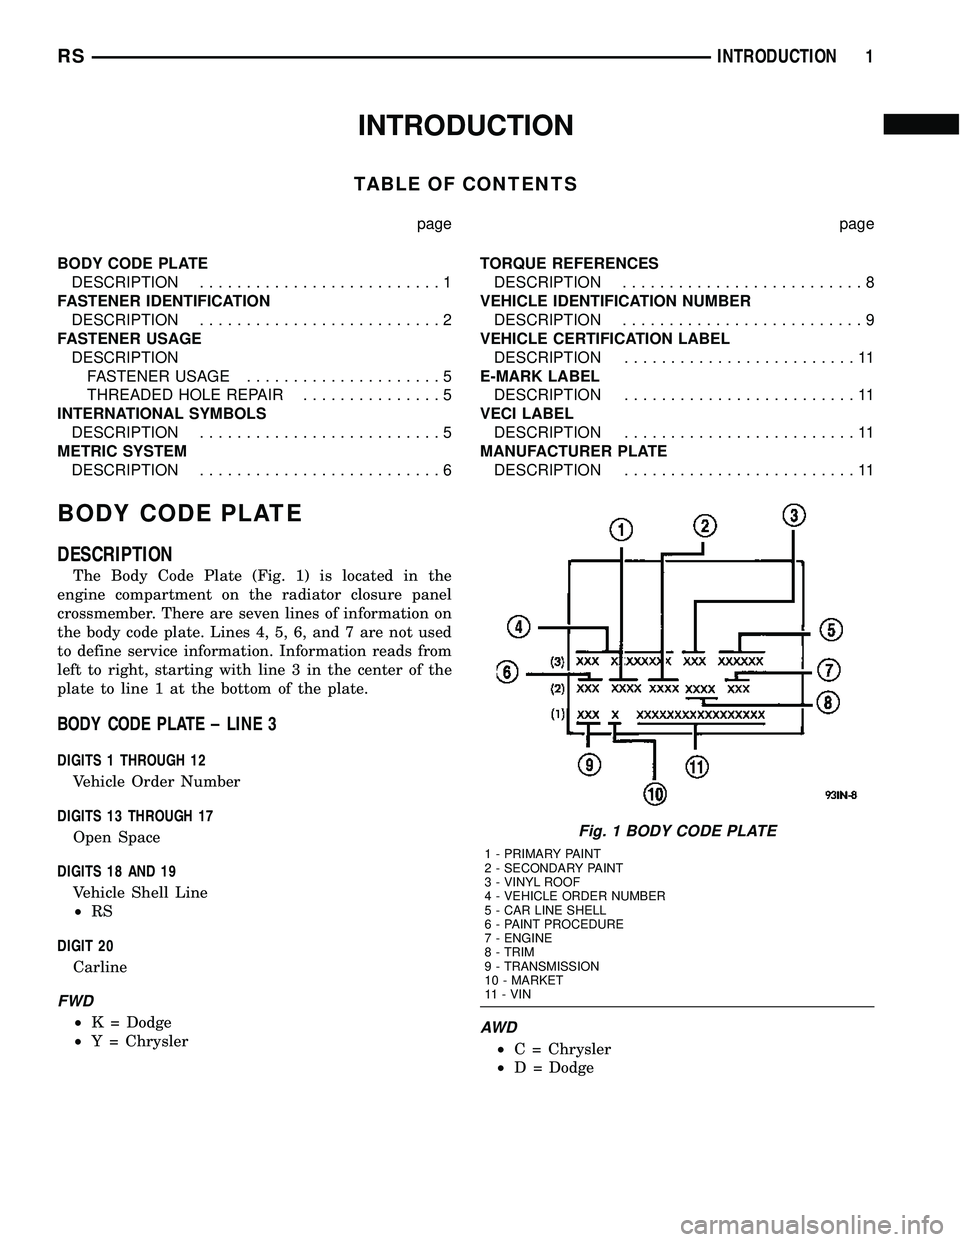
The Body Code Plate (Fig. 1) is located in the
engine compartment on the radiator closure panel
crossmember. There are seven lines of information on
the body code plate. Lines 4, 5, 6, and 7 are not used
to define service information. Information reads from
left to right, starting with line 3 in the center of the
plate to line 1 at the bottom of the plate.
BODY CODE PLATE ± LINE 3
DIGITS 1 THROUGH 12
Vehicle Order Number
DIGITS 13 THROUGH 17
Open Space
DIGITS 18 AND 19
Vehicle Shell Line
²RS
DIGIT 20
Carline
FWD
²K = Dodge
²Y = ChryslerAW D
²C = Chrysler
²D = Dodge
Fig. 1 BODY CODE PLATE
1 - PRIMARY PAINT
2 - SECONDARY PAINT
3 - VINYL ROOF
4 - VEHICLE ORDER NUMBER
5 - CAR LINE SHELL
6 - PAINT PROCEDURE
7 - ENGINE
8 - TRIM
9 - TRANSMISSION
10 - MARKET
11 - VIN
RSINTRODUCTION1
Page 6 of 2339
FASTENER USAGE
DESCRIPTION
FASTENER USAGE
WARNING: USE OF AN INCORRECT FASTENER
MAY RESULT IN COMPONENT DAMAGE OR PER-
SONAL INJURY.
Fasteners and torque specifications references in
this Service Manual are identified in metric and SAE
format.
During any maintenance or repair procedures, it is
important to salvage all fasteners (nuts, bolts, etc.)
for reassembly. If the fastener is not salvageable, a
fastener of equivalent specification must be used.
THREADED HOLE REPAIR
Most stripped threaded holes can be repaired using
a Helicoilt. Follow the vehicle or Helicoiltrecommen-
dations for application and repair procedures.
INTERNATIONAL SYMBOLS
DESCRIPTION
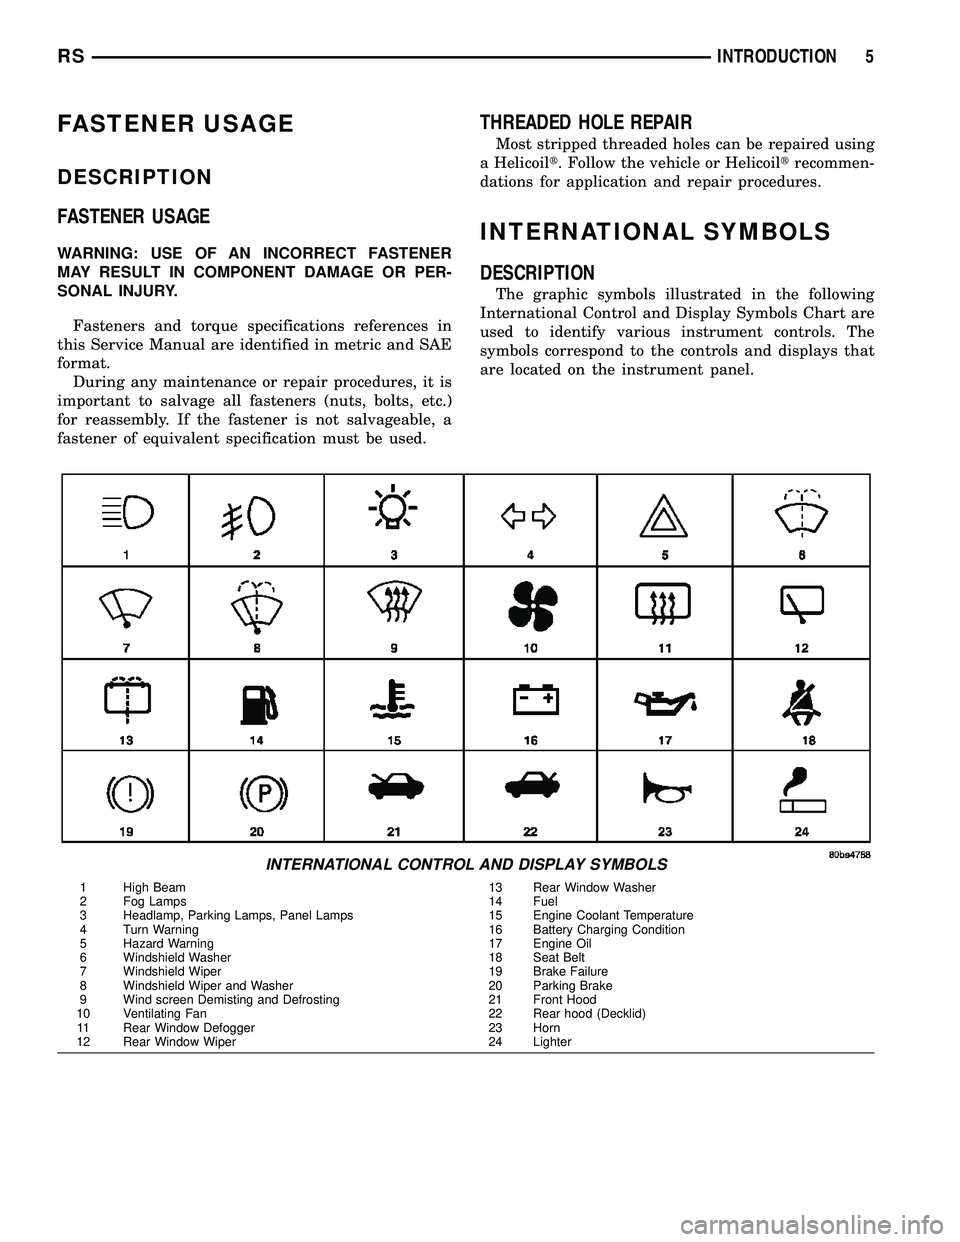
The graphic symbols illustrated in the following
International Control and Display Symbols Chart are
used to identify various instrument controls. The
symbols correspond to the controls and displays that
are located on the instrument panel.
INTERNATIONAL CONTROL AND DISPLAY SYMBOLS
1 High Beam 13 Rear Window Washer
2 Fog Lamps 14 Fuel
3 Headlamp, Parking Lamps, Panel Lamps 15 Engine Coolant Temperature
4 Turn Warning 16 Battery Charging Condition
5 Hazard Warning 17 Engine Oil
6 Windshield Washer 18 Seat Belt
7 Windshield Wiper 19 Brake Failure
8 Windshield Wiper and Washer 20 Parking Brake
9 Wind screen Demisting and Defrosting 21 Front Hood
10 Ventilating Fan 22 Rear hood (Decklid)
11 Rear Window Defogger 23 Horn
12 Rear Window Wiper 24 Lighter
RSINTRODUCTION5
Page 7 of 2339
METRIC SYSTEM
DESCRIPTION
The metric system is based on quantities of one,
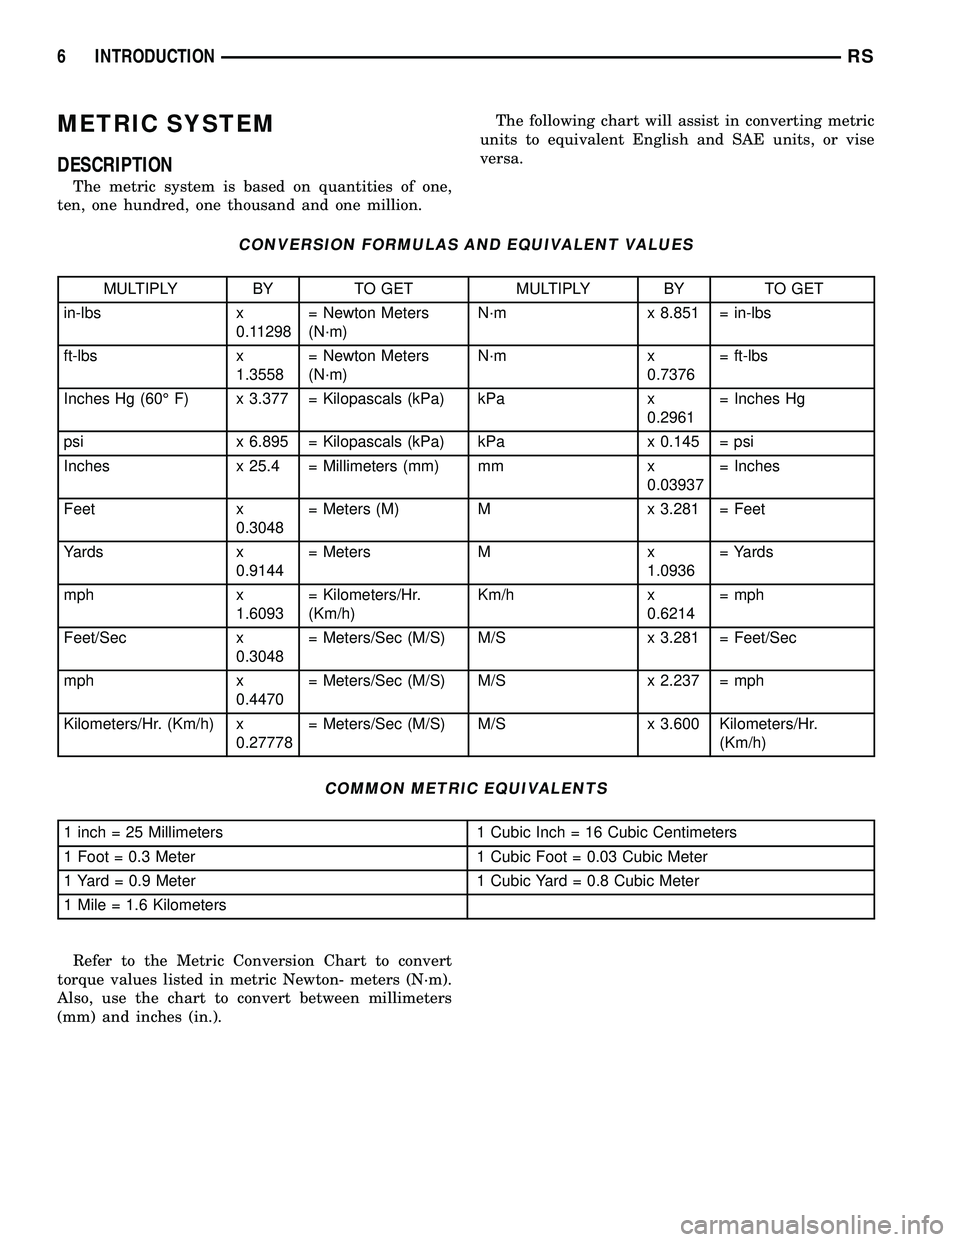
ten, one hundred, one thousand and one million.The following chart will assist in converting metric
units to equivalent English and SAE units, or vise
versa.
CONVERSION FORMULAS AND EQUIVALENT VALUES
MULTIPLY BY TO GET MULTIPLY BY TO GET
in-lbs x
0.11298= Newton Meters
(N´m)N´m x 8.851 = in-lbs
ft-lbs x
1.3558= Newton Meters
(N´m)N´m x
0.7376= ft-lbs
Inches Hg (60É F) x 3.377 = Kilopascals (kPa) kPa x
0.2961= Inches Hg
psi x 6.895 = Kilopascals (kPa) kPa x 0.145 = psi
Inches x 25.4 = Millimeters (mm) mm x
0.03937= Inches
Feet x
0.3048= Meters (M) M x 3.281 = Feet
Yards x
0.9144= Meters M x
1.0936= Yards
mph x
1.6093= Kilometers/Hr.
(Km/h)Km/h x
0.6214= mph
Feet/Sec x
0.3048= Meters/Sec (M/S) M/S x 3.281 = Feet/Sec
mph x
0.4470= Meters/Sec (M/S) M/S x 2.237 = mph
Kilometers/Hr. (Km/h) x
0.27778= Meters/Sec (M/S) M/S x 3.600 Kilometers/Hr.
(Km/h)
COMMON METRIC EQUIVALENTS
1 inch = 25 Millimeters 1 Cubic Inch = 16 Cubic Centimeters
1 Foot = 0.3 Meter 1 Cubic Foot = 0.03 Cubic Meter
1 Yard = 0.9 Meter 1 Cubic Yard = 0.8 Cubic Meter
1 Mile = 1.6 Kilometers
Refer to the Metric Conversion Chart to convert
torque values listed in metric Newton- meters (N´m).
Also, use the chart to convert between millimeters
(mm) and inches (in.).
6 INTRODUCTIONRS
Page 9 of 2339
TORQUE REFERENCES
DESCRIPTION
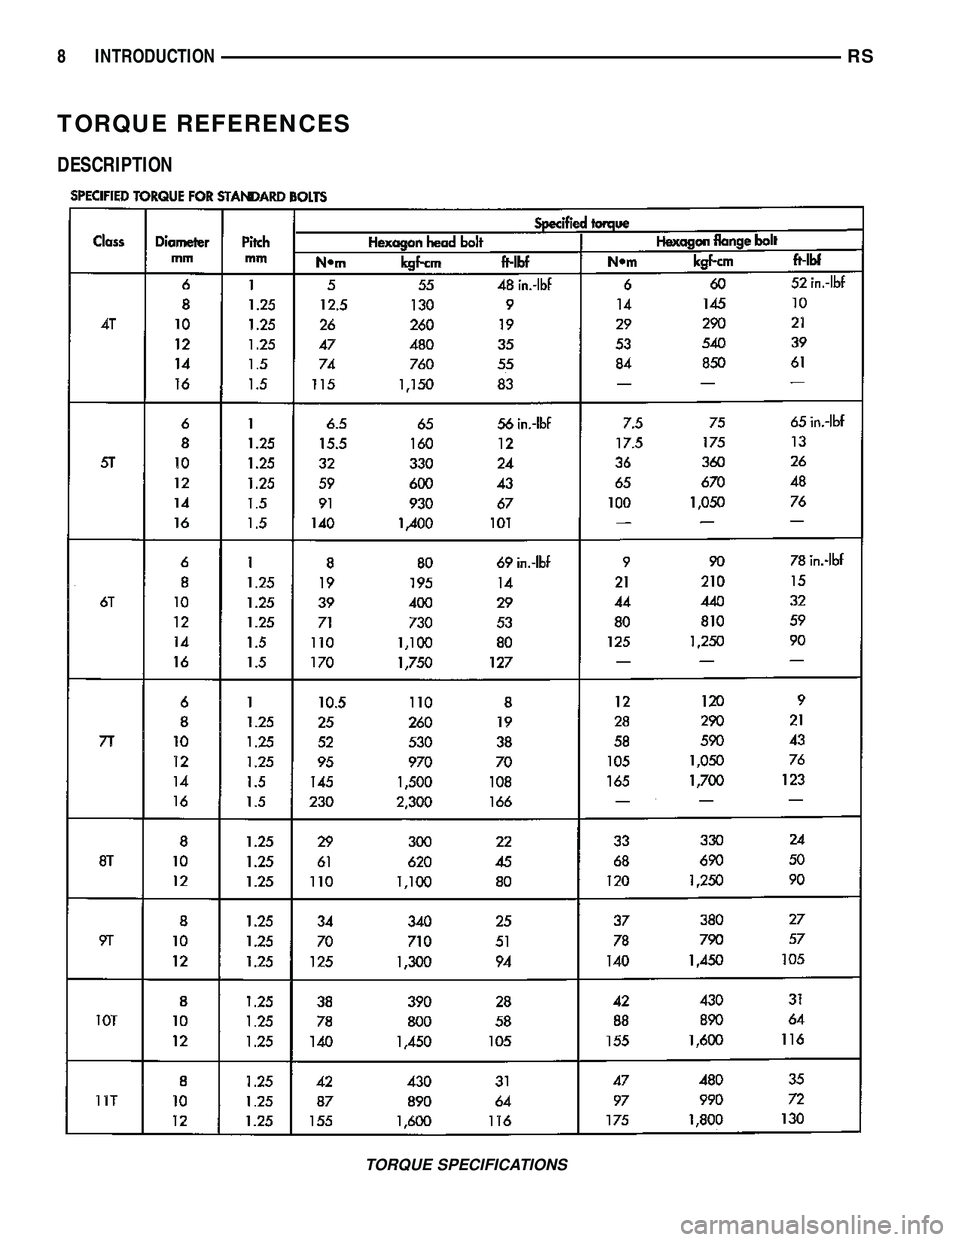
TORQUE SPECIFICATIONS
8 INTRODUCTIONRS
Page 10 of 2339
Individual Torque Charts appear within many or
the Groups. Refer to the Standard Torque Specifica-
tions Chart for torque references not listed in the
individual torque charts.
VEHICLE IDENTIFICATION
NUMBER
DESCRIPTION
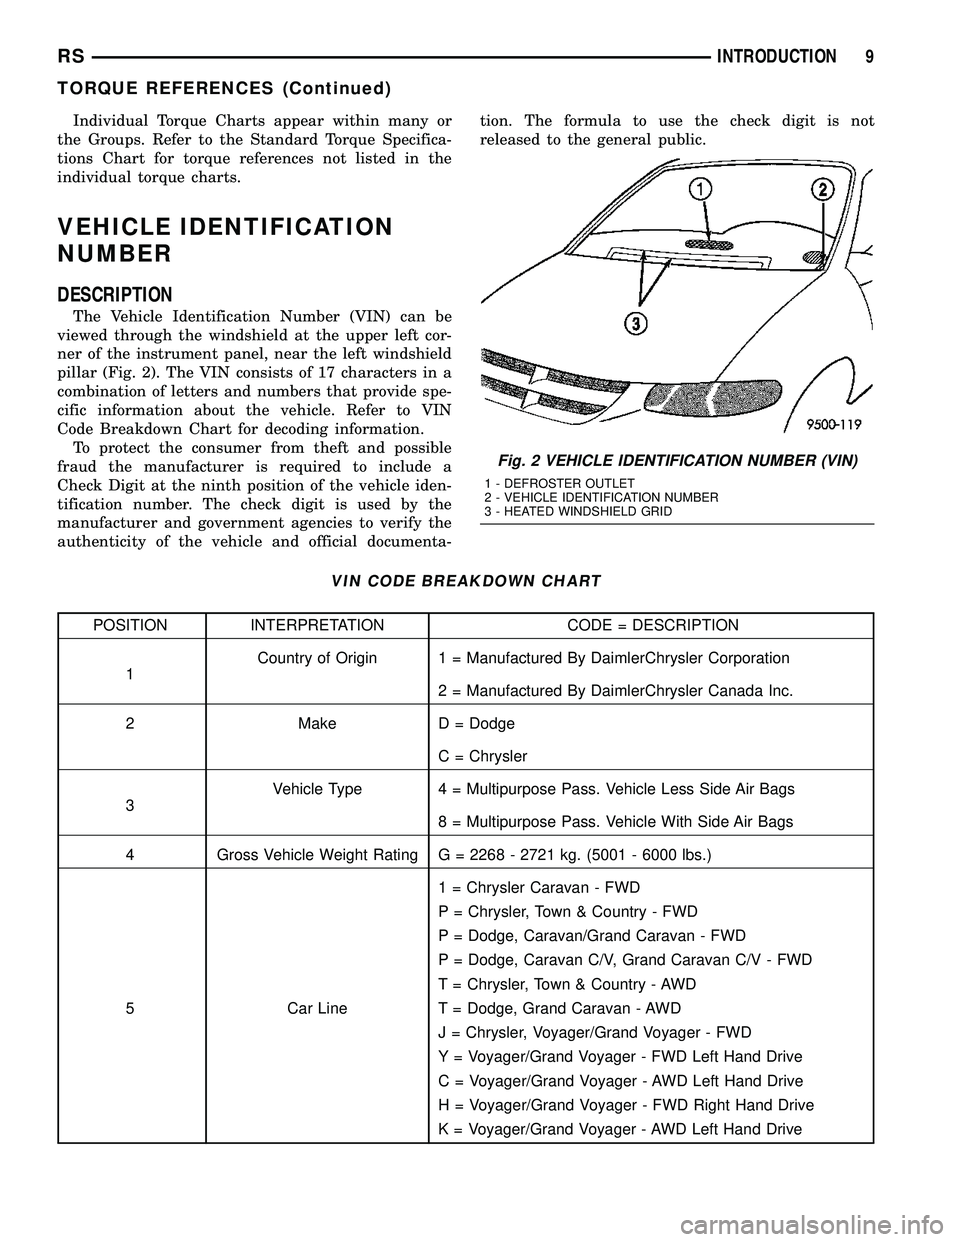
The Vehicle Identification Number (VIN) can be
viewed through the windshield at the upper left cor-
ner of the instrument panel, near the left windshield
pillar (Fig. 2). The VIN consists of 17 characters in a
combination of letters and numbers that provide spe-
cific information about the vehicle. Refer to VIN
Code Breakdown Chart for decoding information.
To protect the consumer from theft and possible
fraud the manufacturer is required to include a
Check Digit at the ninth position of the vehicle iden-
tification number. The check digit is used by the
manufacturer and government agencies to verify the
authenticity of the vehicle and official documenta-tion. The formula to use the check digit is not
released to the general public.
VIN CODE BREAKDOWN CHART
POSITION INTERPRETATION CODE = DESCRIPTION
1Country of Origin 1 = Manufactured By DaimlerChrysler Corporation
2 = Manufactured By DaimlerChrysler Canada Inc.
2 Make D = Dodge
C = Chrysler
3Vehicle Type 4 = Multipurpose Pass. Vehicle Less Side Air Bags
8 = Multipurpose Pass. Vehicle With Side Air Bags
4 Gross Vehicle Weight Rating G = 2268 - 2721 kg. (5001 - 6000 lbs.)
5 Car Line1 = Chrysler Caravan - FWD
P = Chrysler, Town & Country - FWD
P = Dodge, Caravan/Grand Caravan - FWD
P = Dodge, Caravan C/V, Grand Caravan C/V - FWD
T = Chrysler, Town & Country - AWD
T = Dodge, Grand Caravan - AWD
J = Chrysler, Voyager/Grand Voyager - FWD
Y = Voyager/Grand Voyager - FWD Left Hand Drive
C = Voyager/Grand Voyager - AWD Left Hand Drive
H = Voyager/Grand Voyager - FWD Right Hand Drive
K = Voyager/Grand Voyager - AWD Left Hand Drive
Fig. 2 VEHICLE IDENTIFICATION NUMBER (VIN)
1 - DEFROSTER OUTLET
2 - VEHICLE IDENTIFICATION NUMBER
3 - HEATED WINDSHIELD GRID
RSINTRODUCTION9
TORQUE REFERENCES (Continued)
Page 42 of 2339
SUSPENSION
TABLE OF CONTENTS
page page
FRONT SUSPENSION.....................1
REAR SUSPENSION......................26WHEEL ALIGNMENT.....................47
FRONT SUSPENSION
TABLE OF CONTENTS
page page
FRONT SUSPENSION
DESCRIPTION - FRONT SUSPENSION.......2
OPERATION - FRONT SUSPENSION.........2
STANDARD PROCEDURE - LUBRICATION....2
SPECIFICATIONS
FRONT SUSPENSION FASTENER TORQUE . . 3
SPECIAL TOOLS
FRONT SUSPENSION...................3
BUSHINGS
REMOVAL - STABILIZER BAR CUSHION......4
INSTALLATION - STABILIZER BAR CUSHION . . . 4
HUB / BEARING
DESCRIPTION..........................5
OPERATION............................5
DIAGNOSIS AND TESTING - HUB AND
BEARING............................5
REMOVAL.............................5
INSTALLATION..........................5
KNUCKLE
DESCRIPTION..........................6
OPERATION............................7
REMOVAL - STEERING KNUCKLE...........7
INSPECTION - STEERING KNUCKLE.........9
INSTALLATION - STEERING KNUCKLE.......9
LOWER BALL JOINT
DESCRIPTION.........................10
OPERATION...........................10
DIAGNOSIS AND TESTING - LOWER BALL
JOINT..............................10
LOWER BALL JOINT SEAL BOOT
DESCRIPTION - EXPORT.................10
REMOVAL
REMOVAL...........................11
REMOVAL - EXPORT...................11INSTALLATION
INSTALLATION.......................11
INSTALLATION - EXPORT...............11
LOWER CONTROL ARM
DESCRIPTION.........................12
OPERATION...........................12
REMOVAL - LOWER CONTROL ARM........12
DISASSEMBLY
DISASSEMBLY - LOWER CONTROL ARM
(REAR BUSHING - STANDARD)..........13
DISASSEMBLY - LOWER CONTROL ARM
(REAR BUSHING - HYDRO).............13
INSPECTION - LOWER CONTROL ARM......14
ASSEMBLY
ASSEMBLY - LOWER CONTROL ARM
(REAR BUSHING - STANDARD)..........14
ASSEMBLY - LOWER CONTROL ARM
(REAR BUSHING - HYDRO).............15
INSTALLATION - LOWER CONTROL ARM....15
STABILIZER BAR
DESCRIPTION.........................16
OPERATION...........................16
REMOVAL.............................17
INSPECTION..........................17
INSTALLATION.........................17
STRUT
DESCRIPTION - STRUT ASSEMBLY.........19
OPERATION - STRUT ASSEMBLY..........19
DIAGNOSIS AND TESTING - STRUT
ASSEMBLY..........................20
REMOVAL - STRUT ASSEMBLY............20
DISASSEMBLY - STRUT ASSEMBLY........21
ASSEMBLY - STRUT ASSEMBLY...........23
INSTALLATION - STRUT ASSEMBLY........25
RSSUSPENSION2-1
Page 44 of 2339
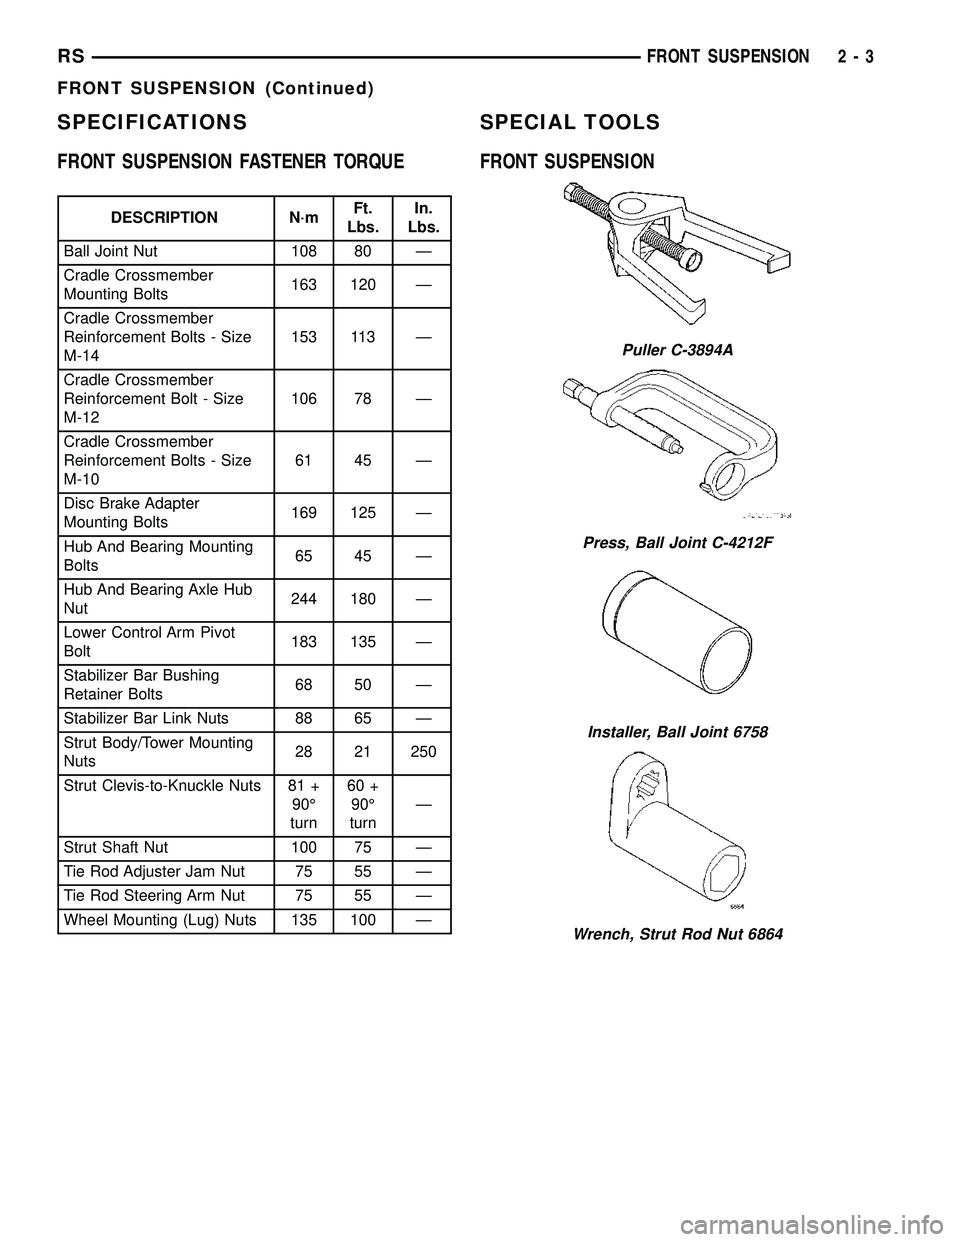
SPECIFICATIONS
FRONT SUSPENSION FASTENER TORQUE
DESCRIPTION N´mFt.
Lbs.In.
Lbs.
Ball Joint Nut 108 80 Ð
Cradle Crossmember
Mounting Bolts163 120 Ð
Cradle Crossmember
Reinforcement Bolts - Size
M-14153 113 Ð
Cradle Crossmember
Reinforcement Bolt - Size
M-12106 78 Ð
Cradle Crossmember
Reinforcement Bolts - Size
M-1061 45 Ð
Disc Brake Adapter
Mounting Bolts169 125 Ð
Hub And Bearing Mounting
Bolts65 45 Ð
Hub And Bearing Axle Hub
Nut244 180 Ð
Lower Control Arm Pivot
Bolt183 135 Ð
Stabilizer Bar Bushing
Retainer Bolts68 50 Ð
Stabilizer Bar Link Nuts 88 65 Ð
Strut Body/Tower Mounting
Nuts28 21 250
Strut Clevis-to-Knuckle Nuts 81 +
90É
turn60 +
90É
turnÐ
Strut Shaft Nut 100 75 Ð
Tie Rod Adjuster Jam Nut 75 55 Ð
Tie Rod Steering Arm Nut 75 55 Ð
Wheel Mounting (Lug) Nuts 135 100 Ð
SPECIAL TOOLS
FRONT SUSPENSION
Puller C-3894A
Press, Ball Joint C-4212F
Installer, Ball Joint 6758
Wrench, Strut Rod Nut 6864
RSFRONT SUSPENSION2-3
FRONT SUSPENSION (Continued)
Page 45 of 2339
BUSHINGS
REMOVAL - STABILIZER BAR CUSHION
(1) Raise Vehicle. Refer to Hoisting in Lubrication
and Maintenance.
(2) Remove the 2 bolts fastening the emission leak
detection pump to the cradle crossmember reinforce-
ment.
(3) Move the leak detection pump to the side
allowing access to the stabilizer bar cushion retain-
ers.
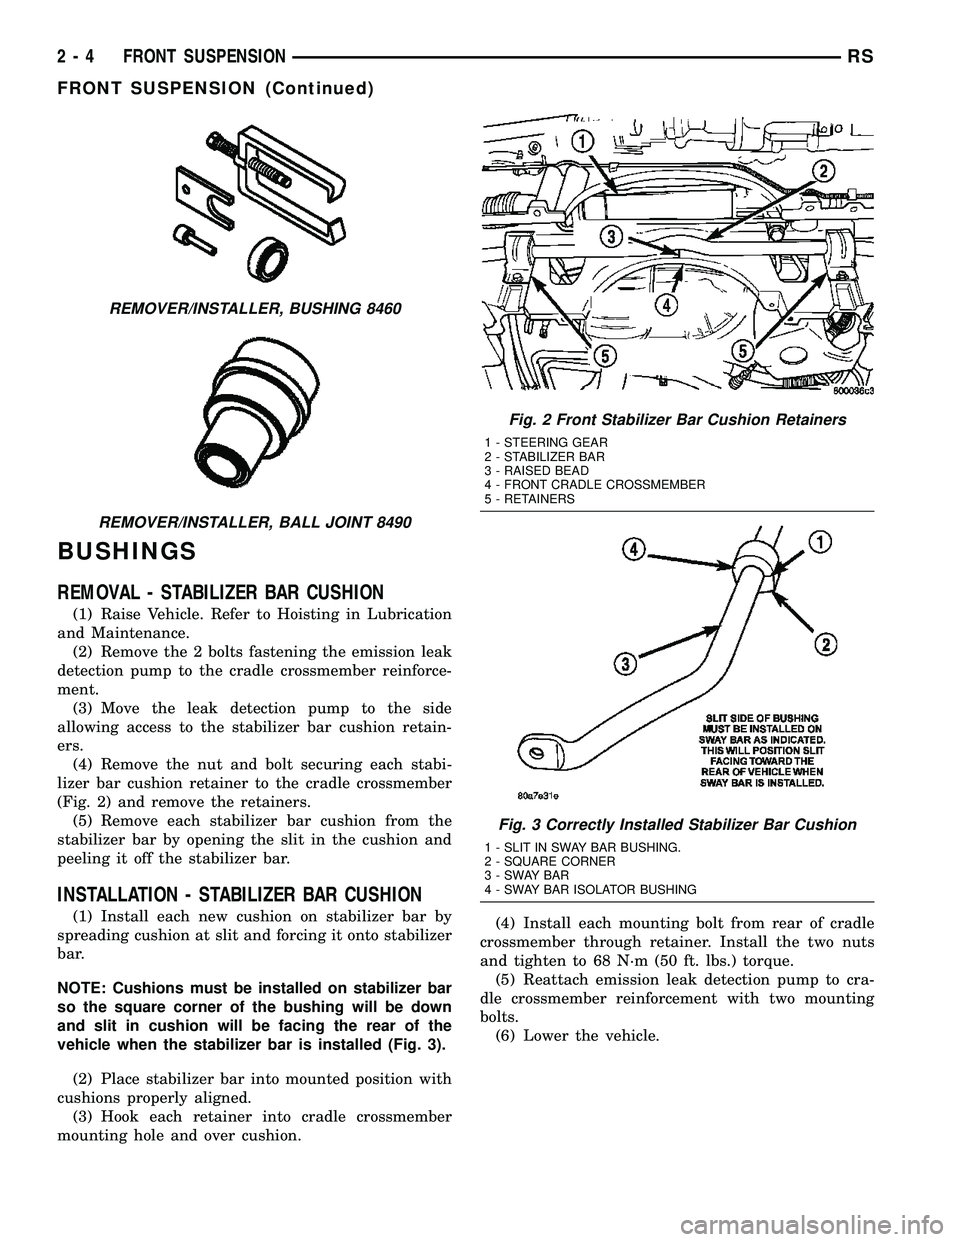
(4) Remove the nut and bolt securing each stabi-
lizer bar cushion retainer to the cradle crossmember
(Fig. 2) and remove the retainers.
(5) Remove each stabilizer bar cushion from the
stabilizer bar by opening the slit in the cushion and
peeling it off the stabilizer bar.
INSTALLATION - STABILIZER BAR CUSHION
(1) Install each new cushion on stabilizer bar by
spreading cushion at slit and forcing it onto stabilizer
bar.
NOTE: Cushions must be installed on stabilizer bar
so the square corner of the bushing will be down
and slit in cushion will be facing the rear of the
vehicle when the stabilizer bar is installed (Fig. 3).
(2) Place stabilizer bar into mounted position with
cushions properly aligned.
(3) Hook each retainer into cradle crossmember
mounting hole and over cushion.(4) Install each mounting bolt from rear of cradle
crossmember through retainer. Install the two nuts
and tighten to 68 N´m (50 ft. lbs.) torque.
(5) Reattach emission leak detection pump to cra-
dle crossmember reinforcement with two mounting
bolts.
(6) Lower the vehicle.
REMOVER/INSTALLER, BUSHING 8460
REMOVER/INSTALLER, BALL JOINT 8490
Fig. 2 Front Stabilizer Bar Cushion Retainers
1 - STEERING GEAR
2 - STABILIZER BAR
3 - RAISED BEAD
4 - FRONT CRADLE CROSSMEMBER
5 - RETAINERS
Fig. 3 Correctly Installed Stabilizer Bar Cushion
1 - SLIT IN SWAY BAR BUSHING.
2 - SQUARE CORNER
3-SWAYBAR
4 - SWAY BAR ISOLATOR BUSHING
2 - 4 FRONT SUSPENSIONRS
FRONT SUSPENSION (Continued)
Page 47 of 2339
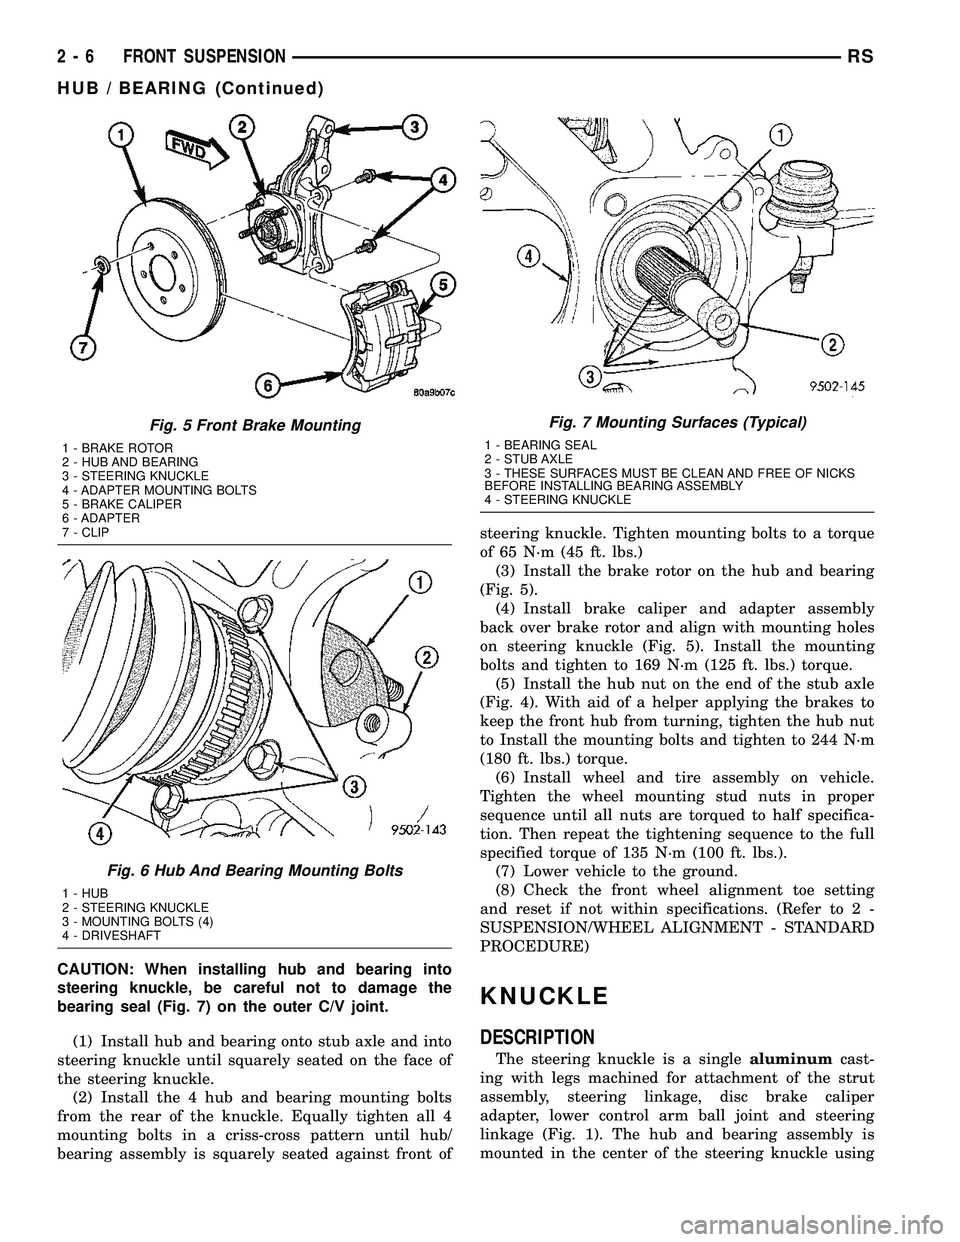
CAUTION: When installing hub and bearing into
steering knuckle, be careful not to damage the
bearing seal (Fig. 7) on the outer C/V joint.
(1) Install hub and bearing onto stub axle and into
steering knuckle until squarely seated on the face of
the steering knuckle.
(2) Install the 4 hub and bearing mounting bolts
from the rear of the knuckle. Equally tighten all 4
mounting bolts in a criss-cross pattern until hub/
bearing assembly is squarely seated against front ofsteering knuckle. Tighten mounting bolts to a torque
of 65 N´m (45 ft. lbs.)
(3) Install the brake rotor on the hub and bearing
(Fig. 5).
(4) Install brake caliper and adapter assembly
back over brake rotor and align with mounting holes
on steering knuckle (Fig. 5). Install the mounting
bolts and tighten to 169 N´m (125 ft. lbs.) torque.
(5) Install the hub nut on the end of the stub axle
(Fig. 4). With aid of a helper applying the brakes to
keep the front hub from turning, tighten the hub nut
to Install the mounting bolts and tighten to 244 N´m
(180 ft. lbs.) torque.
(6) Install wheel and tire assembly on vehicle.
Tighten the wheel mounting stud nuts in proper
sequence until all nuts are torqued to half specifica-
tion. Then repeat the tightening sequence to the full
specified torque of 135 N´m (100 ft. lbs.).
(7) Lower vehicle to the ground.
(8) Check the front wheel alignment toe setting
and reset if not within specifications. (Refer to 2 -
SUSPENSION/WHEEL ALIGNMENT - STANDARD
PROCEDURE)
KNUCKLE
DESCRIPTION
The steering knuckle is a singlealuminumcast-
ing with legs machined for attachment of the strut
assembly, steering linkage, disc brake caliper
adapter, lower control arm ball joint and steering
linkage (Fig. 1). The hub and bearing assembly is
mounted in the center of the steering knuckle using
Fig. 5 Front Brake Mounting
1 - BRAKE ROTOR
2 - HUB AND BEARING
3 - STEERING KNUCKLE
4 - ADAPTER MOUNTING BOLTS
5 - BRAKE CALIPER
6 - ADAPTER
7 - CLIP
Fig. 6 Hub And Bearing Mounting Bolts
1 - HUB
2 - STEERING KNUCKLE
3 - MOUNTING BOLTS (4)
4 - DRIVESHAFT
Fig. 7 Mounting Surfaces (Typical)
1 - BEARING SEAL
2 - STUB AXLE
3 - THESE SURFACES MUST BE CLEAN AND FREE OF NICKS
BEFORE INSTALLING BEARING ASSEMBLY
4 - STEERING KNUCKLE
2 - 6 FRONT SUSPENSIONRS
HUB / BEARING (Continued)
Page 50 of 2339
INSPECTION - STEERING KNUCKLE
Inspect the knuckle for the following:
²Cracks or breaks
²Dents or damage
²Stress marks indicating a bend
The front suspension knuckle is not a repairable
component of the vehicles front suspension. If bent,
broken or damaged in any way, do not attempt to
straighten or repair the steering knuckle. It must be
replaced.
If inspection leads to the hub and bearing, (Refer
to 2 - SUSPENSION/FRONT/HUB / BEARING -
DIAGNOSIS AND TESTING)
INSTALLATION - STEERING KNUCKLE
(1) If the hub and bearing needs to be installed in
the knuckle, place the hub and bearing squarely into
the center hole of the steering knuckle aligning the
threaded mounting holes of the hub and bearing with
the mounting holes in the steering knuckle. Install
the four mounting bolts and tighten them to a torque
of 65 N´m (45 ft. lbs.).
CAUTION: Before installing the knuckle on the ball
joint stud, wipe the ball joint stud and knuckle con-
tact area free of any grease or debris, otherwisedamage to the knuckle can occur. Use a clean shop
cloth with MoparTBrake Parts Cleaner applied to it
for proper cleaning. Do not spray the stud directly.
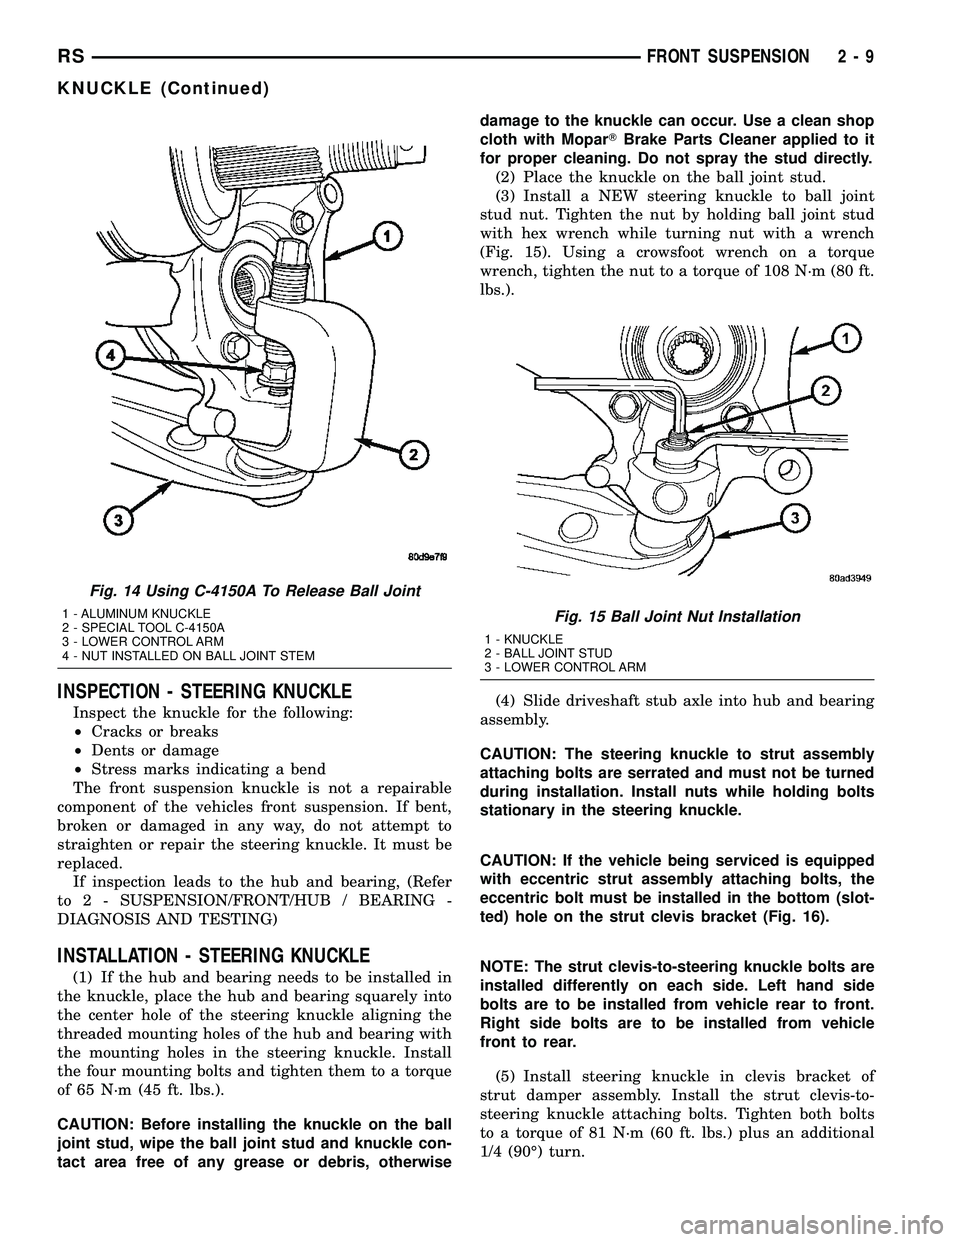
(2) Place the knuckle on the ball joint stud.
(3) Install a NEW steering knuckle to ball joint
stud nut. Tighten the nut by holding ball joint stud
with hex wrench while turning nut with a wrench
(Fig. 15). Using a crowsfoot wrench on a torque
wrench, tighten the nut to a torque of 108 N´m (80 ft.
lbs.).
(4) Slide driveshaft stub axle into hub and bearing
assembly.
CAUTION: The steering knuckle to strut assembly
attaching bolts are serrated and must not be turned
during installation. Install nuts while holding bolts
stationary in the steering knuckle.
CAUTION: If the vehicle being serviced is equipped
with eccentric strut assembly attaching bolts, the
eccentric bolt must be installed in the bottom (slot-
ted) hole on the strut clevis bracket (Fig. 16).
NOTE: The strut clevis-to-steering knuckle bolts are
installed differently on each side. Left hand side
bolts are to be installed from vehicle rear to front.
Right side bolts are to be installed from vehicle
front to rear.
(5) Install steering knuckle in clevis bracket of
strut damper assembly. Install the strut clevis-to-
steering knuckle attaching bolts. Tighten both bolts
to a torque of 81 N´m (60 ft. lbs.) plus an additional
1/4 (90É) turn.
Fig. 14 Using C-4150A To Release Ball Joint
1 - ALUMINUM KNUCKLE
2 - SPECIAL TOOL C-4150A
3 - LOWER CONTROL ARM
4 - NUT INSTALLED ON BALL JOINT STEMFig. 15 Ball Joint Nut Installation
1 - KNUCKLE
2 - BALL JOINT STUD
3 - LOWER CONTROL ARM
RSFRONT SUSPENSION2-9
KNUCKLE (Continued)