headlights CHRYSLER VOYAGER 2020 User Guide
[x] Cancel search | Manufacturer: CHRYSLER, Model Year: 2020, Model line: VOYAGER, Model: CHRYSLER VOYAGER 2020Pages: 516, PDF Size: 28.69 MB
Page 198 of 516

196SAFETY
Enhanced Accident Response System
In the event of an impact, if the communication
network remains intact, and the power remains
intact, depending on the nature of the event,
the ORC will determine whether to have the
Enhanced Accident Response System perform
the following functions:
Cut off fuel to the engine (if equipped).
Cut off battery power to the electric motor (if
equipped).
Flash hazard lights as long as the battery has
power.
Turn on the interior lights, which remain on
as long as the battery has power or for
15 minutes from the intervention of the
Enhanced Accident Response System.
Unlock the power door locks. Your vehicle may also be designed to perform
any of these other functions in response to the
Enhanced Accident Response System:
Turn off the Fuel Filter Heater, Turn off the
HVAC Blower Motor, Close the HVAC Circula
-
tion Door
Cut off battery power to the:
Engine
Electric Motor (if equipped)
Electric power steering
Brake booster
Electric park brake
Automatic transmission gear selector
Horn
Front wiper
Headlamp washer pump NOTE:
After an accident, remember to cycle the ignition
to the STOP (OFF/LOCK) position and remove the
key from the ignition switch to avoid draining the
battery. Carefully check the vehicle for fuel leaks
in the engine compartment and on the ground
near the engine compartment and fuel tank
before resetting the system and starting the
engine. If there are no fuel leaks or damage to
the vehicle electrical devices (e.g. headlights)
after an accident, reset the system by following
the procedure described below. If you have any
doubt, contact an authorized dealer.
Enhanced Accident Response System Reset
Procedure
If applicable, refer to the “Hybrid Supplement”
for additional information.
In order to reset the Enhanced Accident
Response System functions after an event, the
ignition switch must be changed from ignition
START or ON/RUN to ignition OFF. Carefully
check the vehicle for fuel leaks in the engine
compartment and on the ground near the
engine compartment and fuel tank before
resetting the system and starting the engine.
20_RU_OM_EN_US_t.book Page 196
Page 387 of 516

SERVICING AND MAINTENANCE385
BODYWORK
Protection From Atmospheric Agents
Vehicle body care requirements vary according
to geographic locations and usage. Chemicals
that make roads passable in snow and ice and
those that are sprayed on trees and road
surfaces during other seasons are highly
corrosive to the metal in your vehicle. Outside
parking, which exposes your vehicle to airborne
contaminants, road surfaces on which the
vehicle is operated, extreme hot or cold weather
and other extreme conditions will have an
adverse effect on paint, metal trim, and
underbody protection. The following maintenance recommendations
will enable you to obtain maximum benefit from
the corrosion resistance built into your vehicle.
What Causes Corrosion?
Corrosion is the result of deterioration or
removal of paint and protective coatings from
your vehicle.
The most common causes are:
Road salt, dirt and moisture accumulation
Stone and gravel impact
Insects, tree sap and tar
Salt in the air near seacoast localities
Atmospheric fallout/industrial pollutants
Body And Underbody Maintenance
Cleaning Headlights
Your vehicle is equipped with plastic headlights
and fog lights that are lighter and less
susceptible to stone breakage than glass
headlights.
Plastic is not as scratch resistant as glass and
therefore different lens cleaning procedures
must be followed.To minimize the possibility of scratching the
lenses and reducing light output, avoid wiping
with a dry cloth. To remove road dirt, wash with
a mild soap solution followed by rinsing.
Do not use abrasive cleaning components,
solvents, steel wool or other aggressive
material to clean the lenses.
Preserving The Bodywork
Washing
Wash your vehicle regularly. Always wash
your vehicle in the shade using Mopar Car
Wash, or a mild car wash soap, and rinse the
panels completely with clear water.
If insects, tar, or other similar deposits have
accumulated on your vehicle, use Mopar
Super Kleen Bug and Tar Remover to
remove.
Use a high quality cleaner wax, such as
Mopar Cleaner Wax to remove road film,
stains and to protect your paint finish. Take
care never to scratch the paint.
Avoid using abrasive compounds and power
buffing that may diminish the gloss or thin
out the paint finish.
CAUTION!
Before removal of the positive and negative
terminals to the battery, wait at least a
minute with ignition switch in the OFF position
and close the drivers door. When
reconnecting the positive and negative
terminals to the battery be sure the ignition
switch is in the OFF position and the drivers
door is closed.
7
20_RU_OM_EN_US_t.book Page 385
Page 402 of 516

400MULTIMEDIA
Language
After pressing the Language button on the touchscreen, the following settings will be available:
Display
After pressing the Display button on the touchscreen, the following settings will be available.Maximum Vehicle Speed
+ -
NOTE:
The “Maximum Vehicle Speed” feature can be set to 65, 70, 75, 80, or 85 mph (90, 95, 100, 105, 110 km/h). Start Up Fuel Level Message On Off
Early Low Fuel Alert On Off
Setting Name Selectable Options
Setting NameSelectable Options
LanguageEnglishFrançais Español
NOTE:
When the “Language” feature is selected, you may select one of multiple languages (English/Français/Español) for all display nomenclature,
including the trip functions and the navigation system (if equipped). Press the Language button on the touchscreen, then press the desired language
button on the touchscreen until a check-mark appears next to the language, showing that setting has been selected.
Setting Name Selectable Options
Display ModeAutoManual
Display Brightness Headlights ON +-
20_RU_OM_EN_US_t.book Page 400
Page 403 of 516
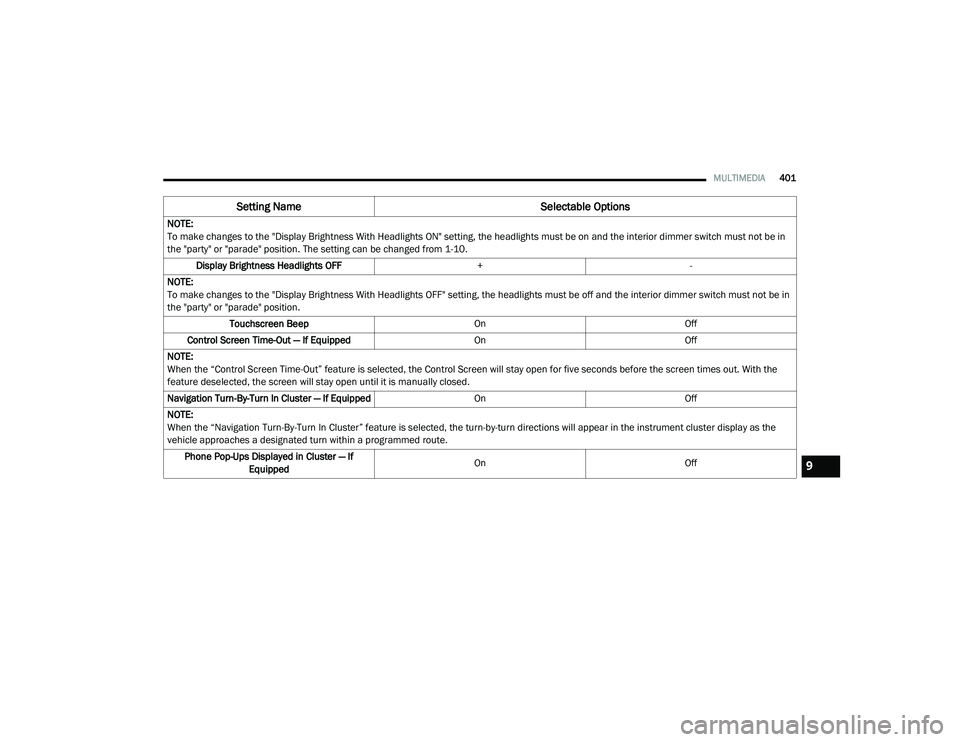
MULTIMEDIA401
NOTE:
To make changes to the "Display Brightness With Headlights ON" setting, the headlights must be on and the interior dimmer switch must not be in
the "party" or "parade" position. The setting can be changed from 1-10.
Display Brightness Headlights OFF +-
NOTE:
To make changes to the "Display Brightness With Headlights OFF" setting, the headlights must be off and the interior dimmer switch must not be in
the "party" or "parade" position. Touchscreen Beep OnOff
Control Screen Time-Out — If Equipped OnOff
NOTE:
When the “Control Screen Time-Out” feature is selected, the Control Screen will stay open for five seconds before the screen times out. With the
feature deselected, the screen will stay open until it is manually closed.
Navigation Turn-By-Turn In Cluster — If Equipped OnOff
NOTE:
When the “Navigation Turn-By-Turn In Cluster” feature is selected, the turn-by-turn directions will appear in the instrument cluster display as the
vehicle approaches a designated turn within a programmed route. Phone Pop-Ups Displayed in Cluster — If Equipped On
Off
Setting Name Selectable Options
9
20_RU_OM_EN_US_t.book Page 401
Page 408 of 516

406MULTIMEDIA
Mirrors & Wipers
After pressing the Mirror & Wipers button on the touchscreen, the following settings will be available:
Brakes
After pressing the Brakes button on the touchscreen, the following settings will be available:
Setting Name Selectable Options
Tilt Side Mirrors in Reverse — If Equipped OnOff
Rain Sensing Auto Wipers — If Equipped OnOff
Headlights with Wipers — If Equipped OnOff
Setting Name Selectable Options
Auto Park BrakeOnOff
Brake Service YesNo
NOTE:
Selecting the “Brake Service” feature will display a pop-up asking whether or you would like to retract the park brakes to allow brake system service.
20_RU_OM_EN_US_t.book Page 406
Page 409 of 516

MULTIMEDIA407
Lights
After pressing the Lights button on the touchscreen, the following settings will be available.
Setting Name Selectable Options
Headlight Off Delay0 sec
60 sec
30 sec 90 sec
NOTE:
When the “Headlight Off Delay” feature is selected, it allows the adjustment of the amount of time the headlights remain on after the engine is shut off.
Headlight Illumination On Approach 0 sec
60 sec
30 sec 90 sec
NOTE:
When this feature is selected, it allows the adjustment of the amount of time the headlights remain on after the doors are unlocked with the key fob. Headlights With Wipers — If Equipped OnOff
Auto Dim High Beams — If Equipped OnOff
Daytime Running Lights YesNo
NOTE:
When “Daytime Running Lights” feature is selected, the daytime running lights can be turned on or off. This feature is only available if allowed by law
in the country of the vehicle purchase. Flash Lights With Lock OnOff
Flash Lights With Power Sliding Door OnOff
9
20_RU_OM_EN_US_t.book Page 407
Page 413 of 516

MULTIMEDIA411
Key Off Options
After pressing the Engine Off Options button on the touchscreen, the following settings will be available:
Setting Name Selectable Options
Key Off Power Delay — If Equipped 0 sec
45 sec
5 min 10 min
NOTE:
When the “Engine Off Power Delay” feature is selected, the power window switches, radio, Uconnect phone system (if equipped), DVD video system
(if equipped), power sunroof (if equipped), and power outlets will remain active for up to 10 minutes after the ignition is placed in the OFF position.
Opening either front door will cancel this feature.
Headlight Off Delay 0 sec
30 sec
60 sec 90 sec
NOTE:
When the “Headlight Off Delay” feature is selected, it allows the adjustment of the amount of time the headlights remain on after the engine is shut off. Easy Exit Seat — If Equipped OnOff
NOTE:
When the “Easy Exit Seat” feature is selected, it provides automatic driver seat positioning to enhance driver mobility when entering and exiting the
vehicle.
9
20_RU_OM_EN_US_t.book Page 411
Page 421 of 516

MULTIMEDIA419
Display
After pressing the Display button on the touchscreen, the following settings will be available:
Setting Name Selectable Options
DisplayManual Auto
Display Brightness Headlights ON +-
NOTE:
To make changes to the "Display Brightness With Headlights ON" setting, the headlights must be on and the interior dimmer switch must not be in
the "party" or "parade" position. Display Brightness Headlights OFF +-
NOTE:
To make changes to the "Display Brightness With Headlights OFF" setting, the headlights must be off and the interior dimmer switch must not be in
the "party" or "parade" position. Set Theme On Off
NOTE:
When the “Set Theme” feature is selected, you may select the theme for the display screen. To make your selection, press the Set Theme button on
the touchscreen, then select the desired theme option button until a check-mark appears showing that the setting has been selected.
9
20_RU_OM_EN_US_t.book Page 419
Page 428 of 516

426MULTIMEDIA
Mirrors & Wipers
After pressing the Mirror & Wipers button on the touchscreen, the following settings will be available:NOTE:
The “Surround View Camera Guidelines” feature allows you to see active guidelines over the Surround View camera display whenever the gear
selector is put into REVERSE or the Surround View Camera Guidelines button on the touchscreen is pressed. The image will be displayed on the radio
touchscreen display.
ParkView Backup Camera Delay — If Equipped On
Off
NOTE:
The “ParkView Backup Camera Delay” setting determines whether or not the screen will display the rear view image with dynamic grid lines for up to
10 seconds after the vehicle is shifted out of REVERSE. This delay will be canceled if the vehicle’s speed exceeds 8 mph (13 km/h), the transmission
is shifted into PARK (P), or the ignition is switched to the OFF position.
ParkView Backup Camera ActiveGuide Lines — If Equipped On
Off
NOTE:
The “ParkView Backup Camera Active Guide Lines” feature overlays the Backup Camera image with active, or dynamic, grid lines to help illustrate the
width of the vehicle and its projected backup path, based on the steering wheel position when the option is checked. A dashed center line overlay
indicates the center of the vehicle to assist with parking or aligning to a hitch/receiver.
Setting Name Selectable Options
Setting NameSelectable Options
Rain Sensing Auto WipersOnOff
Tilt Side Mirrors in Reverse OnOff
Headlights with Wipers OnOff
20_RU_OM_EN_US_t.book Page 426
Page 429 of 516

MULTIMEDIA427
Brakes
After pressing the Brakes button on the touchscreen, the following settings will be available:
Lights
After pressing the Lights button on the touchscreen, the following settings will be available:
Setting Name Selectable Options
Auto Park BrakeOnOff
Brake Service YesNo
NOTE:
Selecting the “Brake Service” feature will display a pop-up asking whether or you would like to retract the park brakes to all break system service.
Setting Name Selectable Options
Headlight Off Delay0 sec
30 sec
60 sec 90 sec
NOTE:
When the “Headlight Off Delay” feature is selected, it allows the adjustment of the amount of time the headlights remain on after the vehicle is shut off.
Headlight Illumination On Approach 0 sec
30 sec
60 sec 90 sec
NOTE:
When the “Headlight Illumination On Approach” feature is selected, it allows the adjustment of the amount of time the headlights remain on after the
doors are unlocked with the key fob.
9
20_RU_OM_EN_US_t.book Page 427