stop start CHRYSLER VOYAGER 2020 Workshop Manual
[x] Cancel search | Manufacturer: CHRYSLER, Model Year: 2020, Model line: VOYAGER, Model: CHRYSLER VOYAGER 2020Pages: 516, PDF Size: 28.69 MB
Page 275 of 516
STARTING AND OPERATING273
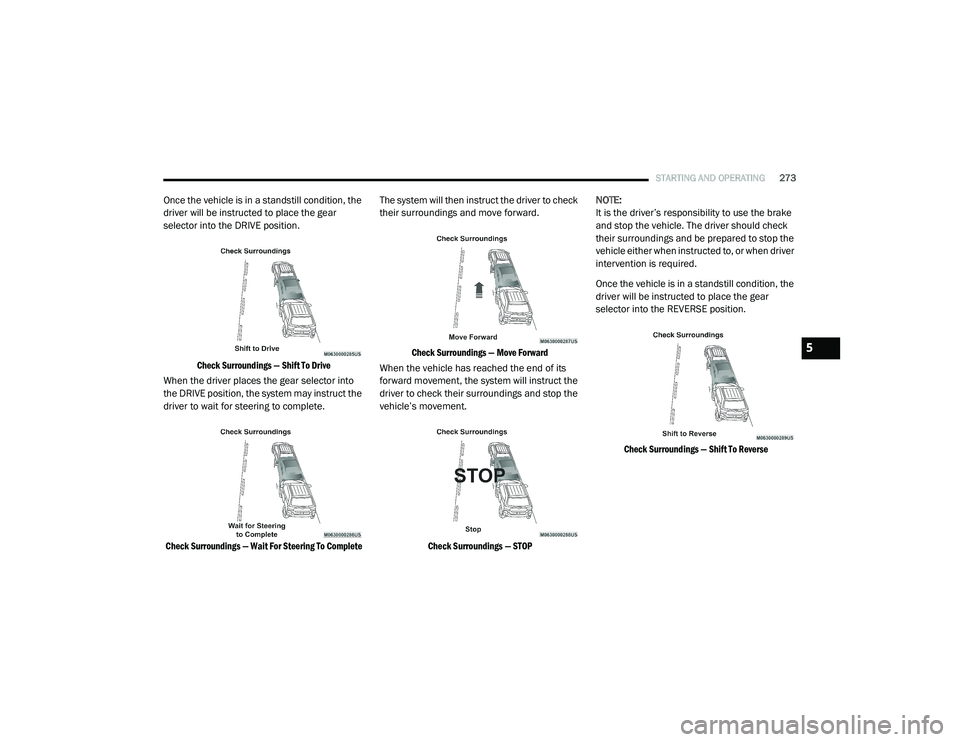
Once the vehicle is in a standstill condition, the
driver will be instructed to place the gear
selector into the DRIVE position.
Check Surroundings — Shift To Drive
When the driver places the gear selector into
the DRIVE position, the system may instruct the
driver to wait for steering to complete.
Check Surroundings — Wait For Steering To Complete
The system will then instruct the driver to check
their surroundings and move forward.
Check Surroundings — Move Forward
When the vehicle has reached the end of its
forward movement, the system will instruct the
driver to check their surroundings and stop the
vehicle’s movement.
Check Surroundings — STOP
NOTE:
It is the driver’s responsibility to use the brake
and stop the vehicle. The driver should check
their surroundings and be prepared to stop the
vehicle either when instructed to, or when driver
intervention is required.
Once the vehicle is in a standstill condition, the
driver will be instructed to place the gear
selector into the REVERSE position.
Check Surroundings — Shift To Reverse
5
20_RU_OM_EN_US_t.book Page 273
Page 277 of 516
STARTING AND OPERATING275
The driver needs to make sure that the
selected parking space for the maneuver
remains free and clear of any obstructions
(e.g. pedestrians, bicycles, etc.).
The driver is responsible to ensure that the
selected parking space is suitable for the
maneuver and free/clear of anything that
may be overhanging or protruding into the
parking space (e.g., ladders, tailgates, etc.
from surrounding objects/vehicles).
When seeking for a parking space, the driver
should drive as parallel or perpendicular
(depending on the type of maneuver) to other
vehicles as possible.
The feature will only indicate the last
detected parking space (example: if passing
multiple available parking spaces, the
system will only indicate the last detected
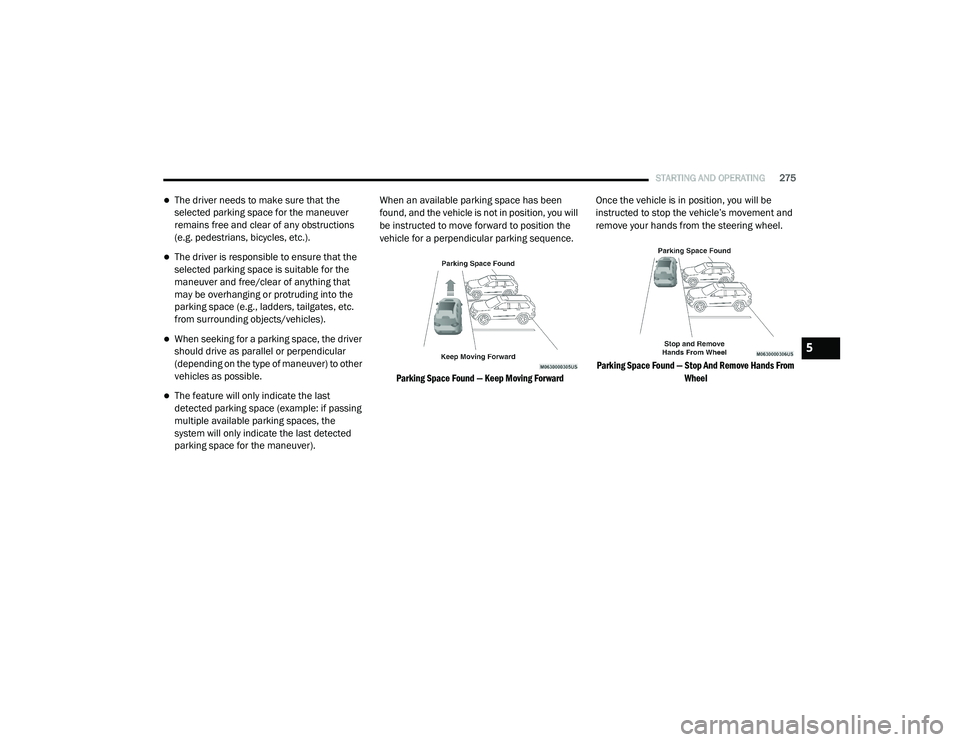
parking space for the maneuver). When an available parking space has been
found, and the vehicle is not in position, you will
be instructed to move forward to position the
vehicle for a perpendicular parking sequence.
Parking Space Found — Keep Moving Forward
Once the vehicle is in position, you will be
instructed to stop the vehicle’s movement and
remove your hands from the steering wheel.
Parking Space Found — Stop And Remove Hands From Wheel
5
20_RU_OM_EN_US_t.book Page 275
Page 279 of 516
STARTING AND OPERATING277
The ParkSense Active Park Assist system will
allow a maximum of eight shifts between
DRIVE or REVERSE. If the maneuver cannot
be completed within eight shifts, the system
will cancel and the instrument cluster display
will instruct the driver to complete the
maneuver manually.
The system will cancel the maneuver if the
vehicle speed exceeds 5 mph (7 km/h)
during active steering guidance into the
parking space. The system will provide a
warning to the driver at 3 mph (5 km/h) that
tells them to slow down. The driver is then
responsible for completing the maneuver if
the system is canceled.
If the system is canceled during the
maneuver for any reason, the driver must
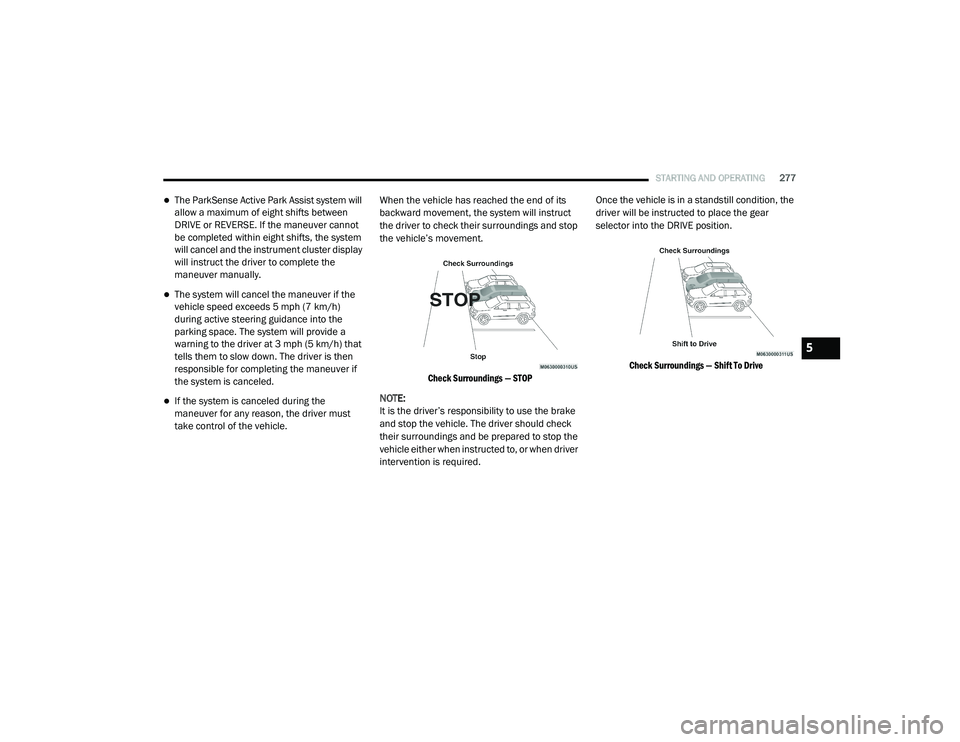
take control of the vehicle. When the vehicle has reached the end of its
backward movement, the system will instruct
the driver to check their surroundings and stop
the vehicle’s movement.
Check Surroundings — STOP
NOTE:
It is the driver’s responsibility to use the brake
and stop the vehicle. The driver should check
their surroundings and be prepared to stop the
vehicle either when instructed to, or when driver
intervention is required. Once the vehicle is in a standstill condition, the
driver will be instructed to place the gear
selector into the DRIVE position.
Check Surroundings — Shift To Drive
5
20_RU_OM_EN_US_t.book Page 277
Page 280 of 516
278STARTING AND OPERATING
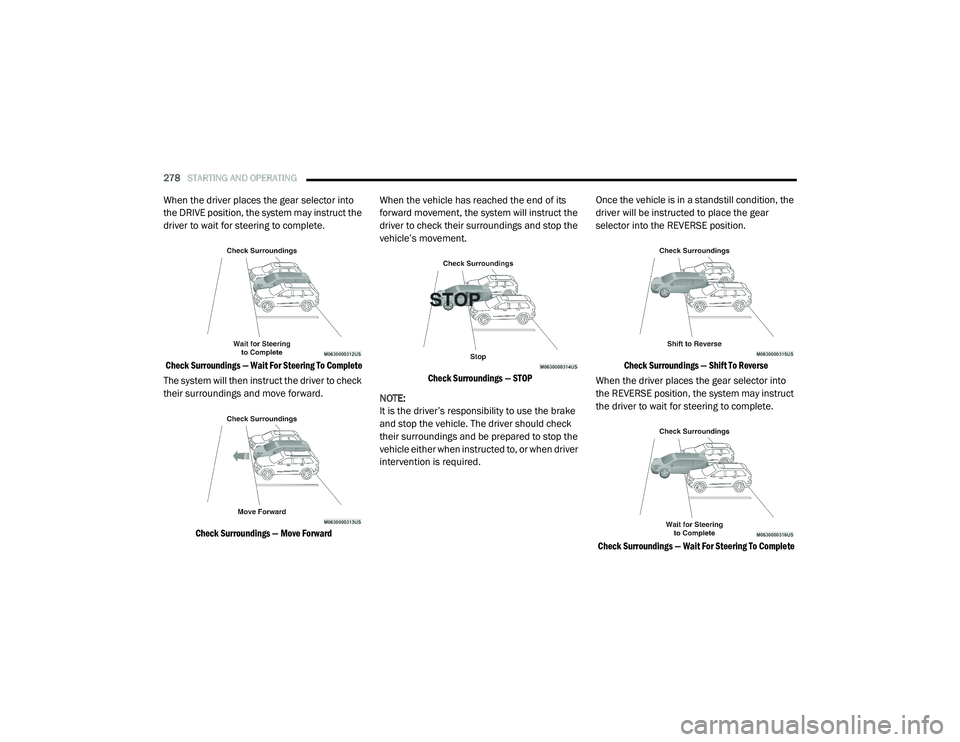
When the driver places the gear selector into
the DRIVE position, the system may instruct the
driver to wait for steering to complete.
Check Surroundings — Wait For Steering To Complete
The system will then instruct the driver to check
their surroundings and move forward.
Check Surroundings — Move Forward
When the vehicle has reached the end of its
forward movement, the system will instruct the
driver to check their surroundings and stop the
vehicle’s movement.
Check Surroundings — STOP
NOTE:
It is the driver’s responsibility to use the brake
and stop the vehicle. The driver should check
their surroundings and be prepared to stop the
vehicle either when instructed to, or when driver
intervention is required. Once the vehicle is in a standstill condition, the
driver will be instructed to place the gear
selector into the REVERSE position.
Check Surroundings — Shift To Reverse
When the driver places the gear selector into
the REVERSE position, the system may instruct
the driver to wait for steering to complete.
Check Surroundings — Wait For Steering To Complete
20_RU_OM_EN_US_t.book Page 278
Page 281 of 516

STARTING AND OPERATING279
The system will then instruct the driver to check
their surroundings and move backward.
Check Surroundings — Move Backwards
Your vehicle is now in the perpendicular park
position. When the maneuver is complete, the
driver will be instructed to check the vehicle's
parking position. If the driver is satisfied with
the vehicle position, they should shift to PARK.
The "Active ParkSense Complete - Check
Parking Position" message will be momentarily
displayed.
Active ParkSense Complete — Check Parking Position
WARNING!
Drivers must be careful when performing
parallel or perpendicular parking maneuvers
even when using the ParkSense Active Park
Assist system. Always check carefully behind
and in front of your vehicle, look behind and
in front of you, and be sure to check for
pedestrians, animals, other vehicles,
obstructions, and blind spots before backing
up and moving forward. You are responsible
for safety and must continue to pay attention
to your surroundings. Failure to do so can
result in serious injury or death.
CAUTION!
The ParkSense Active Park Assist system is
only a parking aid and it is unable to recog
-
nize every obstacle, including small obsta -
cles. Parking curbs might be temporarily
detected or not detected at all. Obstacles
located above or below the sensors will not
be detected when they are in close prox -
imity.
The vehicle must be driven slowly when
using the ParkSense Active Park Assist
system in order to be able to stop in time
when an obstacle is detected. It is recom -
mended that the driver looks over his/her
shoulder when using the ParkSense Active
Park Assist system.
5
20_RU_OM_EN_US_t.book Page 279
Page 286 of 516
284STARTING AND OPERATING
(Continued)
NOTE:
If snow, ice, mud, or any foreign substance
builds up on the camera lens, clean the lens,
rinse with water, and dry with a soft cloth. Do
not cover the lens.
SURROUND VIEW CAMERA SYSTEM — IF
EQUIPPED
Your vehicle may be equipped with the
Surround View Camera System that allows you
to see an on-screen image of the surroundings
and top view of your vehicle whenever the gear
selector is put into REVERSE or a different view
is selected through the "on screen soft buttons".
The top view of the vehicle will show which
doors are open. The image will be displayed on
the touchscreen display along with a caution
note “Check Entire Surroundings” across the
top of the screen. After five seconds, this note
will disappear. The Surround View Camera
System is comprised of four sequential
cameras located in the front grille, rear liftgate
and side mirrors. NOTE:
The Surround View Camera System has program
-
mable settings that may be selected through the
Uconnect System. Refer to “Uconnect Settings”
in “Multimedia” for further information.
When the vehicle is shifted into REVERSE, the
rear camera view and top view is the default view
of the system.
When the vehicle is shifted out of REVERSE (with
camera delay turned on), the camera image will
continue to be displayed for up to 10 seconds
after shifting out of REVERSE unless the vehicle
speed exceeds 8 mph (13 km/h), the vehicle is
shifted into PARK or the ignition is placed in the
OFF position. There is a touchscreen button “X”
to disable the display of the camera image.
When the vehicle is shifted out of REVERSE (with
camera delay turned off), the Surround View
Camera mode is exited and the last known
screen appears again.
When enabled, active guide lines are overlaid on
the image to illustrate the width of the vehicle,
including the side view mirrors and its projected
backup path based on the steering wheel position.
Different colored zones indicate the distance to
the rear of the vehicle.
WARNING!
Drivers must be careful when backing up
even when using the ParkView Rear Back Up
Camera. Always check carefully behind your
vehicle, and be sure to check for pedestrians,
animals, other vehicles, obstructions, or blind
spots before backing up. You are responsible
for the safety of your surroundings and must
continue to pay attention while backing up.
Failure to do so can result in serious injury or
death.
CAUTION!
To avoid vehicle damage, ParkView should
only be used as a parking aid. The ParkView
camera is unable to view every obstacle or
object in your drive path.
To avoid vehicle damage, the vehicle must
be driven slowly when using ParkView to be
able to stop in time when an obstacle is
seen. It is recommended that the driver
look frequently over his/her shoulder when
using ParkView.
CAUTION! (Continued)
20_RU_OM_EN_US_t.book Page 284
Page 288 of 516

286STARTING AND OPERATING
(Continued)
Rear Cross Path ViewPressing the Rear Cross Path soft key
will give the driver a wider angle view of
the rear camera system. The Top view
will be disabled when this is selected
Front View The Front view will show you what is
immediately in front of the vehicle and
is always paired with the Top view of
the vehicle.
Front Cross Path View
Pressing the Front Cross Path soft key will
give the driver a wider angle view of the
front camera system. The Top view will be
disabled when this is selected.
Deactivation
The system can be deactivated in the following
conditions:
The speed of the vehicle reaches greater
than 8 mph (13 km/h).
The vehicle shifted into PARK from a different
gear.
If the vehicle is in any gear other than
REVERSE, press the “X” button.
The camera delay system is turned off manu -
ally through the Uconnect settings menu.
Refer to “Uconnect Settings” in “Multimedia”
for further information.
NOTE:
If snow, ice, mud, or any foreign substance
builds up on the camera lenses, clean the
lenses, rinse with water, and dry with a soft
cloth. Do not cover the lenses.
If a malfunction with the system has
occurred, see an authorized dealer.REFUELING THE VEHICLE
There is no fuel filler cap. Two flapper doors
inside the pipe seal the system.
WARNING!
Drivers must be careful when backing up even
when using the Surround View Camera. Always
check carefully behind your vehicle, and be
sure to check for pedestrians, animals, other
vehicles, obstructions, or blind spots before
backing up. You are responsible for the safety
of your surroundings and must continue to pay
attention while backing up. Failure to do so can
result in serious injury or death.
CAUTION!
To avoid vehicle damage, Surround View
should only be used as a parking aid. The
Surround View camera is unable to view
every obstacle or object in your drive path.
To avoid vehicle damage, the vehicle must
be driven slowly when using Surround View
to be able to stop in time when an obstacle
is seen. It is recommended that the driver
look frequently over his/her shoulder when
using Surround View.
WARNING!
Never have any smoking materials lit in or
near the vehicle when the fuel door is open
or the tank is being filled.
Never add fuel when the engine is running.
This is in violation of most state and federal
fire regulations and may cause the
“Malfunction Indicator Light” to turn on.
20_RU_OM_EN_US_t.book Page 286
Page 297 of 516
STARTING AND OPERATING295
Towing Requirements — Tires
Do not attempt to tow a trailer while using a
compact spare tire.
Do not drive more than 50 mph (80 km/h)
when towing while using a full size spare tire.
Proper tire inflation pressures are essential
to the safe and satisfactory operation of your
vehicle. Refer to “Tires” in “Servicing And
Maintenance” for proper tire inflation proce -
dures.
Check the trailer tires for proper tire inflation
pressures before trailer usage.
Check for signs of tire wear or visible tire
damage before towing a trailer. Refer to
“Tires” in “Servicing And Maintenance” for
the proper inspection procedure.
When replacing tires, refer to “Tires” in
“Servicing And Maintenance” for the proper
tire replacement procedures. Replacing tires
with a higher load carrying capacity will not
increase the vehicle's GVWR and GAWR
limits.
Towing Requirements — Trailer Brakes
Do not interconnect the hydraulic brake
system or vacuum system of your vehicle
with that of the trailer. This could cause inad -
equate braking and possible personal injury.
An electronically actuated trailer brake
controller is required when towing a trailer
with electronically actuated brakes. When
towing a trailer equipped with a hydraulic
surge actuated brake system, an electronic
brake controller is not required.
Trailer brakes are recommended for trailers
over 1,000 lbs (453 kg) and required for
trailers in excess of 2,000 lbs (907 kg).
Vehicles with trailers should not be parked
on a grade. When parking, apply the
parking brake on the tow vehicle. Put the
tow vehicle transmission in PARK. For
four-wheel drive vehicles, make sure the
transfer case is not in NEUTRAL. Always,
block or "chock" the trailer wheels.
GCWR must not be exceeded.
Total weight must be distributed between
the tow vehicle and the trailer such that the
following four ratings are not exceeded :
GVWR
GTW
GAWR
Tongue weight rating for the trailer
hitch utilized.
WARNING! (Continued)
WARNING!
Do not connect trailer brakes to your
vehicle's hydraulic brake lines. It can over -
load your brake system and cause it to fail.
You might not have brakes when you need
them and could have an accident.
Towing any trailer will increase your stop -
ping distance. When towing, you should
allow for additional space between your
vehicle and the vehicle in front of you.
Failure to do so could result in an accident.
5
20_RU_OM_EN_US_t.book Page 295
Page 298 of 516
296STARTING AND OPERATING
Towing Requirements — Trailer Lights And
Wiring
Whenever you pull a trailer, regardless of the
trailer size, stoplights and turn signals on the
trailer are required for motoring safety.
The Trailer Tow Package may include a four and
seven-pin wiring harness. Use a factory
approved trailer harness and connector.
NOTE:
Do not cut or splice wiring into the vehicle’s
wiring harness.
The electrical connections are all complete to
the vehicle but you must mate the harness to a
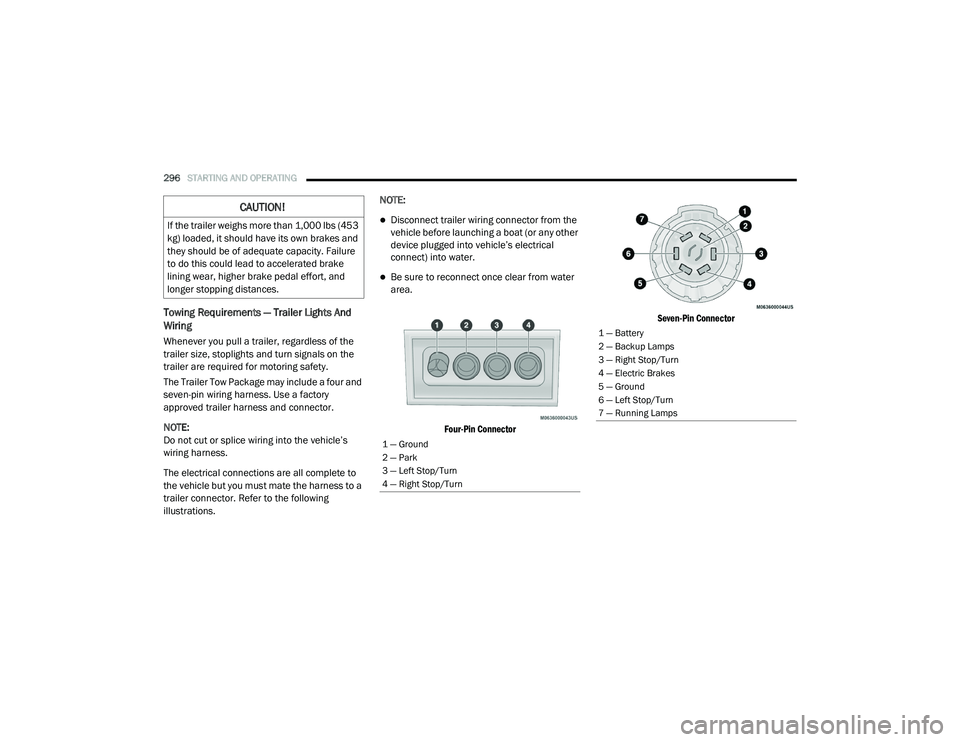
trailer connector. Refer to the following
illustrations. NOTE:
Disconnect trailer wiring connector from the
vehicle before launching a boat (or any other
device plugged into vehicle’s electrical
connect) into water.
Be sure to reconnect once clear from water
area.
Four-Pin Connector Seven-Pin Connector
CAUTION!
If the trailer weighs more than 1,000 lbs (453
kg) loaded, it should have its own brakes and
they should be of adequate capacity. Failure
to do this could lead to accelerated brake
lining wear, higher brake pedal effort, and
longer stopping distances.
1 — Ground
2 — Park
3 — Left Stop/Turn
4 — Right Stop/Turn
1 — Battery
2 — Backup Lamps
3 — Right Stop/Turn
4 — Electric Brakes
5 — Ground
6 — Left Stop/Turn
7 — Running Lamps
20_RU_OM_EN_US_t.book Page 296
Page 299 of 516
STARTING AND OPERATING297
Towing Tips
Before setting out on a trip, practice turning,
stopping, and backing up the trailer in an area
located away from heavy traffic.
Automatic Transmission
Select the DRIVE range when towing. The
transmission controls include a drive strategy to
avoid frequent shifting when towing. For
increased engine braking on steep downhill
grades, select the LOW range.
Speed Control — If Equipped
Do not use on hilly terrain or with heavy
loads.
When using the Speed Control, if you experi -
ence speed drops greater than 10 mph
(16 km/h), disengage until you can get back
to cruising speed.
Use Speed Control in flat terrain and with
light loads to maximize fuel efficiency.
Cooling System
To reduce potential for engine and transmission
overheating, take the following actions:
City Driving
In city traffic — while stopped, place the
transmission in NEUTRAL (N), but do not
increase engine idle speed.
Highway Driving
Reduce speed.
Temporarily turn off air conditioning.
5
20_RU_OM_EN_US_t.book Page 297