stop start CHRYSLER VOYAGER 2020 Repair Manual
[x] Cancel search | Manufacturer: CHRYSLER, Model Year: 2020, Model line: VOYAGER, Model: CHRYSLER VOYAGER 2020Pages: 516, PDF Size: 28.69 MB
Page 301 of 516
STARTING AND OPERATING299
Recreational towing is allowed ONLY if the front
wheels are OFF the ground. This may be
accomplished using a tow dolly (front wheels off
the ground) or vehicle trailer (all four wheels off
the ground). If using a tow dolly, follow this
procedure:
1. Properly secure the dolly to the tow vehicle, following the dolly manufacturer's
instructions.
2. Drive the front wheels onto the tow dolly.
3. Apply the park brake.
4. Place the transmission in PARK.
5. Turn the ignition OFF.
6. Properly secure the front wheels to the dolly, following the dolly manufacturer's
instructions.
7. Turn the ignition to the ON/RUN mode, but do not start the vehicle.
8. Press and hold the brake pedal.
9. Release the park brake.
10. Turn the ignition OFF.
11. Release the brake pedal.DRIVING TIPS
Driving On Slippery Surfaces
Information in this section will aid in safe
controlled launches in adverse conditions.
Acceleration
Rapid acceleration on snow covered, wet, or
other slippery surfaces may cause the driving
wheels to pull erratically to the right or left. This
phenomenon occurs when there is a difference
in the surface traction under the front (driving)
wheels.
Traction
When driving on wet or slushy roads, it is
possible for a wedge of water to build up
between the tire and road surface. This is
hydroplaning and may cause partial or
complete loss of vehicle control and stopping
ability. To reduce this possibility, the following
precautions should be observed:
Slow down during rainstorms or when the
roads are slushy.
Slow down if the road has standing water or
puddles.
Replace the tires when tread wear indicators
first become visible.
Keep tires properly inflated.
Maintain sufficient distance between your
vehicle and the vehicle in front of you to avoid
a collision in a sudden stop.
Driving Through Water
Driving through water more than a few inches/
centimeters deep will require extra caution to
ensure safety and prevent damage to your
vehicle.
WARNING!
Rapid acceleration on slippery surfaces is
dangerous. Unequal traction can cause
sudden pulling of the front wheels. You could
lose control of the vehicle and possibly have a
collision. Accelerate slowly and carefully
whenever there is likely to be poor traction
(ice, snow, wet, mud, loose sand, etc.).
5
20_RU_OM_EN_US_t.book Page 299
Page 302 of 516
300STARTING AND OPERATING
(Continued)
(Continued)
Flowing/Rising Water
Shallow Standing Water
Although your vehicle is capable of driving
through shallow standing water, consider the
following Warnings and Cautions before doing so.
WARNING!
Do not drive on or across a road or path
where water is flowing and/or rising (as in
storm run-off). Flowing water can wear away
the road or path's surface and cause your
vehicle to sink into deeper water.
Furthermore, flowing and/or rising water can
carry your vehicle away swiftly. Failure to
follow this warning may result in injuries that
are serious or fatal to you, your passengers,
and others around you.
WARNING!
Driving through standing water limits your
vehicle’s traction capabilities. Do not
exceed 5 mph (8 km/h) when driving
through standing water.
Driving through standing water limits your
vehicle’s braking capabilities, which
increases stopping distances. Therefore,
after driving through standing water, drive
slowly and lightly press on the brake pedal
several times to dry the brakes.
Failure to follow these warnings may result
in injuries that are serious or fatal to you,
your passengers, and others around you.
CAUTION!
Always check the depth of the standing
water before driving through it. Never drive
through standing water that is deeper than
the bottom of the tire rims mounted on the
vehicle.
Determine the condition of the road or the
path that is under water and if there are any
obstacles in the way before driving through
the standing water.
WARNING! (Continued)
Do not exceed 5 mph (8 km/h) when
driving through standing water. This will
minimize wave effects.
Driving through standing water may cause
damage to your vehicle’s drivetrain compo -
nents. Always inspect your vehicle’s fluids
(i.e., engine oil, transmission, axle, etc.) for
signs of contamination (i.e., fluid that is
milky or foamy in appearance) after driving
through standing water. Do not continue to
operate the vehicle if any fluid appears
contaminated, as this may result in further
damage. Such damage is not covered by
the New Vehicle Limited Warranty.
Getting water inside your vehicle’s engine
can cause it to lock up and stall out, and
cause serious internal damage to the
engine. Such damage is not covered by the
New Vehicle Limited Warranty.
CAUTION! (Continued)
20_RU_OM_EN_US_t.book Page 300
Page 331 of 516
IN CASE OF EMERGENCY329
(Continued)
Whenever You Stop To Use Tire Service Kit:
1. Pull over to a safe location and turn on the vehicle’s Hazard Warning Flashers.
2. Verify that the valve stem (on the wheel with the deflated tire) is in a position that is near
to the ground. This will allow the Tire Service
Kit Hose to reach the valve stem and keep
the Tire Service Kit flat on the ground. This
will provide the best positioning of the kit
when running the air pump. Move the
vehicle as necessary to place the valve
stem in this position before proceeding.
3. Place the transmission in PARK (P) and cycle the ignition in the OFF position.
4. Ensure the park brake is engaged. Setting Up To Use Tire Service Kit:
1. Remove the Tire Service Kit from the
storage location.
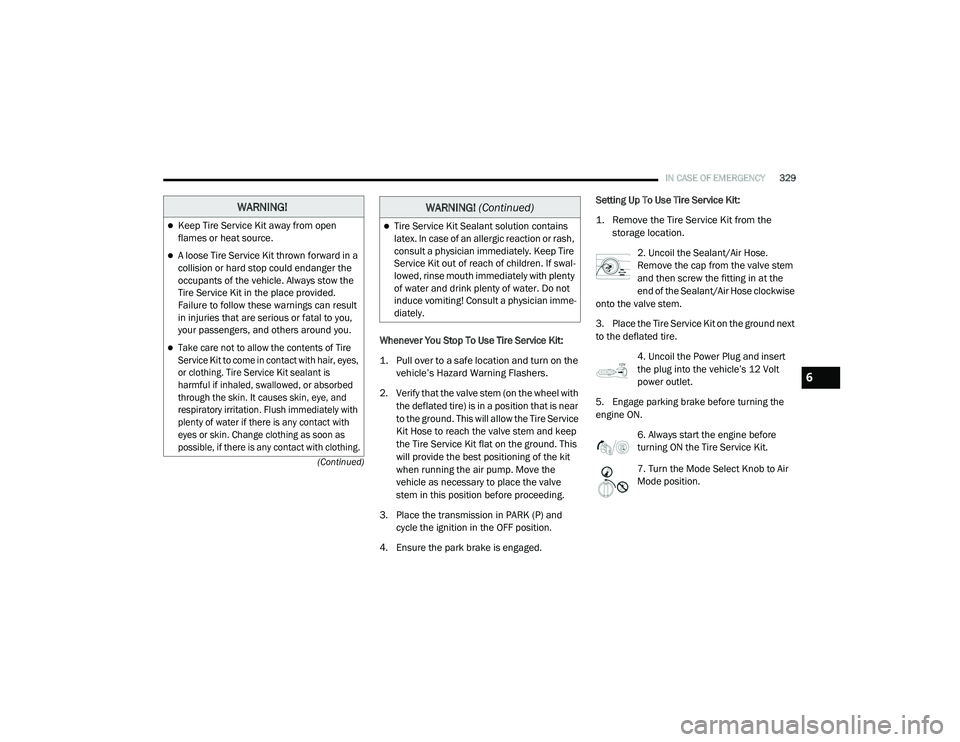
2. Uncoil the Sealant/Air Hose.
Remove the cap from the valve stem
and then screw the fitting in at the
end of the Sealant/Air Hose clockwise
onto the valve stem.
3. Place the Tire Service Kit on the ground next
to the deflated tire.
4. Uncoil the Power Plug and insert
the plug into the vehicle’s 12 Volt
power outlet.
5. Engage parking brake before turning the
engine ON. 6. Always start the engine before
turning ON the Tire Service Kit.
7. Turn the Mode Select Knob to Air
Mode position.
WARNING!
Keep Tire Service Kit away from open
flames or heat source.
A loose Tire Service Kit thrown forward in a
collision or hard stop could endanger the
occupants of the vehicle. Always stow the
Tire Service Kit in the place provided.
Failure to follow these warnings can result
in injuries that are serious or fatal to you,
your passengers, and others around you.
Take care not to allow the contents of Tire
Service Kit to come in contact with hair, eyes,
or clothing. Tire Service Kit sealant is
harmful if inhaled, swallowed, or absorbed
through the skin. It causes skin, eye, and
respiratory irritation. Flush immediately with
plenty of water if there is any contact with
eyes or skin. Change clothing as soon as
possible, if there is any contact with clothing.
Tire Service Kit Sealant solution contains
latex. In case of an allergic reaction or rash,
consult a physician immediately. Keep Tire
Service Kit out of reach of children. If swal -
lowed, rinse mouth immediately with plenty
of water and drink plenty of water. Do not
induce vomiting! Consult a physician imme -
diately.
WARNING! (Continued)
6
20_RU_OM_EN_US_t.book Page 329
Page 341 of 516
IN CASE OF EMERGENCY339
REFUELING IN EMERGENCY
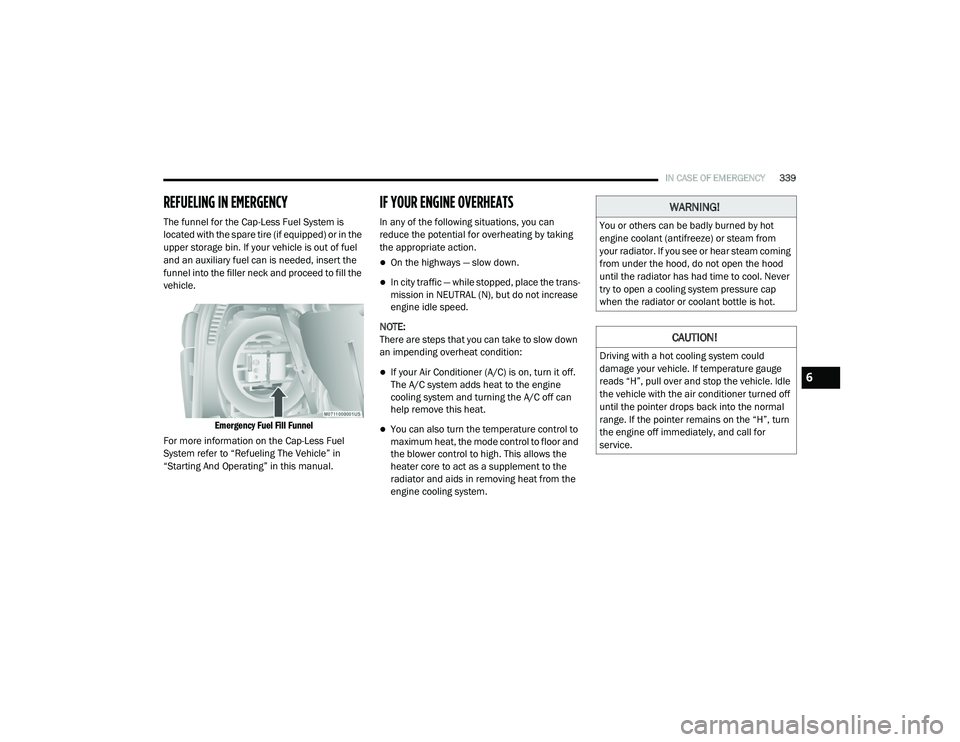
The funnel for the Cap-Less Fuel System is
located with the spare tire (if equipped) or in the
upper storage bin. If your vehicle is out of fuel
and an auxiliary fuel can is needed, insert the
funnel into the filler neck and proceed to fill the
vehicle.
Emergency Fuel Fill Funnel
For more information on the Cap-Less Fuel
System refer to “Refueling The Vehicle” in
“Starting And Operating” in this manual.
IF YOUR ENGINE OVERHEATS
In any of the following situations, you can
reduce the potential for overheating by taking
the appropriate action.
On the highways — slow down.
In city traffic — while stopped, place the trans -
mission in NEUTRAL (N), but do not increase
engine idle speed.
NOTE:
There are steps that you can take to slow down
an impending overheat condition:
If your Air Conditioner (A/C) is on, turn it off.
The A/C system adds heat to the engine
cooling system and turning the A/C off can
help remove this heat.
You can also turn the temperature control to
maximum heat, the mode control to floor and
the blower control to high. This allows the
heater core to act as a supplement to the
radiator and aids in removing heat from the
engine cooling system.
WARNING!
You or others can be badly burned by hot
engine coolant (antifreeze) or steam from
your radiator. If you see or hear steam coming
from under the hood, do not open the hood
until the radiator has had time to cool. Never
try to open a cooling system pressure cap
when the radiator or coolant bottle is hot.
CAUTION!
Driving with a hot cooling system could
damage your vehicle. If temperature gauge
reads “H”, pull over and stop the vehicle. Idle
the vehicle with the air conditioner turned off
until the pointer drops back into the normal
range. If the pointer remains on the “H”, turn
the engine off immediately, and call for
service.
6
20_RU_OM_EN_US_t.book Page 339
Page 352 of 516
350SERVICING AND MAINTENANCE
Checking Oil Level
To assure proper engine lubrication, the engine
oil must be maintained at the correct level.
Check the oil level at regular intervals, such as
every fuel stop. The best time to check the
engine oil level is about five minutes after a fully
warmed engine is shut off.
Checking the oil while the vehicle is on level
ground will improve the accuracy of the oil level
readings. Maintain the oil level between the
MIN and MAX markings on the dipstick. Adding
one quart or one liter of oil when the reading is
at the MIN mark will result in a MAX reading on
these engines.
Adding Washer Fluid
The fluid reservoir is located in the front of the
engine compartment. Be sure to check the fluid
level in the reservoir at regular intervals. Fill the
reservoir with windshield washer solvent (not
radiator antifreeze) and operate the system for
a few seconds to flush out the residual washer
fluid.
When refilling the washer fluid reservoir, take
some washer fluid, apply it to a cloth or towel,
and wipe clean the wiper blades; this will help
blade performance.
To prevent freeze-up of your windshield washer
system in cold weather, select a solution or
mixture that meets or exceeds the temperature
range of your climate. This rating information
can be found on most washer fluid containers.
Maintenance-Free Battery
Your vehicle is equipped with a
maintenance-free battery. You will never have
to add water, nor is periodic maintenance
required.
CAUTION!
Overfilling or underfilling will cause oil aera -
tion, or loss of oil pressure. This could
damage your engine.
Never use Non-Detergent Oil or Straight
Mineral Oil in the engine or damage may
result.
WARNING!
Commercially available windshield washer
solvents are flammable. They could ignite and
burn you. Care must be exercised when filling
or working around the washer solution.
WARNING!
Battery fluid is a corrosive acid solution and
can burn or even blind you. Do not allow
battery fluid to contact your eyes, skin, or
clothing. Do not lean over a battery when
attaching clamps. If acid splashes in eyes
or on skin, flush the area immediately with
large amounts of water. Refer to “Jump
Starting Procedure” in “In Case Of Emer -
gency” for further information.
Battery gas is flammable and explosive.
Keep flame or sparks away from the
battery. Do not use a booster battery or any
other booster source with an output greater
than 12 Volts. Do not allow cable clamps to
touch each other.
Battery posts, terminals, and related acces -
sories contain lead and lead compounds.
Wash hands after handling.
20_RU_OM_EN_US_t.book Page 350
Page 362 of 516
360SERVICING AND MAINTENANCE
(Continued)
Under normal operating conditions, the catalytic
converter will not require maintenance. However,
it is important to keep the engine properly tuned
to ensure proper catalyst operation and prevent
possible catalyst damage.
NOTE:
Intentional tampering with emissions control
systems can result in civil penalties being
assessed against you. In unusual situations involving grossly
malfunctioning engine operation, a scorching
odor may suggest severe and abnormal catalyst
overheating. If this occurs, stop the vehicle, turn
off the engine and allow it to cool. Service,
including a tune-up to manufacturer's
specifications, should be obtained immediately.
To minimize the possibility of catalytic converter
damage:
Do not interrupt the ignition when the trans
-
mission is in gear and the vehicle is in
motion.
Do not try to start the vehicle by pushing or
towing the vehicle.
Do not idle the engine with any ignition
components disconnected or removed, such
as when diagnostic testing, or for prolonged
periods during very rough idle or malfunc -
tioning operating conditions.
A hot exhaust system can start a fire if you
park over materials that can burn. Such
materials might be grass or leaves coming
into contact with your exhaust system. Do
not park or operate your vehicle in areas
where your exhaust system can contact
anything that can burn.
CAUTION!
The catalytic converter requires the use of
unleaded fuel only. Leaded gasoline will
destroy the effectiveness of the catalyst as
an emissions control device and may seri -
ously reduce engine performance and
cause serious damage to the engine.
WARNING! (Continued)
Damage to the catalytic converter can
result if your vehicle is not kept in proper
operating condition. In the event of engine
malfunction, particularly involving engine
misfire or other apparent loss of perfor -
mance, have your vehicle serviced
promptly. Continued operation of your
vehicle with a severe malfunction could
cause the converter to overheat, resulting
in possible damage to the converter and
vehicle.
CAUTION! (Continued)
20_RU_OM_EN_US_t.book Page 360
Page 410 of 516
408MULTIMEDIA
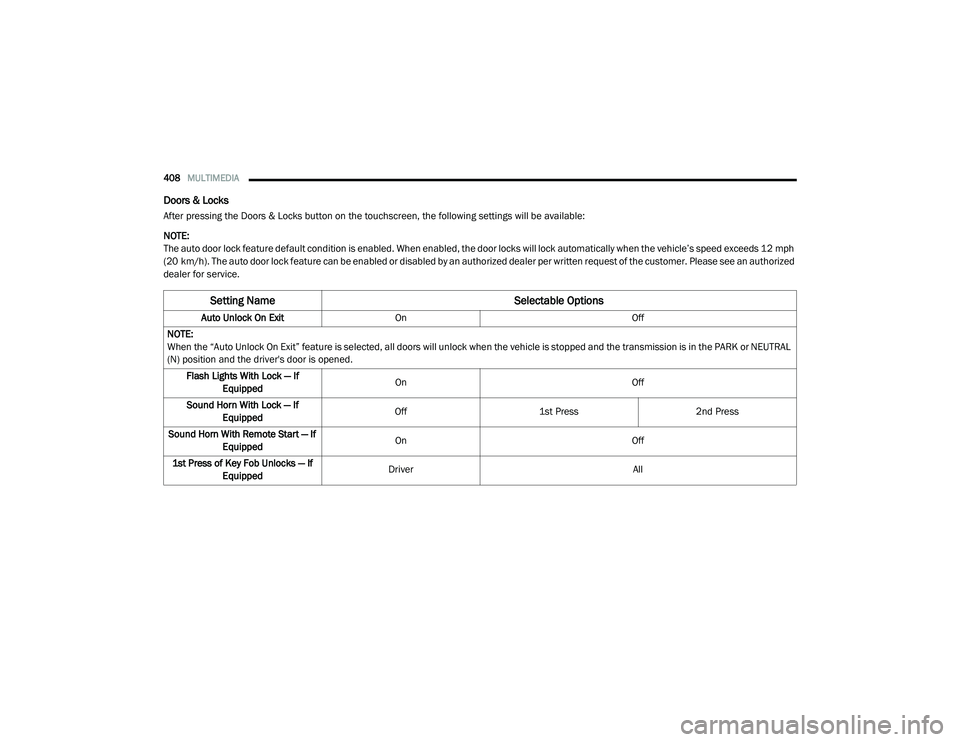
Doors & Locks
After pressing the Doors & Locks button on the touchscreen, the following settings will be available:
NOTE:
The auto door lock feature default condition is enabled. When enabled, the door locks will lock automatically when the vehicle’s speed exceeds 12 mph
(20 km/h). The auto door lock feature can be enabled or disabled by an authorized dealer per written request of the customer. Please see an authorized
dealer for service.
Setting Name Selectable Options
Auto Unlock On ExitOn Off
NOTE:
When the “Auto Unlock On Exit” feature is selected, all doors will unlock when the vehicle is stopped and the transmission is in the PARK or NEUTRAL
(N) position and the driver's door is opened. Flash Lights With Lock — If Equipped On
Off
Sound Horn With Lock — If Equipped Off
1st Press 2nd Press
Sound Horn With Remote Start — If Equipped On
Off
1st Press of Key Fob Unlocks — If Equipped Driver
All
20_RU_OM_EN_US_t.book Page 408
Page 441 of 516
MULTIMEDIA439
Volume/Power Control
Push the Volume/Power control knob to turn off
the screen and mute the radio. Push the
Volume/Power control knob a second time to
turn the screen back on and unmute the radio.
The electronic volume control turns
continuously (360 degrees) in either direction,
without stopping. Turning the Volume/Power
control knob clockwise increases the volume,
and counterclockwise decreases it.
Tune/Scroll Control
When the audio system is turned on, the sound
will be set at the same volume level as last
played.
Turn the rotary Tune/Scroll control knob
clockwise to increase or counterclockwise to
decrease the radio station frequency. Push the
Enter/Browse button to choose a selection.
Screen Close
The X button on the touchscreen at the top right,
provides a means to close the Direct Tune
Screen. The Direct Tune Screen also auto
closes if no activity occurs within a few seconds. Seek And Direct Tune Functions
The Seek Up and Down functions are activated
by pressing the double arrow buttons on the
touchscreen to the right and left of the radio
station display or by pressing the left Steering
Wheel Audio Control up or down.
Seek Up
Press and release the Seek Up button on the
touchscreen to tune the radio to the next
listenable station or channel. During a Seek Up
function, if the radio reaches the starting station
after passing through the entire band two times,
the radio will stop at the station where it began.
Fast Seek Up
Press and hold the Seek Up button on the
touchscreen to advance the radio through the
available stations or channels at a faster rate. The
radio stops at the next available station or channel
when the button on the touchscreen is released.
Seek Down
Press and release the Seek Down button on the
touchscreen to tune the radio to the next
listenable station or channel. During a Seek
Down function, if the radio reaches the starting
station after passing through the entire band
two times, the radio will stop at the station
where it began.Fast Seek Down
Press and hold the Seek Down button on the
touchscreen to advance the radio through the
available stations or channel at a faster rate.
The radio stops at the next available station or
channel when the button on the touchscreen is
released.
Direct Tune
Press the Tune button on the touchscreen
located at the bottom of the radio screen. The
Direct Tune button on the touchscreen is
available in AM, FM, and SXM radio modes and
can be used to direct tune the radio to a desired
station or channel.
Press the available number button on the
touchscreen to begin selecting a desired
station. Once a number has been entered, any
numbers that are no longer possible (stations
that cannot be reached) will become
deactivated/grayed out.
Undo
You can backspace an entry by pressing the
bottom left on the touchscreen.
OK
Once the last digit of a station has been
entered, press the OK button, and the Direct
9
20_RU_OM_EN_US_t.book Page 439
Page 509 of 516
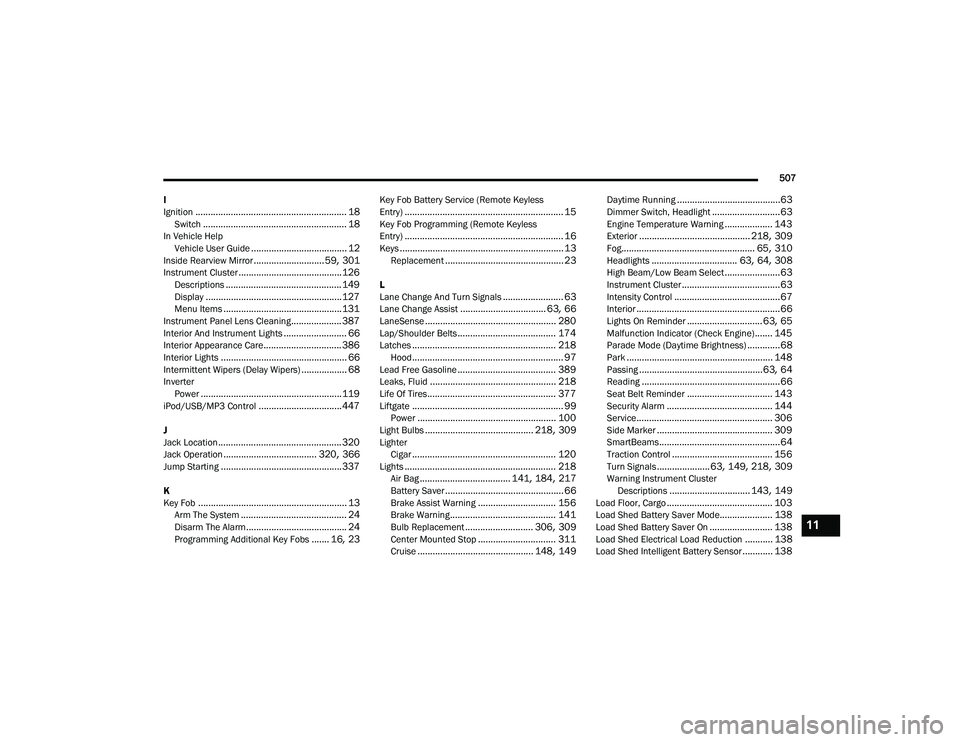
507
I
Ignition
............................................................ 18Switch......................................................... 18In Vehicle Help Vehicle User Guide...................................... 12Inside Rearview Mirror............................ 59, 301Instrument Cluster......................................... 126Descriptions.............................................. 149Display...................................................... 127Menu Items............................................... 131Instrument Panel Lens Cleaning.................... 387Interior And Instrument Lights......................... 66Interior Appearance Care............................... 386Interior Lights.................................................. 66Intermittent Wipers (Delay Wipers).................. 68InverterPower........................................................ 119iPod/USB/MP3 Control................................. 447
J
Jack Location................................................. 320Jack Operation..................................... 320, 366Jump Starting................................................ 337
K
Key Fob........................................................... 13Arm The System.......................................... 24Disarm The Alarm........................................ 24Programming Additional Key Fobs....... 16, 23
Key Fob Battery Service (Remote Keyless
Entry)............................................................... 15Key Fob Programming (Remote Keyless
Entry)............................................................... 16Keys................................................................. 13Replacement............................................... 23
L
Lane Change And Turn Signals........................ 63Lane Change Assist.................................. 63, 66LaneSense.................................................... 280Lap/Shoulder Belts....................................... 174Latches......................................................... 218Hood............................................................ 97Lead Free Gasoline....................................... 389Leaks, Fluid.................................................. 218Life Of Tires................................................... 377Liftgate............................................................ 99Power....................................................... 100Light Bulbs........................................... 218, 309LighterCigar......................................................... 120Lights............................................................ 218Air Bag.................................... 141, 184, 217Battery Saver............................................... 66Brake Assist Warning............................... 156Brake Warning.......................................... 141Bulb Replacement........................... 306, 309Center Mounted Stop............................... 311Cruise.............................................. 148, 149
Daytime Running.........................................63Dimmer Switch, Headlight...........................63Engine Temperature Warning................... 143Exterior............................................ 218, 309Fog..................................................... 65, 310Headlights.................................. 63, 64, 308High Beam/Low Beam Select......................63Instrument Cluster.......................................63Intensity Control..........................................67Interior.........................................................66Lights On Reminder..............................63, 65Malfunction Indicator (Check Engine)....... 145Parade Mode (Daytime Brightness).............68Park.......................................................... 148Passing.................................................63, 64Reading.......................................................66Seat Belt Reminder.................................. 143Security Alarm.......................................... 144Service...................................................... 306Side Marker.............................................. 309SmartBeams................................................64Traction Control........................................ 156Turn Signals..................... 63, 149, 218, 309Warning Instrument Cluster Descriptions................................ 143, 149Load Floor, Cargo.......................................... 103Load Shed Battery Saver Mode..................... 138Load Shed Battery Saver On......................... 138Load Shed Electrical Load Reduction........... 138Load Shed Intelligent Battery Sensor............ 138
11
20_RU_OM_EN_US_t.book Page 507