start stop button CHRYSLER VOYAGER 2021 User Guide
[x] Cancel search | Manufacturer: CHRYSLER, Model Year: 2021, Model line: VOYAGER, Model: CHRYSLER VOYAGER 2021Pages: 348, PDF Size: 18.73 MB
Page 108 of 348
106 (Continued)
STARTING AND OPERATING
STARTING THE ENGINE
Before starting your vehicle, adjust your seat,
adjust both inside and outside mirrors, and fasten
your seat belts. Start the engine with the gear selector in the
NEUTRAL (N) or PARK (P) position. Apply the brake
before shifting to any driving range.
NORMAL STARTING
To Turn On The Engine Using ENGINE START/STOP
Button
1. The transmission must be in PARK or NEUTRAL.
2. Press and hold the brake pedal while pushing the ENGINE START/STOP button once.
3. The system starts the vehicle. If the vehicle fails to start, the starter will disengage
automatically after 10 seconds.
4. If you wish to stop the cranking of the engine prior to the engine starting, push the button
again. ENGINE START/STOP Button Functions — With
Driver’s Foot OFF The Brake Pedal (In PARK Or
NEUTRAL Position)
The ENGINE START/STOP button operates similar
to an ignition switch. It has three positions; OFF,
ACC, and RUN. To change the ignition positions
without starting the vehicle and to use the
accessories follow these steps:
Start with the ignition in the OFF position.
Push the ENGINE START/STOP button once to
place the ignition to the ACC position (instru
-
ment cluster will display “ACC”).
Push the ENGINE START/STOP button a second
time to place the ignition to the RUN position
(instrument cluster will display “ON/RUN”).
Push the ENGINE START/STOP button a third
time to return the ignition to the OFF position
(instrument cluster will display “OFF”).
NOTE:Only press one pedal at a time while driving the
vehicle. Torque performance of the vehicle could
be reduced if both pedals are pressed at the same
time. If pressure is detected on both pedals simul -
taneously, a warning message will display in the
instrument cluster
Úpage 89.
WARNING!
When exiting the vehicle, always remove the
key fob from the vehicle and lock your vehicle.
Never leave children alone in a vehicle, or with
access to an unlocked vehicle.
Allowing children to be in a vehicle unattended
is dangerous for a number of reasons. A child
or others could be seriously or fatally injured.
Children should be warned not to touch the
parking brake, brake pedal or the transmis -
sion gear selector.
Do not leave the key fob in or near the vehicle,
or in a location accessible to children, and do
not leave the ignition of a vehicle equipped
with Keyless Enter ‘n Go™ in the ACC or ON/
RUN mode. A child could operate power
windows, other controls, or move the vehicle.
Do not leave children or animals inside parked
vehicles in hot weather. Interior heat build-up
may cause serious injury or death.
WARNING!
21_RUV_OM_EN_USC_t.book Page 106
Page 109 of 348

STARTING AND OPERATING107
AUTOPARK
AutoPark is a supplemental feature to assist in
placing the vehicle in PARK if the situations below
occur. It is a back up system and should not be
relied upon as the primary method by which the
driver shifts the vehicle into PARK.
The conditions under which AutoPark will engage
are outlined on the following pages. ALWAYS DO A VISUAL CHECK
that your vehicle is in
PARK by looking for the “P” in the instrument
cluster display and on the gear selector. As an
added precaution, always apply the parking brake.
If the vehicle is not in PARK and the driver
attempts to turn off the engine, if certain
conditions are met, the vehicle will AutoPark,
automatically shifting the vehicle’s transmission to
the PARK position. The gear selector will
automatically reset itself to the PARK position. The
vehicle’s ignition will then move to the OFF position
(engine off). When AutoPark is activated the
instrument cluster will display the message
“AutoPark Engaged”.
AutoPark will engage when all of these conditions
are met:
Vehicle is equipped with a gear selector
Vehicle is not in PARK
Vehicle speed is 1.2 mph (1.9 km/h) or less
Driver has pushed the ENGINE START/STOP
button
If the vehicle is not in PARK and the driver exits the
vehicle with the engine running, if certain
conditions are met, the vehicle will AutoPark,
automatically shifting the vehicle’s transmission to
the PARK position. The Electric Park Brake SAFE
HOLD feature will also activate in some conditions
Úpage 113. AutoPark will engage when all of these conditions
are met:
Vehicle is equipped with a gear selector
Vehicle is not in PARK
Vehicle speed is 1.2 mph (1.9 km/h) or less
Driver’s door is ajar
Driver’s seat belt is unbuckled
Brake pedal is not pressed
The message “ AutoPark Engaged ” will display in
the instrument cluster.
AutoPark In Stop/Start Autostop Mode
AutoPark will engage when all of these condi -
tions are met:
Vehicle is equipped with a gear selector
Vehicle is not in PARK
Vehicle speed is 1.2 mph (1.9 km/h) or less
Driver’s door is ajar
Driver’s seat belt is unbuckled or brake pedal is
not pressed
The message “ AutoPark Engaged ” will display in
the instrument cluster.
WARNING!
Driver inattention could lead to failure to place
the vehicle in PARK. ALWAYS DO A VISUAL
CHECK that your vehicle is in PARK by verifying
that a solid (not blinking) “P” is indicated in
the instrument cluster display and near the
gear selector. If the "P" indicator is blinking,
your vehicle is not in PARK. As an added
precaution, always apply the parking brake
when exiting the vehicle.
AutoPark is a supplemental feature. It is not
designed to replace the need to shift your
vehicle into PARK. It is a back up system and
should not be relied upon as the primary
method by which the driver shifts the vehicle
into PARK.
CAUTION!
Engine will remain running.
4
21_RUV_OM_EN_USC_t.book Page 107
Page 111 of 348
STARTING AND OPERATING109
To Turn On The Engine Using ENGINE START/STOP
Button
1. The transmission must be in PARK or NEUTRAL.
2. Press and hold the brake pedal while pushing the ENGINE START/STOP button once.
To release the parking brake manually, the ignition
switch must be in the ON/RUN position. Press on
the brake pedal, then push the parking brake
switch momentarily.
If the driver shifts into PARK while moving,
the vehicle may Park.
PARK will engage ONLY when vehicle speed is
1.2 mph (1.9 km/h) or less.
The message “ Vehicle Speed is Too High to Shift to
P” will display in the instrument cluster display if
vehicle speed is above 1.2 mph (1.9 km/h). The
gear position indicator will blink continuously until
the gear selector is returned to the proper position,
or the requested shift can be completed.
COLD WEATHER OPERATION
(B
ELOW –22°F OR −30°C)
To ensure reliable starting at these temperatures,
use of an externally powered electric engine block
heater (available from an authorized dealer) is
recommended.
AFTER STARTING — WARMING UP
T
HE ENGINE
The idle speed is controlled automatically and it
will decrease as the engine warms up.
IF ENGINE FAILS TO START WARNING!
If vehicle speed is not below 1.2 mph (1.9 km/h)
when the driver shifts into PARK, the
transmission will default to NEUTRAL until the
vehicle speed drops below 1.2 mph (1.9 km/h)
and the above conditions are met, enabling
AutoPark. A vehicle left in the NEUTRAL position
can roll. As an added precaution, always apply
the parking brake when exiting the vehicle.WARNING!
Never pour fuel or other flammable liquid into
the throttle body air inlet opening in an
attempt to start the vehicle. This could result
in flash fire causing serious personal injury.
Do not attempt to push or tow your vehicle to
get it started. Vehicles equipped with an auto -
matic transmission cannot be started this
way. Unburned fuel could enter the catalytic
converter and once the engine has started,
ignite and damage the converter and vehicle.
If the vehicle has a discharged battery,
booster cables may be used to obtain a start
from a booster battery or the battery in
another vehicle. This type of start can be
dangerous if done improperly
Úpage 262.
4
21_RUV_OM_EN_USC_t.book Page 109
Page 112 of 348
110STARTING AND OPERATING
TO TURN OFF THE ENGINE USING
ENGINE START/STOP B
UTTON
1. Place the gear selector in PARK, then push
and release the ENGINE START/STOP button.
2. The ignition switch will return to the OFF position.
3. If the gear selector is not in PARK, the ENGINE START/STOP button must be held for two
seconds or three short pushes in a row with
the vehicle speed above 5 mph (8 km/h) before the engine will shut off. The ignition
switch position will remain in the ACC position
until the gear selector is in PARK and the
button is pushed twice to the OFF position. If
the gear selector is not in PARK and the
ENGINE START/STOP button is pushed once,
the instrument cluster will display a “Vehicle
Not In Park” message and the engine will
remain running. Never leave a vehicle out of
the PARK position, or it could roll.
NOTE:If the ignition switch is left in the ACC or RUN
(engine not running) position and the transmission
is in PARK, the system will automatically time out
after 30 minutes of inactivity and the ignition will
switch to the OFF position.
ENGINE BLOCK HEATER — IF EQUIPPED
The engine block heater warms the engine and
permits quicker starts in cold weather.
Connect the cord to a 110-115 Volt AC electrical
outlet with a grounded, three-wire extension cord.
For ambient temperatures below 0°F (-18°C), the
engine block heater is recommended. For ambient
temperatures below -20°F (-29°C), the engine
block heater is required.
The engine block heater cord is routed under the
hood, behind to the passenger’s side headlamp.
Follow the steps below to properly use the engine
block heater:
1. Locate the engine block heater cord (behind the passenger’s side headlamp).
2. Undo the hook-and-loop strap that secures the heater cord in place.
3. Pull the cord to the front of the vehicle and plug it into a grounded, three-wire extension
cord.
4. After the vehicle is running, reattach the cord to the hook-and-loop strap and properly stow
away behind the passenger’s side headlamp.
NOTE:
The engine block heater cord is a factory
installed option. If your vehicle is not equipped,
heater cords are available from an authorized
dealer.
The engine block heater will require 110 Volts
AC and 6.5 Amps to activate the heater
element.
The engine block heater must be plugged in at
least one hour to have an adequate warming
effect on the engine.
ENGINE BREAK-IN RECOMMENDATIONS
A long break-in period is not required for the engine
and drivetrain (transmission and axle) in your
vehicle.
Drive moderately during the first 300 miles
(500 km). After the initial 60 miles (100 km),
speeds up to 50 or 55 mph (80 or 90 km/h) are
desirable.
WARNING!
Remember to disconnect the engine block
heater cord before driving. Damage to the
110-115 Volt electrical cord could cause
electrocution.
21_RUV_OM_EN_USC_t.book Page 110
Page 121 of 348

STARTING AND OPERATING119
NOTE:
Even if the power steering assistance is no
longer operational, it is still possible to steer
the vehicle. Under these conditions there will
be a substantial increase in steering effort,
especially at low speeds and during parking
maneuvers.
The power steering system is fully electric; it
requires no power steering fluid.
If the condition persists, see an authorized
dealer for service.
STOP/START SYSTEM — IF EQUIPPED
The Stop/Start function is developed to reduce
fuel consumption. The system will stop the engine
automatically during a vehicle stop if the required
conditions are met. Releasing the brake pedal,
pressing the accelerator pedal or shifting out of
DRIVE (D) will automatically re-start the engine.
This vehicle has been upgraded with a heavy duty
starter, enhanced battery, and other upgraded
engine parts to handle the additional engine starts.
AUTOSTOP MODE
The Stop/Start feature is enabled after every
normal customer engine start. At that time, the
system will go into STOP/START READY and if
all other conditions are met, can go into a
STOP/START AUTOSTOP ACTIVE. To Activate Auto STOP/START, The Following Must
Occur:
The system must be in STOP/START READY
state. A STOP/START READY message will be
displayed in the instrument cluster within the
Stop/Start section
Úpage 97.
The vehicle must be completely stopped.
The gear selector must be in a forward gear and
the brake pedal pressed.
The engine will shut down, the tachometer will
move to the zero position and the Stop/Start
telltale will illuminate indicating you are in
Autostop. Customer settings will be maintained
throughout the Auto Stop/Start process.
POSSIBLE REASONS THE ENGINE DOES
N
OT AUTOSTOP
Prior to engine shut down, the system will check
many safety and comfort conditions for Stop/Start
and ensure they are fulfilled. Detailed information
about the operation of the Stop/Start system
may be viewed in the instrument cluster display
Stop/Start screen. In the following situations the
engine will not stop:
If Stop/Start is manually disabled by the
Stop/Start OFF button.
Driver’s seat belt is not buckled.
Driver’s door is not closed.
Battery temperature is too warm or cold.
Battery charge is low. During this time a
message will display "Stop/Start Not Ready
Battery Charging".
The vehicle is on a steep grade.
Cabin heating or cooling is in process and an
acceptable cabin temperature has not been
achieved.
HVAC is set to full defrost mode at a high blower
speed.
HVAC set to MAX A/C.
Engine has not reached normal operating
temperature.
The transmission is not in a forward gear.
Hood is open.
Brake pedal is not pressed with sufficient pres -
sure.
Accelerator pedal input.
Engine temperature too high.
5 mph (8 km/h) threshold not achieved from
previous Autostop.
Steering angle beyond threshold.
It may be possible for the vehicle to be driven
several times without the Stop/Start system going
into a STOP/START READY state under more
extreme conditions of the items listed above.
4
21_RUV_OM_EN_USC_t.book Page 119
Page 122 of 348
120STARTING AND OPERATING
TO START THE ENGINE WHILE IN AUTO
S
TOP/START
While in a forward gear, the engine will start when
the brake pedal is released or the throttle pedal is
pressed. The transmission will automatically
re-engage upon engine restart.
Conditions That Will Cause The Engine To Start
Automatically While In Auto Stop/Start:
The transmission selector is moved out of
DRIVE.
To maintain cabin temperature comfort.
HVAC is set to full defrost mode.
HVAC system temperature or fan speed is
manually adjusted.
Battery voltage drops too low. During this time a
message will display "Stop/Start Not Ready
Battery Charging".
Stop/Start OFF switch is pushed.
A Stop/Start system error occurs.
TO MANUALLY TURN OFF THE
S
TOP/START SYSTEM
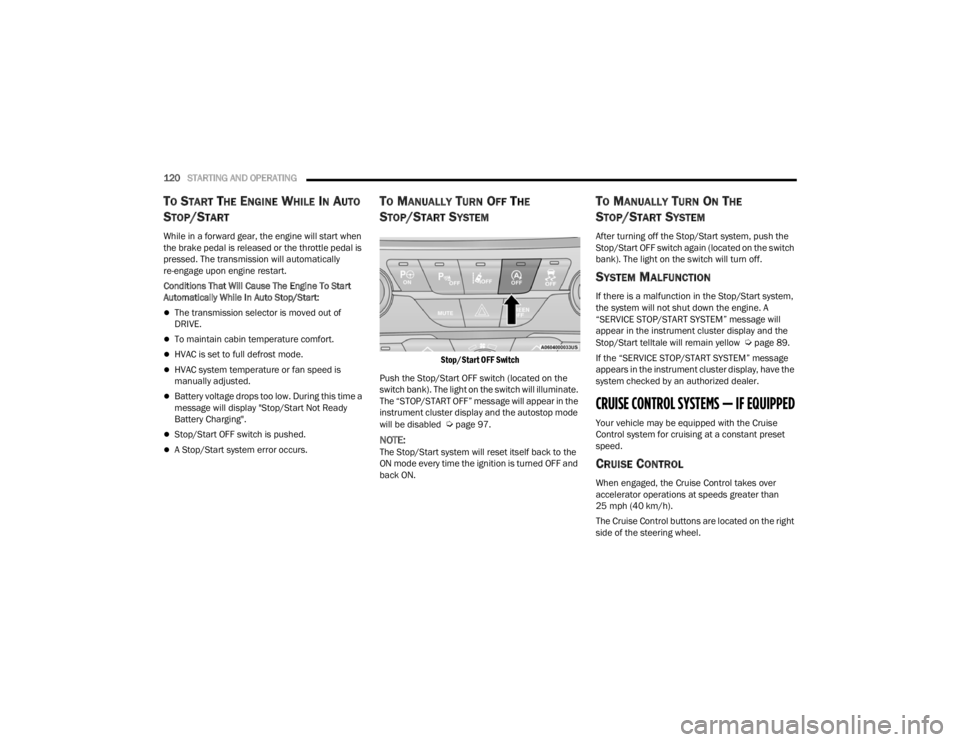
Stop/Start OFF Switch
Push the Stop/Start OFF switch (located on the
switch bank). The light on the switch will illuminate.
The “STOP/START OFF” message will appear in the
instrument cluster display and the autostop mode
will be disabled
Úpage 97.
NOTE:The Stop/Start system will reset itself back to the
ON mode every time the ignition is turned OFF and
back ON.
TO MANUALLY TURN ON THE
S
TOP/START SYSTEM
After turning off the Stop/Start system, push the
Stop/Start OFF switch again (located on the switch
bank). The light on the switch will turn off.
SYSTEM MALFUNCTION
If there is a malfunction in the Stop/Start system,
the system will not shut down the engine. A
“SERVICE STOP/START SYSTEM” message will
appear in the instrument cluster display and the
Stop/Start telltale will remain yellow
Úpage 89.
If the “SERVICE STOP/START SYSTEM” message
appears in the instrument cluster display, have the
system checked by an authorized dealer.
CRUISE CONTROL SYSTEMS — IF EQUIPPED
Your vehicle may be equipped with the Cruise
Control system for cruising at a constant preset
speed.
CRUISE CONTROL
When engaged, the Cruise Control takes over
accelerator operations at speeds greater than
25 mph (40 km/h).
The Cruise Control buttons are located on the right
side of the steering wheel.
21_RUV_OM_EN_USC_t.book Page 120
Page 130 of 348
128STARTING AND OPERATING
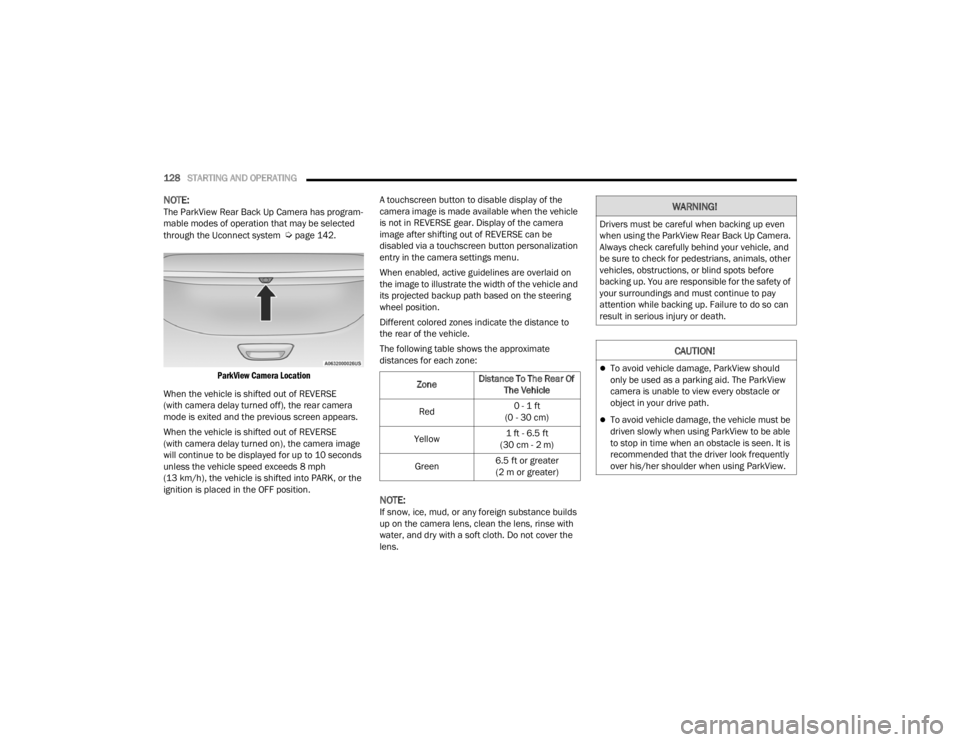
NOTE:The ParkView Rear Back Up Camera has program -
mable modes of operation that may be selected
through the Uconnect system
Úpage 142.
ParkView Camera Location
When the vehicle is shifted out of REVERSE
(with camera delay turned off), the rear camera
mode is exited and the previous screen appears.
When the vehicle is shifted out of REVERSE
(with camera delay turned on), the camera image
will continue to be displayed for up to 10 seconds
unless the vehicle speed exceeds 8 mph
(13 km/h), the vehicle is shifted into PARK, or the
ignition is placed in the OFF position. A touchscreen button to disable display of the
camera image is made available when the vehicle
is not in REVERSE gear. Display of the camera
image after shifting out of REVERSE can be
disabled via a touchscreen button personalization
entry in the camera settings menu.
When enabled, active guidelines are overlaid on
the image to illustrate the width of the vehicle and
its projected backup path based on the steering
wheel position.
Different colored zones indicate the distance to
the rear of the vehicle.
The following table shows the approximate
distances for each zone:
NOTE:If snow, ice, mud, or any foreign substance builds
up on the camera lens, clean the lens, rinse with
water, and dry with a soft cloth. Do not cover the
lens.
Zone
Distance To The Rear Of
The Vehicle
Red 0 - 1 ft
(0 - 30 cm)
Yellow 1 ft - 6.5 ft
(30 cm - 2 m)
Green 6.5 ft or greater
(2 m or greater)
WARNING!
Drivers must be careful when backing up even
when using the ParkView Rear Back Up Camera.
Always check carefully behind your vehicle, and
be sure to check for pedestrians, animals, other
vehicles, obstructions, or blind spots before
backing up. You are responsible for the safety of
your surroundings and must continue to pay
attention while backing up. Failure to do so can
result in serious injury or death.
CAUTION!
To avoid vehicle damage, ParkView should
only be used as a parking aid. The ParkView
camera is unable to view every obstacle or
object in your drive path.
To avoid vehicle damage, the vehicle must be
driven slowly when using ParkView to be able
to stop in time when an obstacle is seen. It is
recommended that the driver look frequently
over his/her shoulder when using ParkView.
21_RUV_OM_EN_USC_t.book Page 128
Page 162 of 348
160MULTIMEDIA
RADIO MODE
Radio Controls
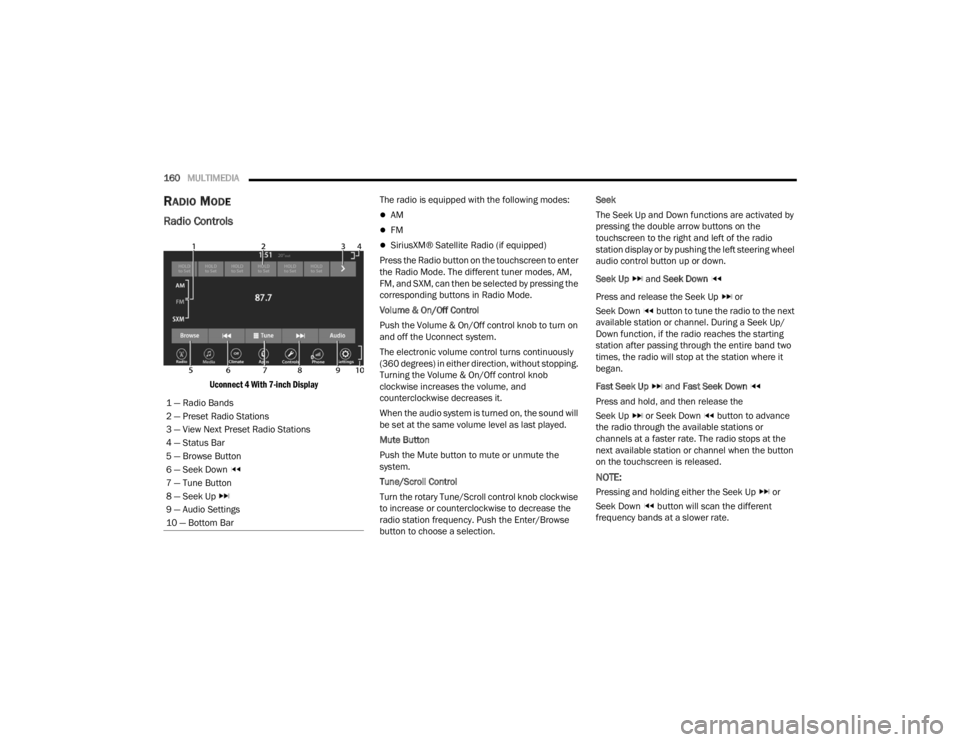
Uconnect 4 With 7-inch Display
The radio is equipped with the following modes:
AM
FM
SiriusXM® Satellite Radio (if equipped)
Press the Radio button on the touchscreen to enter
the Radio Mode. The different tuner modes, AM,
FM, and SXM, can then be selected by pressing the
corresponding buttons in Radio Mode.
Volume & On/Off Control
Push the Volume & On/Off control knob to turn on
and off the Uconnect system.
The electronic volume control turns continuously
(360 degrees) in either direction, without stopping.
Turning the Volume & On/Off control knob
clockwise increases the volume, and
counterclockwise decreases it.
When the audio system is turned on, the sound will
be set at the same volume level as last played.
Mute Button
Push the Mute button to mute or unmute the
system.
Tune/Scroll Control
Turn the rotary Tune/Scroll control knob clockwise
to increase or counterclockwise to decrease the
radio station frequency. Push the Enter/Browse
button to choose a selection. Seek
The Seek Up and Down functions are activated by
pressing the double arrow buttons on the
touchscreen to the right and left of the radio
station display or by pushing the left steering wheel
audio control button up or down.
Seek Up
and Seek Down
Press and release the Seek Up or
Seek Down button to tune the radio to the next
available station or channel. During a Seek Up/
Down function, if the radio reaches the starting
station after passing through the entire band two
times, the radio will stop at the station where it
began.
Fast Seek Up and Fast Seek Down
Press and hold, and then release the
Seek Up or Seek Down button to advance the radio through the available stations or
channels at a faster rate. The radio stops at the
next available station or channel when the button
on the touchscreen is released.
NOTE:
Pressing and holding either the Seek Up or
Seek Down button will scan the different
frequency bands at a slower rate.
1 — Radio Bands
2 — Preset Radio Stations
3 — View Next Preset Radio Stations
4 — Status Bar
5 — Browse Button
6 — Seek Down
7 — Tune Button
8 — Seek Up
9 — Audio Settings
10 — Bottom Bar
21_RUV_OM_EN_USC_t.book Page 160
Page 200 of 348

198SAFETY
FCW Limited Warning
If the instrument cluster displays “ACC/FCW
Limited Functionality” or “ACC/FCW Limited
Functionality Clean Front Windshield”
momentarily, there may be a condition that limits
FCW functionality. Although the vehicle is still
drivable under normal conditions, the active
braking may not be fully available. Once the
condition that limited the system performance is
no longer present, the system will return to its full
performance state. If the problem persists, see an
authorized dealer.
Service FCW Warning
If the system turns off, and the instrument cluster
displays:
ACC/FCW Unavailable Service Required
Cruise/FCW Unavailable Service Required
This indicates there is an internal system fault.
Although the vehicle is still drivable under normal
conditions, have the system checked by an
authorized dealer.
Pedestrian Emergency Braking (PEB) —
If Equipped
The Pedestrian Emergency Braking (PEB) is a
subsystem of the FCW system that provides the
driver with audible and visual warnings in the
instrument cluster display, and may apply
automatic braking when it detects a potential
frontal collision with a pedestrian.
If a PEB event begins at a speed below 37 mph
(60 km/h), the system may provide braking to
mitigate the potential collision with a pedestrian. If
the PEB event stops the vehicle completely, the
system will hold the vehicle at a standstill for two
seconds and then release the brakes. When the
system determines a collision with the pedestrian
in front of you is no longer probable, the warning
message will be deactivated.
The minimum speed for PEB activation is 3 mph
(5 km/h). Turning PEB On Or Off
NOTE:The default status of PEB is “On.” This allows the
system to warn you of a possible frontal collision
with the pedestrian.
The PEB button is located in the Uconnect display
in the Controls settings
Úpage 142.
To turn the PEB system off, push the Pedestrian
Emergency Braking button once.
To turn the PEB system back on, push the
Pedestrian Emergency Braking button again.
Changing the PEB status to “Off” deactivates the
system, so no warning or active braking will be
available in case of a possible frontal collision with
the pedestrian.
NOTE:The PEB system will NOT retain the last setting
selected by the driver after ignition shut down. The
system will reset to the default setting when the
vehicle is restarted.
WARNING!
Pedestrian Emergency Braking (PEB) is not
intended to avoid a collision on its own, nor can
PEB detect every type of potential collision with
a pedestrian. The driver has the responsibility to
avoid a collision by controlling the vehicle via
braking and steering. Failure to follow this
warning could lead to serious injury or death.
21_RUV_OM_EN_USC_t.book Page 198
Page 261 of 348
IN CASE OF EMERGENCY259
Sealing A Tire With Tire Service Kit
Whenever You Stop To Use Tire Service Kit:
1. Pull over to a safe location and turn on the vehicle’s Hazard Warning Flashers.
2. Verify that the valve stem (on the wheel with the deflated tire) is in a position that is near to
the ground. This will allow the Tire Service Kit
Hose to reach the valve stem and keep the Tire
Service Kit flat on the ground. This will provide
the best positioning of the kit when injecting
the sealant into the deflated tire and running
the air pump. Move the vehicle as necessary to
place the valve stem in this position before
proceeding.
3. Place the transmission in PARK (P) and cycle the ignition in the OFF position.
4. Apply the parking brake.
Setting Up To Use Tire Service Kit:
1. Uncoil the Sealant Hose and then remove the cap from the fitting at the end of the hose.
2. Place the Tire Service Kit flat on
the ground next to the deflated tire. 3. Remove the cap from the valve stem and then
screw the fitting at the end of the Sealant Hose
onto the valve stem.
4. Uncoil the Power Plug and insert
the plug into the vehicle’s 12 Volt
power outlet.
NOTE:Do not remove foreign objects (e.g., screws or
nails) from the tire.
Injecting Tire Service Kit Sealant Into The Deflated
Tire:
1. Always start the vehicle before
turning the Tire Service Kit on.
2. Ensure the Mode Select Knob is to
the Sealant Mode position.
3. After pushing the Power Button,
the sealant (white fluid) will flow from
the Sealant Bottle through the
Sealant Hose and into the tire.
NOTE:Sealant may leak out through the puncture in the
tire. If the sealant (white fluid) does not flow within
0 – 10 seconds through the Sealant Hose:
1. Push the Power Button to turn the Tire Service
Kit off. Disconnect the Sealant Hose from the
valve stem. Make sure the valve stem is free
of debris. Reconnect the Sealant Hose to the
valve stem. Check that the Mode Select Knob
is in the Sealant Mode position and not Air
Mode. Push the Power Button to turn the Tire
Service Kit on.
2. Connect the Power Plug to a different 12 Volt power outlet in your vehicle or another vehicle,
if available. Make sure the vehicle is running
before turning the Tire Service Kit on.
3. The Sealant Bottle may be empty due to previous use. Call for assistance.
If the sealant (white fluid) does flow through the
Sealant Hose:
1. Continue to operate the pump
until sealant is no longer flowing
through hose (typically takes
30 - 70 seconds). As the sealant
flows through the Sealant Hose, the Pressure
Gauge can read as high as 70 psi (4.8 Bar).
The Pressure Gauge will decrease quickly
from approximately 70 psi (4.8 Bar) to the
actual tire pressure when the Sealant Bottle
is empty.
7
21_RUV_OM_EN_USC_t.book Page 259