display CHRYSLER VOYAGER 2022 Service Manual
[x] Cancel search | Manufacturer: CHRYSLER, Model Year: 2022, Model line: VOYAGER, Model: CHRYSLER VOYAGER 2022Pages: 316, PDF Size: 17.41 MB
Page 126 of 316
124STARTING AND OPERATING
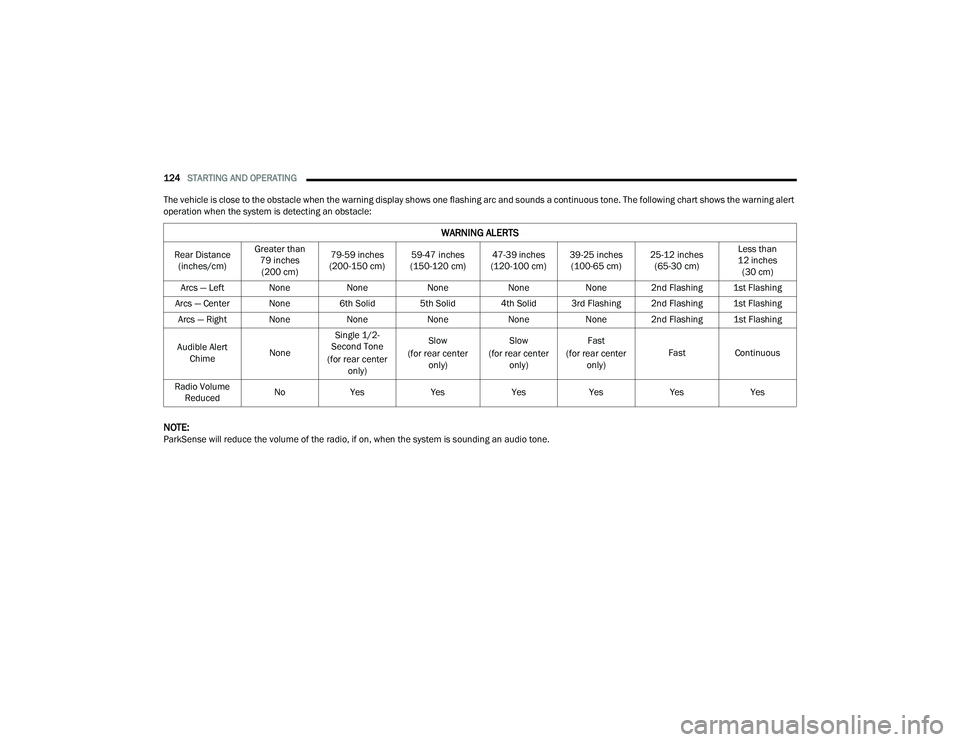
The vehicle is close to the obstacle when the warning display shows one flashing arc and sounds a continuous tone. The following chart shows the warning alert
operation when the system is detecting an obstacle:
NOTE:ParkSense will reduce the volume of the radio, if on, when the system is sounding an audio tone.
WARNING ALERTS
Rear Distance (inches/cm) Greater than
79 inches(200 cm) 79-59 inches
(200-150 cm) 59-47 inches
(150-120 cm) 47-39 inches
(120-100 cm) 39-25 inches
(100-65 cm) 25-12 inches
(65-30 cm) Less than
12 inches (30 cm)
Arcs — Left None NoneNoneNoneNone 2nd Flashing 1st Flashing
Arcs — Center None 6th Solid 5th Solid 4th Solid 3rd Flashing 2nd Flashing 1st Flashing
Arcs — Right None NoneNoneNoneNone 2nd Flashing 1st Flashing
Audible Alert Chime NoneSingle 1/2-
Second Tone
(for rear center only) Slow
(for rear center only) Slow
(for rear center only) Fast
(for rear center only) Fast
Continuous
Radio Volume Reduced No
Yes YesYesYes YesYes
22_RUVG_OM_EN_USC_t.book Page 124
Page 127 of 316
STARTING AND OPERATING125
ENABLING AND DISABLING PARKSENSE
ParkSense can be enabled and disabled
with the ParkSense switch, located on
the switch panel below the Uconnect
display.
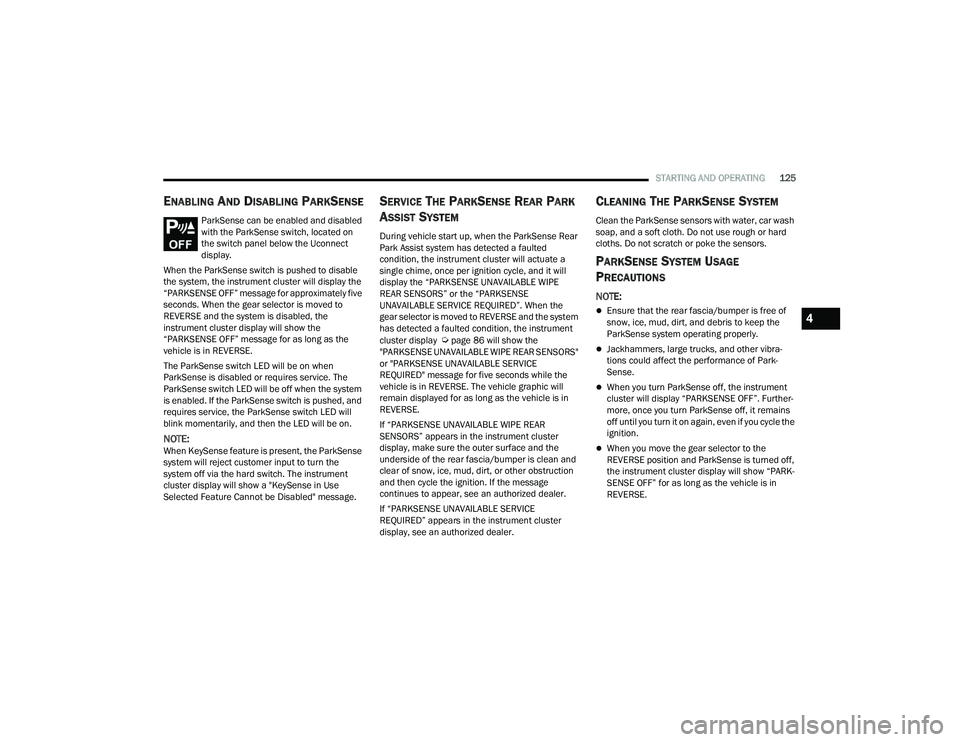
When the ParkSense switch is pushed to disable
the system, the instrument cluster will display the
“PARKSENSE OFF” message for approximately five
seconds. When the gear selector is moved to
REVERSE and the system is disabled, the
instrument cluster display will show the
“PARKSENSE OFF” message for as long as the
vehicle is in REVERSE.
The ParkSense switch LED will be on when
ParkSense is disabled or requires service. The
ParkSense switch LED will be off when the system
is enabled. If the ParkSense switch is pushed, and
requires service, the ParkSense switch LED will
blink momentarily, and then the LED will be on.
NOTE:When KeySense feature is present, the ParkSense
system will reject customer input to turn the
system off via the hard switch. The instrument
cluster display will show a "KeySense in Use
Selected Feature Cannot be Disabled" message.
SERVICE THE PARKSENSE REAR PARK
A
SSIST SYSTEM
During vehicle start up, when the ParkSense Rear
Park Assist system has detected a faulted
condition, the instrument cluster will actuate a
single chime, once per ignition cycle, and it will
display the “PARKSENSE UNAVAILABLE WIPE
REAR SENSORS” or the “PARKSENSE
UNAVAILABLE SERVICE REQUIRED”. When the
gear selector is moved to REVERSE and the system
has detected a faulted condition, the instrument
cluster display
Úpage 86 will show the
"PARKSENSE UNAVAILABLE WIPE REAR SENSORS"
or "PARKSENSE UNAVAILABLE SERVICE
REQUIRED" message for five seconds while the
vehicle is in REVERSE. The vehicle graphic will
remain displayed for as long as the vehicle is in
REVERSE.
If “PARKSENSE UNAVAILABLE WIPE REAR
SENSORS” appears in the instrument cluster
display, make sure the outer surface and the
underside of the rear fascia/bumper is clean and
clear of snow, ice, mud, dirt, or other obstruction
and then cycle the ignition. If the message
continues to appear, see an authorized dealer.
If “PARKSENSE UNAVAILABLE SERVICE
REQUIRED” appears in the instrument cluster
display, see an authorized dealer.
CLEANING THE PARKSENSE SYSTEM
Clean the ParkSense sensors with water, car wash
soap, and a soft cloth. Do not use rough or hard
cloths. Do not scratch or poke the sensors.
PARKSENSE SYSTEM USAGE
P
RECAUTIONS
NOTE:
Ensure that the rear fascia/bumper is free of
snow, ice, mud, dirt, and debris to keep the
ParkSense system operating properly.
Jackhammers, large trucks, and other vibra -
tions could affect the performance of Park -
Sense.
When you turn ParkSense off, the instrument
cluster will display “PARKSENSE OFF”. Further -
more, once you turn ParkSense off, it remains
off until you turn it on again, even if you cycle the
ignition.
When you move the gear selector to the
REVERSE position and ParkSense is turned off,
the instrument cluster display will show “PARK -
SENSE OFF” for as long as the vehicle is in
REVERSE.
4
22_RUVG_OM_EN_USC_t.book Page 125
Page 128 of 316
126STARTING AND OPERATING
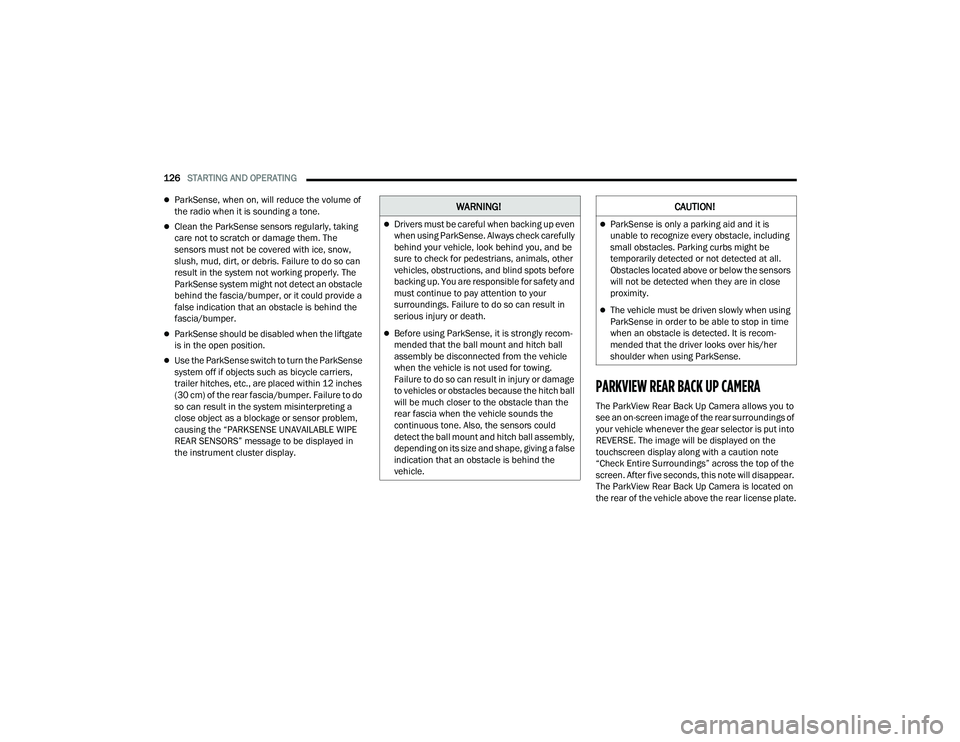
ParkSense, when on, will reduce the volume of
the radio when it is sounding a tone.
Clean the ParkSense sensors regularly, taking
care not to scratch or damage them. The
sensors must not be covered with ice, snow,
slush, mud, dirt, or debris. Failure to do so can
result in the system not working properly. The
ParkSense system might not detect an obstacle
behind the fascia/bumper, or it could provide a
false indication that an obstacle is behind the
fascia/bumper.
ParkSense should be disabled when the liftgate
is in the open position.
Use the ParkSense switch to turn the ParkSense
system off if objects such as bicycle carriers,
trailer hitches, etc., are placed within 12 inches
(30 cm) of the rear fascia/bumper. Failure to do
so can result in the system misinterpreting a
close object as a blockage or sensor problem,
causing the “PARKSENSE UNAVAILABLE WIPE
REAR SENSORS” message to be displayed in
the instrument cluster display.
PARKVIEW REAR BACK UP CAMERA
The ParkView Rear Back Up Camera allows you to
see an on-screen image of the rear surroundings of
your vehicle whenever the gear selector is put into
REVERSE. The image will be displayed on the
touchscreen display along with a caution note
“Check Entire Surroundings” across the top of the
screen. After five seconds, this note will disappear.
The ParkView Rear Back Up Camera is located on
the rear of the vehicle above the rear license plate.
WARNING!
Drivers must be careful when backing up even
when using ParkSense. Always check carefully
behind your vehicle, look behind you, and be
sure to check for pedestrians, animals, other
vehicles, obstructions, and blind spots before
backing up. You are responsible for safety and
must continue to pay attention to your
surroundings. Failure to do so can result in
serious injury or death.
Before using ParkSense, it is strongly recom -
mended that the ball mount and hitch ball
assembly be disconnected from the vehicle
when the vehicle is not used for towing.
Failure to do so can result in injury or damage
to vehicles or obstacles because the hitch ball
will be much closer to the obstacle than the
rear fascia when the vehicle sounds the
continuous tone. Also, the sensors could
detect the ball mount and hitch ball assembly,
depending on its size and shape, giving a false
indication that an obstacle is behind the
vehicle.
CAUTION!
ParkSense is only a parking aid and it is
unable to recognize every obstacle, including
small obstacles. Parking curbs might be
temporarily detected or not detected at all.
Obstacles located above or below the sensors
will not be detected when they are in close
proximity.
The vehicle must be driven slowly when using
ParkSense in order to be able to stop in time
when an obstacle is detected. It is recom -
mended that the driver looks over his/her
shoulder when using ParkSense.
22_RUVG_OM_EN_USC_t.book Page 126
Page 129 of 316
STARTING AND OPERATING127
NOTE:The ParkView Rear Back Up Camera has program -
mable modes of operation that may be selected
through the Uconnect system
Úpage 141.
When the vehicle is shifted out of REVERSE (with
camera delay turned off), the rear camera mode is
exited and the previous screen appears.
When the vehicle is shifted out of REVERSE (with
camera delay turned on), the camera image will
continue to be displayed for up to 10 seconds
unless the vehicle speed exceeds 8 mph
(13 km/h), the vehicle is shifted into PARK, or the
ignition is placed in the OFF position.
A touchscreen button to disable display of the
camera image is made available when the vehicle
is not in REVERSE gear. Display of the camera
image after shifting out of REVERSE can be
disabled via a touchscreen button personalization
entry in the camera settings menu.
When enabled, active guidelines are overlaid on
the image to illustrate the width of the vehicle and
its projected backup path based on the steering
wheel position.
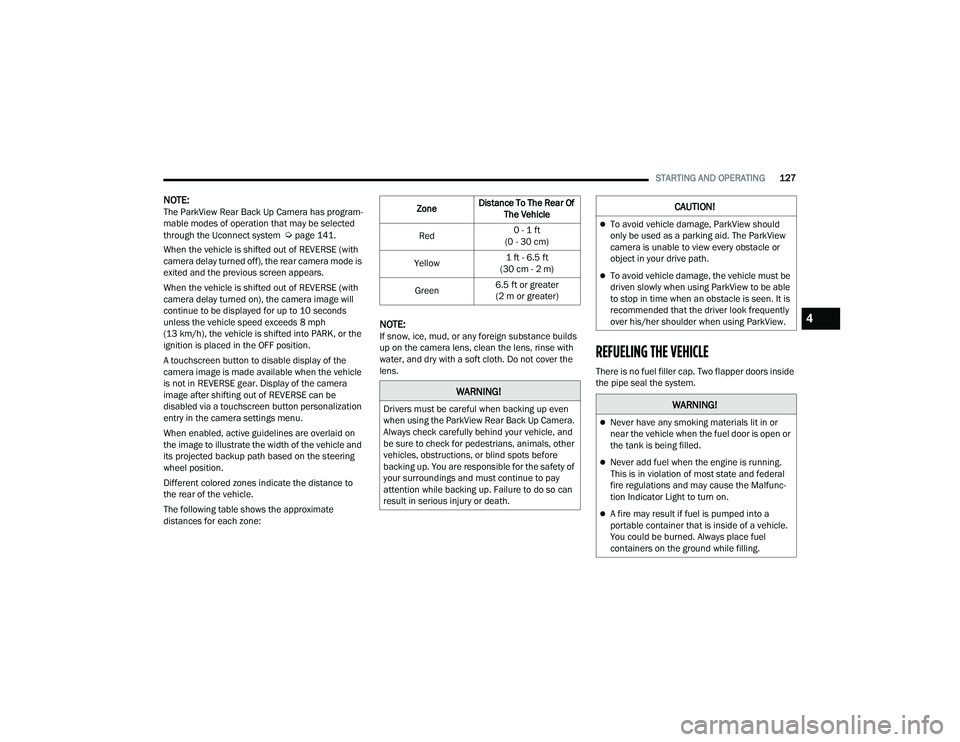
Different colored zones indicate the distance to
the rear of the vehicle.
The following table shows the approximate
distances for each zone:
NOTE:If snow, ice, mud, or any foreign substance builds
up on the camera lens, clean the lens, rinse with
water, and dry with a soft cloth. Do not cover the
lens.
REFUELING THE VEHICLE
There is no fuel filler cap. Two flapper doors inside
the pipe seal the system.
Zone
Distance To The Rear Of
The Vehicle
Red 0 - 1 ft
(0 - 30 cm)
Yellow 1 ft - 6.5 ft
(30 cm - 2 m)
Green 6.5 ft or greater
(2 m or greater)
WARNING!
Drivers must be careful when backing up even
when using the ParkView Rear Back Up Camera.
Always check carefully behind your vehicle, and
be sure to check for pedestrians, animals, other
vehicles, obstructions, or blind spots before
backing up. You are responsible for the safety of
your surroundings and must continue to pay
attention while backing up. Failure to do so can
result in serious injury or death.
CAUTION!
To avoid vehicle damage, ParkView should
only be used as a parking aid. The ParkView
camera is unable to view every obstacle or
object in your drive path.
To avoid vehicle damage, the vehicle must be
driven slowly when using ParkView to be able
to stop in time when an obstacle is seen. It is
recommended that the driver look frequently
over his/her shoulder when using ParkView.
WARNING!
Never have any smoking materials lit in or
near the vehicle when the fuel door is open or
the tank is being filled.
Never add fuel when the engine is running.
This is in violation of most state and federal
fire regulations and may cause the Malfunc -
tion Indicator Light to turn on.
A fire may result if fuel is pumped into a
portable container that is inside of a vehicle.
You could be burned. Always place fuel
containers on the ground while filling.
4
22_RUVG_OM_EN_USC_t.book Page 127
Page 142 of 316
140
MULTIMEDIA
UCONNECT SYSTEMS
For detailed information about your Uconnect 5
With 7-inch Display or Uconnect 5/5 NAV With
10.1-inch Display system, refer to your Uconnect
Owner’s Manual Supplement.
NOTE:Uconnect screen images are for illustration
purposes only and may not reflect exact software
for your vehicle.
CYBERSECURITY
Your vehicle may be a connected vehicle and may
be equipped with both wired and wireless
networks. These networks allow your vehicle to
send and receive information. This information
allows systems and features in your vehicle to
function properly.
Your vehicle may be equipped with certain security
features to reduce the risk of unauthorized and
unlawful access to vehicle systems and wireless
communications. Vehicle software technology
continues to evolve over time and FCA US LLC,
working with its suppliers, evaluates and takes
appropriate steps as needed. Similar to a
computer or other devices, your vehicle may
require software updates to improve the usability and performance of your systems or to reduce the
potential risk of unauthorized and unlawful access
to your vehicle systems.
The risk of unauthorized and unlawful access to
your vehicle systems may still exist, even if the
most recent version of vehicle software (such as
Uconnect software) is installed.
NOTE:
FCA US LLC or your dealer may contact you
directly regarding software updates.
To help further improve vehicle security and
minimize the potential risk of a security breach,
vehicle owners should:
Routinely check www.driveuconnect.com
(US Residents) or www.driveuconnect.ca
(Canadian Residents) to learn about avail -
able Uconnect software updates.
Only connect and use trusted media
devices (e.g. personal mobile phones,
USBs, CDs).
Privacy of any wireless and wired communications
cannot be assured. Third parties may unlawfully
intercept information and private communications
without your consent
Úpage 102.
WARNING!
It is not possible to know or to predict all of the
possible outcomes if your vehicle’s systems
are breached. It may be possible that vehicle
systems, including safety related systems,
could be impaired or a loss of vehicle control
could occur that may result in an accident
involving serious injury or death.
ONLY insert trusted devices/components into
your vehicle. Media of unknown origin could
possibly contain malicious software, and if
installed in your vehicle, it may increase the
possibility for vehicle systems to be breached.
As always, if you experience unusual vehicle
behavior, take your vehicle to your nearest
authorized dealer immediately.
22_RUVG_OM_EN_USC_t.book Page 140
Page 143 of 316
MULTIMEDIA141
UCONNECT SETTINGS
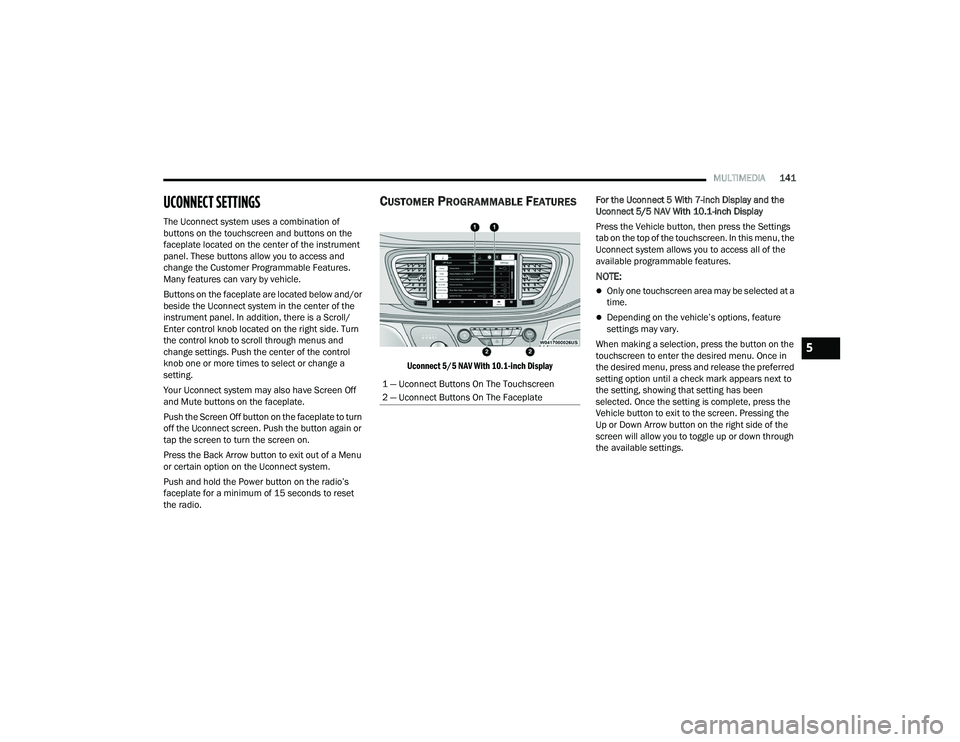
The Uconnect system uses a combination of
buttons on the touchscreen and buttons on the
faceplate located on the center of the instrument
panel. These buttons allow you to access and
change the Customer Programmable Features.
Many features can vary by vehicle.
Buttons on the faceplate are located below and/or
beside the Uconnect system in the center of the
instrument panel. In addition, there is a Scroll/
Enter control knob located on the right side. Turn
the control knob to scroll through menus and
change settings. Push the center of the control
knob one or more times to select or change a
setting.
Your Uconnect system may also have Screen Off
and Mute buttons on the faceplate.
Push the Screen Off button on the faceplate to turn
off the Uconnect screen. Push the button again or
tap the screen to turn the screen on.
Press the Back Arrow button to exit out of a Menu
or certain option on the Uconnect system.
Push and hold the Power button on the radio’s
faceplate for a minimum of 15 seconds to reset
the radio.
CUSTOMER PROGRAMMABLE FEATURES
Uconnect 5/5 NAV With 10.1-inch Display
For the Uconnect 5 With 7-inch Display and the
Uconnect 5/5 NAV With 10.1-inch Display
Press the Vehicle button, then press the Settings
tab on the top of the touchscreen. In this menu, the
Uconnect system allows you to access all of the
available programmable features.
NOTE:
Only one touchscreen area may be selected at a
time.
Depending on the vehicle’s options, feature
settings may vary.
When making a selection, press the button on the
touchscreen to enter the desired menu. Once in
the desired menu, press and release the preferred
setting option until a check mark appears next to
the setting, showing that setting has been
selected. Once the setting is complete, press the
Vehicle button to exit to the screen. Pressing the
Up or Down Arrow button on the right side of the
screen will allow you to toggle up or down through
the available settings.
1 — Uconnect Buttons On The Touchscreen
2 — Uconnect Buttons On The Faceplate
5
22_RUVG_OM_EN_USC_t.book Page 141
Page 144 of 316
142MULTIMEDIA
KeySense
The vehicle’s KeySense settings are protected by a unique four-digit PIN, which the vehicle owner creates when accessing the specific settings for the first
time. This four-digit PIN can only be reset by an authorized dealer.
After pressing the KeySense button on the touchscreen, and entering the KeySense PIN, the following settings will be available:
Setting Name Description
Forward Collision Warning Sensitivity — If Equipped This setting will change the distance at which the Forward Collision Warning
(FCW) alert sounds. The “Medium” setting will have the FCW system signal
when an object is in view, and the possibility of a collision is detected. The
“Near” setting will have the FCW system signal when the object is closer to the
vehicle. The “Far” setting will have the FCW system signal when an object is at
a far distance from the vehicle.
Forward Collision Warning — If Equipped This setting will turn the Forward Collision Warning (FCW) system on or off.
The “Warning Only” setting will provide only an audible chime when a collision
is detected. The “Warning + Active Braking” setting will provide an audible
chime and apply some brake pressure when a collision is detected.
ParkSense — If Equipped This setting will change the type of ParkSense alert when a close object is
detected. The “Sound Only” setting will provide an audible chime when an
object is detected. The “Sound and Display” setting will provide both an
audible chime and a visual display when an object is detected.
Front ParkSense Volume — If Equipped This setting adjusts the volume of the Front ParkSense system. The available
settings are “Low”, “Medium”, and “High”.
Rear ParkSense Volume — If Equipped This setting adjusts the volume of the Rear ParkSense system. The available
settings are “Low”, “Medium”, and “High”.
Rear ParkSense Braking Assist — If Equipped This setting will turn the Rear ParkSense Braking Assist on or off.
22_RUVG_OM_EN_USC_t.book Page 142
Page 145 of 316
MULTIMEDIA143
Display
Blind Spot Alert — If Equipped This setting will change the type of alert provided when an object is detected
in a vehicle’s blind spot. The “Lights” setting will activate the Blind Spot Alert
lights on the outside mirrors. The “Lights & Chime” setting will activate both
the lights on the outside mirrors and an audible chime.
Maximum Vehicle Speed This setting adjusts the Maximum Vehicle Speed. This feature can be set to
65, 70, 75, 80, or 85 mph (90, 95, 100, 105 or 110 km/h) by using the “-”
and “+” options.
Start Up Fuel Level Message This setting will turn on the Start Up Fuel Level Message on or off.
Earlier Low Fuel Alert This setting will turn on the Earlier Low Fuel Alert on or off.
Setting NameDescription
After pressing the Display button on the touchscreen, the following settings will be available:
Setting NameDescription
Language This setting will change the language of the Uconnect system and Instrument
Cluster Display. The available languages are English, Français, and Español.
Display Mode This setting will allow you to set the brightness manually or have the system
set it automatically. The “Auto” setting has the system automatically adjust
the display brightness. The “Manual” setting will allow the user to adjust the
brightness of the display.
Display Brightness With Headlights ON/Brightness This setting will allow you to set the brightness when the headlights are on. To
access this setting, Display Mode must be set to Manual. The “+” setting will
increase the brightness; the “-” will decrease the brightness.
5
22_RUVG_OM_EN_USC_t.book Page 143
Page 146 of 316
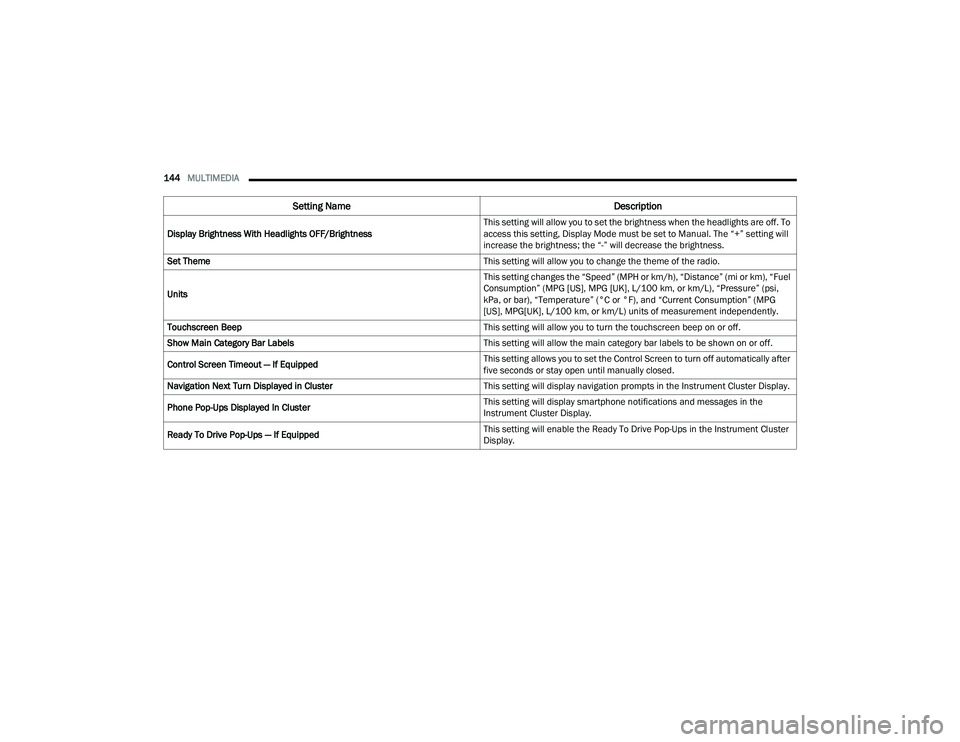
144MULTIMEDIA
Display Brightness With Headlights OFF/Brightness This setting will allow you to set the brightness when the headlights are off. To
access this setting, Display Mode must be set to Manual. The “+” setting will
increase the brightness; the “-” will decrease the brightness.
Set Theme This setting will allow you to change the theme of the radio.
Units This setting changes the “Speed” (MPH or km/h), “Distance” (mi or km), “Fuel
Consumption” (MPG [US], MPG [UK], L/100 km, or km/L), “Pressure” (psi,
kPa, or bar), “Temperature” (°C or °F), and “Current Consumption” (MPG
[US], MPG[UK], L/100 km, or km/L) units of measurement independently.
Touchscreen Beep This setting will allow you to turn the touchscreen beep on or off.
Show Main Category Bar Labels This setting will allow the main category bar labels to be shown on or off.
Control Screen Timeout — If Equipped This setting allows you to set the Control Screen to turn off automatically after
five seconds or stay open until manually closed.
Navigation Next Turn Displayed in Cluster This setting will display navigation prompts in the Instrument Cluster Display.
Phone Pop-Ups Displayed In Cluster This setting will display smartphone notifications and messages in the
Instrument Cluster Display.
Ready To Drive Pop-Ups — If Equipped This setting will enable the Ready To Drive Pop-Ups in the Instrument Cluster
Display.
Setting Name
Description
22_RUVG_OM_EN_USC_t.book Page 144
Page 147 of 316
MULTIMEDIA145
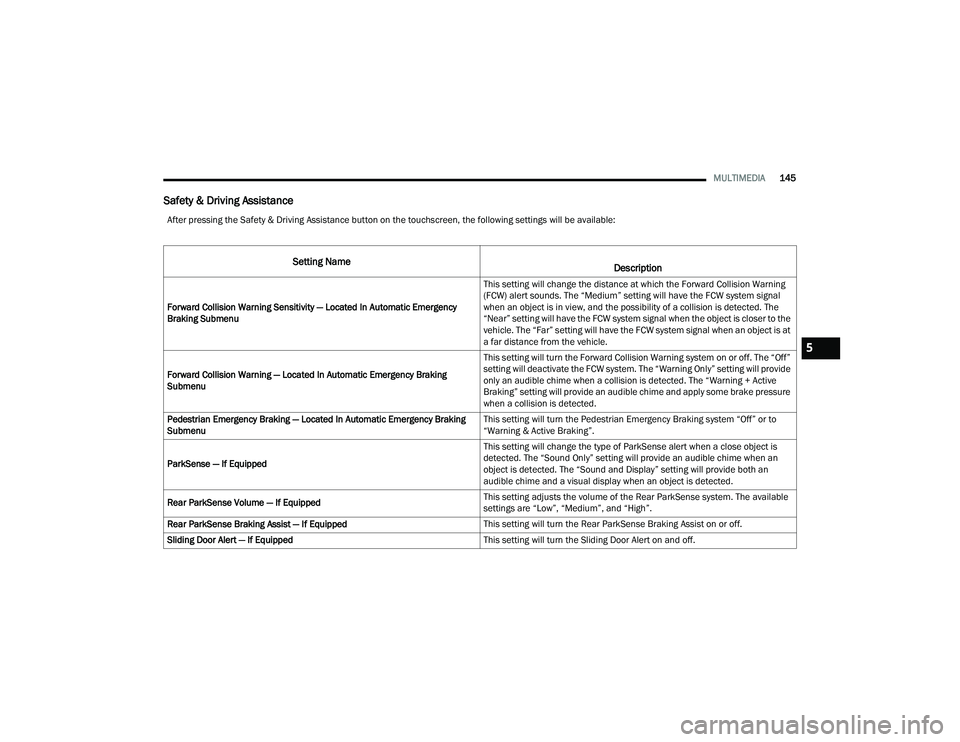
Safety & Driving Assistance
After pressing the Safety & Driving Assistance button on the touchscreen, the following settings will be available:
Setting Name
Description
Forward Collision Warning Sensitivity — Located In Automatic Emergency
Braking Submenu This setting will change the distance at which the Forward Collision Warning
(FCW) alert sounds. The “Medium” setting will have the FCW system signal
when an object is in view, and the possibility of a collision is detected. The
“Near” setting will have the FCW system signal when the object is closer to the
vehicle. The “Far” setting will have the FCW system signal when an object is at
a far distance from the vehicle.
Forward Collision Warning — Located In Automatic Emergency Braking
Submenu This setting will turn the Forward Collision Warning system on or off. The “Off”
setting will deactivate the FCW system. The “Warning Only” setting will provide
only an audible chime when a collision is detected. The “Warning + Active
Braking” setting will provide an audible chime and apply some brake pressure
when a collision is detected.
Pedestrian Emergency Braking — Located In Automatic Emergency Braking
Submenu This setting will turn the Pedestrian Emergency Braking system “Off” or to
“Warning & Active Braking”.
ParkSense — If Equipped This setting will change the type of ParkSense alert when a close object is
detected. The “Sound Only” setting will provide an audible chime when an
object is detected. The “Sound and Display” setting will provide both an
audible chime and a visual display when an object is detected.
Rear ParkSense Volume — If Equipped This setting adjusts the volume of the Rear ParkSense system. The available
settings are “Low”, “Medium”, and “High”.
Rear ParkSense Braking Assist — If Equipped This setting will turn the Rear ParkSense Braking Assist on or off.
Sliding Door Alert — If Equipped This setting will turn the Sliding Door Alert on and off.
5
22_RUVG_OM_EN_USC_t.book Page 145