brake light CHRYSLER VOYAGER 2023 User Guide
[x] Cancel search | Manufacturer: CHRYSLER, Model Year: 2023, Model line: VOYAGER, Model: CHRYSLER VOYAGER 2023Pages: 256, PDF Size: 13.97 MB
Page 85 of 256
STARTING AND OPERATING83
The following indicators should be used to ensure that you
have properly engaged the transmission into the PARK
position:
Look at the transmission gear position display and
verify that it indicates the PARK position (P), and is not
blinking.
With the brake pedal released, verify that the gear
selector will not move out of PARK.
REVERSE (R)
This range is for moving the vehicle backward. Shift into
REVERSE only after the vehicle has come to a complete stop.
NEUTRAL (N)
Use this range when the vehicle is standing for prolonged
periods with the engine running. The engine may be
started in this range. Apply the parking brake and shift the
transmission into PARK if you must exit the vehicle.
DRIVE (D)
This range should be used for most city and highway driving. It
provides the smoothest upshifts and downshifts, and the best
fuel economy. The transmission automatically upshifts through
all forward gears. The DRIVE position provides optimum driving
characteristics under all normal operating conditions.
If the transmission temperature exceeds normal operating
limits, the transmission controller may modify the transmission
shift schedule, reduce engine torque, and/or expand the range
of torque converter clutch engagement. This is done to prevent
transmission damage due to overheating.
If the transmission becomes extremely hot, the
Transmission Temperature Warning Light will illuminate, a
warning message will appear in the instrument cluster,
and the transmission may operate differently until the
transmission cools down.
During cold temperatures, transmission operation may be
modified depending on engine and transmission temperature
as well as vehicle speed. This feature improves warm-up time
of the engine and transmission to achieve maximum efficiency.
Engagement of the torque converter clutch, and shifts into
EIGHTH or NINTH gear, are inhibited until the transmission fluid
is warm
Ú
page 84. Normal operation will resume once the
transmission temperature has risen to a suitable level.
LOW (L)
Use this range for engine braking when descending
very steep grades. In this range, the transmission will
downshift for increased engine braking. To access the
LOW position, push down on the gear selector and rotate
it fully clockwise.
Transmission Limp Home Mode
Transmission function is monitored electronically for
abnormal conditions. If a condition is detected that could
result in transmission damage, Transmission Limp Home
Mode is activated. In this mode, the transmission may
operate only in a fixed gear, or may remain in NEUTRAL.
The Malfunction Indicator Light (MIL) may be illuminated.
Limp Home Mode may allow the vehicle to be driven to an
authorized dealer for service without damaging the
transmission.
CAUTION!
Before moving the transmission gear selector out of
PARK, you must start the engine, and also press the
brake pedal. Otherwise, damage to the gear selector
could result.
DO NOT race the engine when shifting from PARK
or NEUTRAL into another gear range, as this can
damage the drivetrain.
WARNING!
Do not coast in NEUTRAL and never turn off the ignition to
coast down a hill. These are unsafe practices that limit your
response to changing traffic or road conditions. You might
lose control of the vehicle and have a collision.
CAUTION!
Towing the vehicle, coasting, or driving for any other
reason with the transmission in NEUTRAL can cause
severe transmission damage.
If Recreational Towing
Úpage 101.
If Towing A Disabled Vehicle
Úpage 190.
4
23_RUV_OM_EN_US_t.book Page 83
Page 89 of 256
STARTING AND OPERATING87
To Activate
Push the on/off button to activate the Cruise Control. The
cruise indicator light in the instrument cluster display will
illuminate. To turn the system off, push the on/off button
a second time. The cruise indicator light will turn off.
The system should be turned off when not in use.
To Set A Desired Speed
Turn the Cruise Control on.
NOTE:The vehicle should be traveling at a steady speed and on
level ground before pushing the SET (+) or SET (-) button.
When the vehicle has reached the desired speed, push
the SET (+) or SET (-) button and release. Release the
accelerator and the vehicle will operate at the selected
speed.
To Vary The Speed Setting
To Increase Or Decrease The Set Speed
When the Cruise Control is set, you can increase speed by
pushing the SET (+) button, or decrease speed by pushing
the SET (-) button. U.S. Speed (mph)
Pushing the SET (+), or SET (-) button once will result in
a 1 mph speed adjustment. Each subsequent tap of
the button results in an adjustment of 1 mph.
If the button is continually pushed, the set speed will
continue to adjust in 5 mph increments until the button
is released. The new set speed is reflected in the instru -
ment cluster display.
Metric Speed (km/h)
Pushing the SET (+), or SET (-) button once will result in
a 1 km/h speed adjustment. Each subsequent tap of
the button results in an adjustment of 1 km/h.
If the button is continually pushed, the set speed will
continue to adjust in 10 km/h increments until the
button is released. The new set speed is reflected in
the instrument cluster display.
To Accelerate For Passing
Press the accelerator as you would normally. When the
pedal is released, the vehicle will return to the set speed.
USING CRUISE CONTROL ON HILLS
The transmission may downshift on hills to maintain the
vehicle set speed.
The Cruise Control system maintains speed up and down
hills. A slight speed change on moderate hills is normal.
On steep hills, a greater speed loss or gain may occur so it
may be preferable to drive without Cruise Control.
To Resume Speed
To resume a previously set speed, push the RES button
and release. Resume can be used at any speed above
20 mph (32 km/h).
To Deactivate
A tap on the brake pedal, pushing the CANC button, or
normal brake pressure will deactivate the Cruise Control
system without erasing the set speed from memory.
Pushing the on/off button or placing the ignition in the OFF
position erases the set speed from memory.
PARKSENSE REAR PARK ASSIST —
IF EQUIPPED
The ParkSense Rear Park Assist system provides visual
and audible indications of the distance between the rear
fascia and a detected obstacle when backing up (e.g.
during a parking maneuver). If your vehicle is equipped
with an automatic transmission, the vehicle brakes may
be automatically applied and released when performing a
reverse parking maneuver if the system detects a possible
collision with an obstacle.
WARNING!
Leaving the Cruise Control system on when not in use is
dangerous. You could accidentally set the system or
cause it to go faster than you want. You could lose
control and have an accident. Always leave the system
off when you are not using it.
WARNING!
Cruise Control can be dangerous where the system
cannot maintain a constant speed. Your vehicle could
go too fast for the conditions, and you could lose control
and have an accident. Do not use Cruise Control in
heavy traffic or on roads that are winding, icy,
snow-covered or slippery.
4
23_RUV_OM_EN_US_t.book Page 87
Page 102 of 256
100STARTING AND OPERATING
Towing Requirements — Tires
Do not attempt to tow a trailer while using a compact
spare tire.
Do not drive more than 50 mph (80 km/h) when towing
while using a full size spare tire.
Proper tire inflation pressures are essential to the safe
and satisfactory operation of your vehicle.
Check the trailer tires for proper tire inflation pressures
before trailer usage.
Check for signs of tire wear or visible tire damage
before towing a trailer.
Replacing tires with a higher load carrying capacity will
not increase the vehicle's GVWR and GAWR limits.
For further information
Úpage 224.
Towing Requirements — Trailer Brakes
Do not interconnect the hydraulic brake system or
vacuum system of your vehicle with that of the trailer.
This could cause inadequate braking and possible
personal injury.
An electronically actuated trailer brake controller is
required when towing a trailer with electronically actu -
ated brakes. When towing a trailer equipped with a
hydraulic surge actuated brake system, an electronic
brake controller is not required.
Trailer brakes are recommended for trailers over
1,000 lb (453 kg) and required for trailers in excess of
2,000 lb (907 kg).
Towing Requirements — Trailer Lights And
Wiring
Whenever you pull a trailer, regardless of the trailer size,
stop lights and turn signals on the trailer are required for
motoring safety.
The Trailer Tow Package may include a four and seven-pin
wiring harness. Use a factory approved trailer harness and
connector.
NOTE:
Do not cut or splice wiring into the vehicle’s wiring harness.
The electrical connections are all complete to the vehicle
but you must mate the harness to a trailer connector.
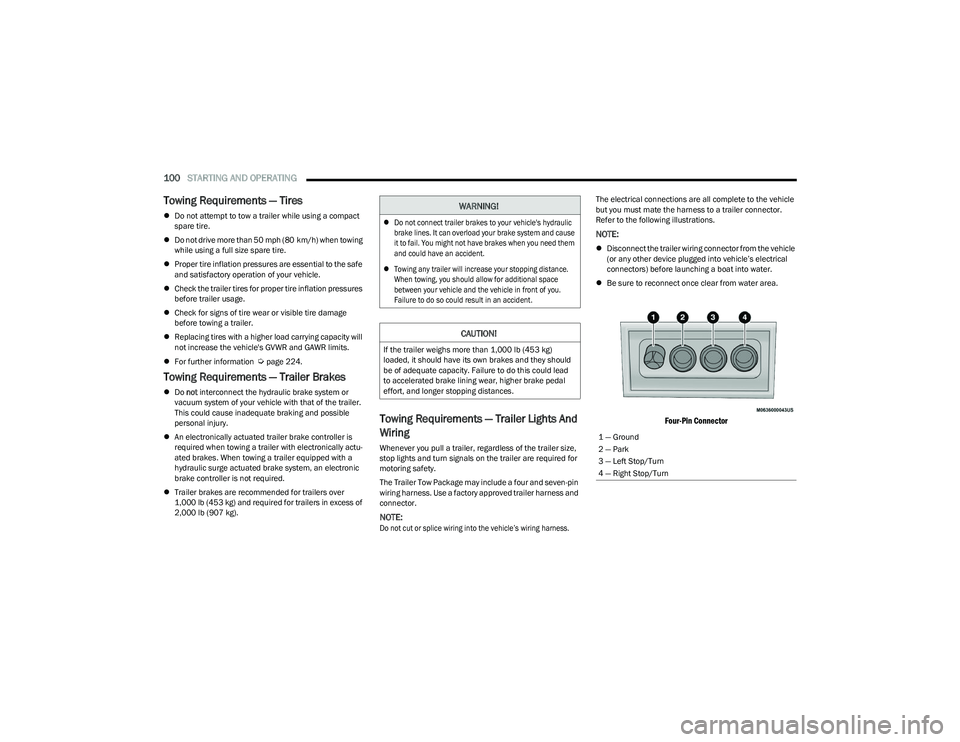
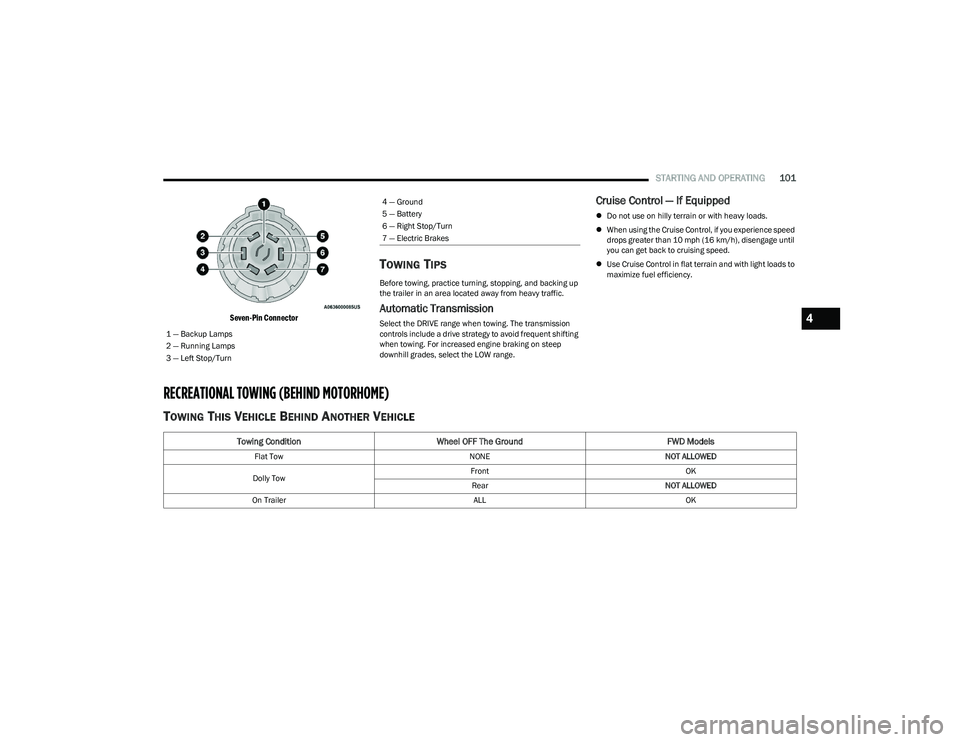
Refer to the following illustrations.
NOTE:
Disconnect the trailer wiring connector from the vehicle
(or any other device plugged into vehicle’s electrical
connectors) before launching a boat into water.
Be sure to reconnect once clear from water area.
Four-Pin Connector
WARNING!
Do not connect trailer brakes to your vehicle's hydraulic
brake lines. It can overload your brake system and cause
it to fail. You might not have brakes when you need them
and could have an accident.
Towing any trailer will increase your stopping distance.
When towing, you should allow for additional space
between your vehicle and the vehicle in front of you.
Failure to do so could result in an accident.
CAUTION!
If the trailer weighs more than 1,000 lb (453 kg)
loaded, it should have its own brakes and they should
be of adequate capacity. Failure to do this could lead
to accelerated brake lining wear, higher brake pedal
effort, and longer stopping distances.
1 — Ground
2 — Park
3 — Left Stop/Turn
4 — Right Stop/Turn
23_RUV_OM_EN_US_t.book Page 100
Page 103 of 256
STARTING AND OPERATING101
Seven-Pin Connector
TOWING TIPS
Before towing, practice turning, stopping, and backing up
the trailer in an area located away from heavy traffic.
Automatic Transmission
Select the DRIVE range when towing. The transmission
controls include a drive strategy to avoid frequent shifting
when towing. For increased engine braking on steep
downhill grades, select the LOW range.
Cruise Control — If Equipped
Do not use on hilly terrain or with heavy loads.
When using the Cruise Control, if you experience speed
drops greater than 10 mph (16 km/h), disengage until
you can get back to cruising speed.
Use Cruise Control in flat terrain and with light loads to
maximize fuel efficiency.
RECREATIONAL TOWING (BEHIND MOTORHOME)
TOWING THIS VEHICLE BEHIND ANOTHER VEHICLE
1 — Backup Lamps
2 — Running Lamps
3 — Left Stop/Turn
4 — Ground
5 — Battery
6 — Right Stop/Turn
7 — Electric Brakes
Towing Condition Wheel OFF The Ground FWD Models
Flat TowNONENOT ALLOWED
Dolly Tow Front
OK
Rear NOT ALLOWED
On Trailer ALLOK
4
23_RUV_OM_EN_US_t.book Page 101
Page 105 of 256
STARTING AND OPERATING103
(Continued)
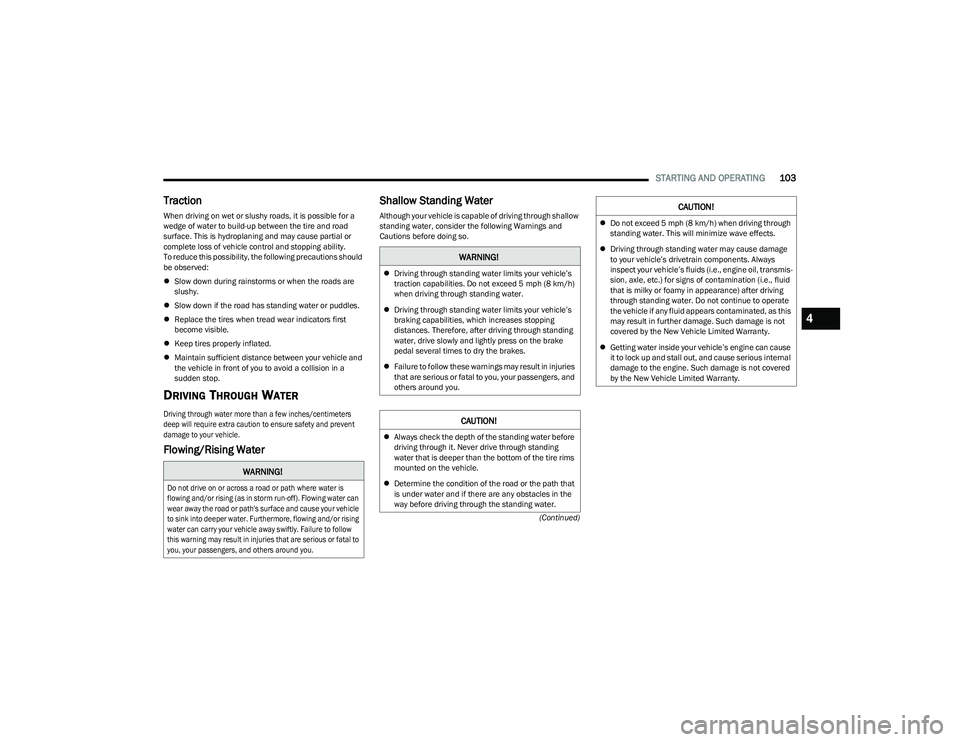
Traction
When driving on wet or slushy roads, it is possible for a
wedge of water to build-up between the tire and road
surface. This is hydroplaning and may cause partial or
complete loss of vehicle control and stopping ability.
To reduce this possibility, the following precautions should
be observed:
Slow down during rainstorms or when the roads are
slushy.
Slow down if the road has standing water or puddles.
Replace the tires when tread wear indicators first
become visible.
Keep tires properly inflated.
Maintain sufficient distance between your vehicle and
the vehicle in front of you to avoid a collision in a
sudden stop.
DRIVING THROUGH WATER
Driving through water more than a few inches/centimeters
deep will require extra caution to ensure safety and prevent
damage to your vehicle.
Flowing/Rising Water Shallow Standing Water
Although your vehicle is capable of driving through shallow
standing water, consider the following Warnings and
Cautions before doing so.
WARNING!
Do not drive on or across a road or path where water is
flowing and/or rising (as in storm run-off). Flowing water can
wear away the road or path's surface and cause your vehicle
to sink into deeper water. Furthermore, flowing and/or rising
water can carry your vehicle away swiftly. Failure to follow
this warning may result in injuries that are serious or fatal to
you, your passengers, and others around you.
WARNING!
Driving through standing water limits your vehicle’s
traction capabilities. Do not exceed 5 mph (8 km/h)
when driving through standing water.
Driving through standing water limits your vehicle’s
braking capabilities, which increases stopping
distances. Therefore, after driving through standing
water, drive slowly and lightly press on the brake
pedal several times to dry the brakes.
Failure to follow these warnings may result in injuries
that are serious or fatal to you, your passengers, and
others around you.
CAUTION!
Always check the depth of the standing water before
driving through it. Never drive through standing
water that is deeper than the bottom of the tire rims
mounted on the vehicle.
Determine the condition of the road or the path that
is under water and if there are any obstacles in the
way before driving through the standing water.
Do not exceed 5 mph (8 km/h) when driving through
standing water. This will minimize wave effects.
Driving through standing water may cause damage
to your vehicle’s drivetrain components. Always
inspect your vehicle’s fluids (i.e., engine oil, transmis -
sion, axle, etc.) for signs of contamination (i.e., fluid
that is milky or foamy in appearance) after driving
through standing water. Do not continue to operate
the vehicle if any fluid appears contaminated, as this
may result in further damage. Such damage is not
covered by the New Vehicle Limited Warranty.
Getting water inside your vehicle’s engine can cause
it to lock up and stall out, and cause serious internal
damage to the engine. Such damage is not covered
by the New Vehicle Limited Warranty.
CAUTION!
4
23_RUV_OM_EN_US_t.book Page 103
Page 108 of 256
106MULTIMEDIA
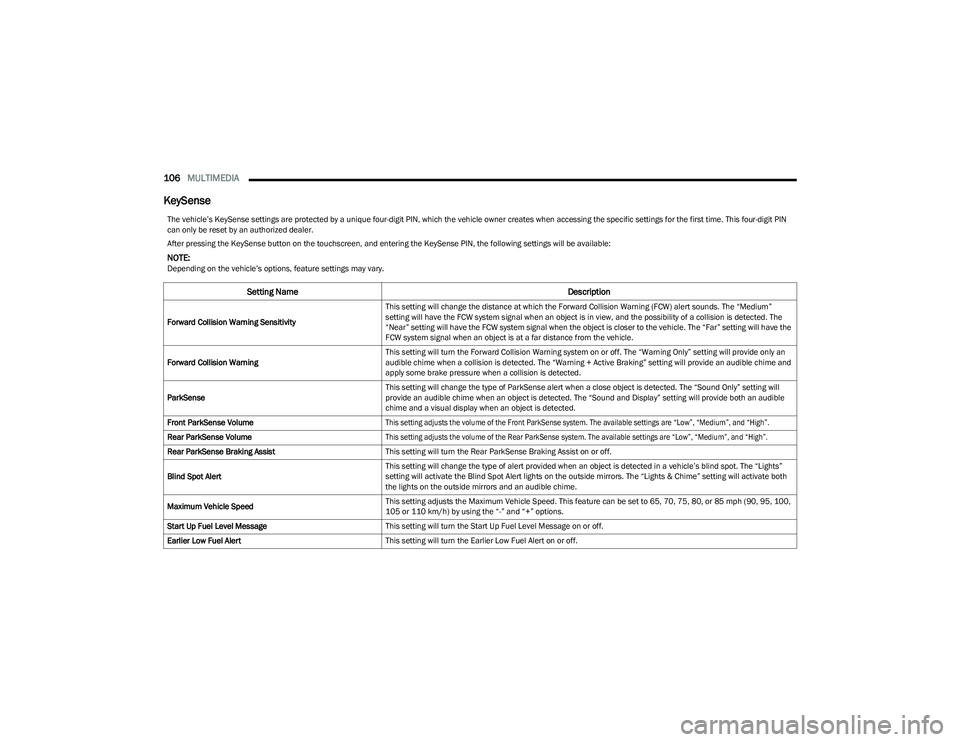
KeySense
The vehicle’s KeySense settings are protected by a unique four-digit PIN, which the vehicle owner creates when accessing the specific settings for the first time. This four-digit PIN
can only be reset by an authorized dealer.
After pressing the KeySense button on the touchscreen, and entering the KeySense PIN, the following settings will be available:
NOTE:Depending on the vehicle’s options, feature settings may vary.
Setting Name Description
Forward Collision Warning SensitivityThis setting will change the distance at which the Forward Collision Warning (FCW) alert sounds. The “Medium”
setting will have the FCW system signal when an object is in view, and the possibility of a collision is detected. The
“Near” setting will have the FCW system signal when the object is closer to the vehicle. The “Far” setting will have the
FCW system signal when an object is at a far distance from the vehicle.
Forward Collision Warning This setting will turn the Forward Collision Warning system on or off. The “Warning Only” setting will provide only an
audible chime when a collision is detected. The “Warning + Active Braking” setting will provide an audible chime and
apply some brake pressure when a collision is detected.
ParkSense This setting will change the type of ParkSense alert when a close object is detected. The “Sound Only” setting will
provide an audible chime when an object is detected. The “Sound and Display” setting will provide both an audible
chime and a visual display when an object is detected.
Front ParkSense Volume
This setting adjusts the volume of the Front ParkSense system. The available settings are “Low”, “Medium”, and “High”.
Rear ParkSense Volume
This setting adjusts the volume of the Rear ParkSense system. The available settings are “Low”, “Medium”, and “High”.
Rear ParkSense Braking Assist This setting will turn the Rear ParkSense Braking Assist on or off.
Blind Spot Alert This setting will change the type of alert provided when an object is detected in a vehicle’s blind spot. The “Lights”
setting will activate the Blind Spot Alert lights on the outside mirrors. The “Lights & Chime” setting will activate both
the lights on the outside mirrors and an audible chime.
Maximum Vehicle Speed This setting adjusts the Maximum Vehicle Speed. This feature can be set to 65, 70, 75, 80, or 85 mph (90, 95, 100,
105 or 110 km/h) by using the “-” and “+” options.
Start Up Fuel Level Message This setting will turn the Start Up Fuel Level Message on or off.
Earlier Low Fuel Alert This setting will turn the Earlier Low Fuel Alert on or off.
23_RUV_OM_EN_US_t.book Page 106
Page 112 of 256
110MULTIMEDIA
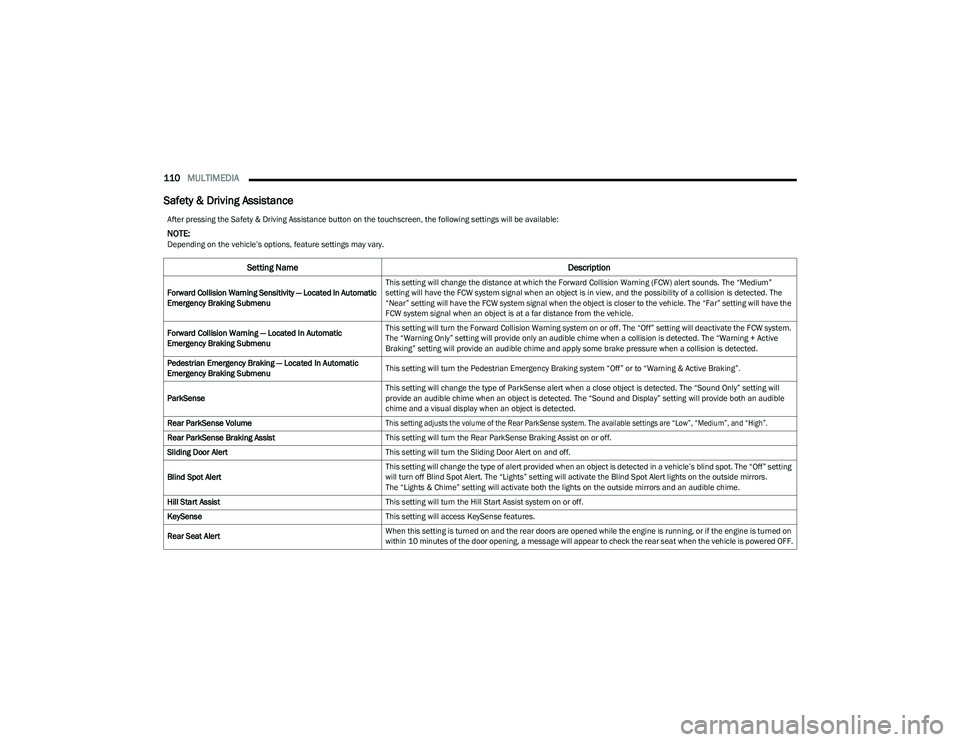
Safety & Driving Assistance
After pressing the Safety & Driving Assistance button on the touchscreen, the following settings will be available:
NOTE:Depending on the vehicle’s options, feature settings may vary.
Setting Name Description
Forward Collision Warning Sensitivity — Located In Automatic
Emergency Braking SubmenuThis setting will change the distance at which the Forward Collision Warning (FCW) alert sounds. The “Medium”
setting will have the FCW system signal when an object is in view, and the possibility of a collision is detected. The
“Near” setting will have the FCW system signal when the object is closer to the vehicle. The “Far” setting will have the
FCW system signal when an object is at a far distance from the vehicle.
Forward Collision Warning — Located In Automatic
Emergency Braking Submenu This setting will turn the Forward Collision Warning system on or off. The “Off” setting will deactivate the FCW system.
The “Warning Only” setting will provide only an audible chime when a collision is detected. The “Warning + Active
Braking” setting will provide an audible chime and apply some brake pressure when a collision is detected.
Pedestrian Emergency Braking — Located In Automatic
Emergency Braking Submenu This setting will turn the Pedestrian Emergency Braking system “Off” or to “Warning & Active Braking”.
ParkSense This setting will change the type of ParkSense alert when a close object is detected. The “Sound Only” setting will
provide an audible chime when an object is detected. The “Sound and Display” setting will provide both an audible
chime and a visual display when an object is detected.
Rear ParkSense Volume
This setting adjusts the volume of the Rear ParkSense system. The available settings are “Low”, “Medium”, and “High”.
Rear ParkSense Braking Assist This setting will turn the Rear ParkSense Braking Assist on or off.
Sliding Door Alert This setting will turn the Sliding Door Alert on and off.
Blind Spot Alert This setting will change the type of alert provided when an object is detected in a vehicle’s blind spot. The “Off” setting
will turn off Blind Spot Alert. The “Lights” setting will activate the Blind Spot Alert lights on the outside mirrors.
The “Lights & Chime” setting will activate both the lights on the outside mirrors and an audible chime.
Hill Start Assist This setting will turn the Hill Start Assist system on or off.
KeySense This setting will access KeySense features.
Rear Seat Alert When this setting is turned on and the rear doors are opened while the engine is running, or if the engine is turned on
within 10 minutes of the door opening, a message will appear to check the rear seat when the vehicle is powered OFF.
23_RUV_OM_EN_US_t.book Page 110
Page 116 of 256
114MULTIMEDIA
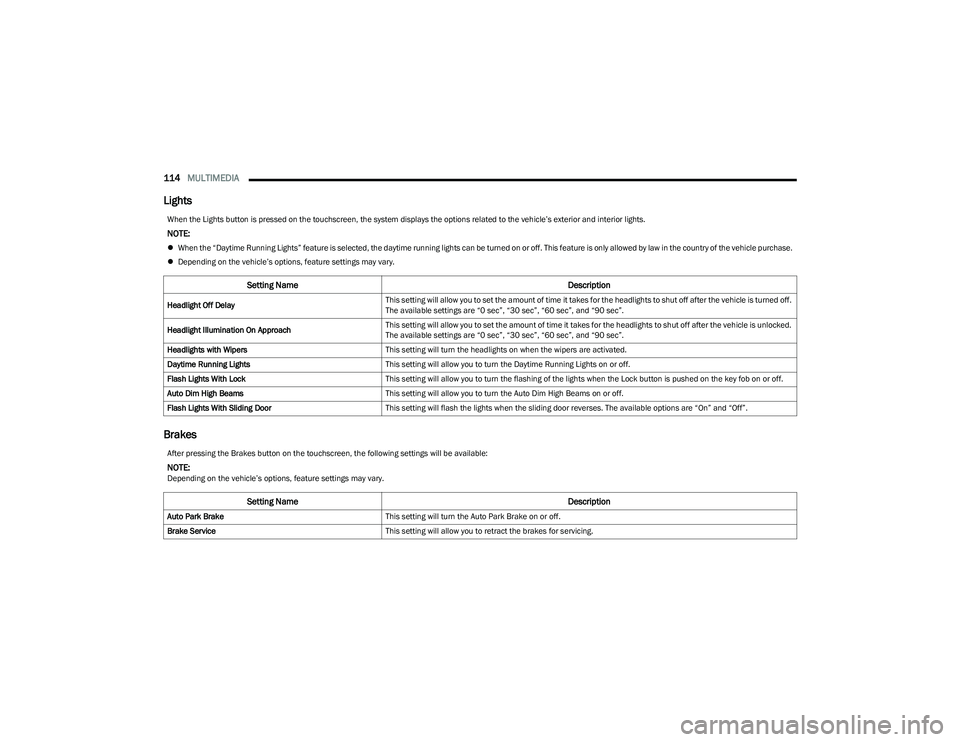
Lights
Brakes
When the Lights button is pressed on the touchscreen, the system displays the options related to the vehicle’s exterior and interior lights.
NOTE:
When the “Daytime Running Lights” feature is selected, the daytime running lights can be turned on or off. This feature is only allowed by law in the country of the vehicle purchase.
Depending on the vehicle’s options, feature settings may vary.
Setting Name Description
Headlight Off DelayThis setting will allow you to set the amount of time it takes for the headlights to shut off after the vehicle is turned off.
The available settings are “0 sec”, “30 sec”, “60 sec”, and “90 sec”.
Headlight Illumination On Approach This setting will allow you to set the amount of time it takes for the headlights to shut off after the vehicle is unlocked.
The available settings are “0 sec”, “30 sec”, “60 sec”, and “90 sec”.
Headlights with Wipers This setting will turn the headlights on when the wipers are activated.
Daytime Running Lights This setting will allow you to turn the Daytime Running Lights on or off.
Flash Lights With Lock This setting will allow you to turn the flashing of the lights when the Lock button is pushed on the key fob on or off.
Auto Dim High Beams This setting will allow you to turn the Auto Dim High Beams on or off.
Flash Lights With Sliding Door This setting will flash the lights when the sliding door reverses. The available options are “On” and “Off”.
After pressing the Brakes button on the touchscreen, the following settings will be available:
NOTE:Depending on the vehicle’s options, feature settings may vary.
Setting Name Description
Auto Park BrakeThis setting will turn the Auto Park Brake on or off.
Brake Service This setting will allow you to retract the brakes for servicing.
23_RUV_OM_EN_US_t.book Page 114
Page 123 of 256
121
SAFETY
SAFETY FEATURES
ANTI-LOCK BRAKE SYSTEM (ABS)
The ABS provides increased vehicle stability and brake
performance under most braking conditions. The system
automatically prevents wheel lock and enhances vehicle
control during braking.
The ABS performs a self-check cycle to ensure that the
ABS is working properly each time the vehicle is started
and driven. During this self-check, you may hear a slight
clicking sound as well as some related motor noises.
The ABS is activated during braking when the system
detects one or more wheels are beginning to lock. Road
conditions such as ice, snow, gravel, bumps, railroad
tracks, loose debris, or panic stops may increase the
likelihood of ABS activation(s).
You also may experience the following normal
characteristics when the ABS activates:
ABS motor noise or clicking sounds (you may continue
to hear for a short time after the stop)
Brake pedal pulsations
A slight drop of the brake pedal at the end of the stop
The ABS is designed to function with the Original
Equipment Manufacturer (OEM) tires. Modification may
result in degraded ABS performance.
Anti-Lock Brake System (ABS) Warning
Light
The yellow ABS Warning Light will turn on when the ignition
is placed in the ON/RUN mode and may stay on for as long
as four seconds.
If the ABS Warning Light remains on or comes on while
driving, it indicates that the anti-lock portion of the brake
system is not functioning and that service is required.
However, the conventional brake system will continue to
operate normally if the ABS Warning Light is on.
If the ABS Warning Light is on, the brake system should be
serviced as soon as possible to restore the benefits of
Anti-Lock Brakes. If the ABS Warning Light does not come
on when the ignition is placed in the ON/RUN mode, have
the light repaired as soon as possible.
REAR SEAT REMINDER ALERT (RSRA)
RSRA alerts of the possible presence of an object, passenger,
or pet in the rear seats through a visual and auditory
notification. When the system is activated, it displays the
message “Check Rear Seat” on the instrument cluster display
and sounds an auditory alert upon the driver placing the
ignition in the OFF position to exit the vehicle. The system
will activate automatically if a rear door is opened within
10 minutes of the ignition being placed in the ON/RUN position.
RSRA should be used as a reminder to check the rear seats, it
does not directly detect objects, passengers, or pets and is only
activated when the previous conditions are met.
WARNING!
The ABS contains sophisticated electronic equip -
ment that may be susceptible to interference caused
by improperly installed or high output radio transmit -
ting equipment. This interference can cause possible
loss of anti-lock braking capability. Installation of
such equipment should be performed by qualified
professionals.
Pumping of the Anti-Lock Brakes will diminish their
effectiveness and may lead to a collision. Pumping
makes the stopping distance longer. Just press firmly
on your brake pedal when you need to slow down
or stop.
The ABS cannot prevent the natural laws of physics
from acting on the vehicle, nor can it increase
braking or steering efficiency beyond that afforded
by the condition of the vehicle brakes and tires or the
traction afforded.
The ABS cannot prevent collisions, including those
resulting from excessive speed in turns, following
another vehicle too closely, or hydroplaning.
The capabilities of an ABS equipped vehicle must
never be exploited in a reckless or dangerous
manner that could jeopardize the user’s safety
or the safety of others.
6
23_RUV_OM_EN_US_t.book Page 121
Page 124 of 256
122SAFETY
To enable or disable RSRA, see Úpage 105.
ELECTRONIC BRAKE CONTROL (EBC)
S
YSTEM
Your vehicle is equipped with an advanced Electronic
Brake Control (EBC) system. This system includes
Anti-Lock Brake System (ABS), Brake Assist System (BAS),
Electronic Brake Force Distribution (EBD), Electronic
Roll Mitigation (ERM), Electronic Stability Control (ESC),
Hill Start Assist (HSA), and Traction Control System
(TCS).These systems work together to enhance both
vehicle stability and control in various driving conditions. Your vehicle may also be equipped with Dynamic Steering
Torque (DST), Ready Alert Braking (RAB), Rain Brake
Support (RBS) and Trailer Sway Control (TSC).
Brake Assist System (BAS)
The BAS is designed to optimize the vehicle’s braking capability
during emergency braking maneuvers. The system detects an
emergency braking situation by sensing the rate and amount of
brake application and then applies optimum pressure to the
brakes. This can help reduce braking distances. The BAS
complements the Anti-Lock Brake System (ABS). Applying the
brakes very quickly results in the best BAS assistance.
To receive the benefit of the system, you must apply continuous
braking pressure during the stopping sequence (do not “pump”
the brakes). Do not reduce brake pedal pressure unless
braking is no longer desired. Once the brake pedal is released,
the BAS is deactivated.
Brake System Warning Light
The red Brake System Warning Light will turn on when the
ignition is placed in the ON/RUN mode and may stay on for
as long as four seconds.
If the Brake System Warning Light remains on or comes on
while driving, it indicates that the brake system is not
functioning properly and that immediate service is
required. If the Brake System Warning Light does not
come on when the ignition is placed in the ON/RUN mode,
have the light repaired as soon as possible.
Dynamic Steering Torque (DST)
DST is a feature of the ESC and Electric Power Steering
(EPS) modules that provides torque at the steering wheel
for certain driving conditions in which the ESC module is
detecting vehicle instability. The torque that the steering
wheel receives is only meant to help the driver realize
optimal steering behavior in order to reach/maintain
vehicle stability. The only notification the driver receives
that the feature is active is the torque applied to the
steering wheel.
NOTE:The DST feature is only meant to help the driver realize the
correct course of action through small torques on the
steering wheel, which means the effectiveness of the DST
feature is highly dependent on the driver’s sensitivity and
overall reaction to the applied torque. It is very important
to realize that this feature will not steer the vehicle,
meaning the driver is still responsible for steering the
vehicle.
WARNING!
Before exiting a vehicle, always come to a complete
stop, then shift the automatic transmission into
PARK and apply the parking brake.
Always make sure the keyless ignition node is in the
OFF position, key fob is removed from the vehicle
and vehicle is locked.
Never leave children alone in a vehicle, or with
access to an unlocked vehicle. Leaving children in
a vehicle unattended is dangerous for a number of
reasons. A child or others could be seriously or fatally
injured. Children should be warned not to touch the
parking brake, brake pedal or the gear selector.
Do not leave children or animals inside parked vehi -
cles in hot weather. Interior heat buildup may cause
serious injury or death.
WARNING!
The Brake Assist System (BAS) cannot prevent the natural
laws of physics from acting on the vehicle, nor can it
increase the traction afforded by prevailing road conditions.
BAS cannot prevent collisions, including those resulting from
excessive speed in turns, driving on very slippery surfaces,
or hydroplaning. The capabilities of a BAS-equipped vehicle
must never be exploited in a reckless or dangerous manner,
which could jeopardize the user's safety or the safety of
others.
23_RUV_OM_EN_US_t.book Page 122