brake light CHRYSLER VOYAGER 2023 Owners Manual
[x] Cancel search | Manufacturer: CHRYSLER, Model Year: 2023, Model line: VOYAGER, Model: CHRYSLER VOYAGER 2023Pages: 256, PDF Size: 13.97 MB
Page 5 of 256
3
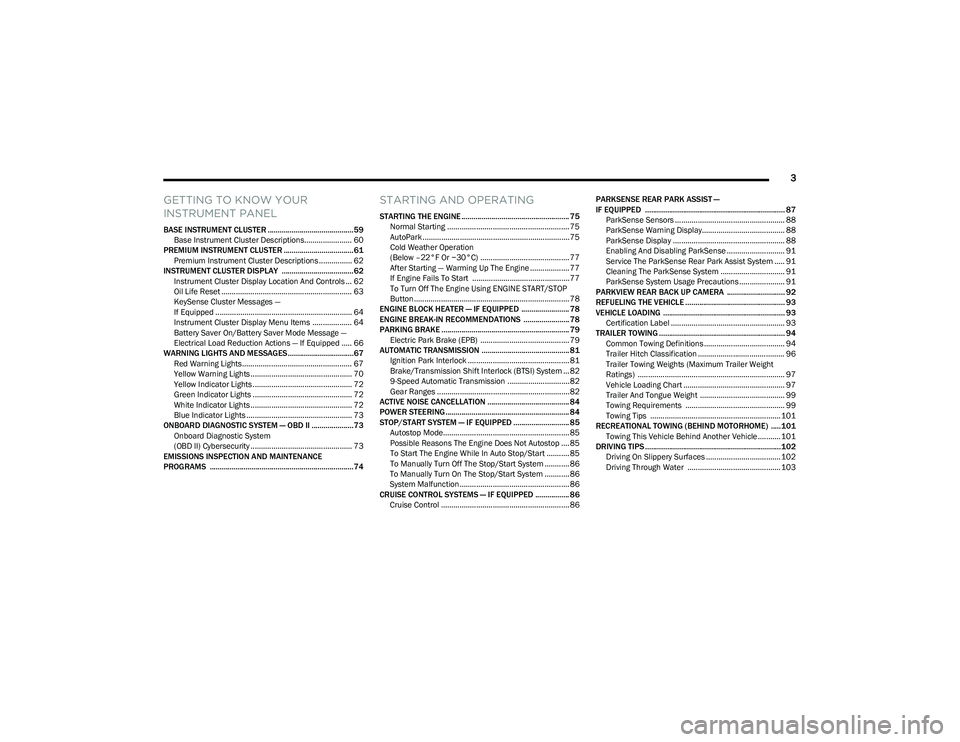
GETTING TO KNOW YOUR
INSTRUMENT PANEL
BASE INSTRUMENT CLUSTER ...........................................59Base Instrument Cluster Descriptions....................... 60
PREMIUM INSTRUMENT CLUSTER ...................................61 Premium Instrument Cluster Descriptions ................ 62
INSTRUMENT CLUSTER DISPLAY ....................................62 Instrument Cluster Display Location And Controls ... 62
Oil Life Reset ............................................................... 63
KeySense Cluster Messages —
If Equipped .................................................................. 64
Instrument Cluster Display Menu Items ................... 64
Battery Saver On/Battery Saver Mode Message —
Electrical Load Reduction Actions — If Equipped ..... 66
WARNING LIGHTS AND MESSAGES.................................67 Red Warning Lights ..................................................... 67
Yellow Warning Lights ................................................. 70
Yellow Indicator Lights ................................................ 72
Green Indicator Lights ................................................ 72
White Indicator Lights ................................................. 72
Blue Indicator Lights ................................................... 73
ONBOARD DIAGNOSTIC SYSTEM — OBD II .....................73 Onboard Diagnostic System
(OBD II) Cybersecurity ................................................. 73
EMISSIONS INSPECTION AND MAINTENANCE
PROGRAMS ........................................................................74
STARTING AND OPERATING
STARTING THE ENGINE ...................................................... 75 Normal Starting ........................................................... 75
AutoPark .......................................................................75
Cold Weather Operation
(Below –22°F Or −30°C) ........................................... 77
After Starting — Warming Up The Engine ................... 77
If Engine Fails To Start ............................................... 77
To Turn Off The Engine Using ENGINE START/STOP
Button ........................................................................... 78
ENGINE BLOCK HEATER — IF EQUIPPED ........................ 78
ENGINE BREAK-IN RECOMMENDATIONS ....................... 78
PARKING BRAKE ................................................................ 79 Electric Park Brake (EPB) ........................................... 79
AUTOMATIC TRANSMISSION ............................................ 81 Ignition Park Interlock ................................................. 81
Brake/Transmission Shift Interlock (BTSI) System ... 82
9-Speed Automatic Transmission ..............................82
Gear Ranges ................................................................ 82
ACTIVE NOISE CANCELLATION ......................................... 84
POWER STEERING .............................................................. 84
STOP/START SYSTEM — IF EQUIPPED ............................ 85 Autostop Mode............................................................. 85
Possible Reasons The Engine Does Not Autostop .... 85
To Start The Engine While In Auto Stop/Start ........... 85
To Manually Turn Off The Stop/Start System ............ 86
To Manually Turn On The Stop/Start System ............ 86
System Malfunction..................................................... 86
CRUISE CONTROL SYSTEMS — IF EQUIPPED ................. 86 Cruise Control .............................................................. 86 PARKSENSE REAR PARK ASSIST —
IF EQUIPPED ...................................................................... 87
ParkSense Sensors ..................................................... 88
ParkSense Warning Display........................................ 88
ParkSense Display ...................................................... 88
Enabling And Disabling ParkSense ............................ 91
Service The ParkSense Rear Park Assist System ..... 91
Cleaning The ParkSense System ............................... 91
ParkSense System Usage Precautions ...................... 91
PARKVIEW REAR BACK UP CAMERA ............................. 92
REFUELING THE VEHICLE .................................................. 93
VEHICLE LOADING ............................................................. 93 Certification Label ....................................................... 93
TRAILER TOWING ............................................................... 94 Common Towing Definitions....................................... 94
Trailer Hitch Classification .......................................... 96
Trailer Towing Weights (Maximum Trailer Weight
Ratings) ....................................................................... 97
Vehicle Loading Chart ................................................. 97
Trailer And Tongue Weight ......................................... 99
Towing Requirements ................................................ 99
Towing Tips ............................................................... 101
RECREATIONAL TOWING (BEHIND MOTORHOME) ..... 101 Towing This Vehicle Behind Another Vehicle ........... 101
DRIVING TIPS ....................................................................102 Driving On Slippery Surfaces .................................... 102
Driving Through Water ............................................. 103
23_RUV_OM_EN_US_t.book Page 3
Page 9 of 256
7
SYMBOLS KEY
If you do not read the entire Owner’s Manual, you may miss important information.
Observe all Cautions and Warnings.
VEHICLE MODIFICATIONS/ALTERATIONS SYMBOL GLOSSARY
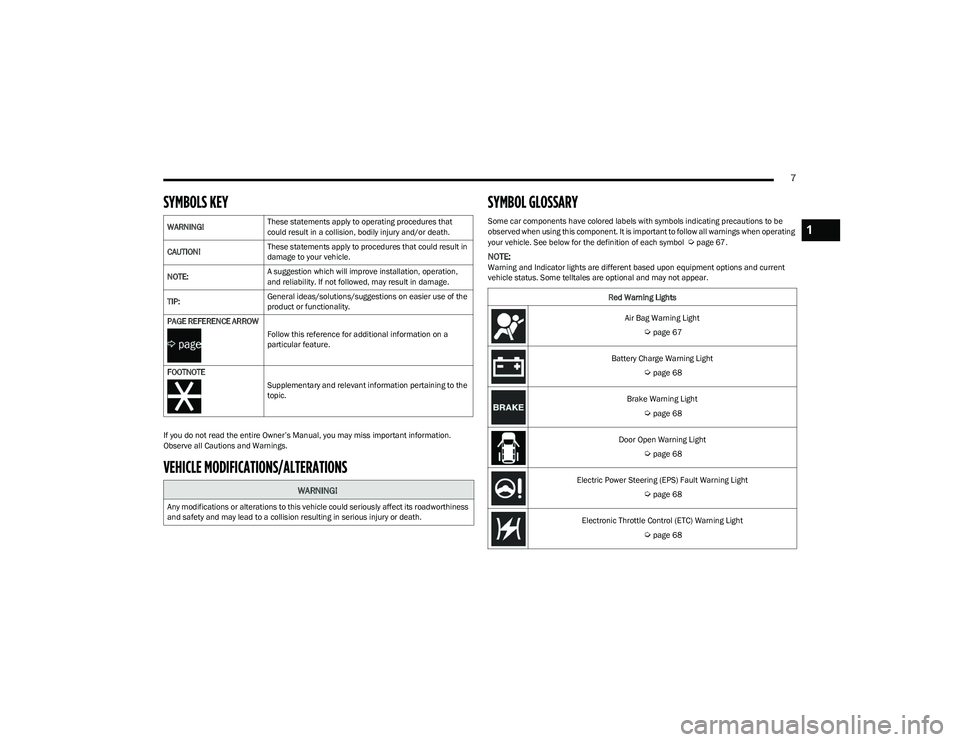
Some car components have colored labels with symbols indicating precautions to be
observed when using this component. It is important to follow all warnings when operating
your vehicle. See below for the definition of each symbol
Úpage 67.
NOTE:Warning and Indicator lights are different based upon equipment options and current
vehicle status. Some telltales are optional and may not appear.
WARNING!
These statements apply to operating procedures that
could result in a collision, bodily injury and/or death.
CAUTION! These statements apply to procedures that could result in
damage to your vehicle.
NOTE: A suggestion which will improve installation, operation,
and reliability. If not followed, may result in damage.
TIP: General ideas/solutions/suggestions on easier use of the
product or functionality.
PAGE REFERENCE ARROW
Follow this reference for additional information on a
particular feature.
FOOTNOTE Supplementary and relevant information pertaining to the
topic.
WARNING!
Any modifications or alterations to this vehicle could seriously affect its roadworthiness
and safety and may lead to a collision resulting in serious injury or death.
Red Warning Lights
Air Bag Warning Light
Úpage 67
Battery Charge Warning Light
Úpage 68
Brake Warning Light
Úpage 68
Door Open Warning Light
Úpage 68
Electric Power Steering (EPS) Fault Warning Light
Úpage 68
Electronic Throttle Control (ETC) Warning Light
Úpage 68
1
23_RUV_OM_EN_US_t.book Page 7
Page 10 of 256
8
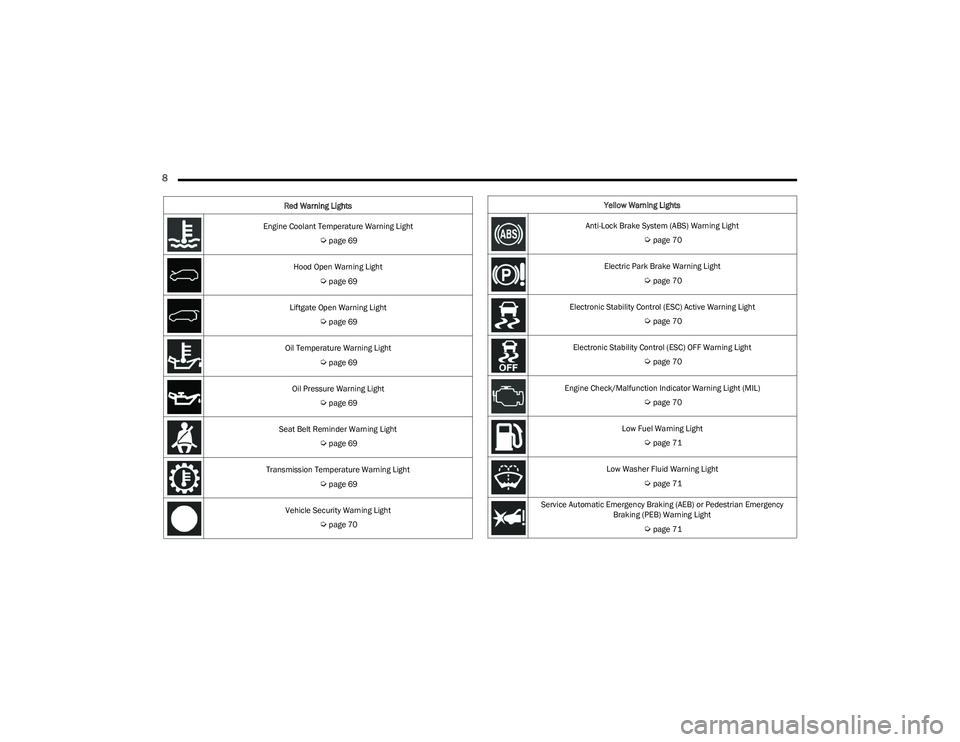
Engine Coolant Temperature Warning Light
Úpage 69
Hood Open Warning Light
Úpage 69
Liftgate Open Warning Light
Úpage 69
Oil Temperature Warning Light
Úpage 69
Oil Pressure Warning Light
Úpage 69
Seat Belt Reminder Warning Light
Úpage 69
Transmission Temperature Warning Light
Úpage 69
Vehicle Security Warning Light
Úpage 70
Red Warning Lights
Yellow Warning Lights
Anti-Lock Brake System (ABS) Warning Light
Úpage 70
Electric Park Brake Warning Light
Úpage 70
Electronic Stability Control (ESC) Active Warning Light
Úpage 70
Electronic Stability Control (ESC) OFF Warning Light
Úpage 70
Engine Check/Malfunction Indicator Warning Light (MIL)
Úpage 70
Low Fuel Warning Light
Úpage 71
Low Washer Fluid Warning Light
Úpage 71
Service Automatic Emergency Braking (AEB) or Pedestrian Emergency Braking (PEB) Warning Light
Úpage 71
23_RUV_OM_EN_US_t.book Page 8
Page 16 of 256
14GETTING TO KNOW YOUR VEHICLE
REMOTE START — IF EQUIPPED
This system uses the key fob to start the engine
conveniently from outside the vehicle while still
maintaining security. The system has a range
of 328 ft (100 m).
Remote Start is used to defrost windows in cold weather
and to reach a comfortable climate in all ambient
conditions before the customer enters the vehicle.
NOTE:Obstructions between the vehicle and key fob may reduce
this range Úpage 244.
HOW TO USE REMOTE START
Push and release the Remote Start button on the key fob
twice within five seconds. The vehicle doors will lock, the
parking lights will flash, and the horn will chirp twice
(if programmed). Then, the engine will start, and the
vehicle will remain in the Remote Start mode for a
15 minute cycle. Pushing the Remote Start button a third time shuts the
engine off.
To drive the vehicle, push the unlock button and place the
ignition in the ON/RUN position.
NOTE:
With Remote Start, the engine will only run for
15 minutes.
Remote Start can only be used twice.
If an engine fault is present or fuel level is low, the
vehicle will start and then shut down in 10 seconds.
The parking lights will turn on and remain on during
Remote Start mode.
For security, power window operations are disabled
when the vehicle is in the Remote Start mode.
The ignition must be placed in the ON/RUN position
before the Remote Start sequence can be repeated for
a third cycle.
All of the following conditions must be met before the
engine will Remote Start:
Gear selector in PARK
Doors closed
Hood closed
Liftgate closed
Hazard switch off
Brake switch inactive (brake pedal not pressed)
Battery at an acceptable charge level
Panic button not pushed
System not disabled from previous Remote Start event
Vehicle Security system indicator flashing
Ignition in OFF position
Fuel level meets minimum requirement
Vehicle Security system is not signaling an intrusion
Malfunction Indicator Light (MIL) is not illuminated
TO EXIT REMOTE START MODE
To drive the vehicle after starting the Remote Start system,
either push and release the unlock button on the key fob to
unlock the doors, or unlock the vehicle using Keyless Enter ‘n
Go™ — Passive Entry via the door handles, and disarm the
Vehicle Security system (if equipped). Then, prior to the end of
the 15 minute cycle, push and release the START/STOP ignition
button.
The Remote Start system will turn the engine off if the
Remote Start button on the key fob is pushed again, or if
the engine is allowed to run for the entire 15 minute cycle.
Once the ignition is placed in the ON/RUN position, the
climate controls will resume previously set operations
(temperature, blower control, etc.).
WARNING!
Do not start or run an engine in a closed garage
or confined area. Exhaust gas contains carbon
monoxide (CO) which is odorless and colorless.
Carbon monoxide is poisonous and can cause
serious injury or death when inhaled.
Keep key fobs away from children. Operation of the
Remote Start system, windows, door locks or other
controls could cause serious injury or death.
23_RUV_OM_EN_US_t.book Page 14
Page 42 of 256
40GETTING TO KNOW YOUR VEHICLE
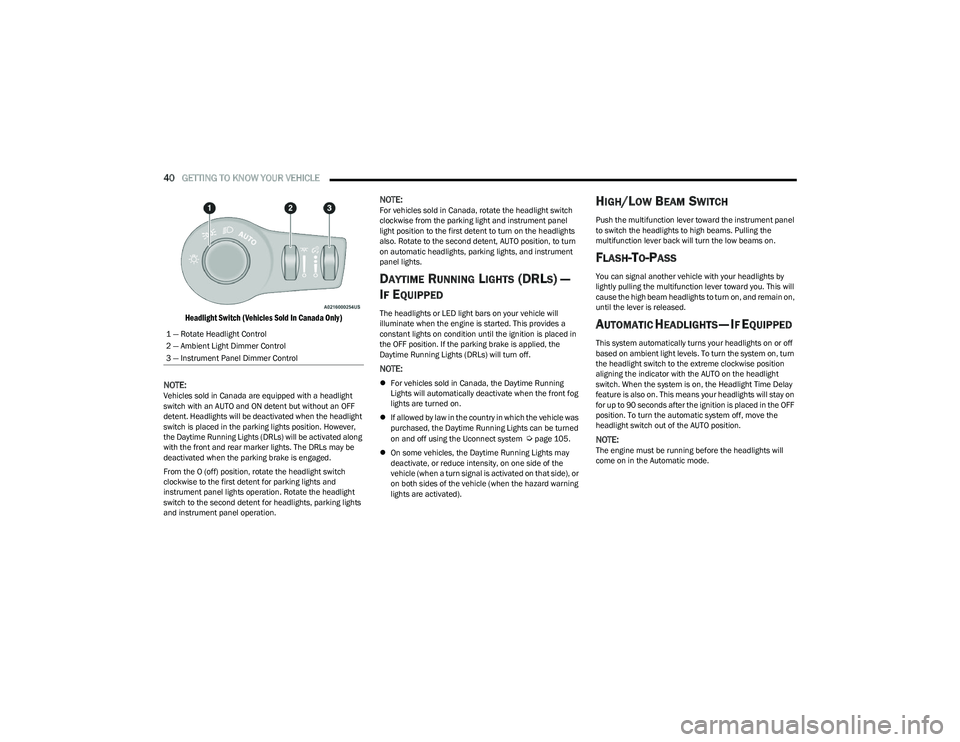
Headlight Switch (Vehicles Sold In Canada Only)
NOTE:
Vehicles sold in Canada are equipped with a headlight
switch with an AUTO and ON detent but without an OFF
detent. Headlights will be deactivated when the headlight
switch is placed in the parking lights position. However,
the Daytime Running Lights (DRLs) will be activated along
with the front and rear marker lights. The DRLs may be
deactivated when the parking brake is engaged.
From the O (off) position, rotate the headlight switch
clockwise to the first detent for parking lights and
instrument panel lights operation. Rotate the headlight
switch to the second detent for headlights, parking lights
and instrument panel operation.
NOTE:For vehicles sold in Canada, rotate the headlight switch
clockwise from the parking light and instrument panel
light position to the first detent to turn on the headlights
also. Rotate to the second detent, AUTO position, to turn
on automatic headlights, parking lights, and instrument
panel lights.
DAYTIME RUNNING LIGHTS (DRLS) —
I
F EQUIPPED
The headlights or LED light bars on your vehicle will
illuminate when the engine is started. This provides a
constant lights on condition until the ignition is placed in
the OFF position. If the parking brake is applied, the
Daytime Running Lights (DRLs) will turn off.
NOTE:
For vehicles sold in Canada, the Daytime Running
Lights will automatically deactivate when the front fog
lights are turned on.
If allowed by law in the country in which the vehicle was
purchased, the Daytime Running Lights can be turned
on and off using the Uconnect system
Úpage 105.
On some vehicles, the Daytime Running Lights may
deactivate, or reduce intensity, on one side of the
vehicle (when a turn signal is activated on that side), or
on both sides of the vehicle (when the hazard warning
lights are activated).
HIGH/LOW BEAM SWITCH
Push the multifunction lever toward the instrument panel
to switch the headlights to high beams. Pulling the
multifunction lever back will turn the low beams on.
FLASH-TO-PASS
You can signal another vehicle with your headlights by
lightly pulling the multifunction lever toward you. This will
cause the high beam headlights to turn on, and remain on,
until the lever is released.
AUTOMATIC HEADLIGHTS — IF EQUIPPED
This system automatically turns your headlights on or off
based on ambient light levels. To turn the system on, turn
the headlight switch to the extreme clockwise position
aligning the indicator with the AUTO on the headlight
switch. When the system is on, the Headlight Time Delay
feature is also on. This means your headlights will stay on
for up to 90 seconds after the ignition is placed in the OFF
position. To turn the automatic system off, move the
headlight switch out of the AUTO position.
NOTE:The engine must be running before the headlights will
come on in the Automatic mode.
1 — Rotate Headlight Control
2 — Ambient Light Dimmer Control
3 — Instrument Panel Dimmer Control
23_RUV_OM_EN_US_t.book Page 40
Page 70 of 256
68GETTING TO KNOW YOUR INSTRUMENT PANEL
Battery Charge Warning Light
This warning light will illuminate when the
battery is not charging properly. If it stays on
while the engine is running, there may be a
malfunction with the charging system. Contact
an authorized dealer as soon as possible.
This indicates a possible problem with the electrical
system or a related component.
Brake Warning Light
This warning light monitors various brake
functions, including brake fluid level and
parking brake application. If the brake light
turns on it may indicate that the parking brake
is applied, that the brake fluid level is low, or that there is
a problem with the Anti-Lock Brake System reservoir.
If the light remains on when the parking brake has been
disengaged, and the fluid level is at the full mark on the
master cylinder reservoir, it indicates a possible brake
hydraulic system malfunction or that a problem with the
Brake Booster has been detected by the Anti-Lock Brake
System (ABS) / Electronic Stability Control (ESC) system.
In this case, the light will remain on until the condition has
been corrected. If the problem is related to the brake
booster, the ABS pump will run when applying the brake,
and a brake pedal pulsation may be felt during each stop.
The dual brake system provides a reserve braking capacity
in the event of a failure to a portion of the hydraulic
system. A leak in either half of the dual brake system is
indicated by the Brake Warning Light, which will turn on
when the brake fluid level in the master cylinder has
dropped below a specified level.
The light will remain on until the cause is corrected.
NOTE:The light may flash momentarily during sharp cornering
maneuvers, which change fluid level conditions. The
vehicle should have service performed, and the brake
fluid level checked.
If brake failure is indicated, immediate repair is necessary.
Vehicles equipped with the Anti-Lock Brake System (ABS)
are also equipped with Electronic Brake Force Distribution
(EBD). In the event of an EBD failure, the Brake Warning
Light will turn on along with the ABS Light. Immediate
repair to the ABS system is required.
Operation of the Brake Warning Light can be checked by
turning the ignition switch from the OFF position to the ON/RUN
position. The light should illuminate for approximately two
seconds. The light should then turn off unless the parking brake
is applied or a brake fault is detected. If the light does not
illuminate, have the light inspected by an authorized dealer.
The light also will turn on when the parking brake is
applied with the ignition switch in the ON/RUN position.
NOTE:This light shows only that the parking brake is applied.
It does not show the degree of brake application.
Door Open Warning Light — If Equipped
This warning light will illuminate when a door is
ajar/open and not fully closed. This indicator
will reflect which doors are open.
NOTE:If the vehicle is moving, there will also be a single chime.
Electric Power Steering (EPS) Fault
Warning Light
This warning light will turn on when there's a
fault with the EPS system Úpage 84.
Electronic Throttle Control (ETC) Warning
Light
This warning light will illuminate to indicate a
problem with the ETC system. If a problem is
detected while the vehicle is running, the light
will either stay on or flash depending on the
nature of the problem. Cycle the ignition when the vehicle
is safely and completely stopped and the transmission is
placed in the PARK (P) position. The light should turn off.
If the light remains on with the vehicle running, your
vehicle will usually be drivable; however, see an
authorized dealer for service as soon as possible.
WARNING!
Driving a vehicle with the red brake light on is
dangerous. Part of the brake system may have failed.
It will take longer to stop the vehicle. You could have a
collision. Have the vehicle checked immediately.
WARNING!
Continued operation with reduced assist could pose a
safety risk to yourself and others. Service should be
obtained as soon as possible.
23_RUV_OM_EN_US_t.book Page 68
Page 71 of 256
GETTING TO KNOW YOUR INSTRUMENT PANEL69
NOTE:This light may turn on if the accelerator and brake pedals
are pressed at the same time.
If the light continues to flash when the vehicle is running,
immediate service is required and you may experience
reduced performance, an elevated/rough idle, or engine
stall and your vehicle may require towing. The light will
come on when the ignition is placed in the ON/RUN or
ACC/ON/RUN position and remain on briefly as a bulb
check. If the light does not come on during starting, have
the system checked by an authorized dealer.
Engine Coolant Temperature Warning Light
This warning light warns of an overheated
engine condition. If the engine coolant
temperature is too high, this indicator will
illuminate and a single chime will sound. If the
temperature reaches the upper limit, a continuous chime
will sound for four minutes or until the engine is able to
cool; whichever comes first.
If the light turns on while driving, safely pull over and stop
the vehicle. If the Air Conditioning (A/C) system is on, turn
it off. Also, shift the transmission into NEUTRAL (N) and
idle the vehicle. If the temperature reading does not return
to normal, turn the engine off immediately and call for
service
Úpage 187.
Hood Open Warning Light
This warning light will illuminate when the hood
is left open and not fully closed.
NOTE:If the vehicle is moving, there will also be a single chime.
Liftgate Open Warning Light
This warning light will illuminate when the
liftgate is open.
NOTE:If the vehicle is moving, there will also be a single chime.
Oil Temperature Warning Light
This warning light will illuminate to indicate the
engine oil temperature is high. If the light turns
on while driving, stop the vehicle and shut off
the engine as soon as possible. Wait for oil
temperature to return to normal levels.
Oil Pressure Warning Light
This warning light will illuminate to indicate low
engine oil pressure. If the light turns on while
driving, stop the vehicle, shut off the engine as
soon as possible, and contact an authorized
dealer. A chime will sound when this light turns on.
Do not operate the vehicle until the cause is corrected.
This light does not indicate how much oil is in the engine.
The engine oil level must be checked under the hood.
Seat Belt Reminder Warning Light
This warning light indicates when the driver or
passenger seat belt is unbuckled. When the
ignition is first placed in the ON/RUN or
ACC/ON/RUN position and if the driver’s seat
belt is unbuckled, a chime will sound and the light will turn on. When driving, if the driver or front passenger seat belt
remains unbuckled, the Seat Belt Reminder Light will flash
or remain on continuously and a chime will sound
Úpage 134.
Transmission Temperature Warning Light
This warning light will illuminate to warn of a
high transmission fluid temperature. This may
occur with strenuous usage such as trailer
towing. If this light turns on, stop the vehicle
and run the engine at idle or slightly faster, with the
transmission in PARK (P) or NEUTRAL (N), until the light
turns off. Once the light turns off, you may continue to
drive normally.
WARNING!
If you continue operating the vehicle when the Transmission
Temperature Warning Light is illuminated you could cause
the fluid to boil over, come in contact with hot engine or
exhaust components and cause a fire.
CAUTION!
Continuous driving with the Transmission Temperature
Warning Light illuminated will eventually cause severe
transmission damage or transmission failure.
3
23_RUV_OM_EN_US_t.book Page 69
Page 72 of 256
70GETTING TO KNOW YOUR INSTRUMENT PANEL
Vehicle Security Warning Light —
If Equipped
This warning light will flash at a fast rate for
approximately 15 seconds when the vehicle
security system is arming, and then will flash
slowly until the vehicle is disarmed.
YELLOW WARNING LIGHTS
Anti-Lock Brake System (ABS) Warning
Light
This warning light monitors the ABS. The light
will turn on when the ignition is placed in the
ON/RUN or ACC/ON/RUN position and may
stay on for as long as four seconds.
If the ABS light remains on or turns on while driving,
then the Anti-Lock portion of the brake system is not
functioning and service is required as soon as possible.
However, the conventional brake system will continue to
operate normally, assuming the Brake Warning Light is not
also on.
If the ABS light does not turn on when the ignition is placed
in the ON/RUN or ACC/ON/RUN position, have the brake
system inspected by an authorized dealer.
Electric Park Brake Warning Light
This warning light will illuminate to indicate the
Electric Park Brake is not functioning properly
and service is required. Contact an authorized
dealer.
Electronic Stability Control (ESC) Active
Warning Light — If Equipped
This warning light will indicate when the ESC
system is Active. The ESC Indicator Light in the
instrument cluster will come on when the ignition is
placed in the ON/RUN or ACC/ON/RUN position,
and when ESC is activated. It should go out with the engine
running. If the ESC Indicator Light comes on continuously with
the engine running, a malfunction has been detected in the
ESC system. If this warning light remains on after several
ignition cycles, and the vehicle has been driven several miles
(kilometers) at speeds greater than 30 mph (48 km/h), see an
authorized dealer as soon as possible to have the problem
diagnosed and corrected.
The ESC OFF Indicator Light and the ESC Indicator Light
come on momentarily each time the ignition is placed
in the ON/RUN or ACC/ON/RUN position.
The ESC system will make buzzing or clicking sounds
when it is active. This is normal; the sounds will stop
when ESC becomes inactive.
This light will come on when the vehicle is in an ESC
event.
Electronic Stability Control (ESC) OFF
Warning Light — If Equipped
This warning light indicates the ESC is off.
Each time the ignition is turned to ON/RUN or
ACC/ON/RUN, the ESC system will be on, even
if it was turned off previously.
Engine Check/Malfunction Indicator
Warning Light (MIL)
The Engine Check/Malfunction Indicator Light (MIL)
is a part of an Onboard Diagnostic System called
OBD II that monitors engine and automatic
transmission control systems. This warning light
will illuminate when the ignition is in the ON/RUN position
before engine start. If the bulb does not come on when turning
the ignition switch from OFF to ON/RUN, have the condition
checked promptly.
Certain conditions, such as a loose or missing gas cap,
poor quality fuel, etc., may illuminate the light after engine
start. The vehicle should be serviced if the light stays on
through several typical driving styles. In most situations,
the vehicle will drive normally and will not require towing.
When the engine is running, the MIL may flash to alert
serious conditions that could lead to immediate loss of
power or severe catalytic converter damage. The vehicle
should be serviced by an authorized dealer as soon as
possible if this occurs.
WARNING!
A malfunctioning catalytic converter can reach higher
temperatures than in normal operating conditions.
This can cause a fire if you drive slowly or park over
flammable substances such as dry plants, wood,
cardboard, etc. This could result in death or serious
injury to the driver, occupants or others.
23_RUV_OM_EN_US_t.book Page 70
Page 81 of 256
STARTING AND OPERATING79
(Continued)
PARKING BRAKE
ELECTRIC PARK BRAKE (EPB)
Your vehicle is equipped with an EPB that offers simple
operation, and some additional features that make the
parking brake more convenient and useful.
The parking brake is primarily intended to prevent the
vehicle from rolling while parked. Before leaving the
vehicle, make sure that the parking brake is applied.
Also, be certain to leave the transmission in PARK.
You can engage the parking brake in two ways;
Manually, by applying the EPB switch.
Automatically, by enabling the Auto Park Brake feature
in the customer programmable features
Úpage 105.
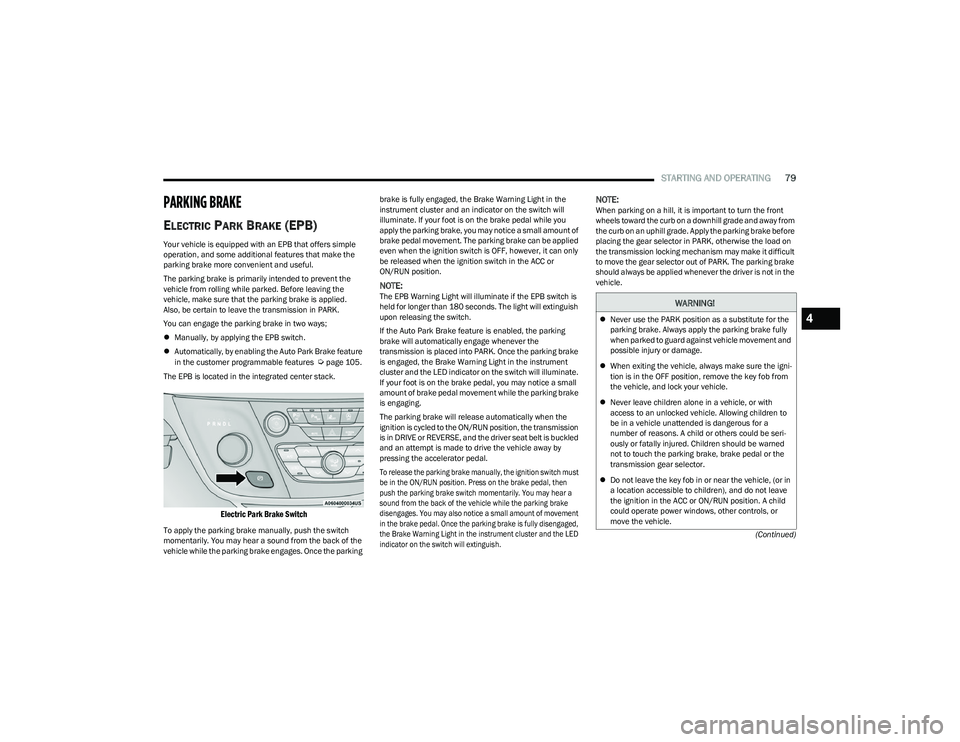
The EPB is located in the integrated center stack.
Electric Park Brake Switch
To apply the parking brake manually, push the switch
momentarily. You may hear a sound from the back of the
vehicle while the parking brake engages. Once the parking brake is fully engaged, the Brake Warning Light in the
instrument cluster and an indicator on the switch will
illuminate. If your foot is on the brake pedal while you
apply the parking brake, you may notice a small amount of
brake pedal movement. The parking brake can be applied
even when the ignition switch is OFF, however, it can only
be released when the ignition switch in the ACC or
ON/RUN position.
NOTE:The EPB Warning Light will illuminate if the EPB switch is
held for longer than 180 seconds. The light will extinguish
upon releasing the switch.
If the Auto Park Brake feature is enabled, the parking
brake will automatically engage whenever the
transmission is placed into PARK. Once the parking brake
is engaged, the Brake Warning Light in the instrument
cluster and the LED indicator on the switch will illuminate.
If your foot is on the brake pedal, you may notice a small
amount of brake pedal movement while the parking brake
is engaging.
The parking brake will release automatically when the
ignition is cycled to the ON/RUN position, the transmission
is in DRIVE or REVERSE, and the driver seat belt is buckled
and an attempt is made to drive the vehicle away by
pressing the accelerator pedal.
To release the parking brake manually, the ignition switch must
be in the ON/RUN position. Press on the brake pedal, then
push the parking brake switch momentarily. You may hear a
sound from the back of the vehicle while the parking brake
disengages. You may also notice a small amount of movement
in the brake pedal. Once the parking brake is fully disengaged,
the Brake Warning Light in the instrument cluster and the LED
indicator on the switch will extinguish.
NOTE:When parking on a hill, it is important to turn the front
wheels toward the curb on a downhill grade and away from
the curb on an uphill grade. Apply the parking brake before
placing the gear selector in PARK, otherwise the load on
the transmission locking mechanism may make it difficult
to move the gear selector out of PARK. The parking brake
should always be applied whenever the driver is not in the
vehicle.
WARNING!
Never use the PARK position as a substitute for the
parking brake. Always apply the parking brake fully
when parked to guard against vehicle movement and
possible injury or damage.
When exiting the vehicle, always make sure the igni -
tion is in the OFF position, remove the key fob from
the vehicle, and lock your vehicle.
Never leave children alone in a vehicle, or with
access to an unlocked vehicle. Allowing children to
be in a vehicle unattended is dangerous for a
number of reasons. A child or others could be seri -
ously or fatally injured. Children should be warned
not to touch the parking brake, brake pedal or the
transmission gear selector.
Do not leave the key fob in or near the vehicle, (or in
a location accessible to children), and do not leave
the ignition in the ACC or ON/RUN position. A child
could operate power windows, other controls, or
move the vehicle.4
23_RUV_OM_EN_US_t.book Page 79
Page 82 of 256
80STARTING AND OPERATING
If exceptional circumstances should make it necessary to
engage the parking brake while the vehicle is in motion,
push on the EPB switch for as long as engagement is
desired. The Brake Warning Light will illuminate, and a
continuous chime will sound. The rear stop lamps will also
be illuminated automatically while the vehicle remains in
motion. To disengage the parking brake while the vehicle is in
motion, release the switch. If the vehicle is brought to a
complete stop using the parking brake, when the vehicle
reaches approximately 3 mph (4.8 km/h), the parking
brake will remain engaged.
In the unlikely event of a malfunction of the EPB system,
a yellow EPB Warning Light will illuminate. This may be
accompanied by the Brake Warning Light flashing. In this
case, urgent service of the EPB system is required. Do not
rely on the parking brake to hold the vehicle stationary.
Auto Park Brake
The Electric Park Brake (EPB) can be programmed to be applied
automatically whenever the vehicle is at a standstill and the
automatic transmission is placed in PARK. Auto Park Brake is
enabled and disabled by customer selection through the
customer programmable features
Ú
page 105.
SafeHold
SafeHold is a safety feature of the Electric Park Brake
(EPB) system that will engage the parking brake
automatically if the vehicle is left unsecured. If the
automatic transmission is not in PARK, the seat belt is
unbuckled, the driver door is open, the vehicle is at a
standstill, and there is no attempt to press the brake pedal
or accelerator pedal, the parking brake will automatically
engage to prevent the vehicle from rolling.
SafeHold can be temporarily bypassed by pushing the EPB
while the driver door is open and brake pedal is pressed.
Once manually bypassed, SafeHold will be enabled again
once the vehicle reaches 12 mph (20 km/h) or the ignition
is cycled to the OFF position and back to ON again.
Brake Service Mode
We recommend having your brakes serviced by an
authorized dealer. You should only make repairs for
which you have the knowledge and the right equipment.
You should only enter Brake Service Mode during brake
service.
When servicing your rear brakes, it may be necessary for
you or your technician to push the rear piston into the rear
caliper bore. With the Electric Park Brake (EPB) system,
this can only be done after retracting the EPB actuator.
Fortunately, actuator retraction can be done easily by
entering Brake Service Mode in your vehicle
Úpage 105.
This menu-based system will guide you through the steps
necessary to retract the EPB actuator in order to perform
rear brake service.
Brake Service Mode has requirements that must be met in
order to be activated:
The vehicle must be at a standstill.
The parking brake must be unapplied.
The transmission must be in PARK or NEUTRAL.
While in Brake Service Mode, the EPB Warning Light will
flash continuously while the ignition switch is ON.
When brake service work is complete, the following steps
must be followed to reset the parking brake system to
normal operation:
Ensure the vehicle is at a standstill.
Press the brake pedal with moderate force.
Apply the EPB.
Be sure the parking brake is fully disengaged before
driving; failure to do so can lead to brake failure and
a collision.
Always fully apply the parking brake when leaving
your vehicle, or it may roll and cause damage or
injury. Also be certain to leave the transmission in
PARK. Failure to do so may allow the vehicle to roll
and cause damage or injury.
Driving the vehicle with the parking brake engaged,
or repeated use of the parking brake to slow the
vehicle may cause serious damage to the brake
system.
CAUTION!
If the Brake System Warning Light remains on with the
parking brake released, a brake system malfunction
is indicated. Have the brake system serviced by an
authorized dealer immediately.
WARNING!
23_RUV_OM_EN_US_t.book Page 80