brakes CHRYSLER VOYAGER 2023 User Guide
[x] Cancel search | Manufacturer: CHRYSLER, Model Year: 2023, Model line: VOYAGER, Model: CHRYSLER VOYAGER 2023Pages: 256, PDF Size: 13.97 MB
Page 116 of 256
114MULTIMEDIA
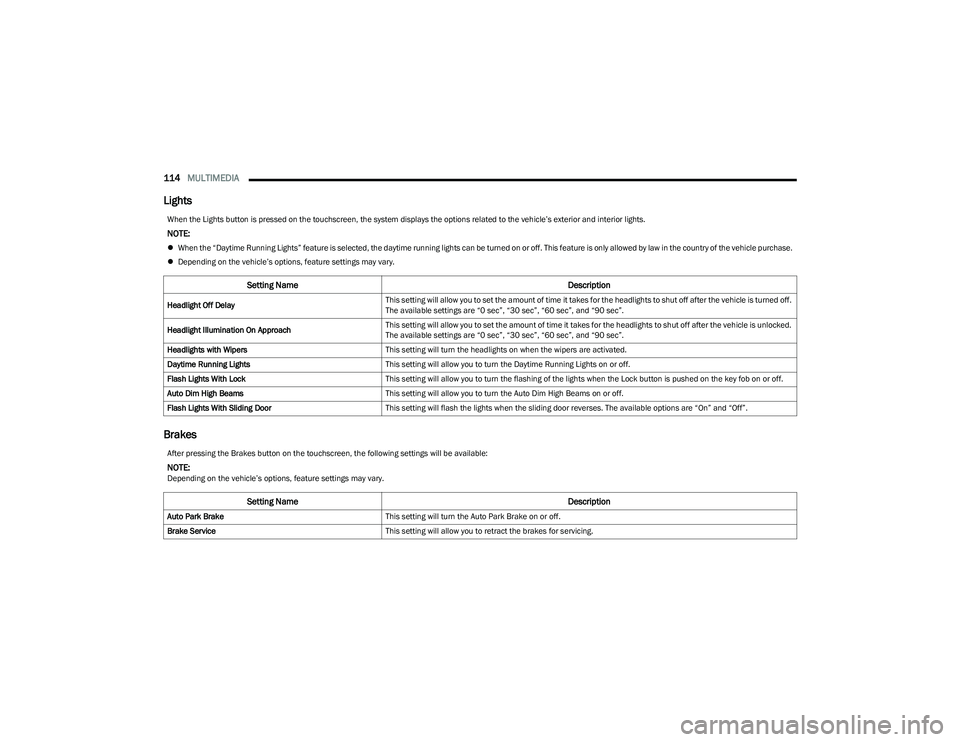
Lights
Brakes
When the Lights button is pressed on the touchscreen, the system displays the options related to the vehicle’s exterior and interior lights.
NOTE:
When the “Daytime Running Lights” feature is selected, the daytime running lights can be turned on or off. This feature is only allowed by law in the country of the vehicle purchase.
Depending on the vehicle’s options, feature settings may vary.
Setting Name Description
Headlight Off DelayThis setting will allow you to set the amount of time it takes for the headlights to shut off after the vehicle is turned off.
The available settings are “0 sec”, “30 sec”, “60 sec”, and “90 sec”.
Headlight Illumination On Approach This setting will allow you to set the amount of time it takes for the headlights to shut off after the vehicle is unlocked.
The available settings are “0 sec”, “30 sec”, “60 sec”, and “90 sec”.
Headlights with Wipers This setting will turn the headlights on when the wipers are activated.
Daytime Running Lights This setting will allow you to turn the Daytime Running Lights on or off.
Flash Lights With Lock This setting will allow you to turn the flashing of the lights when the Lock button is pushed on the key fob on or off.
Auto Dim High Beams This setting will allow you to turn the Auto Dim High Beams on or off.
Flash Lights With Sliding Door This setting will flash the lights when the sliding door reverses. The available options are “On” and “Off”.
After pressing the Brakes button on the touchscreen, the following settings will be available:
NOTE:Depending on the vehicle’s options, feature settings may vary.
Setting Name Description
Auto Park BrakeThis setting will turn the Auto Park Brake on or off.
Brake Service This setting will allow you to retract the brakes for servicing.
23_RUV_OM_EN_US_t.book Page 114
Page 123 of 256
121
SAFETY
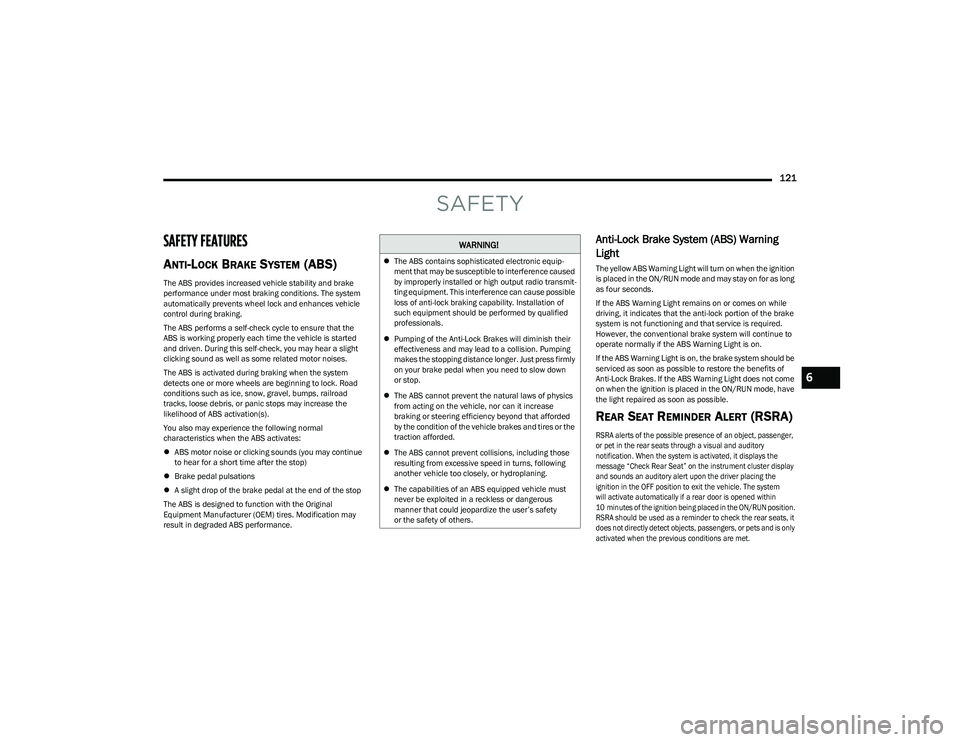
SAFETY FEATURES
ANTI-LOCK BRAKE SYSTEM (ABS)
The ABS provides increased vehicle stability and brake
performance under most braking conditions. The system
automatically prevents wheel lock and enhances vehicle
control during braking.
The ABS performs a self-check cycle to ensure that the
ABS is working properly each time the vehicle is started
and driven. During this self-check, you may hear a slight
clicking sound as well as some related motor noises.
The ABS is activated during braking when the system
detects one or more wheels are beginning to lock. Road
conditions such as ice, snow, gravel, bumps, railroad
tracks, loose debris, or panic stops may increase the
likelihood of ABS activation(s).
You also may experience the following normal
characteristics when the ABS activates:
ABS motor noise or clicking sounds (you may continue
to hear for a short time after the stop)
Brake pedal pulsations
A slight drop of the brake pedal at the end of the stop
The ABS is designed to function with the Original
Equipment Manufacturer (OEM) tires. Modification may
result in degraded ABS performance.
Anti-Lock Brake System (ABS) Warning
Light
The yellow ABS Warning Light will turn on when the ignition
is placed in the ON/RUN mode and may stay on for as long
as four seconds.
If the ABS Warning Light remains on or comes on while
driving, it indicates that the anti-lock portion of the brake
system is not functioning and that service is required.
However, the conventional brake system will continue to
operate normally if the ABS Warning Light is on.
If the ABS Warning Light is on, the brake system should be
serviced as soon as possible to restore the benefits of
Anti-Lock Brakes. If the ABS Warning Light does not come
on when the ignition is placed in the ON/RUN mode, have
the light repaired as soon as possible.
REAR SEAT REMINDER ALERT (RSRA)
RSRA alerts of the possible presence of an object, passenger,
or pet in the rear seats through a visual and auditory
notification. When the system is activated, it displays the
message “Check Rear Seat” on the instrument cluster display
and sounds an auditory alert upon the driver placing the
ignition in the OFF position to exit the vehicle. The system
will activate automatically if a rear door is opened within
10 minutes of the ignition being placed in the ON/RUN position.
RSRA should be used as a reminder to check the rear seats, it
does not directly detect objects, passengers, or pets and is only
activated when the previous conditions are met.
WARNING!
The ABS contains sophisticated electronic equip -
ment that may be susceptible to interference caused
by improperly installed or high output radio transmit -
ting equipment. This interference can cause possible
loss of anti-lock braking capability. Installation of
such equipment should be performed by qualified
professionals.
Pumping of the Anti-Lock Brakes will diminish their
effectiveness and may lead to a collision. Pumping
makes the stopping distance longer. Just press firmly
on your brake pedal when you need to slow down
or stop.
The ABS cannot prevent the natural laws of physics
from acting on the vehicle, nor can it increase
braking or steering efficiency beyond that afforded
by the condition of the vehicle brakes and tires or the
traction afforded.
The ABS cannot prevent collisions, including those
resulting from excessive speed in turns, following
another vehicle too closely, or hydroplaning.
The capabilities of an ABS equipped vehicle must
never be exploited in a reckless or dangerous
manner that could jeopardize the user’s safety
or the safety of others.
6
23_RUV_OM_EN_US_t.book Page 121
Page 124 of 256
122SAFETY
To enable or disable RSRA, see Úpage 105.
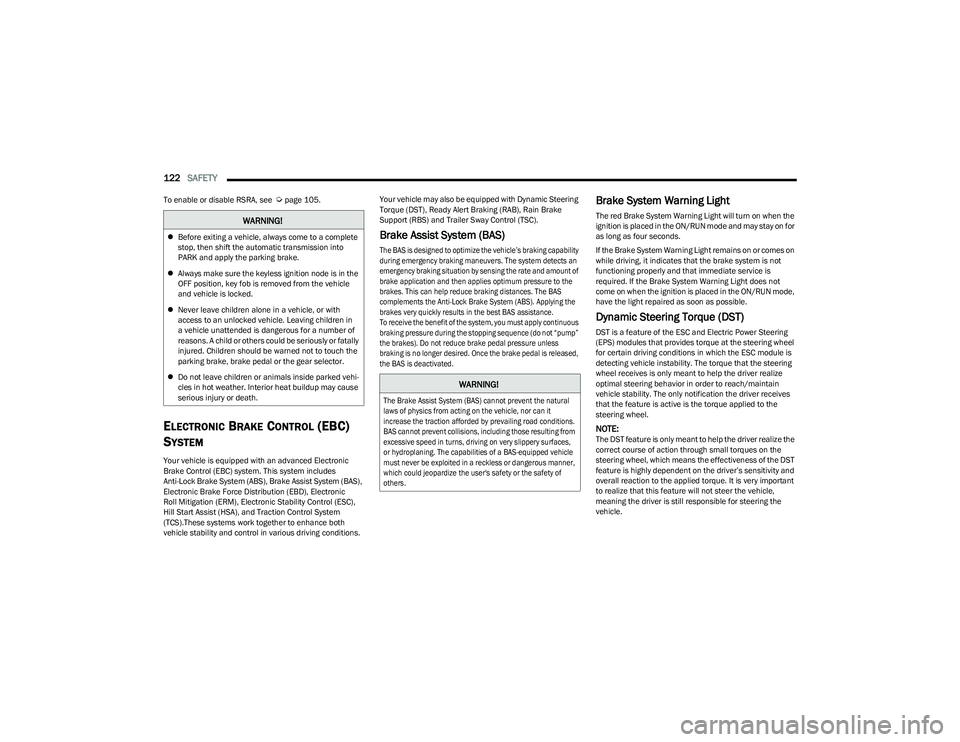
ELECTRONIC BRAKE CONTROL (EBC)
S
YSTEM
Your vehicle is equipped with an advanced Electronic
Brake Control (EBC) system. This system includes
Anti-Lock Brake System (ABS), Brake Assist System (BAS),
Electronic Brake Force Distribution (EBD), Electronic
Roll Mitigation (ERM), Electronic Stability Control (ESC),
Hill Start Assist (HSA), and Traction Control System
(TCS).These systems work together to enhance both
vehicle stability and control in various driving conditions. Your vehicle may also be equipped with Dynamic Steering
Torque (DST), Ready Alert Braking (RAB), Rain Brake
Support (RBS) and Trailer Sway Control (TSC).
Brake Assist System (BAS)
The BAS is designed to optimize the vehicle’s braking capability
during emergency braking maneuvers. The system detects an
emergency braking situation by sensing the rate and amount of
brake application and then applies optimum pressure to the
brakes. This can help reduce braking distances. The BAS
complements the Anti-Lock Brake System (ABS). Applying the
brakes very quickly results in the best BAS assistance.
To receive the benefit of the system, you must apply continuous
braking pressure during the stopping sequence (do not “pump”
the brakes). Do not reduce brake pedal pressure unless
braking is no longer desired. Once the brake pedal is released,
the BAS is deactivated.
Brake System Warning Light
The red Brake System Warning Light will turn on when the
ignition is placed in the ON/RUN mode and may stay on for
as long as four seconds.
If the Brake System Warning Light remains on or comes on
while driving, it indicates that the brake system is not
functioning properly and that immediate service is
required. If the Brake System Warning Light does not
come on when the ignition is placed in the ON/RUN mode,
have the light repaired as soon as possible.
Dynamic Steering Torque (DST)
DST is a feature of the ESC and Electric Power Steering
(EPS) modules that provides torque at the steering wheel
for certain driving conditions in which the ESC module is
detecting vehicle instability. The torque that the steering
wheel receives is only meant to help the driver realize
optimal steering behavior in order to reach/maintain
vehicle stability. The only notification the driver receives
that the feature is active is the torque applied to the
steering wheel.
NOTE:The DST feature is only meant to help the driver realize the
correct course of action through small torques on the
steering wheel, which means the effectiveness of the DST
feature is highly dependent on the driver’s sensitivity and
overall reaction to the applied torque. It is very important
to realize that this feature will not steer the vehicle,
meaning the driver is still responsible for steering the
vehicle.
WARNING!
Before exiting a vehicle, always come to a complete
stop, then shift the automatic transmission into
PARK and apply the parking brake.
Always make sure the keyless ignition node is in the
OFF position, key fob is removed from the vehicle
and vehicle is locked.
Never leave children alone in a vehicle, or with
access to an unlocked vehicle. Leaving children in
a vehicle unattended is dangerous for a number of
reasons. A child or others could be seriously or fatally
injured. Children should be warned not to touch the
parking brake, brake pedal or the gear selector.
Do not leave children or animals inside parked vehi -
cles in hot weather. Interior heat buildup may cause
serious injury or death.
WARNING!
The Brake Assist System (BAS) cannot prevent the natural
laws of physics from acting on the vehicle, nor can it
increase the traction afforded by prevailing road conditions.
BAS cannot prevent collisions, including those resulting from
excessive speed in turns, driving on very slippery surfaces,
or hydroplaning. The capabilities of a BAS-equipped vehicle
must never be exploited in a reckless or dangerous manner,
which could jeopardize the user's safety or the safety of
others.
23_RUV_OM_EN_US_t.book Page 122
Page 127 of 256

SAFETY125
The following conditions must be met in order for HSA to
activate:
The feature must be enabled.
The vehicle must be stopped.
The parking brake must be off.
The driver door must be closed.
The vehicle must be on a sufficient grade.
The gear selection must match vehicle uphill direction
(i.e., vehicle facing uphill is in forward gear; vehicle
backing uphill is in REVERSE (R) gear).
HSA will work in REVERSE gear and all forward gears.
The system will not activate if the transmission is in
PARK (P) or NEUTRAL (N).
Disabling And Enabling HSA
This feature can be turned on or turned off. To change the
current setting, proceed as follows: Úpage 105.
Towing With HSA
HSA will also provide assistance to mitigate roll back while
towing a trailer.
Ready Alert Braking (RAB)
RAB may reduce the time required to reach full braking
during emergency braking situations. It anticipates
when an emergency braking situation may occur by
monitoring how fast the throttle is released by the driver.
The Electronic Brake Control (EBC) system will prepare the
brake system for a panic stop.
Rain Brake Support (RBS)
RBS may improve braking performance in wet conditions.
It will periodically apply a small amount of brake pressure
to remove any water buildup on the front brake rotors.
It functions when the windshield wipers are in LO or HI
speed. When RBS is active, there is no notification to the
driver and no driver interaction is required.
Traction Control System (TCS)
The TCS monitors the amount of wheel spin of each of the
driven wheels. If wheel spin is detected, the TCS may apply
brake pressure to the spinning wheel(s) and/or reduce vehicle
power to provide enhanced acceleration and stability. A feature
of the TCS, Brake Limited Differential (BLD) functions similarly
to a limited slip differential and controls the wheel spin across
a driven axle. If one wheel on a driven axle is spinning faster
than the other, the system will apply the brake of the spinning
wheel. This will allow more vehicle torque to be applied to the
wheel that is not spinning. BLD may remain enabled even if TCS
and the Electronic Stability Control (ESC) are in reduced modes.
Trailer Sway Control (TSC)
TSC uses sensors in the vehicle to recognize an
excessively swaying trailer and will take the appropriate
actions to attempt to stop the sway. Note that TSC cannot
stop all trailers from swaying. Always use caution when
towing a trailer and follow the trailer tongue weight
recommendations
Úpage 94.
When TSC is functioning, the ESC Activation/Malfunction
Indicator Light will flash, the engine power may be reduced
and you may feel the brakes being applied to individual
wheels to attempt to stop the trailer from swaying. TSC is
disabled when the ESC system is in the “Partial Off” mode.
WARNING!
There may be situations where the Hill Start Assist (HSA) will
not activate and slight rolling may occur, such as on minor
hills or with a loaded vehicle, or while pulling a trailer. HSA is
not a substitute for active driving involvement. It is always
the driver’s responsibility to be attentive to distance to other
vehicles, people, and objects, and most importantly brake
operation to ensure safe operation of the vehicle under all
road conditions. Your complete attention is always required
while driving to maintain safe control of your vehicle. Failure
to follow these warnings can result in a collision or serious
personal injury.
WARNING!
If you use a trailer brake controller with your trailer,
the trailer brakes may be activated and deactivated
with the brake switch. If so, there may not be enough
brake pressure to hold both the vehicle and the
trailer on a hill when the brake pedal is released.
In order to avoid rolling down an incline while
resuming acceleration, manually activate the trailer
brake or apply more vehicle brake pressure prior to
releasing the brake pedal.
HSA is not a parking brake. Always apply the parking
brake fully when exiting your vehicle. Also, be certain
to place the transmission in PARK.
Failure to follow these warnings can result in a colli -
sion or serious personal injury.
6
23_RUV_OM_EN_US_t.book Page 125
Page 131 of 256

SAFETY129
Blind Spot Alert Lights/Chime
When operating in Blind Spot Alert Lights/Chime mode, the
BSM system will provide a visual alert in the appropriate side
view mirror based on a detected object. If the turn signal is then
activated, and it corresponds to an alert present on that side of
the vehicle, an audible chime will also be sounded. Whenever a
turn signal and detected object are present on the same side at
the same time, both the visual and audible alerts will be issued.
In addition to the audible alert the radio (if on) will also be
muted.
NOTE:Whenever an audible alert is requested by the BSM
system, the radio is also muted.
When the system is in RCP, the system shall respond with
both visual and audible alerts when a detected object is
present. Whenever an audible alert is requested, the radio
is also muted. Turn/hazard signal status is ignored; the
RCP state always requests the chime.
Blind Spot Alert Off
When the BSM system is turned off there will be no visual
or audible alerts from either the BSM or RCP systems.
NOTE:
The BSM system will store the current operating mode
when the vehicle is shut off. Each time the vehicle is
started the previously stored mode will be recalled and
used.
The BSM system can work in conjunction with the
KeySense function of the vehicle (if equipped)
Úpage 64.
FORWARD COLLISION WARNING (FCW)
W
ITH MITIGATION — IF EQUIPPED
FCW with Mitigation provides the driver with audible
warnings, visual warnings (within the instrument cluster
display), and may apply a brake jerk to warn the driver
when it detects a potential frontal collision. The warnings
and limited braking are intended to provide the driver with
enough time to react, avoid or mitigate the potential
collision.
NOTE:FCW monitors the information from the forward looking
sensors as well as the Electronic Brake Controller (EBC), to
calculate the probability of a forward collision. When the
system determines that a forward collision is probable, the
driver will be provided with audible and visual warnings
and may provide a brake jerk warning.
If the driver does not take action based upon these progressive
warnings, then the system will provide a limited level of active
braking to help slow the vehicle and mitigate the potential
forward collision. If the driver reacts to the warnings by braking
and the system determines that the driver intends to avoid the
collision by braking but has not applied sufficient brake force,
the system will compensate and provide additional brake force
as required.
If an FCW with Mitigation event begins at a speed below
37 mph (60 km/h), the system may provide the maximum
braking possible to mitigate the potential forward collision. If
the Forward Collision Warning with Mitigation event stops the
vehicle completely, the system will hold the vehicle at standstill
for two seconds and then release the brakes. If a pedestrian is
encountered in the path at the same speed threshold, the
system will also attempt to bring the vehicle to a stop.
FCW Message
When the system determines a collision with the vehicle in
front of you is no longer probable, the warning message
will be deactivated
Úpage 244.
NOTE:
The minimum speed for FCW activation is 1 mph
(2 km/h).
The FCW alerts may be triggered on objects other than
vehicles such as guardrails or sign posts based on the
course prediction. This is expected and is a part of
normal FCW activation and functionality.
It is unsafe to test the FCW system. To prevent such
misuse of the system, after four Active Braking events
within a key cycle, the Active Braking portion of FCW will
be deactivated until the next key cycle.
The FCW system is intended for on-road use only. If the
vehicle is taken off-road, the FCW system should be
deactivated to prevent unnecessary warnings to the
surroundings.6
23_RUV_OM_EN_US_t.book Page 129
Page 133 of 256
SAFETY131
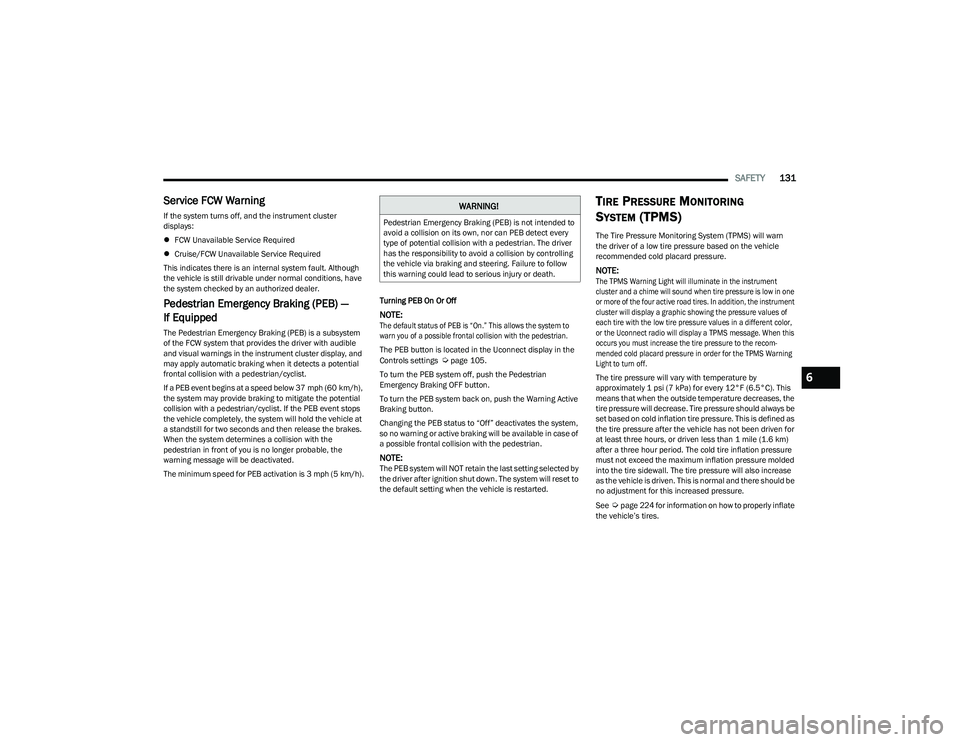
Service FCW Warning
If the system turns off, and the instrument cluster
displays:
FCW Unavailable Service Required
Cruise/FCW Unavailable Service Required
This indicates there is an internal system fault. Although
the vehicle is still drivable under normal conditions, have
the system checked by an authorized dealer.
Pedestrian Emergency Braking (PEB) —
If Equipped
The Pedestrian Emergency Braking (PEB) is a subsystem
of the FCW system that provides the driver with audible
and visual warnings in the instrument cluster display, and
may apply automatic braking when it detects a potential
frontal collision with a pedestrian/cyclist.
If a PEB event begins at a speed below 37 mph (60 km/h),
the system may provide braking to mitigate the potential
collision with a pedestrian/cyclist. If the PEB event stops
the vehicle completely, the system will hold the vehicle at
a standstill for two seconds and then release the brakes.
When the system determines a collision with the
pedestrian in front of you is no longer probable, the
warning message will be deactivated.
The minimum speed for PEB activation is 3 mph (5 km/h). Turning PEB On Or Off
NOTE:
The default status of PEB is “On.” This allows the system to
warn you of a possible frontal collision with the pedestrian.
The PEB button is located in the Uconnect display in the
Controls settings
Úpage 105.
To turn the PEB system off, push the Pedestrian
Emergency Braking OFF button.
To turn the PEB system back on, push the Warning Active
Braking button.
Changing the PEB status to “Off” deactivates the system,
so no warning or active braking will be available in case of
a possible frontal collision with the pedestrian.
NOTE:The PEB system will NOT retain the last setting selected by
the driver after ignition shut down. The system will reset to
the default setting when the vehicle is restarted.
TIRE PRESSURE MONITORING
S
YSTEM (TPMS)
The Tire Pressure Monitoring System (TPMS) will warn
the driver of a low tire pressure based on the vehicle
recommended cold placard pressure.
NOTE:
The TPMS Warning Light will illuminate in the instrument
cluster and a chime will sound when tire pressure is low in one
or more of the four active road tires. In addition, the instrument
cluster will display a graphic showing the pressure values of
each tire with the low tire pressure values in a different color,
or the Uconnect radio will display a TPMS message. When this
occurs you must increase the tire pressure to the recom -
mended cold placard pressure in order for the TPMS Warning
Light to turn off.
The tire pressure will vary with temperature by
approximately 1 psi (7 kPa) for every 12°F (6.5°C). This
means that when the outside temperature decreases, the
tire pressure will decrease. Tire pressure should always be
set based on cold inflation tire pressure. This is defined as
the tire pressure after the vehicle has not been driven for
at least three hours, or driven less than 1 mile (1.6 km)
after a three hour period. The cold tire inflation pressure
must not exceed the maximum inflation pressure molded
into the tire sidewall. The tire pressure will also increase
as the vehicle is driven. This is normal and there should be
no adjustment for this increased pressure.
See
Úpage 224 for information on how to properly inflate
the vehicle’s tires.
WARNING!
Pedestrian Emergency Braking (PEB) is not intended to
avoid a collision on its own, nor can PEB detect every
type of potential collision with a pedestrian. The driver
has the responsibility to avoid a collision by controlling
the vehicle via braking and steering. Failure to follow
this warning could lead to serious injury or death.
6
23_RUV_OM_EN_US_t.book Page 131
Page 190 of 256
188IN CASE OF EMERGENCY
If the temperature gauge is moving towards or close to
the HOT (H) position, you can reduce the potential for
overheating by taking the appropriate action.
On highways — slow down.
In city traffic — while stopped, place the transmission in
NEUTRAL (N), but do not increase the engine idle speed
while preventing vehicle motion with the brakes.
If your Air Conditioner (A/C) is on, turn it off. The A/C
system adds heat to the engine cooling system and
turning the A/C off can help remove this heat.
You can also turn the temperature control to maximum
heat, the mode control to floor and the blower control
to high. This allows the heater core to act as a supple -
ment to the radiator and aids in removing heat from the
engine cooling system.MANUAL PARK RELEASE
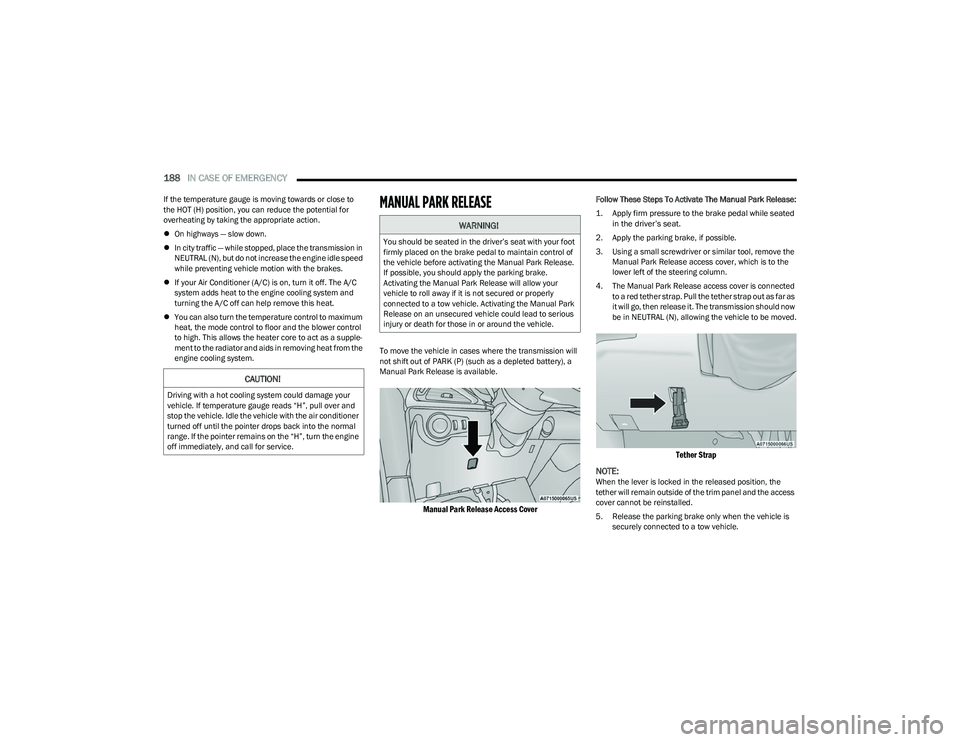
To move the vehicle in cases where the transmission will
not shift out of PARK (P) (such as a depleted battery), a
Manual Park Release is available.
Manual Park Release Access Cover
Follow These Steps To Activate The Manual Park Release:
1. Apply firm pressure to the brake pedal while seated in the driver’s seat.
2. Apply the parking brake, if possible.
3. Using a small screwdriver or similar tool, remove the Manual Park Release access cover, which is to the
lower left of the steering column.
4. The Manual Park Release access cover is connected to a red tether strap. Pull the tether strap out as far as
it will go, then release it. The transmission should now
be in NEUTRAL (N), allowing the vehicle to be moved.
Tether Strap
NOTE:
When the lever is locked in the released position, the
tether will remain outside of the trim panel and the access
cover cannot be reinstalled.
5. Release the parking brake only when the vehicle is securely connected to a tow vehicle.
CAUTION!
Driving with a hot cooling system could damage your
vehicle. If temperature gauge reads “H”, pull over and
stop the vehicle. Idle the vehicle with the air conditioner
turned off until the pointer drops back into the normal
range. If the pointer remains on the “H”, turn the engine
off immediately, and call for service.
WARNING!
You should be seated in the driver’s seat with your foot
firmly placed on the brake pedal to maintain control of
the vehicle before activating the Manual Park Release.
If possible, you should apply the parking brake.
Activating the Manual Park Release will allow your
vehicle to roll away if it is not secured or properly
connected to a tow vehicle. Activating the Manual Park
Release on an unsecured vehicle could lead to serious
injury or death for those in or around the vehicle.
23_RUV_OM_EN_US_t.book Page 188
Page 208 of 256
206SERVICING AND MAINTENANCE
(Continued)
As long as the engine operating temperature is satisfactory, the
coolant bottle need only be checked once a month.
When additional coolant is needed to maintain the proper
level, it should be added to the coolant bottle. Do not
overfill.
See an authorized dealer for service.
Cooling System Notes
NOTE:When the vehicle is stopped after a few miles/kilometers
of operation, you may observe vapor coming from the front
of the engine compartment. This is normally a result of
moisture from rain, snow, or high humidity accumulating
on the radiator and being vaporized when the thermostat
opens, allowing hot engine coolant (antifreeze) to enter
the radiator.
If an examination of your engine compartment shows no
evidence of radiator or hose leaks, the vehicle may be
safely driven. The vapor will soon dissipate.
Do not overfill the coolant expansion bottle.
Check the coolant freeze point in the radiator and in
the coolant expansion bottle. If engine coolant needs
to be added, the contents of the coolant expansion
bottle must also be protected against freezing.
If frequent engine coolant additions are required, the
cooling system should be pressure tested for leaks.
Maintain engine coolant concentration at a minimum
of 50% OAT coolant (conforming to MS.90032) and
distilled water for proper corrosion protection of your
engine which contains aluminum components.
Make sure that the coolant expansion bottle overflow
hoses are not kinked or obstructed.
Keep the front of the radiator clean. If your vehicle is
equipped with air conditioning, keep the front of the
condenser clean.
Do not change the thermostat for Summer or Winter
operation. If replacement is ever necessary, install
ONLY the correct type thermostat. Other designs may
result in unsatisfactory engine cooling performance,
poor gas mileage, and increased emissions.
BRAKE SYSTEM
In order to ensure brake system performance, all brake
system components should be inspected periodically.
For the proper maintenance intervals
Úpage 193.
Brake Master Cylinder
The fluid in the master cylinder should be checked when
performing under hood services or immediately if the
Brake Warning Light is illuminated.
Be sure to clean the top of the master cylinder area before
removing the cap. If necessary, add fluid to bring the fluid
level up to the requirements described on the brake fluid
reservoir. With disc brakes, fluid level can be expected to
fall as the brake pads wear. Brake fluid level should be
checked when pads are replaced. However, low fluid level
may be caused by a leak and a checkup may be needed.
Use only manufacturer recommended brake fluid
Úpage 239.
WARNING!
Riding the brakes can lead to brake failure and possibly
a collision. Driving with your foot resting or riding on
the brake pedal can result in abnormally high brake
temperatures, excessive lining wear, and possible brake
damage. You would not have your full braking capacity
in an emergency.
WARNING!
Use only manufacturer recommended brake fluid Úpage 239. Using the wrong type of brake fluid can
severely damage your brake system and/or impair its
performance. The proper type of brake fluid for your
vehicle is also identified on the original factory
installed hydraulic master cylinder reservoir.
To avoid contamination from foreign matter or moisture,
use only new brake fluid or fluid that has been in a tightly
closed container. Keep the master cylinder reservoir cap
secured at all times. Brake fluid in an open container
absorbs moisture from the air resulting in a lower boiling
point. This may cause it to boil unexpectedly during hard
or prolonged braking, resulting in sudden brake failure.
This could result in a collision.
23_RUV_OM_EN_US_t.book Page 206
Page 231 of 256
SERVICING AND MAINTENANCE229
Limited Use Spare — If Equipped
The limited use spare tire is for temporary emergency use
only. This tire is identified by a label located on the limited
use spare wheel. This label contains the driving limitations
for this spare. This tire may look like the original equipped
tire on the front or rear axle of your vehicle, but it is not.
Installation of this limited use spare tire affects vehicle
handling. Since it is not the same as your original
equipment tire, replace (or repair) the original equipment
tire and reinstall on the vehicle at the first opportunity.
WHEEL AND WHEEL TRIM CARE
All wheels and wheel trim, especially aluminum and
chrome plated wheels, should be cleaned regularly using
mild (neutral Ph) soap and water to maintain their luster
and to prevent corrosion. Wash wheels with the same
soap solution recommended for the body of the vehicle
and remember to always wash when the surfaces are not
hot to the touch.
Your wheels are susceptible to deterioration caused by
salt, sodium chloride, magnesium chloride, calcium
chloride, etc., and other road chemicals used to melt ice
or control dust on dirt roads. Use a soft cloth or sponge
and mild soap to wipe away promptly. Do not use harsh
chemicals or a stiff brush. They can damage the wheel’s
protective coating that helps keep them from corroding
and tarnishing.
When cleaning extremely dirty wheels including excessive
brake dust, care must be taken in the selection of tire and
wheel cleaning chemicals and equipment to prevent
damage to the wheels. Mopar® Wheel Treatment or Mopar® Chrome Cleaner or their equivalent is
recommended or select a non-abrasive, non-acidic
cleaner for aluminum or chrome wheels.
NOTE:If you intend parking or storing your vehicle for an
extended period after cleaning the wheels with wheel
cleaner, drive your vehicle and apply the brakes to
remove the water droplets from the brake components.
This activity will remove the red rust on the brake rotors
and prevent vehicle vibration when braking.
Dark Vapor Chrome, Black Satin Chrome, or Low Gloss
Clear Coat Wheels
WARNING!
Limited use spares are for emergency use only.
Installation of this limited use spare tire affects vehicle
handling. With this tire, do not drive more than the
speed listed on the limited use spare wheel. Keep
inflated to the cold tire inflation pressures listed on your
Tire And Loading Information Placard located on the
driver’s side B-pillar or the rear edge of the driver’s side
door. Replace (or repair) the original equipment tire at
the first opportunity and reinstall it on your vehicle.
Failure to do so could result in loss of vehicle control.
CAUTION!
Avoid products or automatic car washes that use acidic
solutions or strong alkaline additives or harsh brushes.
Many aftermarket wheel cleaners and automatic car
washes may damage the wheel's protective finish. Such
damage is not covered by the New Vehicle Limited
Warranty. Only car wash soap, Mopar® Wheel Cleaner
or equivalent is recommended.
CAUTION!
Do not use scouring pads, steel wool, a bristle brush,
metal polishes or oven cleaner. These products may
damage the wheel's protective finish. Such damage is
not covered by the New Vehicle Limited Warranty. Only
car wash soap, Mopar® Wheel Cleaner or equivalent is
recommended.
CAUTION!
If your vehicle is equipped with these specialty wheels,
DO NOT USE wheel cleaners, abrasives, or polishing
compounds. They will permanently damage this finish
and such damage is not covered by the New Vehicle
Limited Warranty. HAND WASH ONLY USING MILD SOAP
AND WATER WITH A SOFT CLOTH. Used on a regular
basis; this is all that is required to maintain this finish.
8
23_RUV_OM_EN_US_t.book Page 229
Page 237 of 256
235
TECHNICAL SPECIFICATIONS
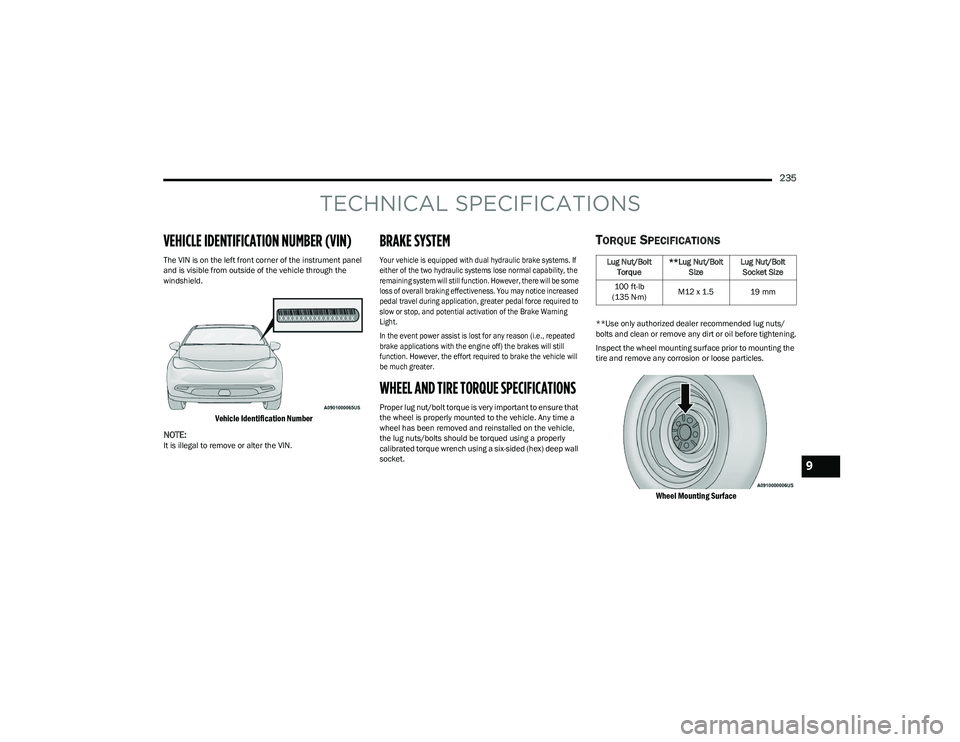
VEHICLE IDENTIFICATION NUMBER (VIN)
The VIN is on the left front corner of the instrument panel
and is visible from outside of the vehicle through the
windshield.
Vehicle Identification Number
NOTE:
It is illegal to remove or alter the VIN.
BRAKE SYSTEM
Your vehicle is equipped with dual hydraulic brake systems. If
either of the two hydraulic systems lose normal capability, the
remaining system will still function. However, there will be some
loss of overall braking effectiveness. You may notice increased
pedal travel during application, greater pedal force required to
slow or stop, and potential activation of the Brake Warning
Light.
In the event power assist is lost for any reason (i.e., repeated
brake applications with the engine off) the brakes will still
function. However, the effort required to brake the vehicle will
be much greater.
WHEEL AND TIRE TORQUE SPECIFICATIONS
Proper lug nut/bolt torque is very important to ensure that
the wheel is properly mounted to the vehicle. Any time a
wheel has been removed and reinstalled on the vehicle,
the lug nuts/bolts should be torqued using a properly
calibrated torque wrench using a six-sided (hex) deep wall
socket.
TORQUE SPECIFICATIONS
**Use only authorized dealer recommended lug nuts/
bolts and clean or remove any dirt or oil before tightening.
Inspect the wheel mounting surface prior to mounting the
tire and remove any corrosion or loose particles.
Wheel Mounting Surface
Lug Nut/Bolt Torque **Lug Nut/Bolt
Size Lug Nut/Bolt
Socket Size
100 ft-lb
(135 N·m) M12 x 1.5 19 mm
9
23_RUV_OM_EN_US_t.book Page 235