tire pressure CHRYSLER VOYAGER 2023 User Guide
[x] Cancel search | Manufacturer: CHRYSLER, Model Year: 2023, Model line: VOYAGER, Model: CHRYSLER VOYAGER 2023Pages: 256, PDF Size: 13.97 MB
Page 134 of 256
132SAFETY
The TPMS will warn the driver of a low tire pressure if the
tire pressure falls below the low-pressure warning limit for
any reason, including low temperature effects and natural
pressure loss through the tire.
The TPMS will continue to warn the driver of low tire
pressure as long as the condition exists, and will not turn
off until the tire pressure is at or above the recommended
cold placard pressure. Once the low tire pressure warning
(TPMS Warning Light) illuminates, you must increase the
tire pressure to the recommended cold placard pressure
in order for the TPMS Warning Light to turn off.
The system will automatically update and the TPMS
Warning Light will turn off once the system receives the
updated tire pressures. The vehicle may need to be driven
for up to 20 minutes above 15 mph (24 km/h) in order for
the TPMS to receive this information.
For example, your vehicle may have a recommended cold
(parked for more than three hours) placard pressure of
33 psi (227 kPa). If the ambient temperature is 68°F
(20°C) and the measured tire pressure is 28 psi
(193 kPa), a temperature drop to 20°F (-7°C) will
decrease the tire pressure to approximately 24 psi
(165 kPa). This tire pressure is low enough to turn on the
TPMS Warning Light. Driving the vehicle may cause the tire
pressure to rise to approximately 28 psi (193 kPa), but the
TPMS Warning Light will still be on. In this situation, the
TPMS Warning Light will turn off only after the tires are
inflated to the vehicle’s recommended cold placard
pressure value
Úpage 244.
NOTE:When filling warm tires, the tire pressure may need to be
increased up to an additional 4 psi (28 kPa) above the
recommended cold placard pressure in order to turn the
TPMS Warning Light off.NOTE:
The TPMS is not intended to replace normal tire care
and maintenance, or to provide warning of a tire failure
or condition.
The TPMS should not be used as a tire pressure gauge
while adjusting your tire pressure.
Driving on a significantly underinflated tire causes the
tire to overheat and can lead to tire failure. Underinfla -
tion also reduces fuel efficiency and tire tread life, and
may affect the vehicle’s handling and stopping ability.
The TPMS is not a substitute for proper tire mainte -
nance, and it is the driver’s responsibility to maintain
correct tire pressure using an accurate tire pressure
gauge, even if underinflation has not reached the level
to trigger illumination of the TPMS Warning Light.
Seasonal temperature changes will affect tire pres -
sure, and the TPMS will monitor the actual tire pres -
sure in the tire.
Premium System
The Tire Pressure Monitoring System (TPMS) uses wireless
technology with wheel rim mounted electronic sensors to
monitor tire pressure levels. Sensors, mounted to each
wheel as part of the valve stem, transmit tire pressure
readings to the receiver module.
NOTE:It is particularly important for you to check the tire
pressure in all of the tires on your vehicle monthly and to
maintain the proper pressure.
CAUTION!
The TPMS has been optimized for the original equip -
ment tires and wheels. TPMS pressures and warning
have been established for the tire size equipped on
your vehicle. Undesirable system operation or sensor
damage may result when using replacement equip -
ment that is not of the same size, type, and/or style.
The TPMS sensor is not designed for use on after -
market wheels and may contribute to a poor overall
system performance or sensor damage. Customers
are encouraged to use Original Equipment Manufac -
turer (OEM) wheels to ensure proper TPMS feature
operation.
Using aftermarket tire sealants may cause the
Tire Pressure Monitoring System (TPMS) sensor to
become inoperable. After using an aftermarket tire
sealant it is recommended that you take your vehicle
to an authorized dealer to have your sensor function
checked.
After inspecting or adjusting the tire pressure always
reinstall the valve stem cap. This will prevent mois -
ture and dirt from entering the valve stem, which
could damage the TPMS sensor.
23_RUV_OM_EN_US_t.book Page 132
Page 135 of 256
SAFETY133
The TPMS consists of the following components:
Receiver module
Four Tire Pressure Monitoring System sensors
Various Tire Pressure Monitoring System messages,
which display in the instrument cluster
Tire Pressure Monitoring System Warning Light
SERVICE TPMS WARNING
When a system fault is detected, the Tire Pressure
Monitoring System (TPMS) Warning Light will flash on and
off for 75 seconds and then remain on solid. The system
fault will also sound a chime. In addition, the instrument
cluster will display a "SERVICE TPM SYSTEM" message for
a minimum of five seconds and then display dashes (--) in
place of the pressure value to indicate which sensor is not
being received.
If the ignition is cycled, this sequence will repeat, providing
the system fault still exists. If the system fault no longer
exists, the TPMS Warning Light will no longer flash, and
the “SERVICE TPM SYSTEM” message will no longer
display, and a pressure value will display in place of the
dashes. A system fault can occur due to any of the
following:
Jamming due to electronic devices or driving next to
facilities emitting the same radio frequencies as the
TPMS sensors
Installing some form of aftermarket window tinting that
affects radio wave signals
Lots of snow or ice around the wheels or wheel housings
Using tire chains on the vehicle
Using wheels/tires not equipped with TPMS sensors Vehicles With Compact Spare — If Equipped
1. The compact spare tire does not have a Tire Pressure
Monitoring System sensor. Therefore, the TPMS will not
monitor the pressure in the compact spare tire.
2. If you install the compact spare tire in place of a road tire that has a pressure below the low-pressure warning limit,
the “Inflate to XX” message will continue to be displayed.
Upon the next ignition cycle, the TPMS Warning Light will
remain on and a chime will sound. In addition, the graphic
in the instrument cluster will still display a different color
pressure value.
3. After driving the vehicle for up to 20 minutes above 15 mph (24 km/h), the TPMS Warning Light will flash on
and off for 75 seconds and then remain on solid. In
addition, the instrument cluster will display a “SERVICE
TPM SYSTEM” message for five seconds and then display
dashes (--) in place of the pressure value.
4. For each subsequent ignition cycle, a chime will sound, the TPMS Warning Light will flash on and off
for 75 seconds and then remain on solid, and the
instrument cluster will display a “SERVICE TPM
SYSTEM” message for five seconds and then display
dashes (- -) in place of the pressure value.
5. Once you repair or replace the original road tire and reinstall it on the vehicle in place of the compact spare,
the TPMS will update automatically. In addition, the
TPMS Warning Light will turn off and the graphic in the
instrument cluster will display a new pressure value
instead of dashes (--), as long as no tire pressure is below
the low-pressure warning limit in any of the four active
road tires. The vehicle may need to be driven for up to
20 minutes above 15 mph (24 km/h) in order for the
TPMS to receive this information.
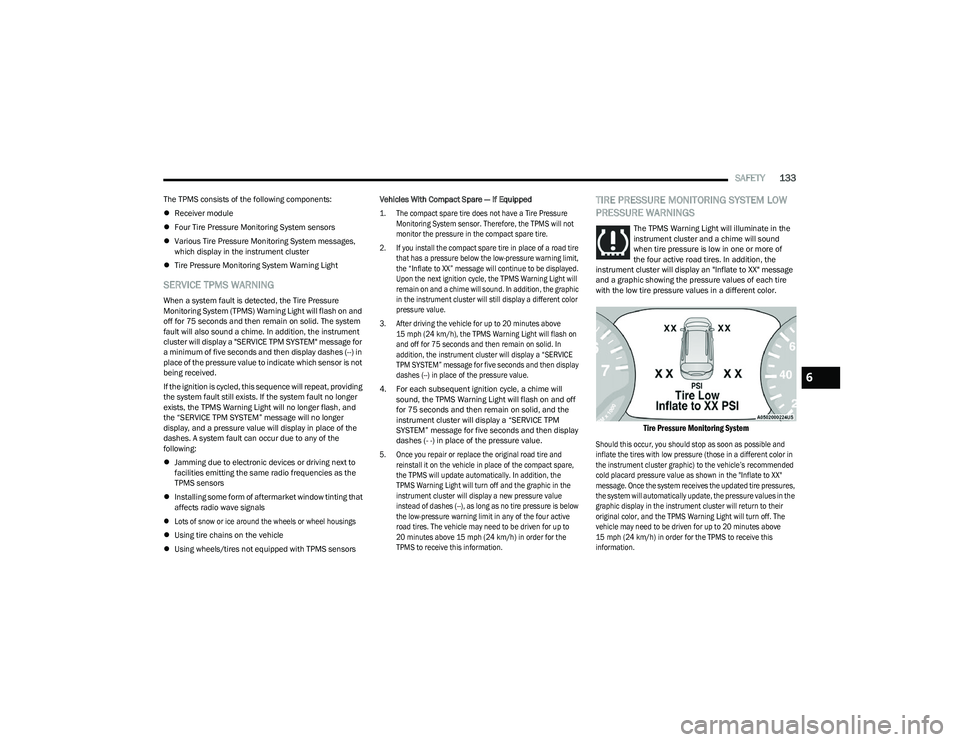
TIRE PRESSURE MONITORING SYSTEM LOW
PRESSURE WARNINGS
The TPMS Warning Light will illuminate in the
instrument cluster and a chime will sound
when tire pressure is low in one or more of
the four active road tires. In addition, the
instrument cluster will display an "Inflate to XX" message
and a graphic showing the pressure values of each tire
with the low tire pressure values in a different color.
Tire Pressure Monitoring System
Should this occur, you should stop as soon as possible and
inflate the tires with low pressure (those in a different color in
the instrument cluster graphic) to the vehicle’s recommended
cold placard pressure value as shown in the "Inflate to XX"
message. Once the system receives the updated tire pressures,
the system will automatically update, the pressure values in the
graphic display in the instrument cluster will return to their
original color, and the TPMS Warning Light will turn off. The
vehicle may need to be driven for up to 20 minutes above
15 mph (24 km/h) in order for the TPMS to receive this
information.
6
23_RUV_OM_EN_US_t.book Page 133
Page 136 of 256
134SAFETY
TPMS DEACTIVATION — IF EQUIPPED
The Tire Pressure Monitoring System (TPMS) can be
deactivated if replacing all four wheel and tire assemblies
(road tires) with wheel and tire assemblies that do not
have TPMS sensors, such as when installing winter wheel
and tire assemblies on your vehicle.
To deactivate the TPMS, first, replace all four wheel and tire
assemblies (road tires) with tires not equipped with Tire
Pressure Monitoring System sensors. Then, drive the
vehicle for 20 minutes above 15 mph (24 km/h). The TPMS
will chime, the TPMS Warning Light will flash on and off for
75 seconds and then remain on. The instrument cluster will
display the “SERVICE TPM SYSTEM” message and then
display dashes (--) in place of the pressure values.
Beginning with the next ignition cycle, the TPMS will no
longer chime or display the “SERVICE TPM SYSTEM”
message in the instrument cluster but dashes (--) will
remain in place of the pressure values.
To reactivate the TPMS, replace all four wheel and tire
assemblies (road tires) with tires equipped with TPMS
sensors. Then, drive the vehicle for up to 20 minutes
above 15 mph (24 km/h). The TPMS will chime, the TPMS
Warning Light will flash on and off for 75 seconds and then
turn off. The instrument cluster will display the “SERVICE
TPM SYSTEM” message and then display pressure values
in place of the dashes. On the next ignition cycle the
"SERVICE TPM SYSTEM" message will no longer be
displayed as long as no system fault exists.OCCUPANT RESTRAINT SYSTEMS
Some of the most important safety features in your vehicle
are the restraint systems:
OCCUPANT RESTRAINT SYSTEMS
F
EATURES
Seat Belt Systems
Supplemental Restraint Systems (SRS) Air Bags
Child Restraints
Some of the safety features described in this section may
be standard equipment on some models, or may be
optional equipment on others. If you are not sure, ask an
authorized dealer.
IMPORTANT SAFETY PRECAUTIONS
Please pay close attention to the information in this
section. It tells you how to use your restraint system
properly, to keep you and your passengers as safe as
possible.
Here are some simple steps you can take to minimize the
risk of harm from a deploying air bag:
1. Children 12 years old and under should always ride buckled up in the rear seat of a vehicle with a rear
seat.
2. A child who is not big enough to wear the vehicle seat belt properly must be secured in the appropriate child
restraint or belt-positioning booster seat in a rear
seating position
Úpage 153. 3. If a child from 2 to 12 years old (not in a rear-facing
child restraint) must ride in the front passenger seat,
move the seat as far back as possible and use the
proper child restraint
Úpage 153.
4. Never allow children to slide the shoulder belt behind them or under their arm.
5. You should read the instructions provided with your child restraint to make sure that you are using it properly.
6. All occupants should always wear their lap and shoulder belts properly.
7. The driver and front passenger seats should be moved back as far as practical to allow the front air
bags room to inflate.
8. Do not lean against the door or window. If your vehicle has side air bags, and deployment occurs, the side air bags
will inflate forcefully into the space between occupants
and the door and occupants could be injured.
9. If the air bag system in this vehicle needs to be modified to accommodate a disabled person, see
Ú
page 240 for
customer service contact information.
WARNING!
Never place a rear-facing child restraint in front of an air
bag. A deploying passenger front air bag can cause death
or serious injury to a child 12 years or younger, including
a child in a rear-facing child restraint.
Never install a rear-facing child restraint in the
front seat of a vehicle. Only use a rear-facing child
restraint in the rear seat. If the vehicle does not have
a rear seat, do not transport a rear-facing child
restraint in that vehicle.
23_RUV_OM_EN_US_t.book Page 134
Page 170 of 256
168SAFETY
(Continued)
PERIODIC SAFETY CHECKS YOU SHOULD
M
AKE OUTSIDE THE VEHICLE
Tires
Examine tires for excessive tread wear and uneven wear
patterns. Check for stones, nails, glass, or other objects
lodged in the tread or sidewall. Inspect the tread for cuts
and cracks. Inspect sidewalls for cuts, cracks, and bulges.
Check the lug nut/bolt torque for tightness. Check the
tires (including spare) for proper cold inflation pressure.
Lights
Have someone observe the operation of brake lights and
exterior lights while you work the controls. Check turn
signal and high beam indicator lights on the instrument
panel.
Door Latches
Check for proper closing, latching, and locking.
Fluid Leaks
Check area under the vehicle after overnight parking for
fuel, coolant, oil, or other fluid leaks. Also, if gasoline
fumes are detected or if fuel or brake fluid leaks are
suspected, the cause should be located and corrected
immediately.
WARNING!
An improperly attached, damaged, folded, or stacked
floor mat, or damaged floor mat fasteners may cause
your floor mat to interfere with the accelerator, brake, or
clutch pedals and cause a loss of vehicle control. To
prevent SERIOUS INJURY or DEATH:
ALWAYS securely attach your floor mat
using the floor mat fasteners. DO NOT
install your floor mat upside down or turn
your floor mat over. Lightly pull to confirm
mat is secured using the floor mat fasteners on a
regular basis.
ALWAYS REMOVE THE EXISTING FLOOR
MAT FROM THE VEHICLE before installing
any other floor mat. NEVER install or stack
an additional floor mat on top of an
existing floor mat.
ONLY install floor mats designed to fit your vehicle.
NEVER install a floor mat that cannot be properly
attached and secured to your vehicle. If a floor mat needs
to be replaced, only use a FCA approved floor mat for the
specific make, model, and year of your vehicle.
ONLY use the driver’s side floor mat on the driver’s side
floor area. To check for interference, with the vehicle
properly parked with the engine off, fully depress the
accelerator, the brake, and the clutch pedal (if present) to
check for interference. If your floor mat interferes with the
operation of any pedal, or is not secure to the floor,
remove the floor mat from the vehicle and place the floor
mat in your trunk.
ONLY use the passenger’s side floor mat on the
passenger’s side floor area.
ALWAYS make sure objects cannot fall or slide into
the driver’s side floor area when the vehicle is
moving. Objects can become trapped under acceler -
ator, brake, or clutch pedals and could cause a loss
of vehicle control.
NEVER place any objects under the floor mat (e.g.,
towels, keys, etc.). These objects could change the
position of the floor mat and may cause interference
with the accelerator, brake, or clutch pedals.
If the vehicle carpet has been removed and
re-installed, always properly attach carpet to the floor
and check the floor mat fasteners are secure to the
vehicle carpet. Fully depress each pedal to check for
interference with the accelerator, brake, or clutch
pedals then re-install the floor mats.
It is recommended to only use mild soap and water
to clean your floor mats. After cleaning, always check
your floor mat has been properly installed and is
secured to your vehicle using the floor mat fasteners
by lightly pulling mat.
WARNING!
23_RUV_OM_EN_US_t.book Page 168
Page 179 of 256
IN CASE OF EMERGENCY177
3. Place the wrench on the jack screw and turn
clockwise until the jack head is properly engaged in
the described location. Do not raise the vehicle until
you are sure the jack is securely engaged.
4. Raise the vehicle by turning the jack screw clockwise, using the swivel wrench. Raise the vehicle only until
the tire just clears the surface and enough clearance
is obtained to install the compact spare tire.
Minimum tire lift provides maximum stability.
5. Remove the wheel lug nuts, for vehicles with wheel covers, remove the cover from the wheel by hand.
Do not pry the wheel cover off. Then pull the wheel off
the hub.
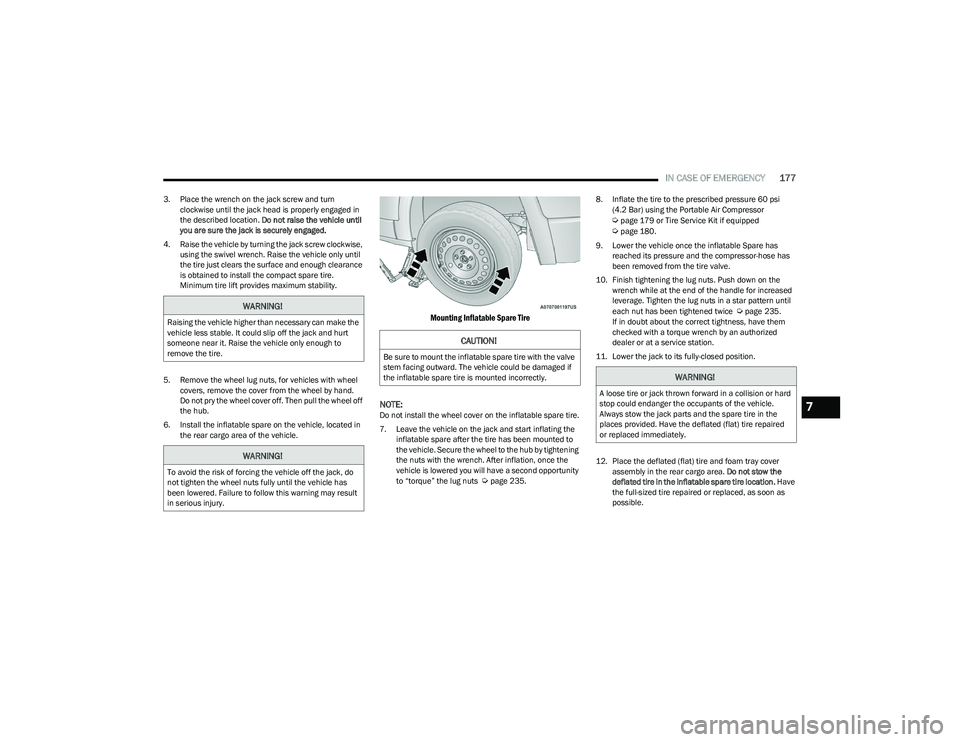
6. Install the inflatable spare on the vehicle, located in the rear cargo area of the vehicle.
Mounting Inflatable Spare Tire
NOTE:
Do not install the wheel cover on the inflatable spare tire.
7. Leave the vehicle on the jack and start inflating the inflatable spare after the tire has been mounted to
the vehicle. Secure the wheel to the hub by tightening
the nuts with the wrench. After inflation, once the
vehicle is lowered you will have a second opportunity
to “torque” the lug nuts
Úpage 235. 8. Inflate the tire to the prescribed pressure 60 psi
(4.2 Bar) using the Portable Air Compressor
Úpage 179 or Tire Service Kit if equipped Úpage 180.
9. Lower the vehicle once the inflatable Spare has reached its pressure and the compressor-hose has
been removed from the tire valve.
10. Finish tightening the lug nuts. Push down on the wrench while at the end of the handle for increased
leverage. Tighten the lug nuts in a star pattern until
each nut has been tightened twice
Úpage 235.
If in doubt about the correct tightness, have them
checked with a torque wrench by an authorized
dealer or at a service station.
11. Lower the jack to its fully-closed position.
12. Place the deflated (flat) tire and foam tray cover assembly in the rear cargo area. Do not stow the
deflated tire in the inflatable spare tire location. Have
the full-sized tire repaired or replaced, as soon as
possible.WARNING!
Raising the vehicle higher than necessary can make the
vehicle less stable. It could slip off the jack and hurt
someone near it. Raise the vehicle only enough to
remove the tire.
WARNING!
To avoid the risk of forcing the vehicle off the jack, do
not tighten the wheel nuts fully until the vehicle has
been lowered. Failure to follow this warning may result
in serious injury.
CAUTION!
Be sure to mount the inflatable spare tire with the valve
stem facing outward. The vehicle could be damaged if
the inflatable spare tire is mounted incorrectly.
WARNING!
A loose tire or jack thrown forward in a collision or hard
stop could endanger the occupants of the vehicle.
Always stow the jack parts and the spare tire in the
places provided. Have the deflated (flat) tire repaired
or replaced immediately.
7
23_RUV_OM_EN_US_t.book Page 177
Page 181 of 256
IN CASE OF EMERGENCY179
PORTABLE AIR COMPRESSOR —
I
F EQUIPPED
Your vehicle may be equipped with a Portable Air
Compressor. Use the Portable Air Compressor located in
the side compartment of the cargo area to inflate the
inflatable tire to 60 psi (4.2 Bar).
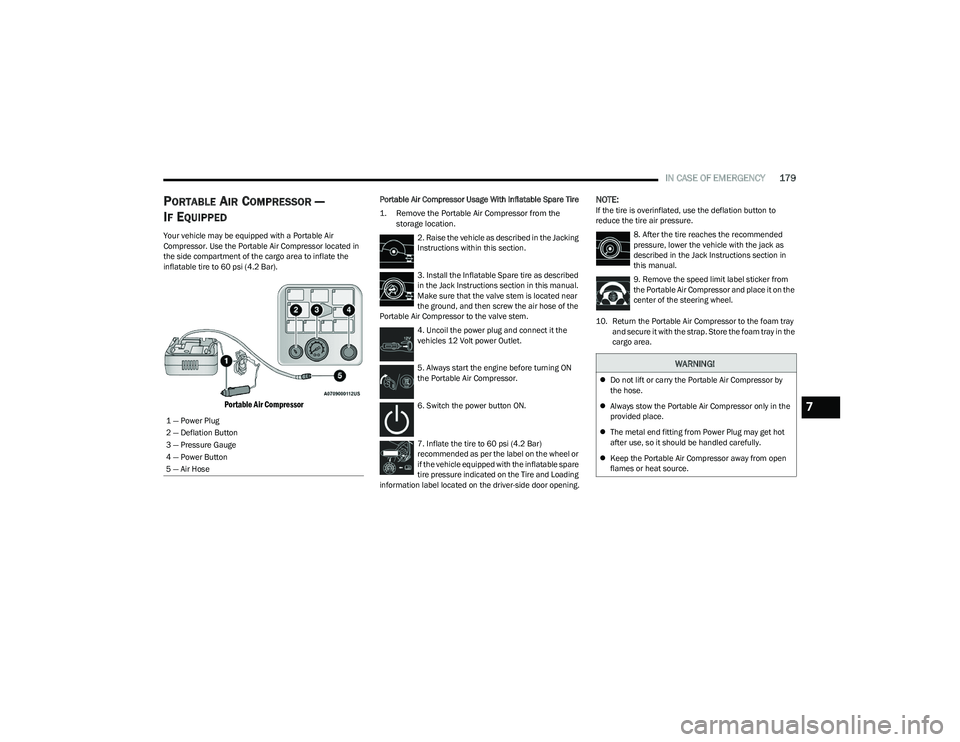
Portable Air Compressor
Portable Air Compressor Usage With Inflatable Spare Tire
1. Remove the Portable Air Compressor from the
storage location.
2. Raise the vehicle as described in the Jacking
Instructions within this section.
3. Install the Inflatable Spare tire as described
in the Jack Instructions section in this manual.
Make sure that the valve stem is located near
the ground, and then screw the air hose of the
Portable Air Compressor to the valve stem.
4. Uncoil the power plug and connect it the
vehicles 12 Volt power Outlet.
5. Always start the engine before turning ON
the Portable Air Compressor.
6. Switch the power button ON.
7. Inflate the tire to 60 psi (4.2 Bar)
recommended as per the label on the wheel or
if the vehicle equipped with the inflatable spare
tire pressure indicated on the Tire and Loading
information label located on the driver-side door opening.NOTE:If the tire is overinflated, use the deflation button to
reduce the tire air pressure.
8. After the tire reaches the recommended
pressure, lower the vehicle with the jack as
described in the Jack Instructions section in
this manual.
9. Remove the speed limit label sticker from
the Portable Air Compressor and place it on the
center of the steering wheel.
10. Return the Portable Air Compressor to the foam tray and secure it with the strap. Store the foam tray in the
cargo area.
1 — Power Plug
2 — Deflation Button
3 — Pressure Gauge
4 — Power Button
5 — Air Hose
WARNING!
Do not lift or carry the Portable Air Compressor by
the hose.
Always stow the Portable Air Compressor only in the
provided place.
The metal end fitting from Power Plug may get hot
after use, so it should be handled carefully.
Keep the Portable Air Compressor away from open
flames or heat source.
7
23_RUV_OM_EN_US_t.book Page 179
Page 183 of 256
IN CASE OF EMERGENCY181
(Continued)
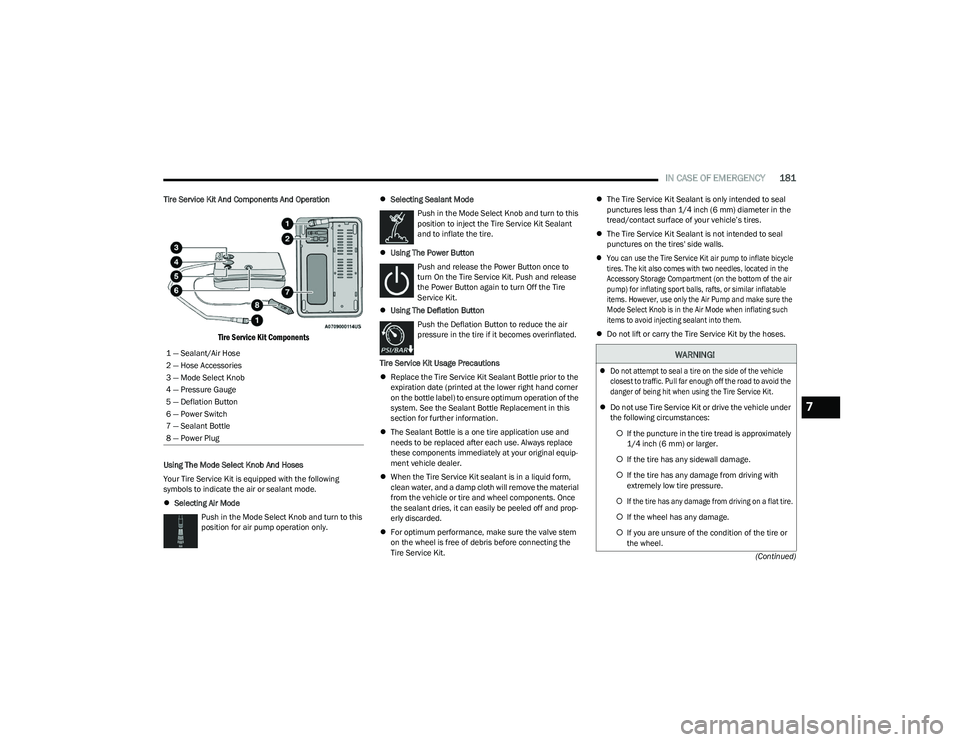
Tire Service Kit And Components And Operation
Tire Service Kit Components
Using The Mode Select Knob And Hoses
Your Tire Service Kit is equipped with the following
symbols to indicate the air or sealant mode.
Selecting Air Mode
Push in the Mode Select Knob and turn to this
position for air pump operation only.
Selecting Sealant Mode
Push in the Mode Select Knob and turn to this
position to inject the Tire Service Kit Sealant
and to inflate the tire.
Using The Power Button
Push and release the Power Button once to
turn On the Tire Service Kit. Push and release
the Power Button again to turn Off the Tire
Service Kit.
Using The Deflation Button
Push the Deflation Button to reduce the air
pressure in the tire if it becomes overinflated.
Tire Service Kit Usage Precautions
Replace the Tire Service Kit Sealant Bottle prior to the
expiration date (printed at the lower right hand corner
on the bottle label) to ensure optimum operation of the
system. See the Sealant Bottle Replacement in this
section for further information.
The Sealant Bottle is a one tire application use and
needs to be replaced after each use. Always replace
these components immediately at your original equip -
ment vehicle dealer.
When the Tire Service Kit sealant is in a liquid form,
clean water, and a damp cloth will remove the material
from the vehicle or tire and wheel components. Once
the sealant dries, it can easily be peeled off and prop -
erly discarded.
For optimum performance, make sure the valve stem
on the wheel is free of debris before connecting the
Tire Service Kit.
The Tire Service Kit Sealant is only intended to seal
punctures less than 1/4 inch (6 mm) diameter in the
tread/contact surface of your vehicle’s tires.
The Tire Service Kit Sealant is not intended to seal
punctures on the tires' side walls.
You can use the Tire Service Kit air pump to inflate bicycle
tires. The kit also comes with two needles, located in the
Accessory Storage Compartment (on the bottom of the air
pump) for inflating sport balls, rafts, or similar inflatable
items. However, use only the Air Pump and make sure the
Mode Select Knob is in the Air Mode when inflating such
items to avoid injecting sealant into them.
Do not lift or carry the Tire Service Kit by the hoses.
1 — Sealant/Air Hose
2 — Hose Accessories
3 — Mode Select Knob
4 — Pressure Gauge
5 — Deflation Button
6 — Power Switch
7 — Sealant Bottle
8 — Power Plug
WARNING!
Do not attempt to seal a tire on the side of the vehicle
closest to traffic. Pull far enough off the road to avoid the
danger of being hit when using the Tire Service Kit.
Do not use Tire Service Kit or drive the vehicle under
the following circumstances:
If the puncture in the tire tread is approximately
1/4 inch (6 mm) or larger.
If the tire has any sidewall damage.
If the tire has any damage from driving with
extremely low tire pressure.
If the tire has any damage from driving on a flat tire.
If the wheel has any damage.
If you are unsure of the condition of the tire or
the wheel.
7
23_RUV_OM_EN_US_t.book Page 181
Page 185 of 256
IN CASE OF EMERGENCY183
If the sealant (white fluid) does flow through the
Sealant Hose:
1. Continue to operate the pump until sealant
is no longer flowing through hose (typically
takes 30 - 70 seconds). As the sealant flows
through the Sealant Hose, the Pressure
Gauge can read as high as 70 psi (4.8 Bar). The Pressure
Gauge will decrease quickly from approximately 70 psi
(4.8 Bar) to the actual tire pressure when the Sealant
Bottle is empty.
2. The pump will start to inject air into the tire
immediately after the Sealant Bottle is empty.
Continue to operate the pump and inflate the
tire to the cold tire inflation pressure found
on the tire and loading information label located in the
driver-side door opening. Check the tire pressure by
looking at the Pressure Gauge.
If the tire does not inflate to at least 26 psi (1.8 Bar)
pressure within 15 minutes:
The tire is too badly damaged. Do not attempt to drive
the vehicle further. Call for assistance.
If the tire inflates to the recommended pressure or is at
least 26 psi (1.8 Bar) pressure within 15 minutes:
NOTE:If the tire becomes overinflated, push the Deflation Button
to reduce the tire pressure to the recommended inflation
pressure before continuing.
1. Push the Power Button to turn the Tire
Service Kit off.
2. Remove the speed limit label from the Tire
Service Kit and place sticker on the steering
wheel.
3. Immediately disconnect the Sealant Hose from the valve stem, reinstall the cap on the fitting at the end
of the hose, and place the Tire Service Kit in the
vehicle storage location.
Drive Vehicle: Immediately after injecting sealant and
inflating the tire, drive the vehicle 5 miles
(8 km) or 10 minutes to ensure distribution
of the Tire Service Kit Sealant within the tire.
Do not exceed 50 mph (80 km/h).
After Driving:
Pull over to a safe location and turn on the vehicle’s
Hazard Warning Flashers.
Verify that the valve stem (on the wheel with the
deflated tire) is in a position that is near to the ground.
This will allow the Tire Service Kit Hose to reach the
valve stem and keep the Tire Service Kit flat on the ground. This will provide the best positioning of the kit
when injecting the sealant into the deflated tire and
running the air pump. Move the vehicle as necessary to
place the valve stem in this position before proceeding.
Place the transmission in PARK (P) and cycle the igni -
tion in the OFF position.
Apply the parking brake.
If tire has improper inflation, see the following the steps.
1. Uncoil the Sealant Hose, and then remove the cap from the fitting at the end of the hose.
2. Place the Tire Service Kit flat on the ground
next to the deflated tire.
3. Remove the cap from the valve stem, and then screw the fitting at the end of the Sealant Hose onto the
valve stem.
4. Uncoil the Power Plug and insert the plug
into the vehicle's 12 Volt power outlet.
5. Uncoil the Hose and screw the fitting at the
end of the hose onto the valve stem.
6. Turn the Mode Select Knob and turn to the
Air Mode position.
7. Check the pressure in the tire by reading the Pressure Gauge.
WARNING!
The Tire Service Kit is not a permanent flat tire repair.
Have the tire inspected and repaired or replaced after
using the Tire Service Kit. Do not exceed 50 mph
(80 km/h) until the tire is repaired or replaced. Failure
to follow this warning can result in injuries that are
serious or fatal to you, your passengers, and others
around you. Have the tire checked as soon as possible
at an authorized dealer.
7
23_RUV_OM_EN_US_t.book Page 183
Page 186 of 256
184IN CASE OF EMERGENCY
If tire pressure is less than 19 psi (1.3 Bar):
The tire is too badly damaged. Do not attempt to drive the
vehicle further. Call for assistance.
If the tire pressure is 19 psi (1.3 Bar) or higher:
1. Push the Power Button to turn on Tire
Service Kit and inflate the tire to the cold tire
inflation pressure found on the tire and
loading information label located in the
driver-side door opening.
NOTE:If the tire becomes overinflated, push the Deflation Button
to reduce the tire pressure to the recommended inflation
pressure before continuing.
2. Disconnect the Tire Service Kit from the valve stem, reinstall the cap on the valve stem and unplug from
12 Volt outlet.
3. Place the Tire Service Kit in its proper storage area in the vehicle.
4. Have the tire inspected and repaired or replaced at the earliest opportunity at an authorized dealer or tire
service center.
5. Remove the Speed Limit sticker from the steering wheel after the tire has been repaired.
6. Replace the Sealant Bottle at an authorized dealer as soon as possible.
NOTE:When having the tire serviced, advise the authorized
dealer or service center that the tire has been sealed
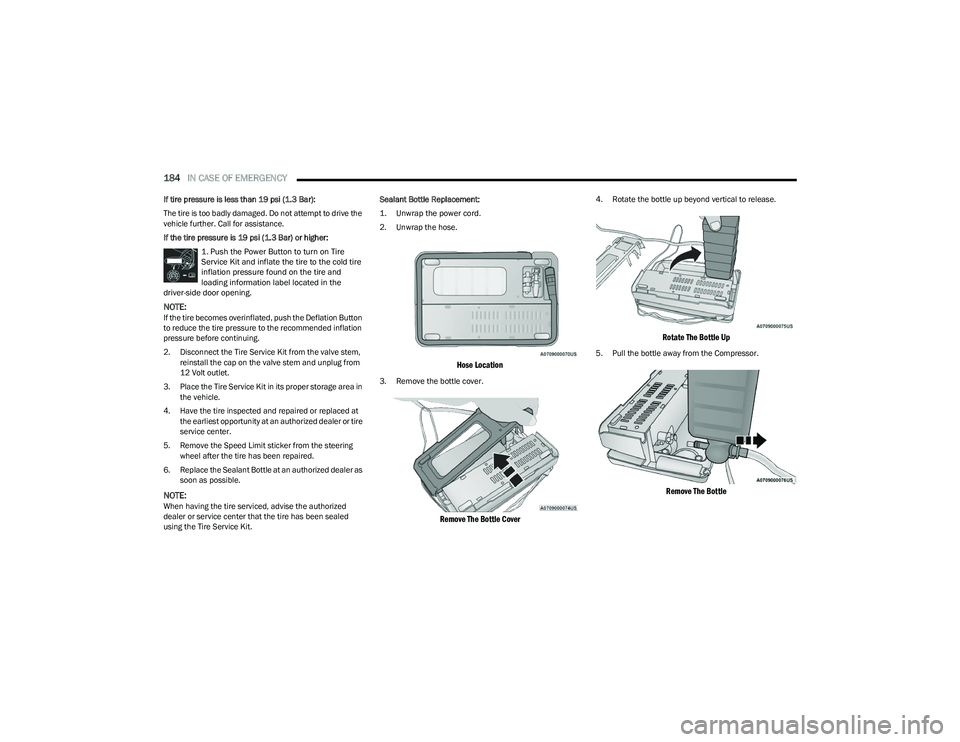
using the Tire Service Kit. Sealant Bottle Replacement:
1. Unwrap the power cord.
2. Unwrap the hose.
Hose Location
3. Remove the bottle cover.
Remove The Bottle Cover
4. Rotate the bottle up beyond vertical to release.
Rotate The Bottle Up
5. Pull the bottle away from the Compressor.
Remove The Bottle
23_RUV_OM_EN_US_t.book Page 184
Page 189 of 256
IN CASE OF EMERGENCY187
REFUELING IN EMERGENCY – IF EQUIPPED
The vehicle is equipped with a refueling funnel for a
Cap-Less Fuel System Úpage 174. If refueling is
necessary, while using an approved gas can, insert the
refueling funnel into the filler neck opening. Take care
to open both flappers with the funnel to avoid spills.
NOTE:In certain cold conditions, ice may prevent the fuel door
from opening. If this occurs, lightly push on the fuel door
to break the ice buildup. Then push on the rear center
edge of the fuel door to re-release. Do not pry on the door.
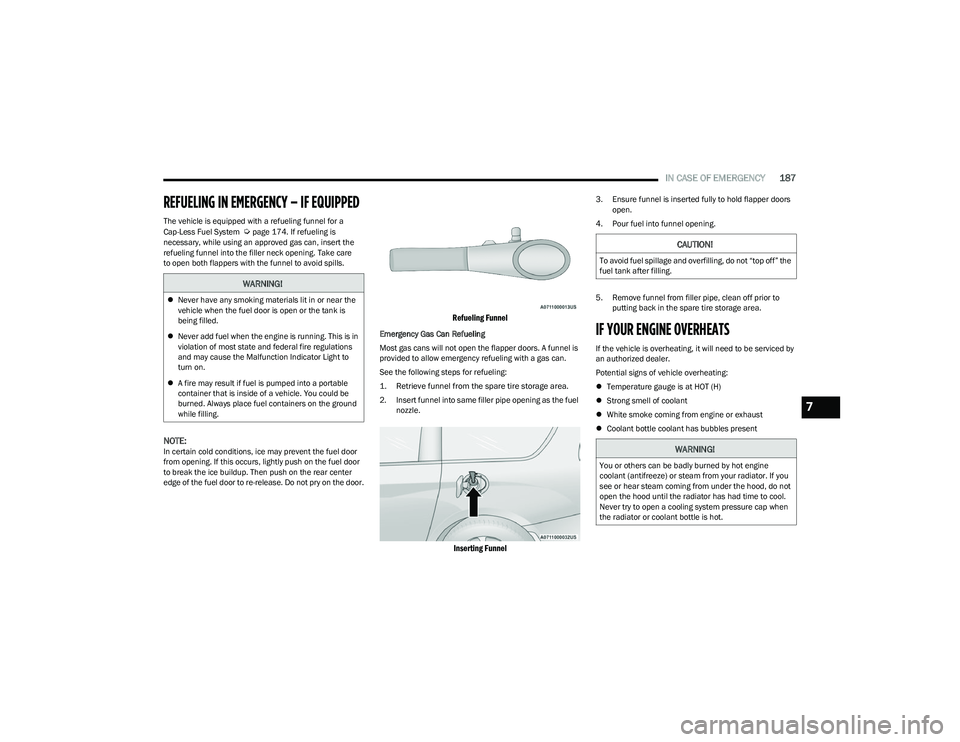
Refueling Funnel
Emergency Gas Can Refueling
Most gas cans will not open the flapper doors. A funnel is
provided to allow emergency refueling with a gas can.
See the following steps for refueling:
1. Retrieve funnel from the spare tire storage area.
2. Insert funnel into same filler pipe opening as the fuel nozzle.
Inserting Funnel
3. Ensure funnel is inserted fully to hold flapper doors open.
4. Pour fuel into funnel opening.
5. Remove funnel from filler pipe, clean off prior to putting back in the spare tire storage area.
IF YOUR ENGINE OVERHEATS
If the vehicle is overheating, it will need to be serviced by
an authorized dealer.
Potential signs of vehicle overheating:
Temperature gauge is at HOT (H)
Strong smell of coolant
White smoke coming from engine or exhaust
Coolant bottle coolant has bubbles present
WARNING!
Never have any smoking materials lit in or near the
vehicle when the fuel door is open or the tank is
being filled.
Never add fuel when the engine is running. This is in
violation of most state and federal fire regulations
and may cause the Malfunction Indicator Light to
turn on.
A fire may result if fuel is pumped into a portable
container that is inside of a vehicle. You could be
burned. Always place fuel containers on the ground
while filling.
CAUTION!
To avoid fuel spillage and overfilling, do not “top off” the
fuel tank after filling.
WARNING!
You or others can be badly burned by hot engine
coolant (antifreeze) or steam from your radiator. If you
see or hear steam coming from under the hood, do not
open the hood until the radiator has had time to cool.
Never try to open a cooling system pressure cap when
the radiator or coolant bottle is hot.
7
23_RUV_OM_EN_US_t.book Page 187