engine CITROEN 2CV 1975 Owners Manual
[x] Cancel search | Manufacturer: CITROEN, Model Year: 1975, Model line: 2CV, Model: CITROEN 2CV 1975Pages: 86, PDF Size: 2.21 MB
Page 5 of 86

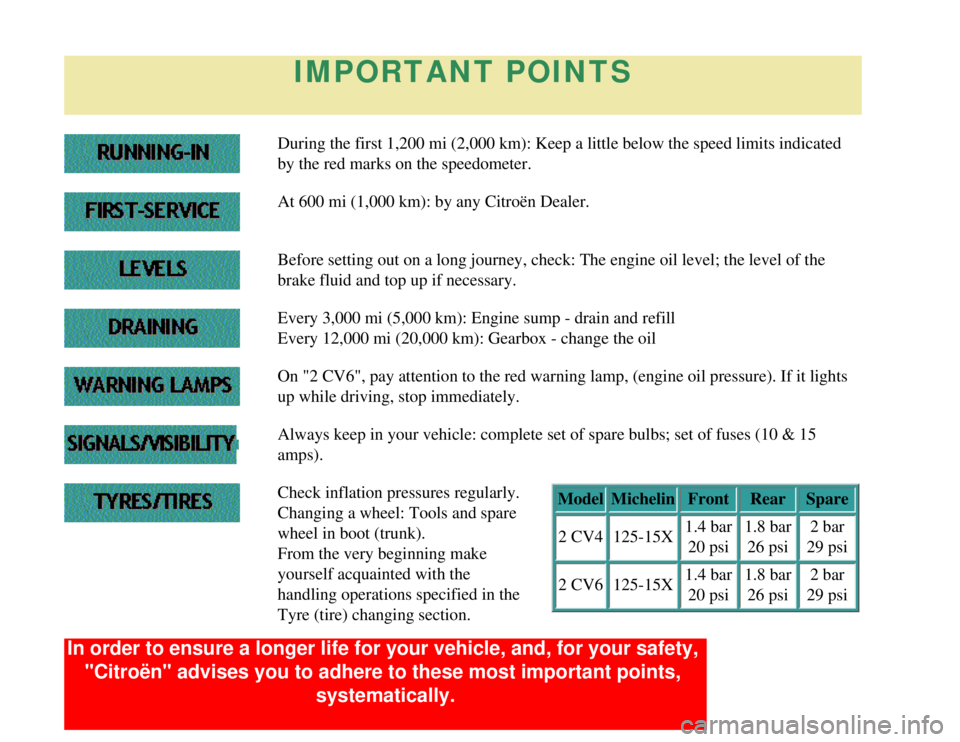
IMPORTANT POINTS
During the first 1,200 mi (2,000 km): Keep a little below the speed li\
mits indicated
by the red marks on the speedometer.
At 600 mi (1,000 km): by any Citroën Dealer.
Before setting out on a long journey, check: The engine oil level; the l\
evel of the
brake fluid and top up if necessary.
Every 3,000 mi (5,000 km): Engine sump - drain and refill
Every 12,000 mi (20,000 km): Gearbox - change the oil
On "2 CV6", pay attention to the red warning lamp, (engine oil pressure\
). If it lights
up while driving, stop immediately.
Always keep in your vehicle: complete set of spare bulbs; set of fuses (\
10 & 15
amps).
Check inflation pressures regularly.
Changing a wheel: Tools and spare
wheel in boot (trunk).
From the very beginning make
yourself acquainted with the
handling operations specified in the
Tyre (tire) changing section.Model
Michelin FrontRearSpare
2 CV4 125-15X 1.4 bar
20 psi 1.8 bar
26 psi 2 bar
29 psi
2 CV6 125-15X 1.4 bar
20 psi 1.8 bar
26 psi 2 bar
29 psi
In order to ensure a longer life for your vehicle, and, for your safety,\
"Citroën" advises you to adhere to these most important points, systematically.
Page 10 of 86

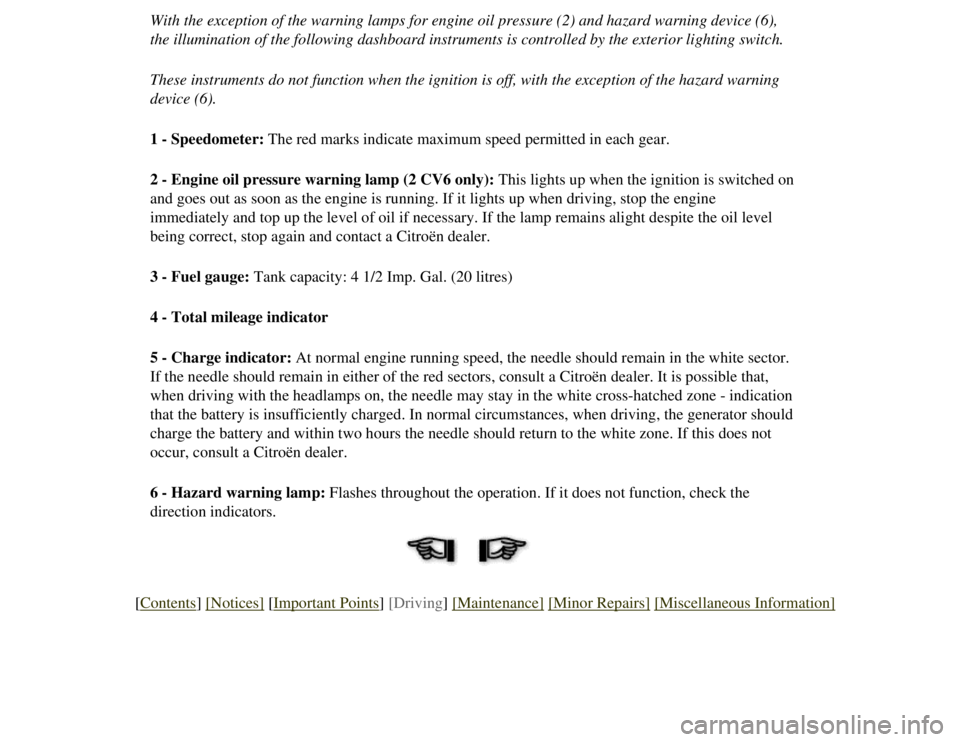
With the exception of the warning lamps for engine oil pressure (2) an\
d hazard warning device (6),
the illumination of the following dashboard instruments is controlled by\
the exterior lighting switch.
These instruments do not function when the ignition is off, with the exc\
eption of the hazard warning
device (6).
1 - Speedometer: The red marks indicate maximum speed permitted in each gear.
2 - Engine oil pressure warning lamp (2 CV6 only): This lights up when the ignition is switched on
and goes out as soon as the engine is running. If it lights up when driv\
ing, stop the engine
immediately and top up the level of oil if necessary. If the lamp remain\
s alight despite the oil level
being correct, stop again and contact a Citroën dealer.
3 - Fuel gauge: Tank capacity: 4 1/2 Imp. Gal. (20 litres)
4 - Total mileage indicator
5 - Charge indicator: At normal engine running speed, the needle should remain in the white se\
ctor.
If the needle should remain in either of the red sectors, consult a Citr\
oën dealer. It is possible that,
when driving with the headlamps on, the needle may stay in the white cro\
ss-hatched zone - indication
that the battery is insufficiently charged. In normal circumstances, whe\
n driving, the generator should
charge the battery and within two hours the needle should return to the \
white zone. If this does not
occur, consult a Citroën dealer.
6 - Hazard warning lamp: Flashes throughout the operation. If it does not function, check the
direction indicators.
[Contents] [Notices] [Important Points] [Driving] [Maintenance] [Minor Repairs] [Miscellaneous Information]
Page 20 of 86

MAINTENANCE
Levels
Checks and Topping up
1 Engine oil dipstick
The engine oil level, which must lie between the ends of the cut-out
on the dipstick, must be checked from time to time between oil
changes and, in particular, before any long journey.
The check should be carried out with the car as level as possible,
after the engine has been stopped for at least 10 minutes.
To top up, add oil without the level going above the top end of the
dipstick cut-out. The length of the cut-out is equivalent to 7/8 imp.
pints (0,5 litre).
2 Engine oil filler pipe
In Summer, as in Winter, use "TOTAL Altigrade GT Spéciale
Autoroute 20 W 40" or "GTS 20 W 50" oil. If "TOTAL" oils are
not available, use equivalent grades of other reputable makes.
In very cold countries (temperatures often lower than -10C (14F),
use "TOTAL Altigrade GT Spéciale Autoroute 10 W 30" or "GTS
10 W 30" oil, or equivalent grades of other reputable makes.
Never use additives
Do not forget to tightly seal the oil filler cap.
3 Brake fluid reservoir
Fig. 32
Engine Oil Dipstick 1 - Maximum2 - Minimum
3 - Oil level reading
Page 22 of 86
![CITROEN 2CV 1975 Owners Manual
Fig. 32b
Levels
1 - Engine oil dipstick
2 - Engine oil filler tube
3 - Brake fluid reservoir
4 - Battery
5 - Windscreen washer bottle
[Contents] [Notices] [Important Points] [Driving] [Maintenance] [ CITROEN 2CV 1975 Owners Manual
Fig. 32b
Levels
1 - Engine oil dipstick
2 - Engine oil filler tube
3 - Brake fluid reservoir
4 - Battery
5 - Windscreen washer bottle
[Contents] [Notices] [Important Points] [Driving] [Maintenance] [](/img/9/56684/w960_56684-21.png)
Fig. 32b
Levels
1 - Engine oil dipstick
2 - Engine oil filler tube
3 - Brake fluid reservoir
4 - Battery
5 - Windscreen washer bottle
[Contents] [Notices] [Important Points] [Driving] [Maintenance] [Minor Repairs] [Miscellaneous Information]
Page 25 of 86

sulphated, unscrew them, clean them, and soak the felt insulating
washers in castor oil or in neutral vaseline oil. If the vehicle is not \
in use, recharge the battery every month.
In Winter, a correct charge protects against frost. The battery
charged normally (a density of 1.25 to 1.27) resists to -50C (-58F),\
whilst a discharged battery (density 1.07 to 1.09) may burst at -5C
(23F).
Do not disconnect the leads from the terminals when the engine
is running.
Never recharge the battery without first having disconnecting
the leads from the two terminals.
Air Filter Maintenance (Fig. 35)
Cleaning instructions are to be found on the filter cover (1).
Fig. 35
Air filter
1 - Cover
[Contents] [Notices] [Important Points] [Driving] [Maintenance] [Minor Repairs] [Miscellaneous Information]
Page 41 of 86

RH side and tail lamps
(and rear number plate lamps) Fuel gauge
Direction indicators Windscreen wipers
Alternator field feed
Charging rate indicator
Engine oil pressure warning lamp (on "2 CV 6")
LOWER FUSE BOX (Item B) Green marking (16 A) Blue marking (16 A)
RH dipped beam LH main beam
Red marking (16 A) Yellow marking (16 A)
LH dipped beam RH main beam
REPLACING THE BATTERY (Fig. 46)
Battery reference: 12 V - 125/25 Ah. CEI (or 150/30 Ah. CEI)
Disconnect the battery terminals, always beginning with the
negative one.
Unscrew the two tie-rods of the support frame then disengage the
battery by sliding it towards the front of the vehicle.
Check that the terminals are in the correct position before fitting the \
new battery.
Fig. 46
Battery
1 - Terminals 2 - Tie-rods
Page 45 of 86

MINOR REPAIRS
Starting using the starting handle
STARTING USING THE STARTING HANDLE (Fig. 48)
The handle is placed in the boot (trunk).
To use it, open the bonnet and introduce the handle into the orifice
(1) of the front grill until it engages in the fan pulley.
Do not forget to keep the handbrake on and to position the gear
change lever in neutral).
When the vehicle is fitted with an auxiliary centrifugal clutch, the
engine cannot be started by towing or running downhill, whatever
gear is engaged. It is impossible to do so, as the clutch, which is
disengaged from the transmission when the engine is at a standstill,
will not re-engage. Should this procedure be attempted, it could
lead to serious mechanical trouble.
Fig. 48
Starting using the starting handle
1 - Orifice
TOWING THE CAR
From the front:
Attach a cable to the rings specially provided at the end of the front
sidemembers. Use both rings when towing, Never fasten a cable or
rope to the bumper.
From the rear:
Attach a cable to the rings provided for this purpose on the rear
sidemembers, taking all the precautions necessary to protect the
body closing panels.
Page 49 of 86

MISCELLANEOUS INFORMATION
Running-in, servicing, guarantee, running costs, towing a trailer, vehicle identification, replacement parts
RUNNING-IN
During the first 1,200 miles (2,000 kilometres), avoid over-revving,
and do not let the needle reach the coloured marks of the
corresponding speed ranges, before changing gear. Also avoid
during this period:
-harsh acceleration,
-fierce braking (the brake linings must be run in),
-long journeys at constant speed,
-labouring the engine at too low a speed.
SERVICING AND GUARANTEE
At the time of delivery, you will be given a "Maintenance Guide",
with a "Guarantee Card" and a 600 miles (1,000 km) "Servicing
Certificate".
On completion of the first 600 miles (1,000 km), any Citroën dealer\
,
whether he supplied the vehicle or not, will service the car, free-of-
charge, on presentation of this "Maintenance Guide".
It is particularly important that the oil filter cartridge, which has to\
comply to the standard regulations, should be of the type
recommended by Citroën.
Only the cost of the materials used will be charged for.
The dealer will keep the Servicing Certificate and sign the
Guarantee Card.
Page 50 of 86

This card must be signed for you to benefit from the guarantee.
INFLUENCE OF DRIVING TECHNIQUES ON RUNNING
COSTS
The manner in which a car is driven affects its running costs,
particularly as far as fuel, oil, and tyre expenses are concerned.
Running costs increase notably with:
-speed,
-frequent and prolonged use of low gears,
-accelerating and braking too often or too fiercely,
unnecessary use of the accelerator pedal,
-leaving the choke out,
-taking bends at high speeds,
-tyre inflated to incorrect pressures.
Oil consumption, which varies a great deal with the use of the car,
is also influenced when running in the engine, and you are advised
to pay particular attention to this point as well as to the oil change
section in the Maintenance Guide.
TOWING A TRAILER
If you intend to tow a caravan or trailer, consult your Citroën deale\
r
first, who will give you all the necessary advice, especially in so far \
as the legal requirements are concerned.
The maximum towing weights are, in France:
- Trailer without brake: 270 kg (595 lbs)
- Trailer with overrun brake: 400 kg (881 lbs)
IDENTIFICATION
Positions
Manufacturer's plate:Under the bonnet on the scuttle panel, RH
side.
Page 51 of 86

Stamped identification:On the front part (RH side) or the inner
platform.
Engine plate: On the engine housing, RH side.
Fig. 49
Manufacturer's plate
Information
On manufacturer's plate: Type of vehicle
Series
Number in series of the type
Gross Vehicle Weight: (PTC) (in kg)
Gross Train Weight: (with trailer)
(PTR) (in kg)
Stamped on body: Type of vehicle
Series
Number in series of the type
Engine plate: Make
Engine type
Production numberFig. 50
Engine plate
In France, the type of car and the number in the series of the type
are also indicated on the registration card (grey card) for the French\
market.
[
Contents] [Notices] [Important Points] [Driving] [Maintenance] [Minor Repairs] [Miscellaneous Information]