ESP CITROEN AMI 2021 Handbook (in English)
[x] Cancel search | Manufacturer: CITROEN, Model Year: 2021, Model line: AMI, Model: CITROEN AMI 2021Pages: 44, PDF Size: 1.67 MB
Page 2 of 44
Access to the Handbook
ONLINE
View or download the handbook at the following
address:
http://service.citroen.com/ACddb/Scan this QR Code for direct access.
This symbol indicates the latest
information available.
Select:
–
the language,
–
the vehicle and body style,
–
the issue period of the handbook corresponding to
the date of 1st registration of the vehicle.
MOBILE
Install the Scan MyCitro\353n application (content
004400590044004C004F00440045004F0048000300521089004C00510048000C0011
Also available in the
MyCitro\353n App application.
Page 8 of 44
6
Dashboard instruments
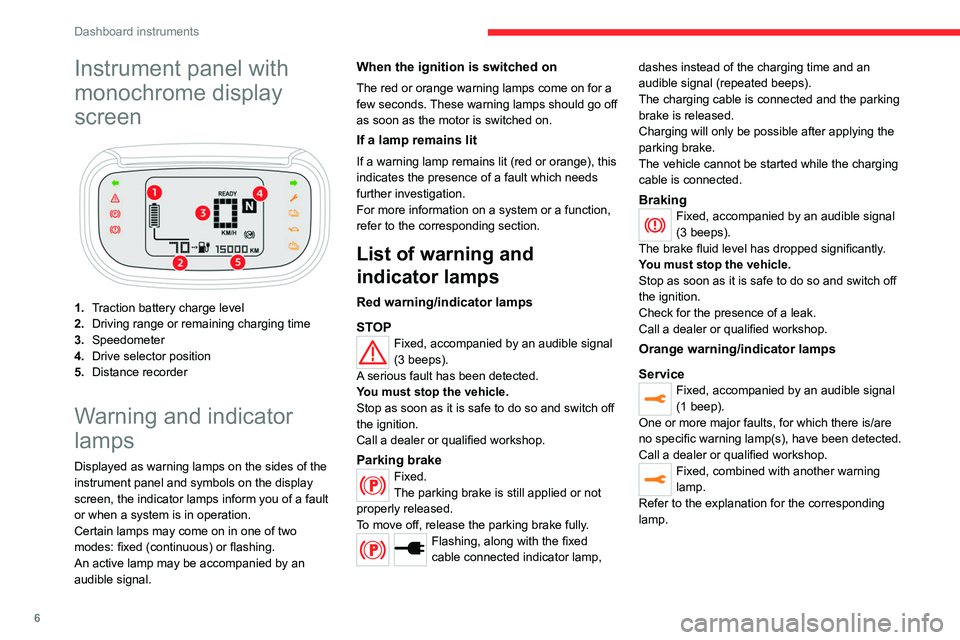
Instrument panel with
monochrome display
screen
1.Traction battery charge level
2. Driving range or remaining charging time
3. Speedometer
4. Drive selector position
5. Distance recorder
Warning and indicator
lamps
Displayed as warning lamps on the sides of the
instrument panel and symbols on the display
screen, the indicator lamps inform you of a fault
or when a system is in operation.
Certain lamps may come on in one of two
modes: fixed (continuous) or flashing.
An active lamp may be accompanied by an
audible signal.
When the ignition is switched on
The red or orange warning lamps come on for a
few seconds. These warning lamps should go off
as soon as the motor is switched on.
If a lamp remains lit
If a warning lamp remains lit (red or orange), this
indicates the presence of a fault which needs
further investigation.
For more information on a system or a function,
refer to the corresponding section.
List of warning and
indicator lamps
Red warning/indicator lamps
STOP
Fixed, accompanied by an audible signal
(3 beeps).
A serious fault has been detected.
You must stop the vehicle.
Stop as soon as it is safe to do so and switch off
the ignition.
Call a dealer or qualified workshop.
Parking brakeFixed.
The parking brake is still applied or not
properly released.
To move off, release the parking brake fully.
Flashing, along with the fixed
cable connected indicator lamp, dashes instead of the charging time and an
audible signal (repeated beeps).
The charging cable is connected and the parking
brake is released.
Charging will only be possible after applying the
parking brake.
The vehicle cannot be started while the charging
cable is connected.
BrakingFixed, accompanied by an audible signal
(3 beeps).
The brake fluid level has dropped significantly.
You must stop the vehicle.
Stop as soon as it is safe to do so and switch off
the ignition.
Check for the presence of a leak.
Call a dealer or qualified workshop.
Orange warning/indicator lamps
Service
Fixed, accompanied by an audible signal
(1 beep).
One or more major faults, for which there is/are
no specific warning lamp(s), have been detected.
Call a dealer or qualified workshop.
Fixed, combined with another warning
lamp.
Refer to the explanation for the corresponding
lamp.
Page 9 of 44
7
Dashboard instruments
1Minimum traction battery charge levelFixed, combined with the last bar on the
charge meter showing and an audible
signal (1 beep).
The traction battery has reached the first alert
threshold.
Put the vehicle on charge as soon as possible.
Fixed, combined with the flashing
vehicle driving range warning lamp
and an audible signal (1 beep).
The traction battery has reached the second
alert threshold.
The motor's power decreases rapidly.
You must put the vehicle on charge.
Limited powerFixed, accompanied by an audible signal
(1 beep).
A drop in performance in the drive train due to a
low battery temperature.
The decrease in motor power temporarily affects
the vehicle's performance.
Maximum traction battery temperature
Fixed, combined with the STOP
warning lamp and an audible
signal (1 beep).
The traction battery's temperature is too high.
You must stop the vehicle.
Stop as soon as it is safe to do so and switch off
the ignition.
Call a dealer or qualified workshop.
Green warning/indicator lamps
Direction indicators
Flashing left or right indicator with audible
signal.
The left or right direction indicator lamps are on.
Flashing left and right indicators with
audible signal.
The hazard warning lamps are on.
White indicator lamps
Foot on the brake
Flashing.
Insufficient pressure or no pressure
detected on the brake pedal for changing the
direction of travel.
Depress the brake pedal to select or change the
direction of travel.
Vehicle ready to driveFixed.
The vehicle is switched on.
The warning lamp remains on while driving.
The lamp will go out when you switch off the
motor and exit the vehicle.
Fixed, accompanied by an audible signal
(1 beep).
A drive position is selected without any pressure
on the pedals for 5 seconds.
Press D or R on the drive selector, then
accelerate or brake.
Vehicle driving rangeFixed.
The remaining driving range is displayed.
Cable connectedFixed, combined with the remaining
charging time.
The charging cable is connected to the charging
socket.
The traction battery is being charged.
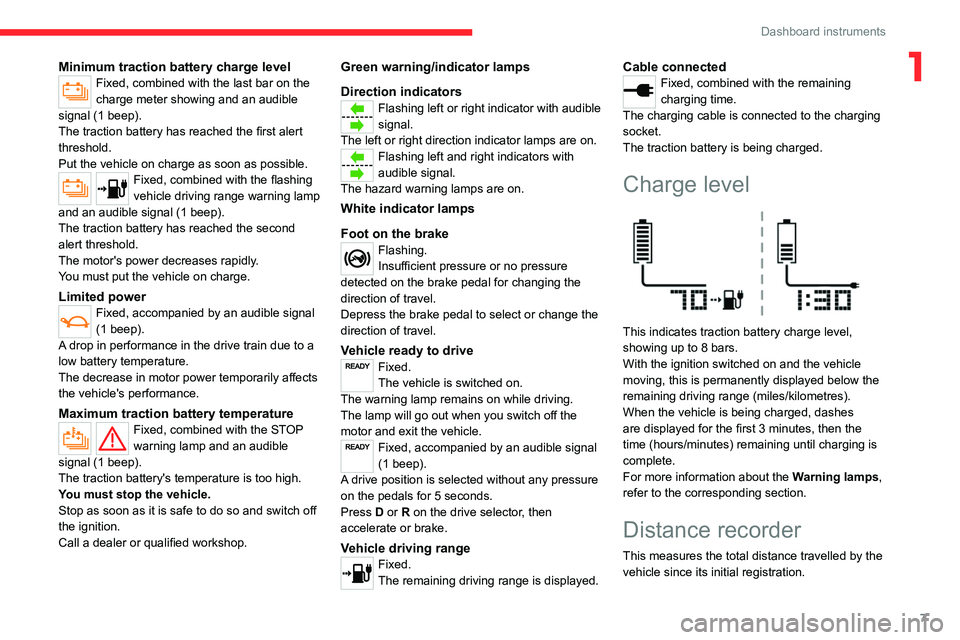
Charge level
This indicates traction battery charge level,
showing up to 8 bars.
With the ignition switched on and the vehicle
moving, this is permanently displayed below the
remaining driving range (miles/kilometres).
When the vehicle is being charged, dashes
are displayed for the first 3 minutes, then the
time (hours/minutes) remaining until charging is
complete.
For more information about the Warning lamps,
refer to the corresponding section.
Distance recorder
This measures the total distance travelled by the
vehicle since its initial registration.
Page 18 of 44

16
Safety
Installation
The lower part of the strap must be
positioned as low as possible on the pelvis.
The upper part must be positioned in the
hollow of the shoulder.
In order to be effective, a seat belt must:
–
be tightened as close to the body as
possible.
–
be pulled in front of you with a smooth
movement, checking that it is not twisted.
–
must only be used to secure one person.
– must not show signs of tearing or fraying.
– must not be changed or modified, in order
to avoid affecting its performance.
Recommendations for children
Use a suitable child seat if the passenger
is less than 12 years old or shorter than one
and a half metres.
Make sure that the seat belt is correctly
positioned and tightened.
Never use the same seat belt to secure more
than one child.
Never carry a child on your lap.
For more information on Child seats, refer to
the corresponding section.
Maintenance
Have the seat belts checked regularly by
a dealer or qualified workshop, particularly if
the straps show signs of damage.
Clean the seat belt straps with soapy water or
a textile cleaning product, sold by dealers or
qualified workshops.
Child seats
The regulations on carrying children are specific to each country. Refer to the
legislation in force in your country.
For maximum safety, please observe the
following recommendations:
–
In accordance with European regulations,
all children under the age of 12 or less than
1.5 metres tall must travel in approved child
seats appropriate for their weight , on seats
fitted with a seat belt.
–
Children weighing less than 9 kg must
travel in the "rearward facing" position .
Advice
An incorrectly installed child seat in a
vehicle compromises the child's safety in
the event of an accident.
Ensure that there is no seat belt or seat belt
buckle under the child seat, as this could
destabilise it.
Remember to fasten the seat belts or the
child seat harness keeping the slack relative
to the child's body to a minimum, even for
short journeys.
Check that the seat belt is properly tightened
over the child seat and that it holds the child
seat firmly against the vehicle seat.
For child seats with a support leg, ensure that
the support leg is in firm and steady contact
with the floor.
Installing a booster seat
The chest part of the seat belt must be
positioned on the child's shoulder without
touching the neck.
Ensure that the lap part of the seat belt
passes correctly over the child's thighs.
Use a booster seat with a backrest, equipped
with a belt guide at shoulder level.
As a safety measure, do not leave: – A child alone and unsupervised inside
the vehicle.
–
A child or an animal in a vehicle exposed to
the sun with the windows closed.
–
The keys inside the vehicle.
Page 20 of 44
18
Driving
Driving recommendations
General information
► Observe the driving regulations and remain
vigilant whatever the traffic conditions.
►
Monitor your environment and keep your
hands on the wheel to be able to react to
anything that may happen any time.
►
Drive smoothly, anticipate the need for
braking and maintain a longer safety distance,
especially in bad weather
.
►
Stop the vehicle to carry out operations that
require close attention (such as adjustments).
Never drive with the parking brake
applied . Risk of overheating and
damaging the braking system!
Never leave a vehicle running unattended.
If the driver must leave the vehicle, the
parking brake must be applied and N mode
selected using the drive selector.
On flooded roads
We strongly advise against driving on flooded
roads, as this could seriously damage your
vehicle's motor and electrical systems.
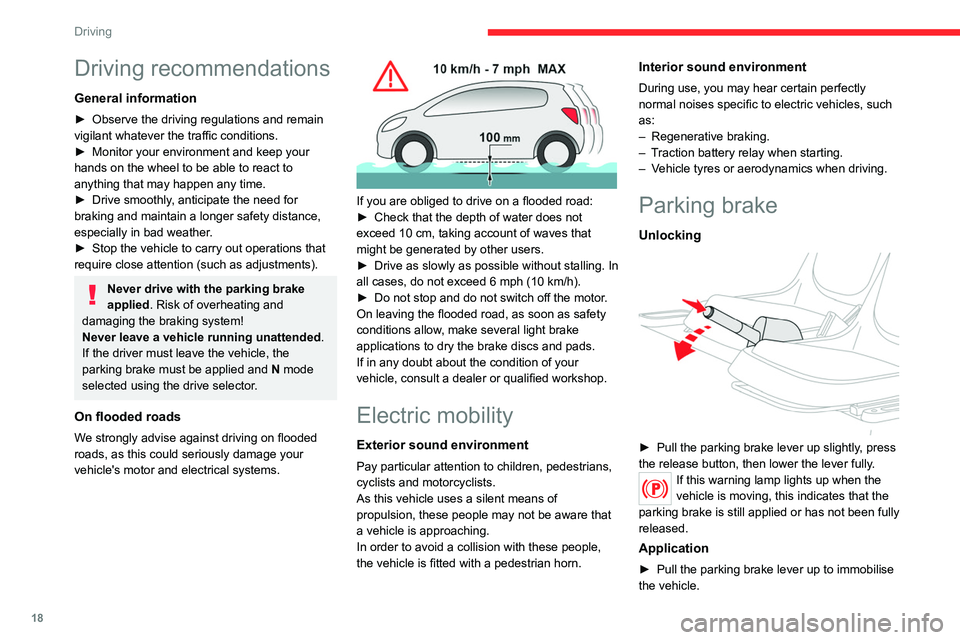
If you are obliged to drive on a flooded road:
► Check that the depth of water does not
exceed 10 cm, taking account of waves that
might be generated by other users.
►
Drive as slowly as possible without stalling. In
all cases, do not exceed 6 mph (10 km/h).
► Do not stop and do not switch off the motor.
On leaving the flooded road, as soon as safety
conditions allow
, make several light brake
applications to dry the brake discs and pads.
If in any doubt about the condition of your
vehicle, consult a dealer or qualified workshop.
Electric mobility
Exterior sound environment
Pay particular attention to children, pedestrians,
cyclists and motorcyclists.
As this vehicle uses a silent means of
propulsion, these people may not be aware that
a vehicle is approaching.
In order to avoid a collision with these people,
the vehicle is fitted with a pedestrian horn.
Interior sound environment
During use, you may hear certain perfectly
normal noises specific to electric vehicles, such
as:
–
Regenerative braking.
– Traction battery relay when starting.
– Vehicle tyres or aerodynamics when driving.
Parking brake
Unlocking
► Pull the parking brake lever up slightly, press
the release button, then lower the lever fully .
If this warning lamp lights up when the
vehicle is moving, this indicates that the
parking brake is still applied or has not been fully
released.
Application
► Pull the parking brake lever up to immobilise
the vehicle.
Page 25 of 44
23
Practical information
7The charge level increases slowly as charging
progresses.
When the charge is completed, the instrument
panel switches off.
Disconnection
► Disconnect the charging cable from the
power socket.
►
Open the passenger door.
► Store all of the charging cable inside its
housing.
►
Close the passenger door.
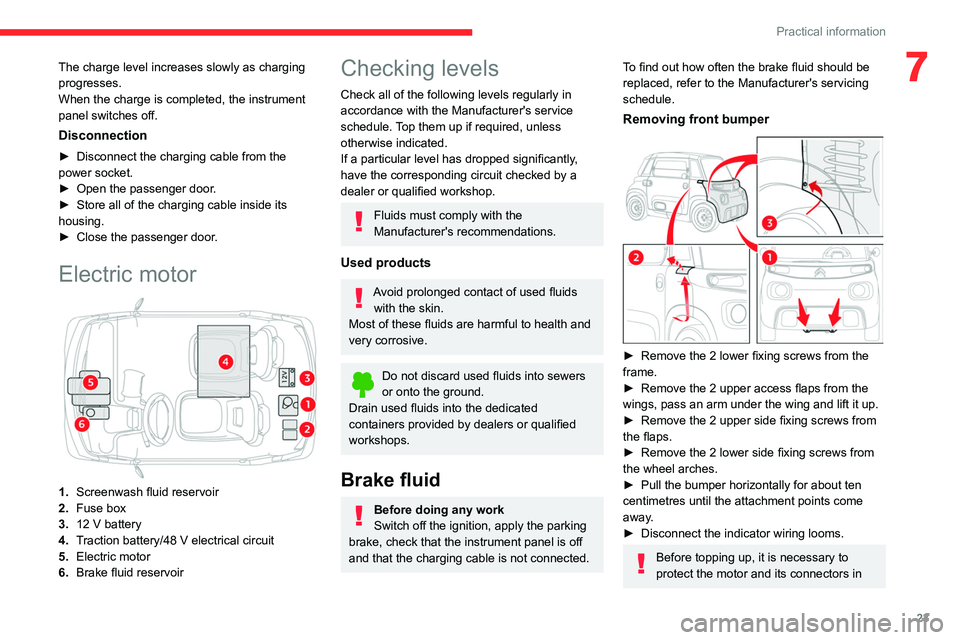
Electric motor
1. Screenwash fluid reservoir
2. Fuse box
3. 12
V battery
4. T
raction battery/48
V electrical circuit
5. Electric motor
6. Brake fluid reservoir
Checking levels
Check all of the following levels regularly in
accordance with the Manufacturer's service
schedule. Top them up if required, unless
otherwise indicated.
If a particular level has dropped significantly,
have the corresponding circuit checked by a
dealer or qualified workshop.
Fluids must comply with the
Manufacturer's recommendations.
Used products
Avoid prolonged contact of used fluids
with the skin.
Most of these fluids are harmful to health and
very corrosive.
Do not discard used fluids into sewers
or onto the ground.
Drain used fluids into the dedicated
containers provided by dealers or qualified
workshops.
Brake fluid
Before doing any work
Switch off the ignition, apply the parking
brake, check that the instrument panel is off
and that the charging cable is not connected.
To find out how often the brake fluid should be
replaced, refer to the Manufacturer's servicing
schedule.
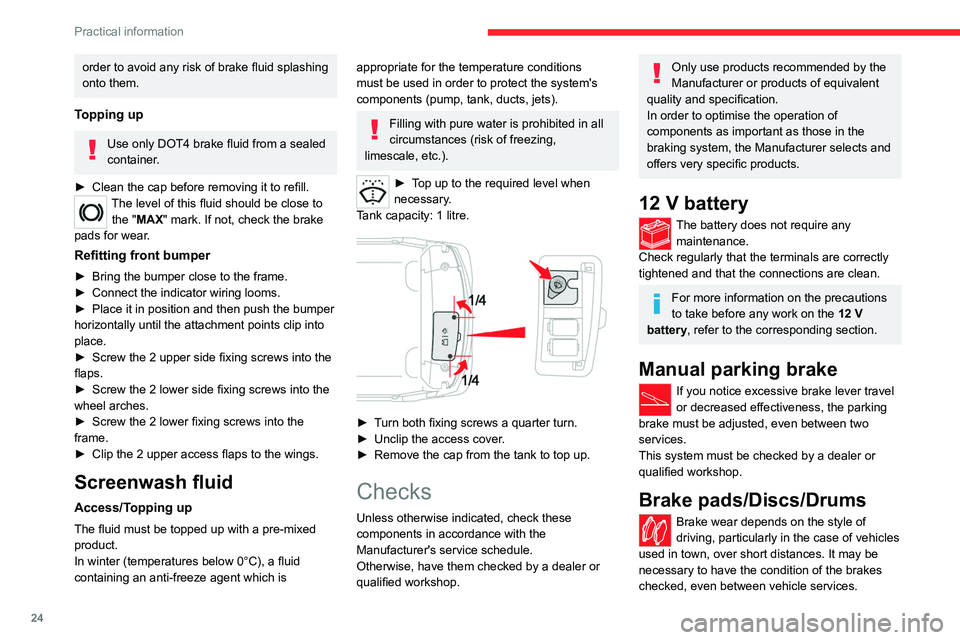
Removing front bumper
► Remove the 2 lower fixing screws from the
frame.
►
Remove the 2 upper access flaps from the
wings, pass an arm under the wing and lift it up.
►
Remove the 2 upper side fixing screws from
the flaps.
►
Remove the 2 lower side fixing screws from
the wheel arches.
►
Pull the bumper horizontally for about ten
centimetres until the attachment points come
away.
►
Disconnect the indicator wiring looms.
Before topping up, it is necessary to
protect the motor and its connectors in
Page 26 of 44
24
Practical information
order to avoid any risk of brake fluid splashing
onto them.
Topping up
Use only DOT4 brake fluid from a sealed
container.
►
Clean the cap before removing it to refill.The level of this fluid should be close to the "MAX" mark. If not, check the brake
pads for wear.
Refitting front bumper
► Bring the bumper close to the frame.
► Connect the indicator wiring looms.
► Place it in position and then push the bumper
horizontally until the attachment points clip into
place.
►
Screw the 2 upper side fixing screws into the
flaps.
►
Screw the 2 lower side fixing screws into the
wheel arches.
►
Screw the 2 lower fixing screws into the
frame.
►
Clip the 2 upper access flaps to the wings.
Screenwash fluid
Access/Topping up
The fluid must be topped up with a pre-mixed
product.
In winter (temperatures below 0°C), a fluid
containing an anti-freeze agent which is
appropriate for the temperature conditions
must be used in order to protect the system's
components (pump, tank, ducts, jets).
Filling with pure water is prohibited in all
circumstances (risk of freezing,
limescale, etc.).
► Top up to the required level when
necessary .
Tank capacity: 1 litre.
► Turn both fixing screws a quarter turn.
► Unclip the access cover.
► Remove the cap from the tank to top up.
Checks
Unless otherwise indicated, check these
components in accordance with the
Manufacturer's service schedule.
Otherwise, have them checked by a dealer or
qualified workshop.
Only use products recommended by the
Manufacturer or products of equivalent
quality and specification.
In order to optimise the operation of
components as important as those in the
braking system, the Manufacturer selects and
offers very specific products.
12 V battery
The battery does not require any maintenance.
Check regularly that the terminals are correctly
tightened and that the connections are clean.
For more information on the precautions
to take before any work on the 12 V
battery
, refer to the corresponding section.
Manual parking brake
If you notice excessive brake lever travel
or decreased effectiveness, the parking
brake must be adjusted, even between two
services.
This system must be checked by a dealer or
qualified workshop.
Brake pads/Discs/Drums
Brake wear depends on the style of
driving, particularly in the case of vehicles
used in town, over short distances. It may be
necessary to have the condition of the brakes
checked, even between vehicle services.
Page 29 of 44

27
In the event of a breakdown
8Changing a wheel
The vehicle is not equipped with on-board tools,
such as a jack or wheel brace.
In the event of a flat tyre, call a dealer or
qualified workshop.
To have winter tyres fitted or the wheels
changed, consult a dealer or qualified workshop.
Changing a bulb
Cleaning
The headlamps have polycarbonate
lenses with a protective coating:
–
Do not clean them with a dry or abrasive
cloth, nor with detergent or solvent
products.
–
Use a sponge and soapy water or a pH
neutral product.
–
When using a jet of water to clean off
persistent marks, do not keep the jet directed
towards the headlamps, lamps or their
edges for too long, so as not to damage their
protective coating and seals.
Light-emitting diodes (LEDs)
Do not touch LED headlamps/lamps.
To replace this type of bulb, you must consult
a dealer or qualified workshop.
Direction indicators
Rapid flashing of the indicator lamp for a
direction indicator
(left or right) indicates that
one of the bulbs on the corresponding side
has failed.
Front lamps
1. Direction indicators
2. Sidelamps
3. Dipped beam headlamps
Rear lamps
1.Direction indicators
2. Sidelamps
3. Brake lamps
4. Number plate lamp
Page 30 of 44
28
In the event of a breakdown
Number plate lamp
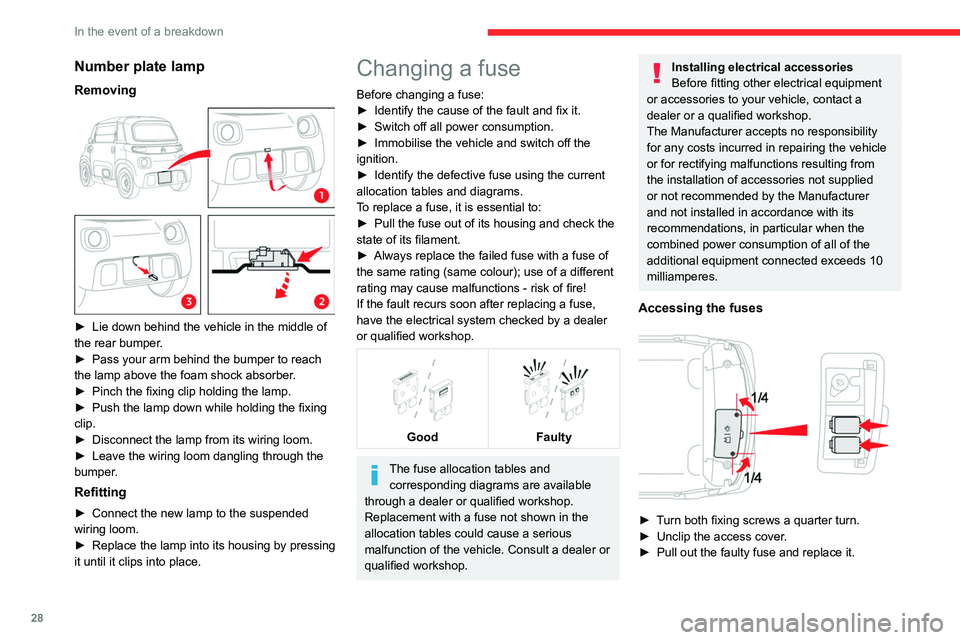
Removing
► Lie down behind the vehicle in the middle of
the rear bumper.
►
Pass your arm behind the bumper to reach
the lamp above the foam shock absorber.
►
Pinch the fixing clip holding the lamp.
► Push the lamp down while holding the fixing
clip.
►
Disconnect the lamp from its wiring loom.
► Leave the wiring loom dangling through the
bumper.
Refitting
► Connect the new lamp to the suspended
wiring loom.
►
Replace the lamp into its housing by pressing
it until it clips into place.
Changing a fuse
Before changing a fuse:
► Identify the cause of the fault and fix it.
► Switch off all power consumption.
► Immobilise the vehicle and switch off the
ignition.
►
Identify the defective fuse using the current
allocation tables and diagrams.
To replace a fuse, it is essential to:
►
Pull the fuse out of its housing and check the
state of its filament.
►
Always replace the failed fuse with a fuse of
the same rating (same colour); use of a different
rating may cause malfunctions - risk of fire!
If the fault recurs soon after replacing a fuse,
have the electrical system checked by a dealer
or qualified workshop.
Good
Faulty
The fuse allocation tables and corresponding diagrams are available
through a dealer or qualified workshop.
Replacement with a fuse not shown in the
allocation tables could cause a serious
malfunction of the vehicle. Consult a dealer or
qualified workshop.
Installing electrical accessories
Before fitting other electrical equipment
or accessories to your vehicle, contact a
dealer or a qualified workshop.
The Manufacturer accepts no responsibility
for any costs incurred in repairing the vehicle
or for rectifying malfunctions resulting from
the installation of accessories not supplied
or not recommended by the Manufacturer
and not installed in accordance with its
recommendations, in particular when the
combined power consumption of all of the
additional equipment connected exceeds 10
milliamperes.
Accessing the fuses
► Turn both fixing screws a quarter turn.
► Unclip the access cover.
► Pull out the faulty fuse and replace it.
Page 32 of 44
30
In the event of a breakdown
Take used remote control batteries and
vehicle batteries to a special collection point.
Protect your eyes and face before
handling the battery.
All operations on the battery must be carried
out in a well ventilated area and away from
naked flames and sources of sparks, to avoid
any risk of explosion or fire.
Wash your hands afterwards.
Flat 12 V battery
It is no longer possible to start the motor
or recharge the traction battery.
Before working on the 12 V battery
Switch off the ignition, apply the parking
brake, check that the instrument panel is off
and that the charging cable is not connected.
Recharging the 12 V battery
Do not recharge the battery without first
disconnecting the terminals and removing the
battery.
Do not disconnect the battery terminals while
the
READY
indicator lamp is lit, or while the
vehicle is charging.
Jump-starting another vehicle
Do not use the 12 V battery to jump-start
another vehicle or to charge another vehicle's
battery
.
Symbols
No sparks or naked flames, no smoking.
Always protect your eyes. Explosive gases can cause blindness and injury.
Keep the vehicle's battery out of the reach
of children.
The vehicle's battery contains sulphuric acid which can make you go blind or
cause severe burns.
For more information, refer to the
handbook.
Explosive gases can be present close to
the battery.
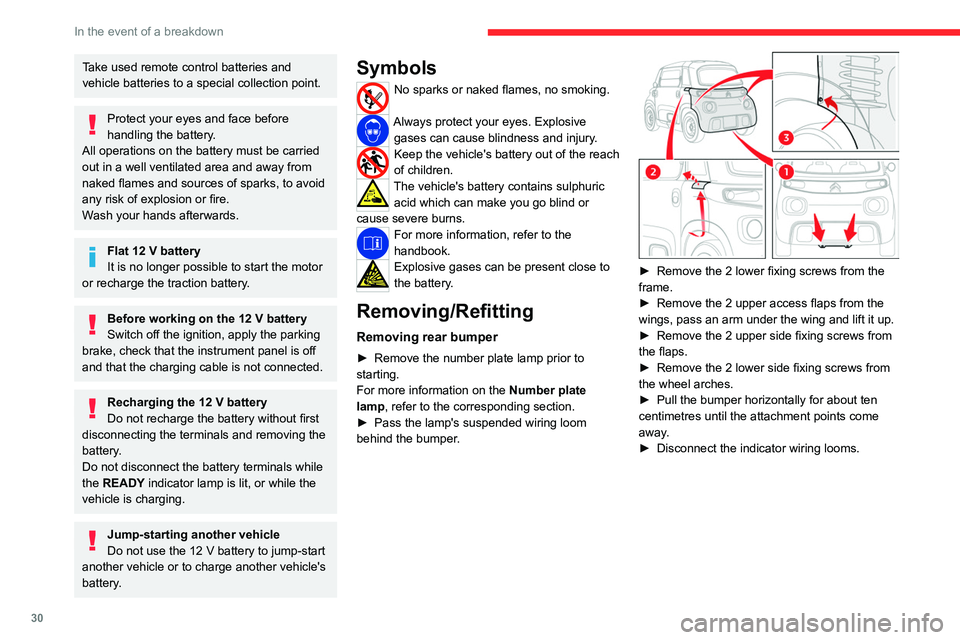
Removing/Refitting
Removing rear bumper
► Remove the number plate lamp prior to
starting.
For more information on the Number plate
lamp, refer to the corresponding section.
►
Pass the lamp's suspended wiring loom
behind the bumper.
► Remove the 2 lower fixing screws from the
frame.
►
Remove the 2 upper access flaps from the
wings, pass an arm under the wing and lift it up.
►
Remove the 2 upper side fixing screws from
the flaps.
►
Remove the 2 lower side fixing screws from
the wheel arches.
►
Pull the bumper horizontally for about ten
centimetres until the attachment points come
away.
►
Disconnect the indicator wiring looms.