sat CITROEN BERLINGO 2023 Owners Manual
[x] Cancel search | Manufacturer: CITROEN, Model Year: 2023, Model line: BERLINGO, Model: CITROEN BERLINGO 2023Pages: 324, PDF Size: 9.41 MB
Page 15 of 324
13
Instruments
1Choice of display colour (Petrol or Diesel)
Depending on version, the instrument panel
display colour depends on the colour scheme
chosen in the touch screen.
The settings are changed via the Settings touch screen menu.
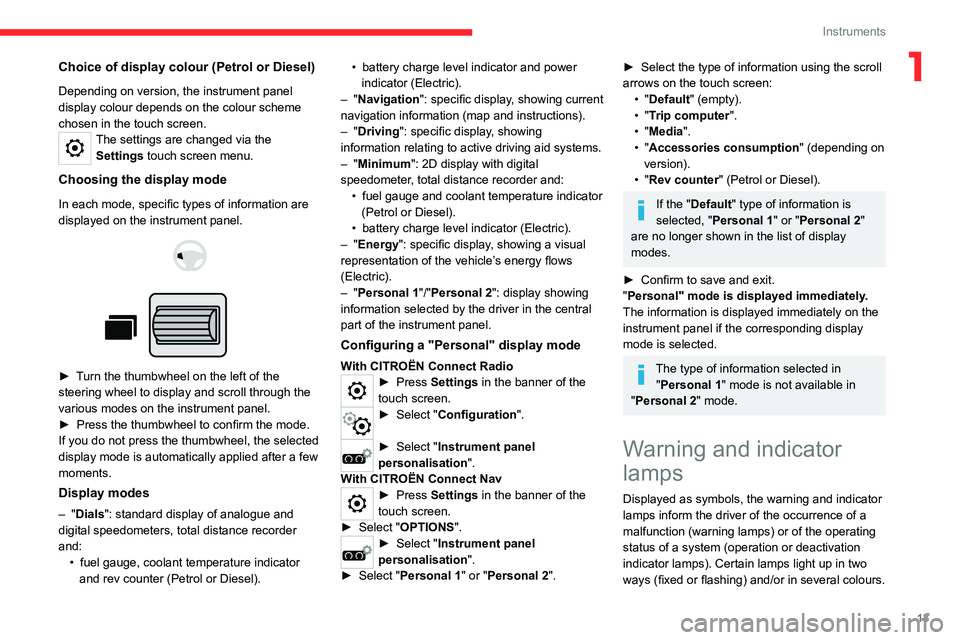
Choosing the display mode
In each mode, specific types of information are
displayed on the instrument panel.
► Turn the thumbwheel on the left of the
steering wheel to display and scroll through the
various modes on the instrument panel.
►
Press the thumbwheel to confirm the mode.
If you do not press the thumbwheel, the selected
display mode is automatically applied after a few
moments.
Display modes
– "Dials": standard display of analogue and
digital speedometers, total distance recorder
and: •
fuel gauge, coolant temperature indicator
and rev counter (Petrol or Diesel). •
battery charge level indicator and power
indicator (Electric).
–
"Navigation": specific display, showing current
navigation information (map and instructions).
– "Driving": specific display, showing
information relating to active driving aid systems.
– "Minimum": 2D display with digital
speedometer, total distance recorder and: •
fuel gauge and coolant temperature indicator
(Petrol or Diesel).
•
battery charge level indicator (Electric).
–
"Energy": specific display, showing a visual
representation of the vehicle’s energy flows
(Electric).
– "Personal 1"/"Personal 2": display showing
information selected by the driver in the central
part of the instrument panel.
Configuring a "Personal" display mode
With CITROËN Connect Radio► Press Settings in the banner of the
touch screen.
► Select " Configuration ".
► Select "Instrument panel
personalisation".
With CITROËN Connect Nav
► Press Settings in the banner of the
touch screen.
►
Select "
OPTIONS".
► Select " Instrument panel
personalisation".
►
Select "
Personal 1" or "Personal 2".
► Select the type of information using the scroll
arrows on the touch screen: •
"Default" (empty).
•
"Trip computer".
•
"Media".
•
"Accessories consumption" (depending on
version).
•
"Rev counter" (Petrol or Diesel).
If the "Default" type of information is
selected, "Personal 1" or "Personal 2"
are no longer shown in the list of display
modes.
►
Confirm to save and exit.
"
Personal" mode is displayed immediately.
The information is displayed immediately on the
instrument panel if the corresponding display
mode is selected.
The type of information selected in "Personal 1" mode is not available in
"Personal 2" mode.
Warning and indicator
lamps
Displayed as symbols, the warning and indicator
lamps inform the driver of the occurrence of a
malfunction (warning lamps) or of the operating
status of a system (operation or deactivation
indicator lamps). Certain lamps light up in two
ways (fixed or flashing) and/or in several colours.
Page 19 of 324
17
Instruments
1Check the pressure of the tyres as soon as
possible.
Reinitialise the detection system after adjusting
the pressure.
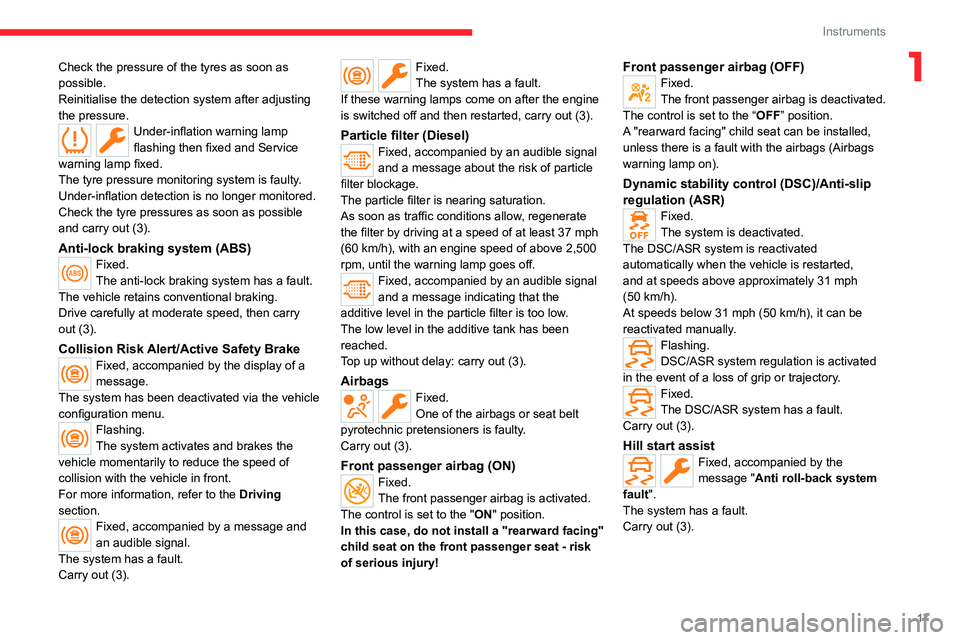
Under-inflation warning lamp
flashing then fixed and Service
warning lamp fixed.
The tyre pressure monitoring system is faulty.
Under-inflation detection is no longer monitored.
Check the tyre pressures as soon as possible
and carry out (3).
Anti-lock braking system (ABS)Fixed.
The anti-lock braking system has a fault.
The vehicle retains conventional braking.
Drive carefully at moderate speed, then carry
out (3).
Collision Risk Alert/Active Safety BrakeFixed, accompanied by the display of a
message.
The system has been deactivated via the vehicle
configuration menu.
Flashing.
The system activates and brakes the
vehicle momentarily to reduce the speed of
collision with the vehicle in front.
For more information, refer to the Driving
section.
Fixed, accompanied by a message and
an audible signal.
The system has a fault.
Carry out (3).
Fixed.
The system has a fault.
If these warning lamps come on after the engine
is switched off and then restarted, carry out (3).
Particle filter (Diesel)Fixed, accompanied by an audible signal
and a message about the risk of particle
filter blockage.
The particle filter is nearing saturation.
As soon as traffic conditions allow, regenerate
the filter by driving at a speed of at least 37
mph
(60
km/h), with an engine speed of above 2,500
rpm, until the warning lamp goes off.
Fixed, accompanied by an audible signal
and a message indicating that the
additive level in the particle filter is too low.
The low level in the additive tank has been
reached.
Top up without delay: carry out (3).
AirbagsFixed.
One of the airbags or seat belt
pyrotechnic pretensioners is faulty.
Carry out (3).
Front passenger airbag (ON)Fixed.
The front passenger airbag is activated.
The control is set to the "ON" position.
In this case, do not install a "rearward facing"
child seat on the front passenger seat - risk
of serious injury!
Front passenger airbag (OFF)Fixed.
The front passenger airbag is deactivated.
The control is set to the “OFF ” position.
A "rearward facing" child seat can be installed,
unless there is a fault with the airbags (Airbags
warning lamp on).
Dynamic stability control (DSC)/Anti-slip
regulation (ASR)
Fixed.
The system is deactivated.
The DSC/ASR system is reactivated
automatically when the vehicle is restarted,
and at speeds above approximately 31 mph
(50
km/h).
At speeds below 31
mph (50 km/h), it can be
reactivated manually.
Flashing.
DSC/ASR system regulation is activated
in the event of a loss of grip or trajectory.
Fixed.
The DSC/ASR system has a fault.
Carry out (3).
Hill start assistFixed, accompanied by the
message "Anti roll-back system
fault".
The system has a fault.
Carry out (3).
Page 43 of 324

41
Access
2Risk of explosion or leaking of
inflammable liquid or gas!
Do not use in/store in/place in an environment
where the temperature is extremely high or
where the pressure is extremely low due to
very high altitude.
Do not try to burn, crush or cut a used battery.
Reinitialising the remote
control
Following replacement of the battery or in
the event of a fault, it may be necessary to
reinitialise the remote control.
Without Keyless Entry and Start
► Switch the ignition off.
► T urn the key to position 2 (Ignition on) .
►
Immediately press the closed padlock button
for a few seconds. ►
Switch off the ignition and remove the key
from the ignition switch.
The remote control is now fully operational
again.
► Insert the mechanical key (incorporated into
the remote control) into the lock to open the
vehicle.
►
Place the electronic key against the back-up
reader on the steering column and hold it there
until the ignition is switched on.
►
W
ith a manual gearbox, place the gear lever
in neutral then fully depress the clutch pedal.
►
W
ith an automatic gearbox, while in mode
P, depress the brake pedal.
►
Switch on the ignition by pressing the
"
START/STOP" button.
If the fault persists after reinitialisation, contact a
CITROËN dealer or a qualified workshop without
delay.
Central locking / unlocking
This function enables the doors to be locked or unlocked simultaneously from inside the vehicle.
When locking/deadlocking from the
outside
When the vehicle is locked or deadlocked
from the outside, the indicator lamp flashes
and the button is deactivated.
►
After normal locking, pull one of the
interior door controls to unlock the vehicle.
►
After deadlocking, you must use the
remote control, the "Keyless Entry and
Start" system or the built-in key to unlock the
vehicle.
Manual mode
► Press this button to lock / unlock the
vehicle.
Driving with the doors locked could make
it difficult for the emergency services to
enter the vehicle in an emergency.
Page 45 of 324
43
Access
2Activation/Deactivation
You can activate or deactivate this function
permanently.
►
With the ignition on, press the central locking
button until an audible signal is triggered and
a corresponding message of confirmation is
displayed.
The state of the system stays in the memory
when the ignition is switched off.
Driving with the doors locked may render
access by the emergency services to the
interior difficult in an emergency.
Carrying long or voluminous objects
If you want to drive with the boot open,
you should press the central locking button
to lock the doors. Otherwise, every time the
speed of the vehicle exceeds 6 mph (10
km/h), the locks will rebound and the alerts
mentioned above will appear.
Pressing the central locking button unlocks
the vehicle.
Above 6 mph (10 km/h), this unlocking is
temporary.
Side-hinged doors
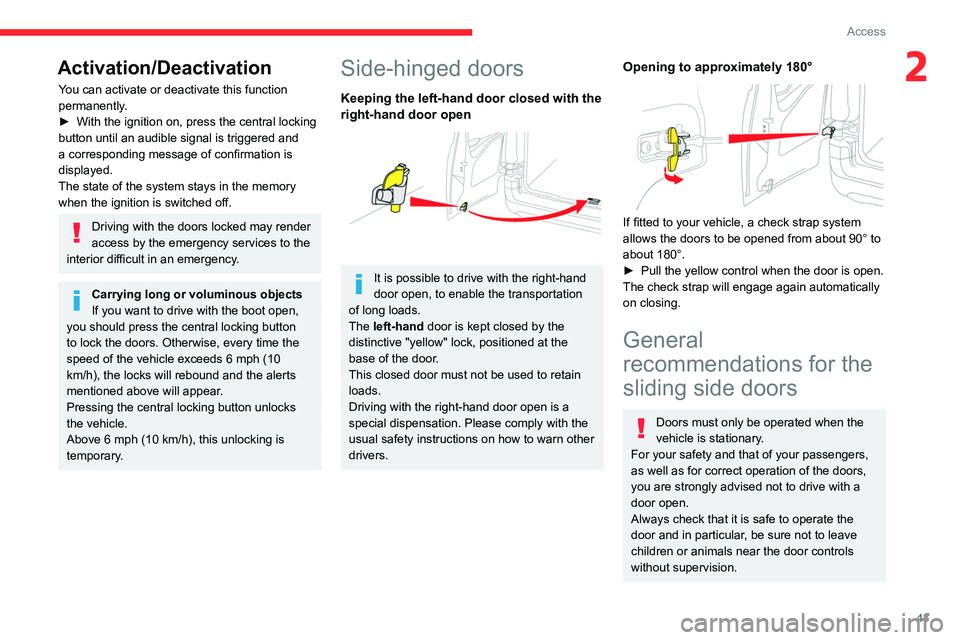
Keeping the left-hand door closed with the
right-hand door open
It is possible to drive with the right-hand
door open, to enable the transportation
of long loads.
The left-hand door is kept closed by the
distinctive "yellow" lock, positioned at the
base of the door.
This closed door must not be used to retain
loads.
Driving with the right-hand door open is a
special dispensation. Please comply with the
usual safety instructions on how to warn other
drivers.
Opening to approximately 180°
If fitted to your vehicle, a check strap system
allows the doors to be opened from about 90° to
about 180°.
►
Pull the yellow control when the door is open.
The check strap will engage again automatically
on closing.
General
recommendations for the
sliding side doors
Doors must only be operated when the
vehicle is stationary.
For your safety and that of your passengers,
as well as for correct operation of the doors,
you are strongly advised not to drive with a
door open.
Always check that it is safe to operate the
door and in particular, be sure not to leave
children or animals near the door controls
without supervision.
Page 54 of 324

52
Ease of use and comfort
► Slot the armrest into the backrest, ensuring
that you align the bayonet lugs with the holes.
►
Push the armrest shaft towards the backrest.
►
While holding it in this position, rotate the
armrest towards the front.
The armrest is once
again secured onto the backrest.
Storage compartment under
the seat
► Lift the passenger ’s seat cushion to access
the storage compartment.
Retractable position
► If the centre console inconveniences you,
remove the passenger's seat armrest.
►
Push the control rearwards fully to tilt and
guide the assembly
.
This position allows you to transport long loads
inside the vehicle with the doors closed.
When retracted, the maximum permitted weight
on the backrest is 50
kg.
►
T
o reposition the seat cushion, raise the
backrest until it locks in the raised position.
Heated seat control
► Approximately 30 seconds after starting the
engine, press the control.
It can be activated when the outside temperature
is below 20°C.
The temperature is controlled automatically
.
Pressing again interrupts operation.
If you press the control while the engine
is not running, the request will be
memorised for approximately 2 minutes.
With the two-seat front bench seat, the driver's
seat control switches the heating on or off for the
bench seat’s outer seat.
Do not use the function when the seat
is not occupied.
Reduce the heating intensity as soon as
possible.
When the seat and passenger compartment
have reached a satisfactory temperature,
Page 75 of 324

73
Ease of use and comfort
3
► Position the strap(s) around the head
restraint(s) (depending on the position of the
partition).
►
T
ighten the strap(s) using the adjustable
section in order to correctly retain the items that
have been loaded inside the cover.
Do not place any load in the passenger
compartment outside the protective cover
(especially over the cover).
Regularly check the condition of the
protective cover.
When signs of wear and tear appear, contact
a CITROËN dealer to have it replaced by a
protective cover that meets the specifications
and qualities required by CITROËN and your
vehicle.
Heating and Ventilation
Advice
Using the ventilation and air
conditioning system
►
T
o ensure that air is distributed evenly,
keep the external air intake grilles at the base
of the windscreen, the nozzles, the vents, the
air outlets and the air extractor in the boot
free from obstructions.
►
Do not cover the sunshine sensor located
on the dashboard; this sensor is used to
regulate the automatic air conditioning
system.
►
Operate the air conditioning system for at
least 5 to 10 minutes once or twice a month to
keep it in good working order
.
►
If the system does not produce cold air
,
switch it off and contact a CITROËN dealer or
a qualified workshop.
When towing a large load on a steep gradient
in high temperatures, switching off the air
conditioning increases the available engine
power, enhancing the towing capacity.
Avoid driving for too long with the ventilation off or with prolonged operation
of interior air recirculation. Risk of misting and
deterioration of the air quality!
If the interior temperature is very high
after the vehicle has stood for a long
time in the sunshine, air the passenger
compartment for a few moments.
Put the air flow control at a setting high
enough to quickly change the air in the
passenger compartment.
Condensation created by the air
conditioning results in a discharge of
water underneath the vehicle. This is perfectly
normal.
Servicing the ventilation and air
conditioning system
►
Ensure that the passenger compartment
filter is in good condition and have the filter
elements replaced regularly
.
We recommend using a composite passenger
compartment filter. Its specific active additive
helps protect against polluting gases and bad
smells.
►
T
o ensure correct operation of the
air conditioning system, have it checked
according to the recommendations in the
Manufacturer’s service schedule.
Page 76 of 324
74
Ease of use and comfort
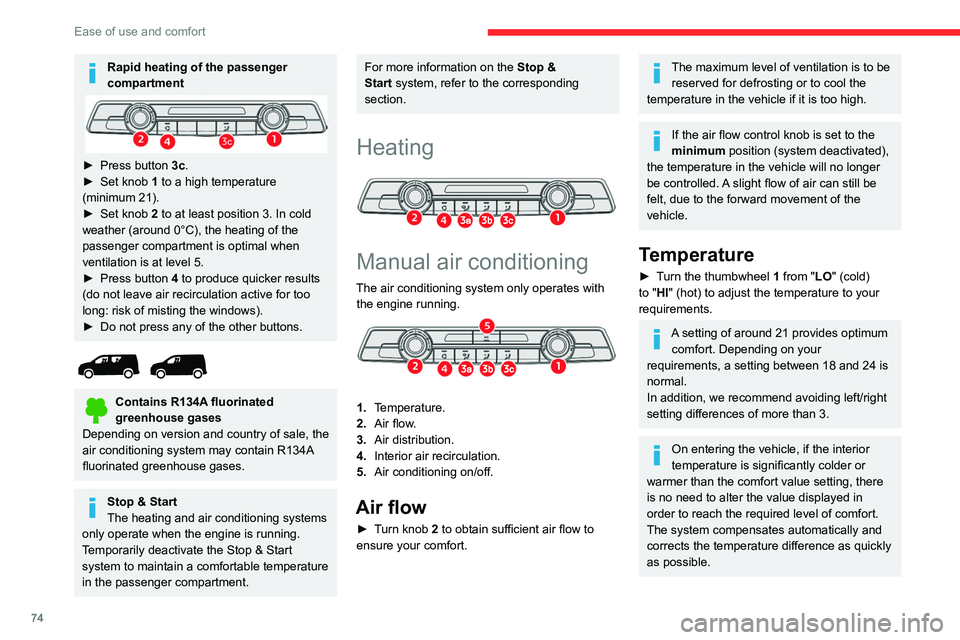
Rapid heating of the passenger
compartment
► Press button 3c.
► Set knob 1 to a high temperature
(minimum 21).
►
Set knob
2 to at least position 3. In cold
weather (around 0°C), the heating of the
passenger compartment is optimal when
ventilation is at level 5.
►
Press button
4 to produce quicker results
(do not leave air recirculation active for too
long: risk of misting the windows).
►
Do not press any of the other buttons.
Contains R134A fluorinated
greenhouse gases
Depending on version and country of sale, the
air conditioning system may contain R134A
fluorinated greenhouse gases.
Stop & Start
The heating and air conditioning systems
only operate when the engine is running.
Temporarily deactivate the Stop & Start
system to maintain a comfortable temperature
in the passenger compartment.
For more information on the Stop &
Start system, refer to the corresponding
section.
Heating
Manual air conditioning
The air conditioning system only operates with the engine running.
1. Temperature.
2. Air flow.
3. Air distribution.
4. Interior air recirculation.
5. Air conditioning on/off.
Air flow
► Turn knob 2 to obtain sufficient air flow to
ensure your comfort.
The maximum level of ventilation is to be
reserved for defrosting or to cool the
temperature in the vehicle if it is too high.
If the air flow control knob is set to the
minimum position (system deactivated),
the temperature in the vehicle will no longer
be controlled. A slight flow of air can still be
felt, due to the forward movement of the
vehicle.
Temperature
► Turn the thumbwheel 1 from "LO" (cold)
to "HI" (hot) to adjust the temperature to your
requirements.
A setting of around 21 provides optimum comfort. Depending on your
requirements, a setting between 18 and 24 is
normal.
In addition, we recommend avoiding left/right
setting differences of more than 3.
On entering the vehicle, if the interior
temperature is significantly colder or
warmer than the comfort value setting, there
is no need to alter the value displayed in
order to reach the required level of comfort.
The system compensates automatically and
corrects the temperature difference as quickly
as possible.
Page 78 of 324
76
Ease of use and comfort
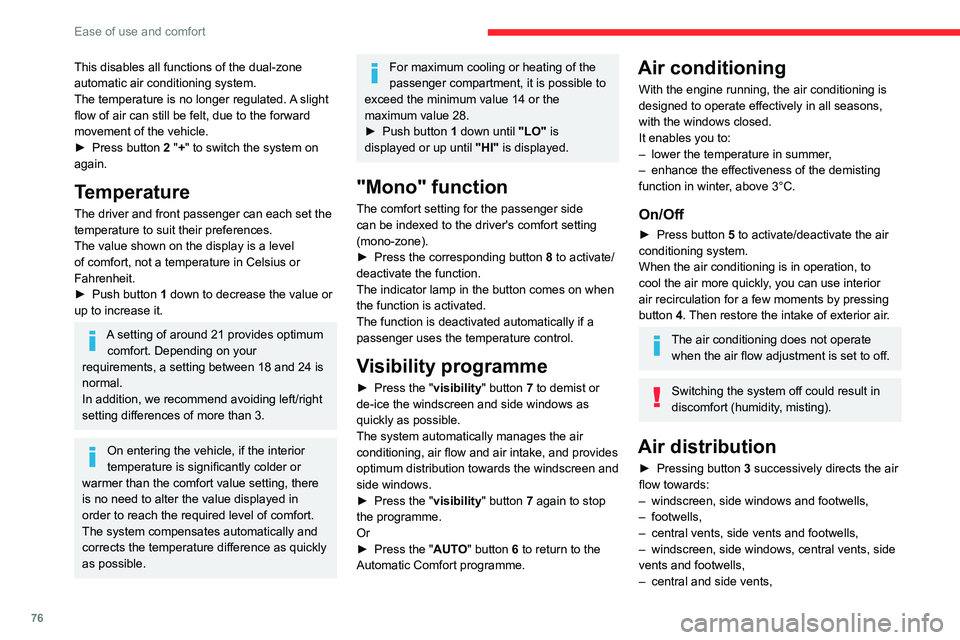
This disables all functions of the dual-zone
automatic air conditioning system.
The temperature is no longer regulated. A slight
flow of air can still be felt, due to the forward
movement of the vehicle.
►
Press button
2 "+" to switch the system on
again.
Temperature
The driver and front passenger can each set the
temperature to suit their preferences.
The value shown on the display is a level
of comfort, not a temperature in Celsius or
Fahrenheit.
►
Push button
1 down to decrease the value or
up to increase it.
A setting of around 21 provides optimum comfort. Depending on your
requirements, a setting between 18 and 24 is
normal.
In addition, we recommend avoiding left/right
setting differences of more than 3.
On entering the vehicle, if the interior
temperature is significantly colder or
warmer than the comfort value setting, there
is no need to alter the value displayed in
order to reach the required level of comfort.
The system compensates automatically and
corrects the temperature difference as quickly
as possible.
For maximum cooling or heating of the
passenger compartment, it is possible to
exceed the minimum value 14 or the
maximum value 28.
►
Push button
1 down until "LO" is
displayed or up until "HI" is displayed.
"Mono" function
The comfort setting for the passenger side
can be indexed to the driver's comfort setting
(mono-zone).
►
Press the corresponding button 8
to activate/
deactivate the function.
The indicator lamp in the button comes on when
the function is activated.
The function is deactivated automatically if a
passenger uses the temperature control.
Visibility programme
► Press the " visibility" button 7 to demist or
de-ice the windscreen and side windows as
quickly as possible.
The system automatically manages the air
conditioning, air flow and air intake, and provides
optimum distribution towards the windscreen and
side windows.
►
Press the "
visibility" button 7 again to stop
the programme.
Or
►
Press the "
AUTO" button 6 to return to the
Automatic Comfort programme.
Air conditioning
With the engine running, the air conditioning is
designed to operate effectively in all seasons,
with the windows closed.
It enables you to:
–
lower the temperature in summer
,
–
enhance the effectiveness of the demisting
function in winter
, above 3°C.
On/Off
► Press button 5 to activate/deactivate the air
conditioning system.
When the air conditioning is in operation, to
cool the air more quickly, you can use interior
air recirculation for a few moments by pressing
button 4. Then restore the intake of exterior air.
The air conditioning does not operate when the air flow adjustment is set to off.
Switching the system off could result in
discomfort (humidity, misting).
Air distribution
► Pressing button 3 successively directs the air
flow towards:
–
windscreen, side windows and footwells,
–
footwells,
–
central vents, side vents and footwells,
–
windscreen, side windows, central vents, side
vents and footwells,
–
central and side vents,
Page 123 of 324

121
Driving
6must turn the steering wheel while pressing
the "START/STOP" button to assist unlocking
of the steering column. A message is
displayed.
Switching off
► Immobilise the vehicle, with the engine at
idle.
►
With a manual gearbox, ideally put the gear
lever into neutral.
►
With an automatic gearbox, ideally select
position
P
.
With the conventional key/With the
remote control key
► Turn the key all the way to position 1 (Stop)
and remove it from the ignition.
►
T
o lock the steering column, turn the steering
wheel until it locks.
To facilitate unlocking of the steering column, it is recommended that the
wheels be returned to the straight ahead
position before switching off the engine.
►
Check that the parking brake is correctly
applied, particularly on sloping ground.
Never switch off the ignition before the
complete immobilisation of the vehicle.
With the engine off, the braking and steering
assistance systems are also turned off: risk of
loss of control of the vehicle.
As a safety measure, never leave the vehicle without taking the remote control
with you, even for a short time.
Avoid attaching heavy objects to the key or the remote control, which would weigh
down on its blade in the ignition switch and
could cause a malfunction.
Key left in the ignition
When opening the driver's door, an alert
message is displayed, accompanied by
an audible signal, to remind you that the key
is still in the ignition switch at position 1
(Stop).
If the key has been left in the ignition switch
at position 2 (Ignition on) , the ignition will be
switched off automatically after one hour.
To switch the ignition back on, turn the key
to position 1 (Stop), then back to position 2
(Ignition on) .
With Keyless Entry and Start
► With the remote control in the recognition
zone, press the " START/STOP" button.
With a manual gearbox, the engine stops and
the steering column locks.
With the EAT8 automatic gearbox, the engine
stops.
If the vehicle is not immobilised, the
engine will not stop.
To avoid any risk of jamming the pedals: – only use mats which are suited to the
fixings already present in the vehicle; these
fixings must be used,
–
never place one mat on top of another
.
The use of mats not approved by CITROËN
may interfere with access to the pedals and
hinder the operation of the cruise control /
speed limiter.
The mats approved by CITROËN have two
fixings located below the seat.
Starting/Switching off the
electric motor
Starting
The drive selector must be in mode P.
► If using a conventional or remote control
key
, depress the brake pedal and turn the key
to position 3 until the motor starts, without
depressing the accelerator. As soon as the motor
starts, release the key so it returns to position 2.
►
If using
Keyless Entry and Start, depress the
brake pedal and briefly press the "START/STOP"
button.
►
Keep your foot on the brake pedal until the
READY
indicator lamp comes on and an audible
signal is emitted, indicating that the vehicle is
ready to drive.
Page 135 of 324

133
Driving
6N.Neutral
To move the vehicle with the ignition off and
so allow it to free-wheel.
For more information on Free-wheeling, refer
to the corresponding section.
D. Drive (automatic forward gear)
B. Brake (regenerative braking)
Regenerative braking (the button lights up to
indicate its activation).
Information displayed on
the instrument panel
When the ignition is switched on, the drive
selector status is displayed on the instrument
panel:
P : Park.
R : Reverse.
N : Neutral.
D : Drive (automatic forward gear).
B : Brake (regenerative braking activated).
Operation
► Move the selector by pressing it forwards
( N or R) or rearwards (N or D) once or twice,
passing the point of resistance if necessary.
For example, to change from
P to R (with your
foot on the brake pedal), either push forwards
twice without passing the point of resistance or
push just once, passing the point of resistance.
Regenerative braking
With the Brake function and when
decelerating
The Brake function emulates engine braking,
slowing the vehicle with no need to depress the
brake pedal. The vehicle slows more quickly
when the driver releases the accelerator pedal.
The energy recovered when the accelerator
pedal is released is then used to partially
recharge the traction battery, thereby increasing
the vehicle's driving range.
The resulting deceleration of the vehicle does not cause the brake lamps to come
on.
►
From mode
D/R, press button B to activate/
deactivate the function (the button lights up when
the function is activated).
D/R on the instrument panel is replaced with B.
The system status is not saved when the ignition
is switched off.
In some situations (e.g. battery full,
extreme temperatures), the amount of
regenerative braking may be temporarily
limited, resulting in less deceleration.
The driver must remain alert to traffic
conditions and must always be ready to use
the brake pedal.
With the brake pedal
When the brake pedal is depressed, the
intelligent braking system automatically recovers
some of the energy and uses it to recharge the
traction battery.
This energy recovery also reduces use of the
brake pads, thereby limiting their wear.
The driver may experience a different sensation when depressing the brake
pedal compared to a vehicle without
regenerative braking.
Driving modes
Driving modes are selected using the following
control:
1.Pressing the control activates Eco mode. The
indicator lamp comes on. (Petrol or Diesel)