display Citroen BERLINGO FIRST 2011.5 1.G User Guide
[x] Cancel search | Manufacturer: CITROEN, Model Year: 2011.5, Model line: BERLINGO FIRST, Model: Citroen BERLINGO FIRST 2011.5 1.GPages: 128, PDF Size: 3.68 MB
Page 29 of 128
27MONITORING and DISPLAY SCREENS
-
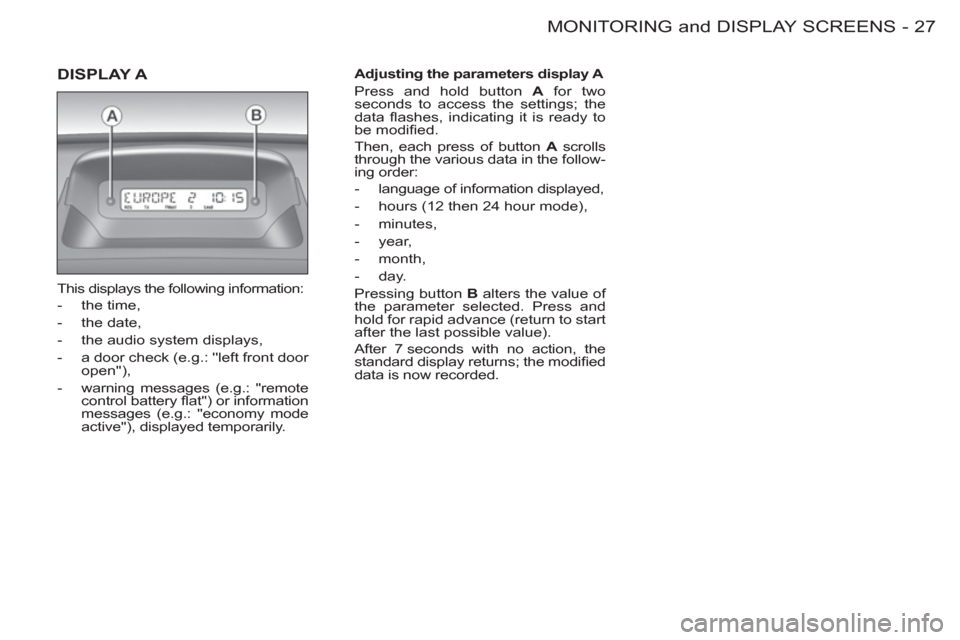
DISPLAY A
This displays the following information:
- the time,
- the date,
- the audio system displays,
- a door check (e.g.: ''left front door
open''),
- warning messages (e.g.: ''remote
control battery fl at'') or information
messages (e.g.: ''economy mode
active''), displayed temporarily.
Adjusting the parameters display A
Press and hold button A
for two
seconds to access the settings; the
data fl ashes, indicating it is ready to
be modifi ed.
Then, each press of button A
scrolls
through the various data in the follow-
ing order:
- language of information displayed,
- hours (12 then 24 hour mode),
- minutes,
- year,
- month,
- day.
Pressing button B
alters the value of
the parameter selected. Press and
hold for rapid advance (return to start
after the last possible value).
After 7 seconds with no action, the
standard display returns; the modifi ed
data is now recorded.
Page 49 of 128
47ACCESS and STARTING
-
ELECTRONIC ENGINE
IMMOBILISER
This locks the engine control sys-
tem as soon as the ignition has been
switched off and therefore prevents
starting of the vehicle by anyone who
does not have the key.
The ignition key has an electronic
chip which has a special code. When
the ignition is switched on, the code
must be recognised for the vehicle to
start.
If the system does not function
correctly,
the central locking button
indicator light, situated in the centre
of the fascia, fl ashes rapidly when the
ignition is switched on (2nd notch),
accompanied by an audible signal
and a message on the display.
In this case your vehicle will not start.
Contact a CITROËN dealer as soon
as possible.
Key in ignition
A buzzer sounds on opening the driv-
er's door, if the key has been left in
the ignition. Make a careful note of the
number of each key. This
number is coded on the label
attached to the key.
The high frequency remote control is
a sensitive system; do not operate it
while it is in your pocket as there is a
possibility that it may unlock the vehi-
cle, without you being aware of it.
The remote control does not operate
when the key is in the ignition, even
when the ignition is switched off,
except for reprogramming.
Do not operate the deadlocking function
if there is anyone inside the vehicle.
Driving with the doors locked may
make access to the passenger com-
partment by the emergency services
more diffi cult in an emergency.
As a safety precaution (with children
on board), remove the key from the
ignition when you leave the vehicle,
even for a short time.
Do not repeatedly press the buttons
of your remote control out of range of
your vehicle.
You run the risk of stopping it from
working and the remote control would
have to be reprogrammed.
When purchasing a second-hand ve-
hicle, have the key codes memorised
by a CITROËN dealer, to ensure that
the keys in your possession are the
only ones which can start the vehicle.
Do not make any modifi cations to the
electronic engine immobiliser system.
If the keys are lost
Visit a CITROËN dealer with the vehi-
cle's V5 registration certifi cate and your
personal identifi cation documents.
The CITROËN network will be able to
retrieve the key code and the trans-
ponder code to order a replacement
key.
A heavy object (key fob...), attached
to the key and weighing down on
its shaft in the ignition switch, could
cause a malfunction.
Page 52 of 128

ACCESS and STARTING50 -
Locking from the inside
Lower or raise control C
to lock or
unlock from the inside.
Locking from the inside
Pressing control D
operates the
central locking, when the doors are
closed.
Automatic central locking
Your vehicle can lock automatically
while driving (speed greater than
6mph (10 km/h)). You can activate or
deactivate this function.
Unlocking from the inside
Press control D
.
It is still
possible to open the doors
from the inside.
Activation
Press and hold control D
.
Activation of the function is accom-
panied by an audible signal and a
message on the display.
Deactivation
Press and hold control D
.
Deactivation of the function is ac-
companied by an audible signal.
Notes:
- doors locked and ignition off: the
indicator light fl ashes,
- doors locked and ignition on: the
indicator light remains on.
Page 67 of 128
65 DRIVING
-
SPEED LIMITER *
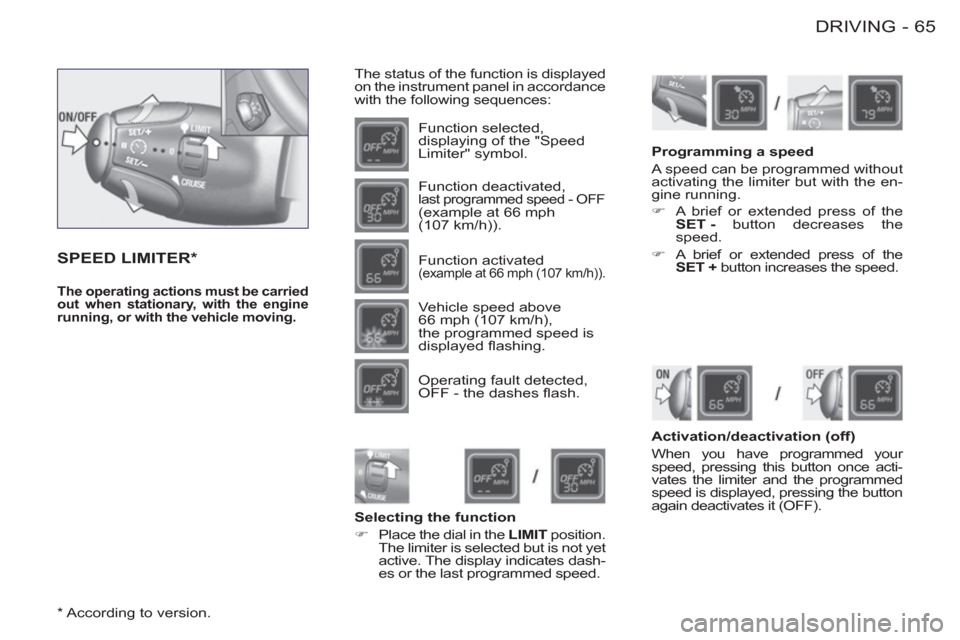
The status of the function is displayed
on the instrument panel in accordance
with the following sequences:
Function selected,
displaying of the "Speed
Limiter" symbol.
Function deactivated,
last programmed speed - OFF
(example at 66 mph
(107 km/h)).
Function activated (example at 66 mph (107 km/h)).
Vehicle speed above
66 mph (107 km/h),
the programmed speed is
displayed fl ashing.
Operating fault detected,
OFF - the dashes fl ash.
Selecting the function
�)
Place the dial in the LIMIT
position.
The limiter is selected but is not yet
active. The display indicates dash-
es or the last programmed speed.
Programming a speed
A speed can be programmed without
activating the limiter but with the en-
gine running.
�)
A brief or extended press of the
SET -
button decreases the
speed.
�)
A brief or extended press of the
SET +
button increases the speed.
Activation/deactivation (off)
When you have programmed your
speed, pressing this button once acti-
vates the limiter and the programmed
speed is displayed, pressing the button
again deactivates it (OFF).
The operating actions must be carried
out when stationary, with the engine
running, or with the vehicle moving.
*
According to version.
Page 68 of 128
66 -
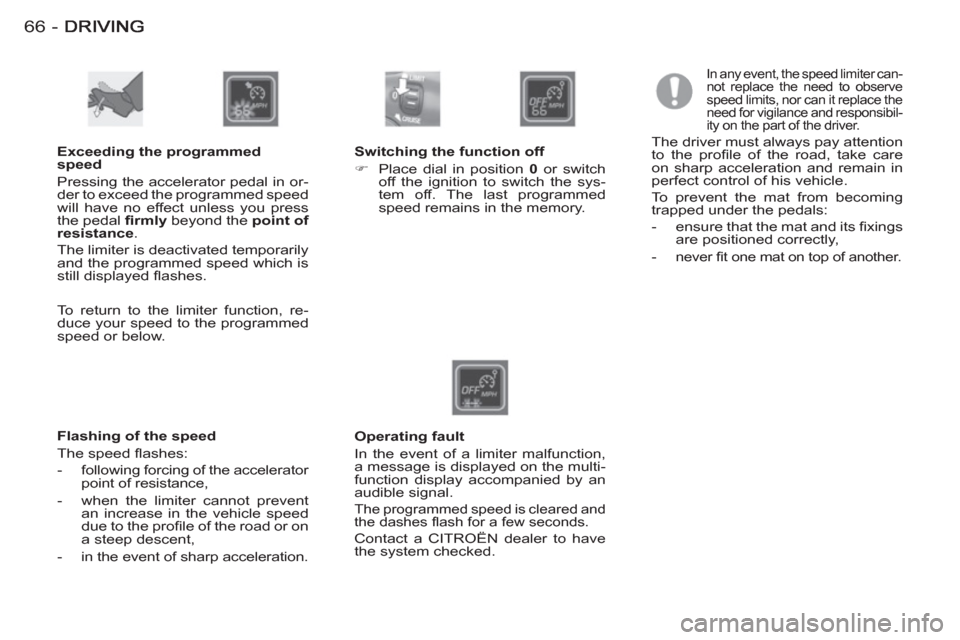
Exceeding the programmed
speed
Pressing the accelerator pedal in or-
der to exceed the programmed speed
will have no effect unless you press
the pedal fi rmly
beyond the point of
resistance
.
The limiter is deactivated temporarily
and the programmed speed which is
still displayed fl ashes.
Flashing of the speed
The speed fl ashes:
- following forcing of the accelerator
point of resistance,
- when the limiter cannot prevent
an increase in the vehicle speed
due to the profi le of the road or on
a steep descent,
- in the event of sharp acceleration.
In any event, the speed limiter can-
not replace the need to observe
speed limits, nor can it replace the
need for vigilance and responsibil-
ity on the part of the driver.
The driver must always pay attention
to the profi le of the road, take care
on sharp acceleration and remain in
perfect control of his vehicle.
To prevent the mat from becoming
trapped under the pedals:
- ensure that the mat and its fi xings
are positioned correctly,
-
never fi t one mat on top of another.
Switching the function off
�)
Place dial in position 0
or switch
off the ignition to switch the sys-
tem off. The last programmed
speed remains in the memory.
Operating fault
In the event of a limiter malfunction,
a message is displayed on the multi-
function display accompanied by an
audible signal.
The programmed speed is cleared and
the dashes fl ash for a few seconds.
Contact a CITROËN dealer to have
the system checked. To return to the limiter function, re-
duce your speed to the programmed
speed or below.
Page 69 of 128
67 DRIVING
-
CRUISE CONTROL *
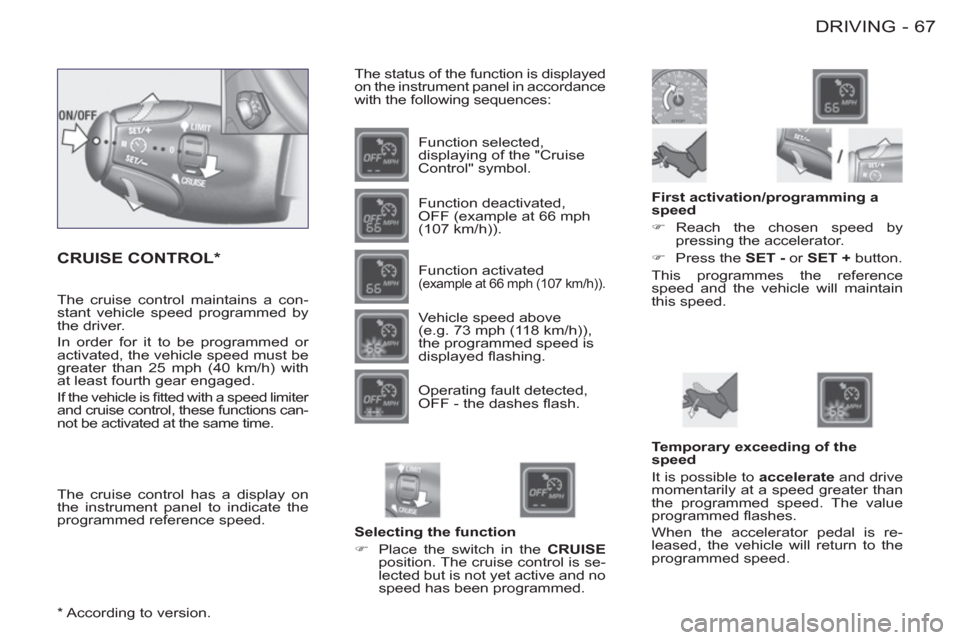
The status of the function is displayed
on the instrument panel in accordance
with the following sequences:
Function selected,
displaying of the "Cruise
Control" symbol.
Function deactivated,
OFF (example at 66 mph
(107 km/h)).
Function activated (example at 66 mph (107 km/h)).
Vehicle speed above
(e.g. 73 mph (118 km/h)),
the programmed speed is
displayed fl ashing.
Operating fault detected,
OFF - the dashes fl ash.
Selecting the function
�)
Place the switch in the CRUISE
position. The cruise control is se-
lected but is not yet active and no
speed has been programmed.
First activation/programming a
speed
�)
Reach the chosen speed by
pressing the accelerator.
�)
Press the SET -
or SET +
button.
This programmes the reference
speed and the vehicle will maintain
this speed.
Temporary exceeding of the
speed
It is possible to accelerate
and drive
momentarily at a speed greater than
the programmed speed. The value
programmed fl ashes.
When the accelerator pedal is re-
leased, the vehicle will return to the
programmed speed. The cruise control has a display on
the instrument panel to indicate the
programmed reference speed. The cruise control maintains a con-
stant vehicle speed programmed by
the driver.
In order for it to be programmed or
activated, the vehicle speed must be
greater than 25 mph (40 km/h) with
at least fourth gear engaged.
If the vehicle is fi tted with a speed limiter
and cruise control, these functions can-
not be activated at the same time.
*
According to version.
Page 70 of 128
DRIVING68 -
When changing the pro-
grammed reference speed
by means of a maintained
press, pay attention as the
speed can increase or de-
crease rapidly.
Do not use the cruise control on slip-
pery roads or in heavy traffi c.
In the event of a steep slope, the
cruise control cannot prevent the
vehicle from exceeding the pro-
grammed speed.
In any event, the cruise control can-
not replace the need to observe the
speed limits, nor can it replace the
need for vigilance and responsibility
on the part of the driver.
It is advisable to leave your feet near
the pedals.
To prevent the mat from becoming
trapped under the pedals:
- ensure that the mat and its fi xings
are positioned correctly,
-
never fi t one mat on top of another.
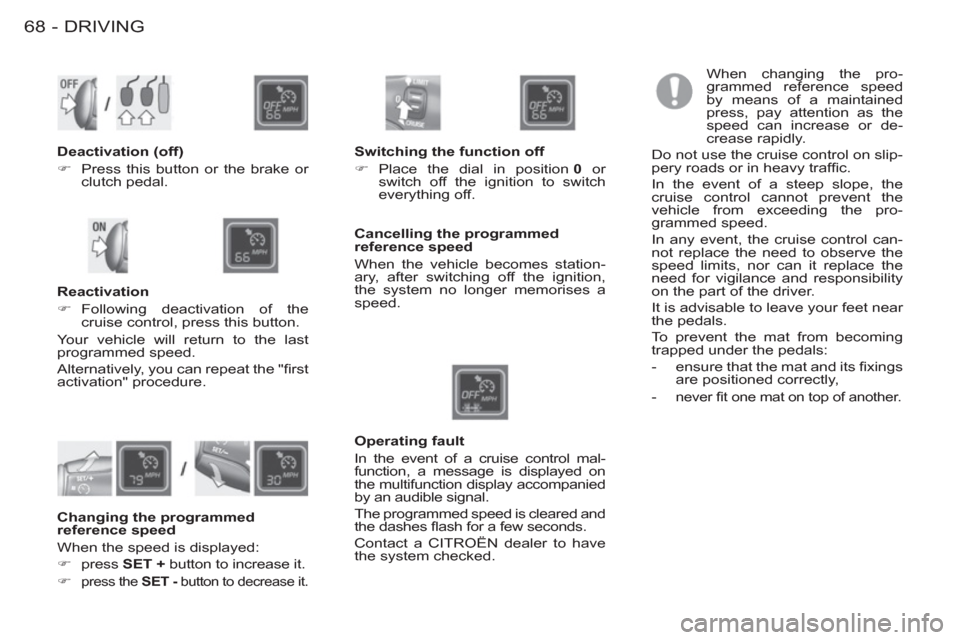
Deactivation (off)
�)
Press this button or the brake or
clutch pedal.
Changing the programmed
reference speed
When the speed is displayed:
�)
press SET +
button to increase it.
�)
press the SET -
button to decrease it.
Reactivation
�)
Following deactivation of the
cruise control, press this button.
Your vehicle will return to the last
programmed speed.
Alternatively, you can repeat the "fi rst
activation" procedure.
Switching the function off
�)
Place the dial in position 0
or
switch off the ignition to switch
everything off.
Operating fault
In the event of a cruise control mal-
function, a message is displayed on
the multifunction display accompanied
by an audible signal.
The programmed speed is cleared and
the dashes fl ash for a few seconds.
Contact a CITROËN dealer to have
the system checked.
Cancelling the programmed
reference speed
When the vehicle becomes station-
ary, after switching off the ignition,
the system no longer memorises a
speed.
Page 72 of 128
DRIVING70 -
If this warning light comes on,
accompanied by an audible
signal, contact a CITROËN
dealer to have the system
checked. The airbags may
no longer be triggered in the event of
a serious impact.
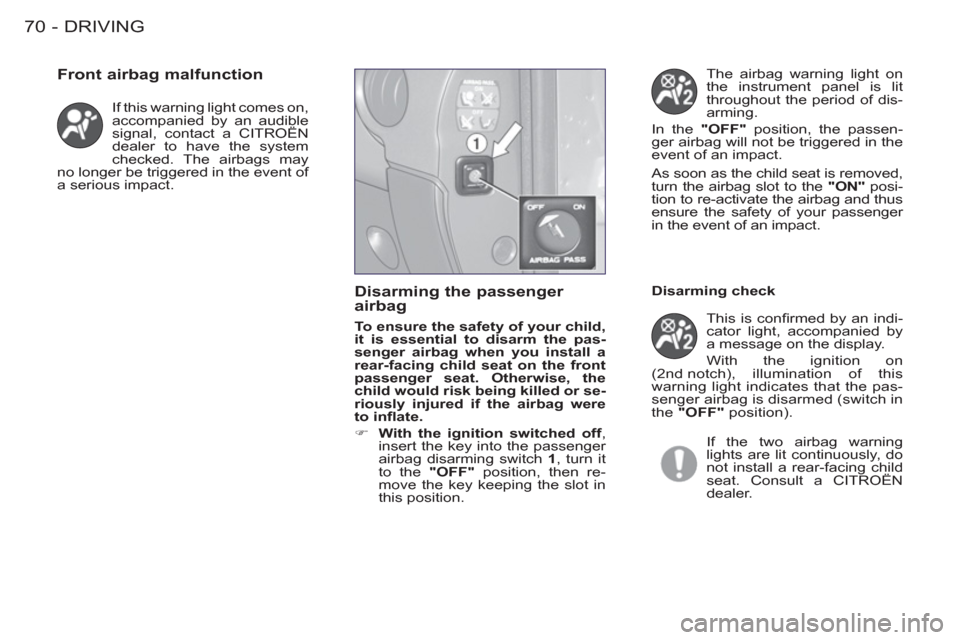
Front airbag malfunction
Disarming the passenger
airbag
To ensure the safety of your child,
it is essential to disarm the pas-
senger airbag when you install a
rear-facing child seat on the front
passenger seat. Otherwise, the
child would risk being killed or se-
riously injured if the airbag were
to infl ate.
�)
With the ignition switched off
,
insert the key into the passenger
airbag disarming switch 1
, turn it
to the "OFF"
position, then re-
move the key keeping the slot in
this position. The airbag warning light on
the instrument panel is lit
throughout the period of dis-
arming.
In the "OFF"
position, the passen-
ger airbag will not be triggered in the
event of an impact.
As soon as the child seat is removed,
turn the airbag slot to the "ON"
posi-
tion to re-activate the airbag and thus
ensure the safety of your passenger
in the event of an impact.
This is confi rmed by an indi-
cator light, accompanied by
a message on the display.
With the ignition on
(2nd notch), illumination of this
warning light indicates that the pas-
senger airbag is disarmed (switch in
the "OFF"
position).
If the two airbag warning
lights are lit continuously, do
not install a rear-facing child
seat. Consult a CITROËN
dealer.
Disarming check
Page 94 of 128
PRACTICAL INFORMATION
92 -
ECONOMY MODE FUNCTION
After the engine has stopped, with
the key in the "accessories" position,
certain functions (windscreen wiper,
electric windows, courtesy lights,
audio equipment, etc.) can only be
used for a combined duration of ap-
proximately thirty minutes, to prevent
discharging the battery.
Once the thirty minutes are over, a
switching to economy mode mes-
sage appears on the multi-function
display and the active functions are
put on standby.
These functions are reactivated au-
tomatically next time the vehicle is
driven.
In order to resume the use of these
functions immediately, the engine
must be started and left to run for a
few minutes.
The time available to you will then
be double the duration for which the
engine is left running. However, this
period will always be between fi ve
and thirty minutes.
BATTERY
It is advisable to disconnect the
battery if the vehicle is not to be
used for a period of more than
one month.
Before disconnecting the bat-
tery, you must wait 2 minutes
after switching off the ignition.
Never disconnect a terminal
when the engine is running.
Never charge a battery without fi rst
disconnecting the terminals.
Close the windows and the roof before
disconnecting the battery.
After every reconnection of the bat-
tery, switch on the ignition and wait
1 minute before starting to allow the
electronic systems to be initialised. If
slight diffi culties are experienced af-
ter this, please contact a CITROËN
dealer.
A fl at battery prevents the
engine from starting.
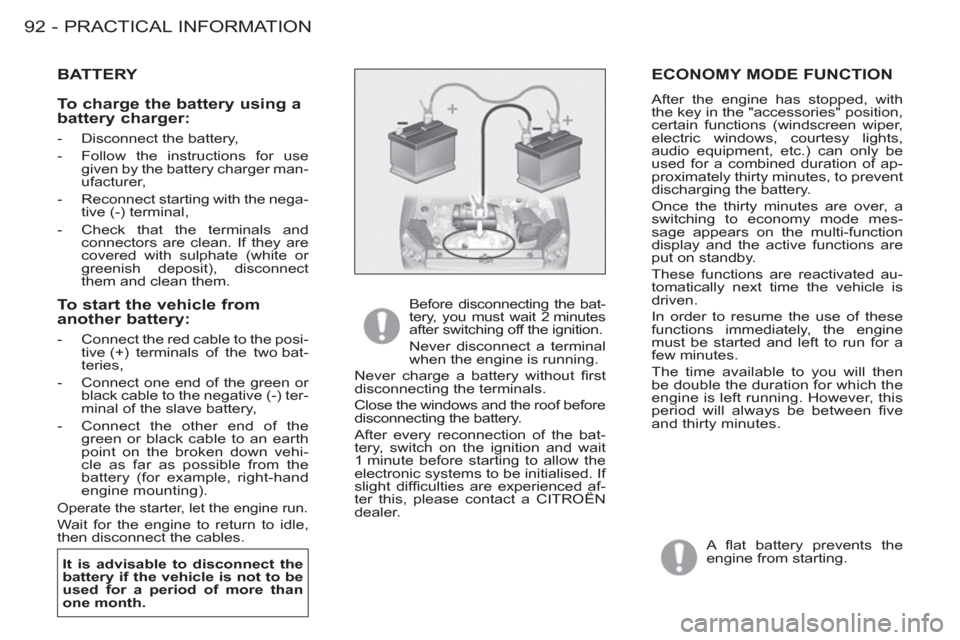
To start the vehicle from
another battery:
- Connect the red cable to the posi-
tive (+) terminals of the two bat-
teries,
- Connect one end of the green or
black cable to the negative (-) ter-
minal of the slave battery,
- Connect the other end of the
green or black cable to an earth
point on the broken down vehi-
cle as far as possible from the
battery (for example, right-hand
engine mounting).
Operate the starter, let the engine run.
Wait for the engine to return to idle,
then disconnect the cables.
To charge the battery using a
battery charger:
- Disconnect the battery,
- Follow the instructions for use
given by the battery charger man-
ufacturer,
- Reconnect starting with the nega-
tive (-) terminal,
- Check that the terminals and
connectors are clean. If they are
covered with sulphate (white or
greenish deposit), disconnect
them and clean them.
Page 114 of 128
AUDIO
11 2 -
GENERAL FUNCTIONS
AUDIO SETTINGS
Adjusting the loudness
This function automatically empha-
sises bass and treble tones. Press
button I
or J
to switch the function on
or off.
On/Off
With the ignition key
in the accessories or
ignition position, press
button A
to switch the
set on or off.
The set can oper-
ate for 30 minutes
without the vehicle ignition being
switched on.
Anti-theft system
The audio system is coded in such a
way that it can operate only on your
vehicle. It would not function if fi tted
to another vehicle.
The anti-theft system is automatic
and requires no action on your
part.
ADJUSTING THE VOLUME
Adjusting the bass
Adjusting the treble
When "TREB"
is displayed, press
button I
or J
to vary the setting.
- "TREB -9"
for a minimum treble
setting,
- "TREB 0"
for a normal setting,
- "TREB +9"
for a maximum treble
setting.
Press button H
several
times in succession
to access the bass
(BASS)
, treble (TREB)
,
loudness (LOUD)
,
fader (FAD)
, balance
(BAL)
and automatic
volume correction.
Exit from audio mode is automatic
after a few seconds without pressing
any button, or by pressing button H
after confi guration of the automatic
volume correction. When "BASS"
is dis-
played, press button I
or J
to vary the set-
ting.
- "BASS -9"
for a
minimum bass set-
ting,
- "BASS 0"
for a
normal setting,
- "BASS +9"
for a maximum bass
setting.
Press button C
to in-
crease the volume, or
button B
to decrease it.
The bass and treble settings
are specifi c to each source.
It is possible to set them dif-
ferently for radio or CD.
Continuous pressure on buttons C
and B
allows a gradual adjustment of
the volume.