lock Citroen BERLINGO MULTISPACE 2015 2.G Owner's Guide
[x] Cancel search | Manufacturer: CITROEN, Model Year: 2015, Model line: BERLINGO MULTISPACE, Model: Citroen BERLINGO MULTISPACE 2015 2.GPages: 298, PDF Size: 12.69 MB
Page 103 of 298

101
Berlingo-2-VP_en_Chap04_Ergonomie_ed01-2015Berlingo-2-VP_en_Chap04_Ergonomie_ed01-2015
Automatic switching on/off
The front courtesy lamp comes on when the key is removed from the ignition, when the
vehicle is unlocked, when one of the
front doors is opened and for location of
the
vehicle using the remote control.
It goes off gradually after the ignition is
switched on and when the vehicle is
locked.Front seats: comes on when one of the front doors is
opened. These are switched on and of
f by
means of a manual switch, with
the
ignition on.
Rear
seats: comes on when
one of the rear doors is
opened.
If
the doors remain open for
a
few minutes, the courtesy
lamps
go off.
Permanently
off.
Permanently
on,
ignition
on.
Front courtesy lamp
COURTESY
LAMPS
Rear courtesy lamp Front individual reading lamps
EaSE oF USE and CoMFoRT
4
Practical information
Page 111 of 298

109
Berlingo-2-VP_en_Chap04_Ergonomie_ed01-2015Berlingo-2-VP_en_Chap04_Ergonomie_ed01-2015
SURVEILLANCE MIRROR
This mirror, placed on top of the central mirror, enables the driver or
front passenger to observe all the rear
seats.
Fitted
on its own ball joint, it's manual
adjustment
is simple and provides a
view
of the rear interior of the vehicle.
It
can also be adjusted for improved
visibility
during manoeuvres or when
overtaking.
REAR WINDOWS
To partially open the rear windows, tilt
the lever and push it fully to lock the
windows
in the open position.
Manual rear view mirror
The rear view mirror has two positions:
-
day
(normal),
-
night
(anti-dazzle).
To
change from one to the other, push
or pull the lever on the lower edge of
the
mirror.
EASE OF USE and COMFORT
4
Mirrors and windows
Page 113 of 298

111
Berlingo-2-VP_en_Chap05_Securite_ed01-2015
HAZARD WARNING LAMPS
H
ORN
Press the centre of the steering wheel.
PARKING BRAKE
Applying
Pull the parking brake lever up to immobilise
your vehicle.
Check
that the parking brake is applied
firmly
before leaving the vehicle.Pull
on the parking brake lever, only
with the vehicle stationary.
In the exceptional case of use of the
parking
brake when the vehicle is
moving,
apply the brake by pulling
gently
to avoid locking the rear wheels
(risk
of skidding).
Press this button, the direction
indicators
flash.
They
can
operate
with
the
ignition
off.
The
hazard
warning
lamps
should
only
be used in dangerous situations, when
stopping
in
an
emergency
or
when
driving
in
unusual
conditions.
When
parking on a slope, direct your
wheels
towards the pavement and pull
the
parking brake lever up.
There is no advantage in engaging
a
gear after parking the vehicle,
particularly
if the vehicle is loaded.
If the parking brake is still on or has not been released properly, this is
indicated
by this warning lamp which
comes
on on the instrument panel.
Automatic operation of hazard
warning lamps
When braking in an emergency, depending on the force of deceleration,
the hazard warning lamps come
on
automatically.
They
switch off
automatically
the first time you
accelerate.
It
is also possible to switch them off by
pressing
the switch on the dashboard.Releasing
Pull the lever up slightly and press the
button to lower the parking brake lever.
driving safely
SaFETY
5
Page 117 of 298

ABS
ABS
11 5
Berlingo-2-VP_en_Chap05_Securite_ed01-2015
ANTI-LOCK BRAKING SYSTEM
(ABS / EBFD)
The ABS and EBFD (electronic brake force
distribution) systems improve the
stability
and manoeuvrability of your
vehicle
on braking, in particular on
poor
or slippery surfaces.
The
ABS
prevents locking of the
wheels, the EBF
d provides control of
the
braking pressure wheel by wheel.If
this warning lamp comes on,
accompanied by an
audible
signal and a message
in the screen, it indicates a
malfunction
of the
ABS
which
could result in a loss of control of the
vehicle
on braking.
If
this warning lamp comes
on,
together with the brake
and
STOP
warning lamps,
accompanied
by an audible
signal
and a message in the
screen,
it indicates a malfunction of
the
electronic brake force distribution
which could result in a loss of control of
the
vehicle on braking.
EMERGENCY BRAKING
ASSIST
ANCE (EBA)
In an emergency, this system enables the optimum braking pressure to be
reached
more quickly, press the pedal
firmly
without releasing it.
It is triggered by the speed at which the
brake
pedal is pressed down.
This
alters the resistance of the brake
pedal
under your foot.
To
maintain operation of the
emergency
braking assistance system:
keep
your foot on the brake pedal.
Good practice
The anti-lock braking system comes into operation automatically when
there
is a risk of wheel lock. It does not
reduce
the braking distance.
o
n very slippery surfaces (ice,
oil, etc...)
the
ABS
may increase the
braking
distance. When braking in
an
emergency, do not hesitate to
press
the brake pedal firmly, without
releasing the pressure, even on a
slippery surface, you will then be able
to
continue to manoeuvre the vehicle
to
avoid an obstacle.
Normal
operation of the
ABS
may be
felt
by slight vibration of the brake
pedal.
When changing wheels (tyres and
rims),
ensure that these are listed by
CITROËN
for the vehicle. Stop as soon as it is safe to do so.
In both cases, contact a CITR
o Ë n
dealer
or a qualified workshop.
driving safely
SaFETY
5
Page 126 of 298

Berlingo-2-VP_en_Chap05_Securite_ed01-2015
124
Recommendations for children:
-
use a suitable child seat if the
passenger is less than 12 years old
or
shorter than one metre fifty,
-
never allow a child to travel on
your lap, even with the seat belt
fastened. For
more information on child
seats, refer to the "Children on
board"
section of chapter 5.
Clean the seat belt straps with
soapy water or a textile cleaning
product, sold by CITR
o Ë n
dealers.
In accordance with current safety
regulations, your CITR
o Ë n dealer can
guarantee
all work or any checks, from
testing
to maintenance, on your seat
belt
equipment.
Have
the seat belts checked regularly
(even
after a minor impact) by a
CITROËN
dealer or a qualified
workshop:
they must not show any
signs of wear
, cutting or fraying
and
they must not be converted or
modified.
The
force
limiter
reduces
the
pressure
of the seat belt against the body of the
occupants.
The pretensioning seat belts are active
when
the
ignition
is
switched
on.
The
inertia
reels
are
fitted
with
a
device
which
automatically
locks
the
strap
in
the
event
of
a
collision
or
emergency
braking
or
if
the
vehicle
rolls
over.
You can unfasten the seat belt by
pressing
the
red
button
on
the
buckle.
Guide
the
seat
belt
after
unfastening.
The
airbag
warning
lamp
comes
on
if
the
pretensioners
are
deployed.
Contact a CITR
o
Ë
n
dealer or a
qualified
workshop.
In
order
to
be
effective,
a
seat
belt:
-
must
restrain
one
person
only,
-
must
not
be
twisted,
check
by
pullin
g in front of you with an even
movement,
-
must
be
tightened
as
close
to
the
body
as
possible.
The upper part of the seat belt should
be positioned in the hollow of the
shoulder.
The lap part should be placed as low
as
possible
on
the
pelvis.
d
o not interchange the seat belt
buckles
as
they
will
not
fulfil
their
role
properly
.
If
the
seats
are
fitted
with
armrests,
the
lap
part
of
the
seat
belt
should
always
pass
under
the
armrest.
Check
that
the
seat
belt
is
fastened
correctly
by
pulling
the
strap
firmly.Front seat belts
The front seats are fitted with pretensioners and force limiters.
Rear seat belts
(5 seat version)
The rear seats are fitted with three-
point inertia reel seat belts.
Seat belts
Page 145 of 298

Berlingo-2-VP_en_Chap05_Securite_ed01-2015
143
ADVICE ON CHILD SEATS
At the rear, always leave sufficient space between the front seat and:
-
a rearward facing child seat,
-
the feet of a child seated in a
forward
facing child seat.
For
this, move the front seat forward
and, if necessary
, straighten its
backrest
as well.
The incorrect installation of a child seat
in
a vehicle compromises the child's
protection
in the event of an accident.
Check that there is no seat belt or seat
belt
buckle under the child seat, as this
could
destabilise the seat.
Remember to fasten the seat belts or
the child seat harnesses
keeping the
slack relative to the child's body to a
minimum, even for short journeys.
For the installation of a child seat using
the seat belt, ensure that the seat belt
is well tensioned on the child seat
and that it is holding the child seat
firmly against the vehicle's seat. If the
passenger
seat is adjustable, move it
forward
if necessary. For the optimum installation of a
forward facing child seat, ensure that
the
back of the child seat is as close as
possible
to the backrest of the vehicle's
seat,
or in contact if possible.
The head restraint must be removed
before installin
g a child seat with a
backrest on the passenger seat.
Ensure that the head restraint is
stowed or attached securely so that it
is not thrown around the vehicle in the
event of sharp braking.
Refit the head restraint as soon as the
child
seat is removed.Children at the front
The legislation on carrying a child on
the
front passenger seat is specific to
each
country. Refer to the legislation in
force
in your country.
d
eactivate the passenger's airbag
when a rearward facing child seat is
installed
on the front seat.
Otherwise,
the child would risk being
seriously
injured or killed if the airbag
were
deployed.
Installing a booster seat
The chest part of the seat belt must be positioned on the child's shoulder
without touching the neck.
Ensure that the lap part of the seat belt
passes
correctly over the child's thighs.
CITROËN
recommends the use of a
booster
seat which has a back, fitted
with
a seat belt guide at shoulder level.
As
a safety precaution, never leave:
-
one
or more children alone and
unsupervised in a vehicle,
-
a
child or an animal in a vehicle
which is exposed to the sun, with
the windows closed,
-
the
keys within reach of children
inside
the vehicle.
To prevent accidental opening of the
doors,
use the "Child Lock".
Take
care
not
to
open
the
rear
windows
by
more than one third.
To
protect young children from the rays
of
the sun, fit side blinds to the rear
windows.
For an installation in row 3, put the
backrests
of
the
outer
and
centre
seats in row 2 in the table position, or
remove
these
seats
in
row
2,
so
that
the child seat or the child's legs do not
touch
the
seats
in
row
2.
Child safety
SaFETY
5
Page 146 of 298

Berlingo-2-VP_en_Chap05_Securite_ed01-2015
144
CHILD LOCK
This prevents opening of the siding
side doors from the inside.
Manual Electric
With the ignition on, press
this
button in the middle of
the
dashboard.
Indicator
lamp on = child lock
on.
Please
note: this system is
independent
of the central locking
control.Always
remove the ignition key
when leaving the vehicle, even for
a
short time.
It
is
advisable to check the state of
the
child
lock each time the ignition is
switched
on.
In
the
event of a serious impact the
electric
child lock is deactivated
automatically
.
a label indicates the position of the
lever
and
the
state
of
the
child
lock.
-
o
pen fully past the point of
resistance.
-
T
ilt the lever, located on the rear
section
of
the
door.
Child safety
Page 149 of 298

147
Berlingo-2-VP_en_Chap06_Accessoire_ed01-2015
TOWBAR WITH SWAN NECK T
OWBALL ,
LOCKABLE
AND
QUICKL
Y
DET
ACHABLE
Presentation
This swan neck towbar, delivered assembled, can be removed and fitted
easily
. No tools are needed.
Instructions for fitting and before
every use
Check
that the swan neck is correctly
locked
by verifying the following points:
-
the
green mark on the locking
wheel is visible
-
the
safety lock on the locking wheel
is directed toward the rear
,
-
the
safety lock is closed and the
key
removed; the locking wheel can
no longer be operated,
-
the
swan neck must no longer
move
at all in its carrier.
When
hooking up the trailer, don't
forget
to connect the trailer harness.
Fitting
Towing a trailer
ACCESSORIES
6
Page 150 of 298

148
Berlingo-2-VP_en_Chap06_Accessoire_ed01-2015
During use
Never unlock the device when
a
trailer or load carrier is fitted to the
swan
neck.
After use
For
journeys
made
without
a
trailer
or
load carrier, the swan neck must
be
removed and the blanking plug
inserted
in the carrier.
This
measure
applies
particularly if the swan neck
could
hinder visibility of the number
plate
or lighting.Removal
Maintenance
Correct operation is only possible if the
swan neck and its carrier remain clean.
Before cleaning the vehicle with a high
pressure
jet wash, the swan neck must
be
removed and the blanking plug
inserted
in the carrier.
Towing a trailer
Page 159 of 298

157
Berlingo-2-VP_en_Chap07_Verification_ed01-2015Berlingo-2-VP_en_Chap07_Verification_ed01-2015
CHECKS
Carbon filter and passenger compartment filterParticle filter (Diesel)
Maintenance of the particle filter must be carried out by a CITROËN dealer.
o
n acceleration after the vehicle has
been running for a prolonged period
at
very low speed or at idle, you may,
in
exceptional circumstances, notice
the
emission of water vapour at the
exhaust.
This
water vapour does not
have any adverse ef
fect on vehicle
handling
or the environment.
Battery
At the start of summer or winter, have your battery checked by a CITROËN
dealer
or a qualified workshop.
Brake pads
Brake pad wear depends on the style of driving, in particular for vehicles
which are used in town, over short
distances.
It may be necessary to
check
the thickness of the pads, even
between
services.
Unless
there is a leak on the circuit, a
drop
in the brake fluid level indicates
that
the brake pads are worn.
Brake disc / drum wear
For information on checking the brake disc / drum wear, contact a CITROËN
dealer
.
Parking brake
Where the parking brake travel is too great or there is a reduction in the
performance
of the system, the parking
brake
should be adjusted, even between
services.
Have
the system checked by a CITROËN
dealer
or a qualified workshop.
Oil filter
Change the filter regularly in accordance with the manufacturer's
servicing
schedule.
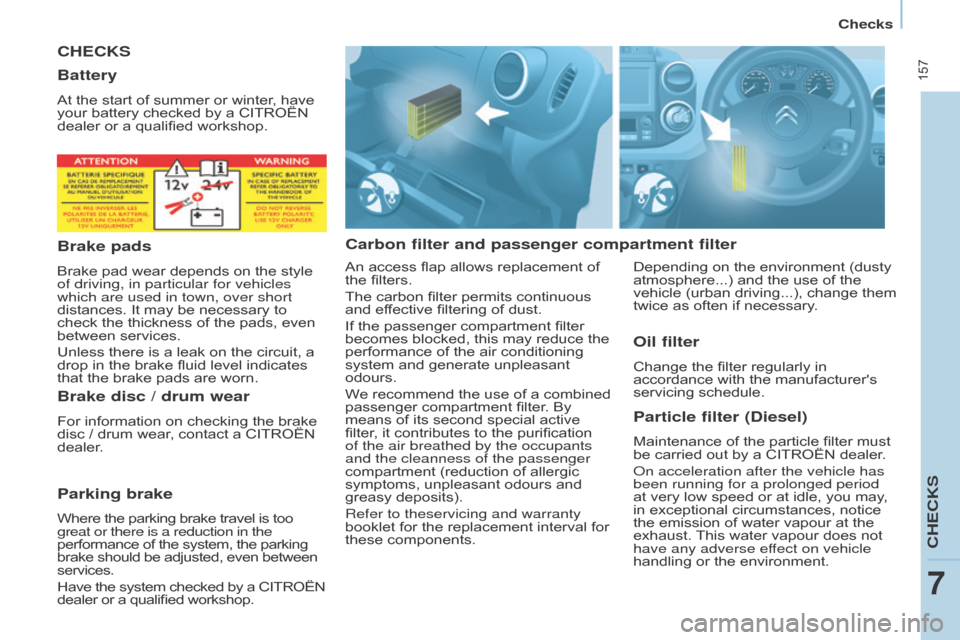
An
access
flap
allows
replacement
of
the
filters.
The
carbon
filter
permits
continuous
and
effective
filtering
of
dust.
If
the
passenger
compartment
filter
becomes
blocked,
this
may
reduce
the
performance
of
the
air
conditioning
system
and
generate
unpleasant
odours.
W
e
recommend
the
use
of
a
combined
passenger
compartment
filter.
By
means
of
its
second
special
active
filter
,
it
contributes
to
the
purification
of the air breathed by the occupants
and the cleanness of the passenger
compartment
(reduction
of
allergic
symptoms,
unpleasant
odours
and
greasy
deposits).
Refer to theservicing and warranty
booklet
for
the
replacement
interval
for
these
components. Depending
on the environment (dusty
atmosphere...)
and the use of the
vehicle
(urban driving...), change them
twice
as often if necessary.
CHECKS
7
Checks