tow Citroen BERLINGO MULTISPACE RHD 2012 2.G User Guide
[x] Cancel search | Manufacturer: CITROEN, Model Year: 2012, Model line: BERLINGO MULTISPACE RHD, Model: Citroen BERLINGO MULTISPACE RHD 2012 2.GPages: 238, PDF Size: 7.53 MB
Page 83 of 238

81
EASE OF US
E an
dCOMFOR
T
3
Seats
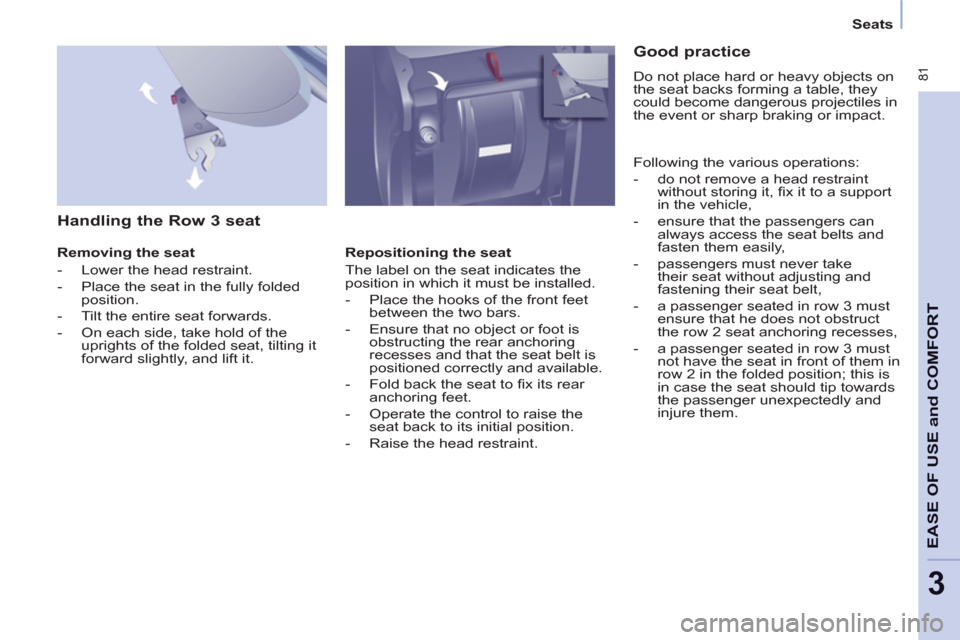
Handling the Row 3 seat
Removing the seat
- Lower the head restraint.
- Place the seat in the fully folded
position.
- Tilt the entire seat forwards.
- On each side, take hold of the
uprights of the folded seat, tilting it
forward slightly, and lift it.
Repositioning the seat
The label on the seat indicates the
position in which it must be installed.
- Place the hooks of the front feet
between the two bars.
- Ensure that no object or foot is
obstructing the rear anchoring
recesses and that the seat belt is
positioned correctly and available.
- Fold back the seat to fi x its rear
anchoring feet.
- Operate the control to raise the
seat back to its initial position.
- Raise the head restraint.
Good practice
Do not place hard or heavy objects on
the seat backs forming a table, they
could become dangerous projectiles in
the event or sharp braking or impact.
Following the various operations:
- do not remove a head restraint
without storing it, fi x it to a support
in the vehicle,
- ensure that the passengers can
always access the seat belts and
fasten them easily,
- passengers must never take
their seat without adjusting and
fastening their seat belt,
- a passenger seated in row 3 must
ensure that he does not obstruct
the row 2 seat anchoring recesses,
- a passenger seated in row 3 must
not have the seat in front of them in
row 2 in the folded position; this is
in case the seat should tip towards
the passenger unexpectedly and
injure them.
Page 94 of 238

92
Practical information
Modutop roof BARS
These two longitudinal Modutop roof
bars can be removed. The maximum authorised weight on
each bar is 35 kg.
In all cases, the load must rest on
the non-slip bands provided for this
purpose and must not touch the roof or
the glazing of the roof.
Recommendations for loading on
the roof:
- Open the protective covers.
- Use the screwdriver (stored in the
tool kit under the right-hand seat) to
remove the 4 bolts.
- Turn the bars 90° placing the
hollow parts towards the front.
- Tighten the 4 bolts.
- Close the protective covers.
- Use the strap passages A
only to
secure the load fi rmly.
Page 97 of 238

95
EASE OF US
E an
dCOMFOR
T
3
Practical information
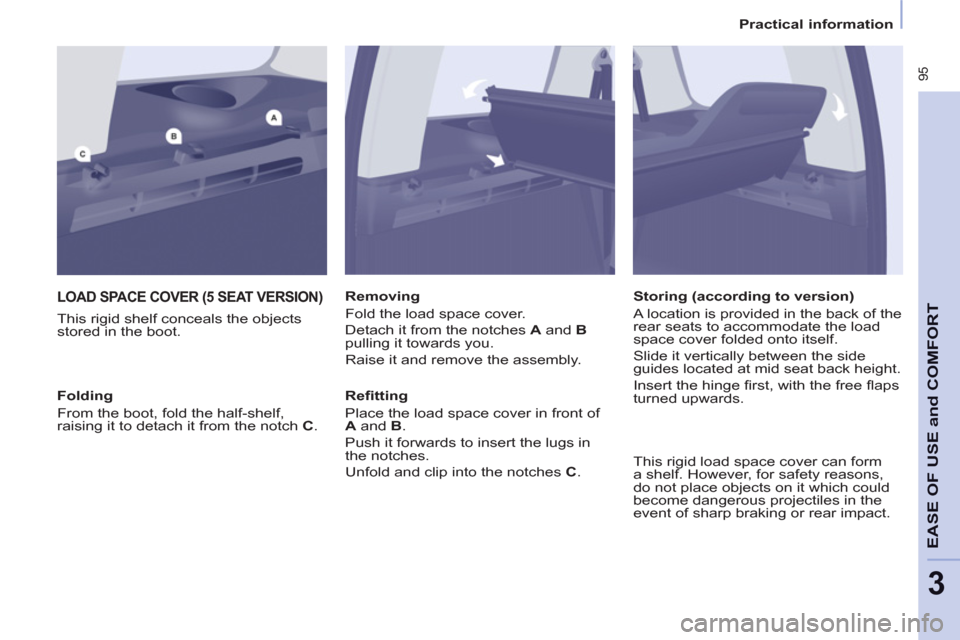
LOAD SPACE COVER (5 SEAT VERSION)
This rigid shelf conceals the objects
stored in the boot.
Removing
Fold the load space cover.
Detach it from the notches A
and B
pulling it towards you.
Raise it and remove the assembly.
Refi tting
Place the load space cover in front of
A
and B
.
Push it forwards to insert the lugs in
the notches.
Unfold and clip into the notches C
.
Folding
From the boot, fold the half-shelf,
raising it to detach it from the notch C
.
Storing (according to version)
A location is provided in the back of the
rear seats to accommodate the load
space cover folded onto itself.
Slide it vertically between the side
guides located at mid seat back height.
Insert the hinge fi rst, with the free fl aps
turned upwards.
This rigid load space cover can form
a shelf. However, for safety reasons,
do not place objects on it which could
become dangerous projectiles in the
event of sharp braking or rear impact.
Page 98 of 238

96
Practical information
12 Volt socket (120 W Max)
It is advisable to limit the use of this
socket to avoid discharging the battery.
Protective net
Open the cover located in the hook
support.
Fix the top of the net in the notches,
having fi rst turned the bar 1/4 of a turn.
Ensure that the end of the bar engages
correctly in the metal part of its
location.
Fix the straps in the locations provided
on the fl oor.
Tighten the net using the straps.
Stowing rings
Use these rings to secure loads on
the fl oor.
Page 99 of 238

97
EASE OF US
E an
dCOMFOR
T
3
Practical information
REAR FITTINGS (7 SEAT VERSION)
Cup holder
Any liquid carried in a cup (mug or
other) on board which could spill,
presents a risk.
Take care.
12 volt socket (120 W max)
It is advisable to limit the use of this
socket to avoid discharging the battery.
Stowing rings
Use the stowing rings on the fl oor to
secure and retain your loads fi rmly.
The seat belt anchorages must not be
used for this purpose.
It is recommended that the load
is immobilised by securing it
fi rmly using the stowing rings on
the fl oor.
Page 101 of 238

99
EASE OF US
E an
dCOMFOR
T
3
Practical information
LOAD SPACE SCREEN, LOAD
SPACE COVER
The load space screen is a load space
cover of the blind type with roller. Take
care not to place heavy objects on the
load space cover when unrolled.
Position the load space screen so as to
present the rear load space cover fl aps
towards you.
Engage the left-hand lug of the roller in
the support A
.
To install it
Place the row 3 seats in the fully folded
position.
Raise the storage fl ap at the boot sill.
Take hold of the roller in the centre and
compress it towards the left-hand pillar.
Raise the assembly. Compress then place the right-hand
lug facing the support B
.
Release to engage the roller in its
support.
Unroll the load space cover to the rear
side pillars.
Engage the ends in the rear notches to
keep it taut.
Page 102 of 238

100
Practical information
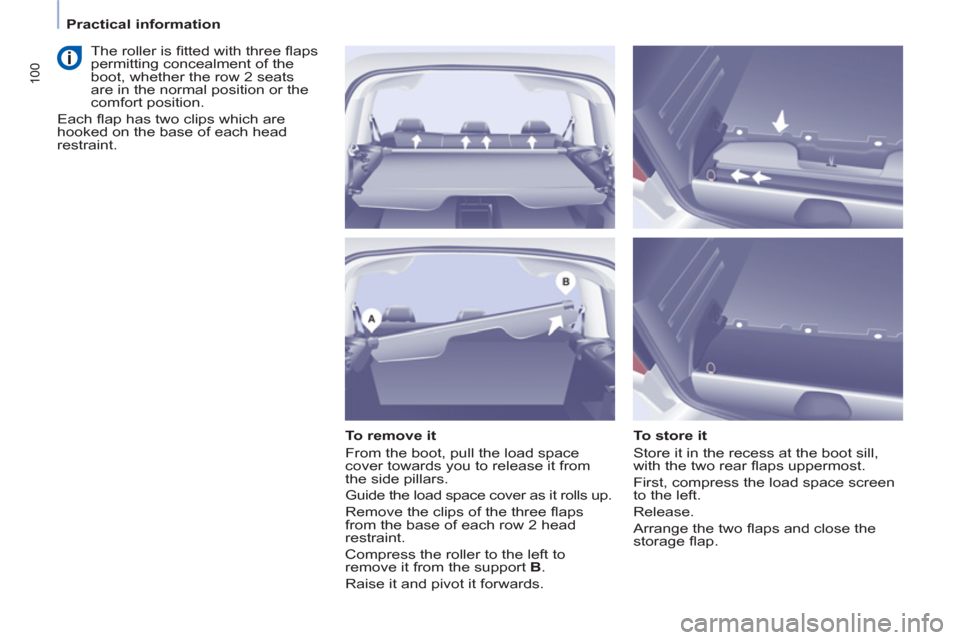
To remove it
From the boot, pull the load space
cover towards you to release it from
the side pillars.
Guide the load space cover as it rolls up.
Remove the clips of the three fl aps
from the base of each row 2 head
restraint.
Compress the roller to the left to
remove it from the support B
.
Raise it and pivot it forwards.
To store it
Store it in the recess at the boot sill,
with the two rear fl aps uppermost.
First, compress the load space screen
to the left.
Release.
Arrange the two fl aps and close the
storage fl ap.
The roller is fi tted with three fl aps
permitting concealment of the
boot, whether the row 2 seats
are in the normal position or the
comfort position.
Each fl ap has two clips which are
hooked on the base of each head
restraint.
Page 106 of 238

104
Driving safely
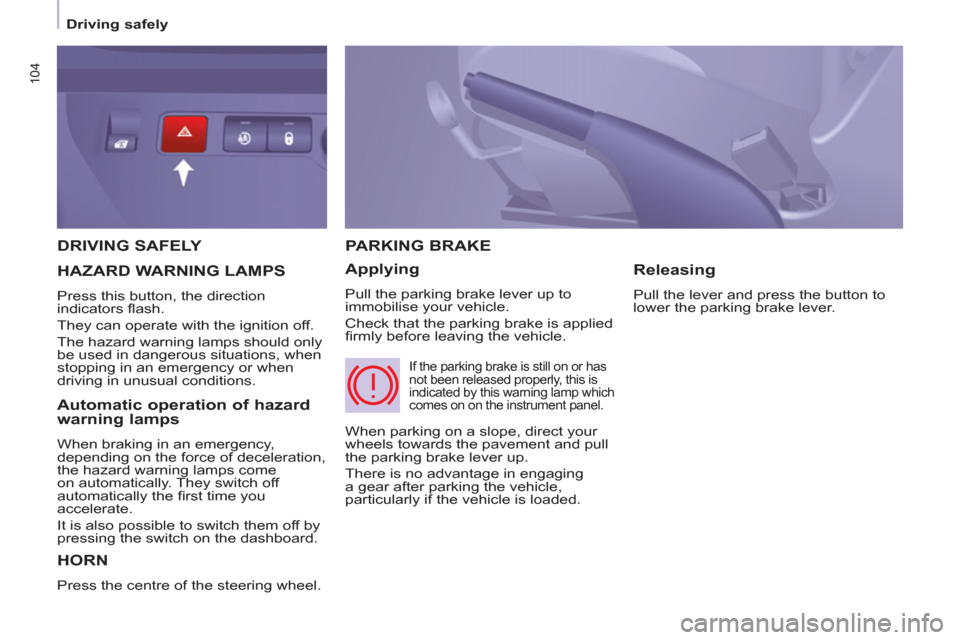
DRIVING SAFELY
HORN
Press the centre of the steering wheel.
PARKING BRAKE
Applying
Pull the parking brake lever up to
immobilise your vehicle.
Check that the parking brake is applied
fi rmly before leaving the vehicle.
Releasing
Pull the lever and press the button to
lower the parking brake lever.
HAZARD WARNING LAMPS
Press this button, the direction
indicators fl ash.
They can operate with the ignition off.
The hazard warning lamps should only
be used in dangerous situations, when
stopping in an emergency or when
driving in unusual conditions.
When parking on a slope, direct your
wheels towards the pavement and pull
the parking brake lever up.
There is no advantage in engaging
a gear after parking the vehicle,
particularly if the vehicle is loaded.
If the parking brake is still on or has
not been released properly, this is
indicated by this warning lamp which
comes on on the instrument panel.
Automatic operation of hazard
warning lamps
When braking in an emergency,
depending on the force of deceleration,
the hazard warning lamps come
on automatically. They switch off
automatically the fi rst time you
accelerate.
It is also possible to switch them off by
pressing the switch on the dashboard.
Page 108 of 238

106
Parking sensors
Activation/Deactivation
Malfunction
In the event of a malfunction, when
reverse gear is engaged the LED in the
button comes on, accompanied by an
audible signal and a message in the
screen. Contact a CITROËN dealer or
a qualifi ed workshop.
Good practice
In bad weather or in winter, ensure that
the sensors are not covered with mud,
ice or snow.
The system will be deactivated
automatically if a trailer is being towed
or if a bicycle carrier is fi tted (vehicle
fi tted with a towbar or bicycle carrier
recommended by CITROËN).
The parking assistance cannot, in
any circumstances, take the place of
the vigilance and responsibility of the
driver. You can activate or deactivate
the system by pressing this
button.
The activation or deactivation
of the system is stored when
the vehicle stops.
Page 115 of 238

11 3
SAFETY
4
Seat belts
Rear seat belts
(7 seat version)
In row 2
The three seats are fi tted with three-
point inertia reel seat belts.
When folding the side seats or
the seat backs to the table position,
avoid trapping the strap of the centre
seat belt.
When handling the side seats
(removing/installing) or when
accessing row 3, avoid hooking the
centre seat belt.
Ensure that the centre seat belt is
rolled up correctly in its strengthener
on the roof.
In row 3
The two seats are fi tted with three-
point inertia reel seat belts.
Do not attach the seat belts to the
stowing rings marked with a red cross,
represented on the label.
Take care to hook the seat belts
correctly on the rings provided for
this purpose.
The row 3 seat belts which are not in
use can be stored to clear the load
space and make use of the load space
cover easier.
Hook the snap hook in the location
provided on the rear pillar trim.