ECU Citroen BERLINGO MULTISPACE RHD 2014 2.G Owner's Guide
[x] Cancel search | Manufacturer: CITROEN, Model Year: 2014, Model line: BERLINGO MULTISPACE RHD, Model: Citroen BERLINGO MULTISPACE RHD 2014 2.GPages: 268, PDF Size: 13.36 MB
Page 128 of 268

126
Child safety
126
ADVICE ON CHILD SEATS
The incorrect installation of a child seat
in a vehicle compromises the child's
protection in the event of an accident.
Remember to fasten the seat belts or
the child seat harnesses keeping the
slack in relation to the child's body to a
minimum , even for short journeys.
For optimum installation of the "forward
facing" child seat, ensure that the back
of the child seat is in contact with the
back of the vehicle's seat and that the
head restraint does not cause any
discomfort.
If the head restraint has to be removed,
ensure that it is stored or attached
securely to prevent it from being
thrown around the vehicle in the event
of sharp braking.
Children under the age of 10 must not
travel in the "forward facing" position
on the front passenger seat, unless
the rear seats are already occupied by
other children, cannot be used or are
absent.
Deactivate the passenger's airbag
when a "rearward facing" child seat is
installed on the front seat.
Otherwise, the child would risk being
seriously injured or killed if the airbag
were to infl ate.
As a safety precaution, do not leave:
- one or more children alone and unsupervised in a vehicle,
- a child or an animal in a vehicle which is exposed to the sun, with
the windows closed,
- the keys within reach of children inside the vehicle.
Installing a booster seat
The chest part of the seat belt must
be positioned on the child's shoulder
without touching the neck.
Ensure that the lap part of the seat belt
passes correctly over the child's thighs.
CITROËN recommends the use of a
booster seat which has a back, fi tted
with a seat belt guide at shoulder level.
CHILD LOCK
This prevents opening of the side
doors from the inside. Manual mode
A label indicates the location of the
child lock.
- Open fully past the point of
resistance.
- Tilt the lever, located on the rear section of the door.
Electric mode With the ignition on, press this
button. The LED comes on.
Warning: this system is
independent of the central
locking control.
Always remove the ignition key when
leaving the vehicle, even for a short
time.
It is advisable to check the activation of
the child lock each time the ignition is
switched on.
In the event of a serious impact the
electric child lock is deactivated
automatically.
To prevent accidental opening of the
doors, use the "Child Lock".
Take care not to open the rear windows
by more than one third.
To protect young children from the rays
of the sun, fi t side blinds to the rear
windows.
Page 132 of 268

Equipment
130
OTHER ACCESSORIES
These accessories and parts, having
been tested and approved for reliability
and safety, are all adapted to your
vehicle. A wide range of recommended
accessories and genuine parts is
available.
A further range is also available,
structured around comfort, leisure and
maintenance:
Anti-theft alarm, window etching, fi rst
aid kit, high visibility vest, front and
rear parking sensors, warning triangle,
security bolts for alloy wheels, ...
Seat covers compatible with airbags
for the front seats, bench seat, rubber
mats, carpet mats, snow chains, blinds,
tailgate bicycle carrier, ...
To prevent the mat from becoming
caught under the pedals:
- ensure that the mat and its fi xings are positioned correctly,
- never fi t one mat on top of another. Audio equipment, hands-free kit,
speakers, CD changer, satellite
navigation system, USB box, Video kit, ...
Regardless of the audio and telematic
equipment offered on the market, the
technical constraints associated with
the fi tting of equipment of these product
groups mean that the special features
of the equipment and its compatibility
with the capacities of your vehicle's
standard equipment must be taken into
account. Please ask a CITROËN dealer
for more information before fi tting such
equipment.
Maximum weights on bars
- Transverse bars on longitudinal
bars: 75 Kg (these bars are not
compatible with the Modutop roof). Installing radiocommunication
transmitters
You are advised to contact a CITROËN
dealer before installing accessory
radiocommunication transmitters with
external aerial on your vehicle.
The CITROËN dealer network
will inform you of the specifi cation
(frequency band, maximum output
power, aerial position, specifi c
conditions of installation) of the
transmitters which can be fi tted, in
accordance with the Motor Vehicle
Electromagnetic Compatibility
Directive (2004/104/EC).
Front mud fl aps, rear mud fl aps,
15/17 inch alloy wheels, wheelarch
trim, leather steering wheel, ...
Screenwash, interior and exterior
cleaning and maintenance products,
spare bulbs, ...
Page 135 of 268

133
Opening the bonnet
CHECKS
6
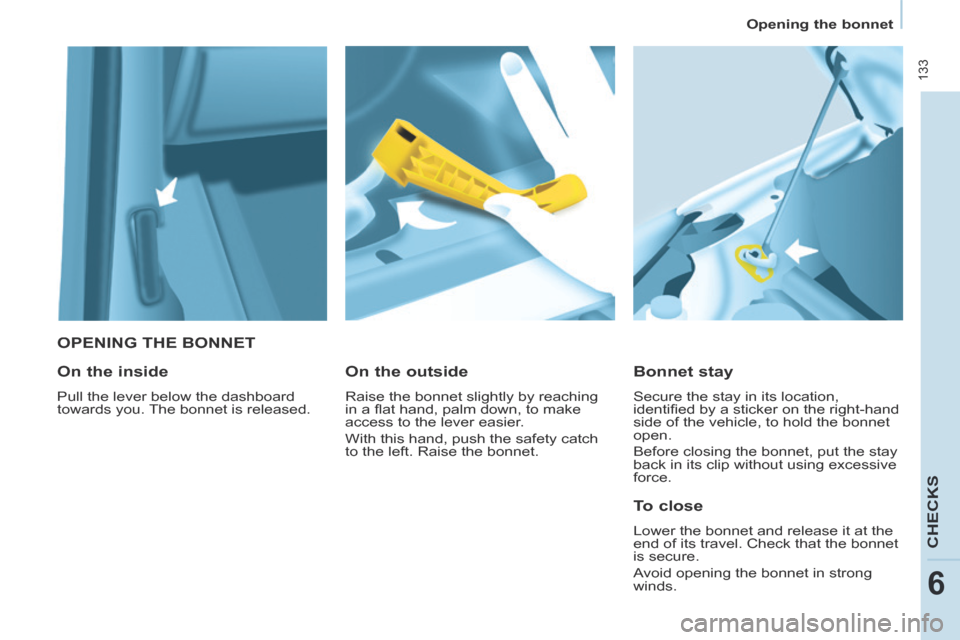
OPENING THE BONNET
Bonnet stay
Secure the stay in its location,
identifi ed by a sticker on the right-hand
side of the vehicle, to hold the bonnet
open.
Before closing the bonnet, put the stay
back in its clip without using excessive
force.
On the outside
Raise the bonnet slightly by reaching
in a fl at hand, palm down, to make
access to the lever easier.
With this hand, push the safety catch
to the left. Raise the bonnet.
On the inside
Pull the lever below the dashboard
towards you. The bonnet is released.
To close
Lower the bonnet and release it at the
end of its travel. Check that the bonnet
is secure.
Avoid opening the bonnet in strong
winds.
Page 150 of 268

Changing a wheel
148
- Lower the vehicle completely by folding the jack, then remove the
jack.
- Tighten the bolts again using the wheelbrace, tighten them fully
without forcing them.
- Place the wheel to be repaired in the carrier. - Secure the carrier on the hook then
raise the carrier using the bolt and
the wheelbrace.
Never go underneath a vehicle
that is supported only by a
jack (use a ramp). Never use a
screwdriver in place of the wheelbrace .
5. FITTING THE SPARE WHEEL
- Position the wheel on the hub and start tightening the bolts by hand.
- Carry out an initial tightening of the bolts using the wheelbrace.
Page 153 of 268

Changing a bulb
151
QUICK HELP
7
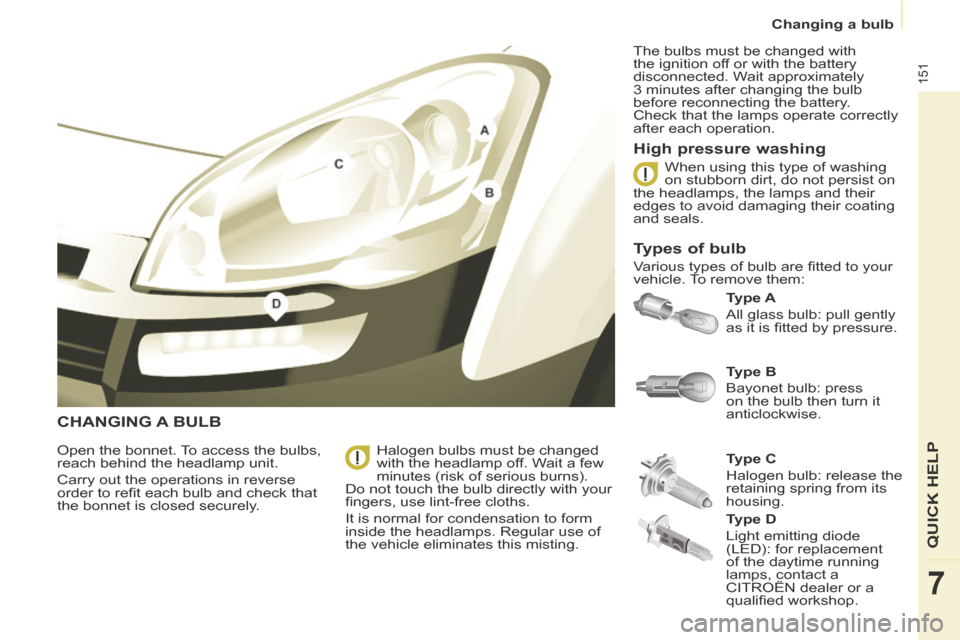
CHANGING A BULB
Type A
All glass bulb: pull gently
as it is fi tted by pressure.
High pressure washing
Open the bonnet. To access the bulbs,
reach behind the headlamp unit.
Carry out the operations in reverse
order to refi t each bulb and check that
the bonnet is closed securely. Type C
Halogen bulb: release the
retaining spring from its
housing. Type B
Bayonet bulb: press
on the bulb then turn it
anticlockwise.
Halogen bulbs must be changed
with the headlamp off. Wait a few
minutes (risk of serious burns).
Do not touch the bulb directly with your
fi ngers, use lint-free cloths.
It is normal for condensation to form
inside the headlamps. Regular use of
the vehicle eliminates this misting. The bulbs must be changed with
the ignition off or with the battery
disconnected. Wait approximately
3 minutes after changing the bulb
before reconnecting the battery.
Check that the lamps operate correctly
after each operation.
When using this type of washing
on stubborn dirt, do not persist on
the headlamps, the lamps and their
edges to avoid damaging their coating
and seals.
Types of bulb
Various types of bulb are fi tted to your
vehicle. To remove them:
Type D
Light emitting diode
(LED): for replacement
of the daytime running
lamps, contact a
CITROËN dealer or a
qualifi ed workshop.
Page 155 of 268

Changing a bulb
153
QUICK HELP
7
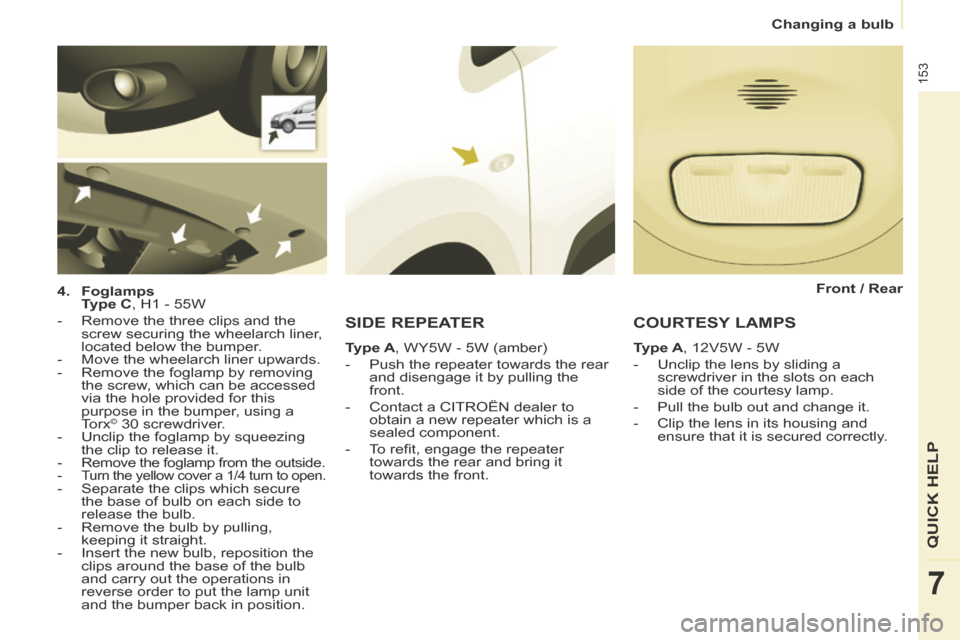
4. Foglamps
Type C , H1 - 55W
- Remove the three clips and the screw securing the wheelarch liner,
located below the bumper.
- Move the wheelarch liner upwards.
- Remove the foglamp by removing the screw, which can be accessed
via the hole provided for this
purpose in the bumper, using a
Torx
© 30 screwdriver.
- Unclip the foglamp by squeezing the clip to release it.
-
Remove the foglamp from the outside. - Turn the yellow cover a 1/4 turn to open. - Separate the clips which secure the base of bulb on each side to
release the bulb.
- Remove the bulb by pulling, keeping it straight.
- Insert the new bulb, reposition the clips around the base of the bulb
and carry out the operations in
reverse order to put the lamp unit
and the bumper back in position.
SIDE REPEATER
Type A , WY5W - 5W (amber)
- Push the repeater towards the rear and disengage it by pulling the
front.
- Contact a CITROËN dealer to obtain a new repeater which is a
sealed component.
- To refi t, engage the repeater towards the rear and bring it
towards the front.
COURTESY LAMPS
Type A , 12V5W - 5W
- Unclip the lens by sliding a screwdriver in the slots on each
side of the courtesy lamp.
- Pull the bulb out and change it.
- Clip the lens in its housing and ensure that it is secured correctly. Front / Rear