Berlingo_2_VP_en_Chap08_aide-rapide_ed02-2014
171
rEAr LAMPS
This procedure requires the use of the spanner supplied with the tools for
changing a wheel.
When
refitting, take care to
reposition the tabs and the supply
wire correctly to avoid trapping
the
wire.
a
fter changing the rear direction
indicator
bulb, the reinitialisation time
is
above 2 minutes.
-
Move aside the 4 tabs then extract
the
bulb holder.
-
Remove
the faulty bulb by
pressing it lightly while turning it
anticlockwise.
-
Change
the bulb.
When
removing the lamp unit:
-
with
tailgate, pull the lamp unit
towards the centre of the vehicle,
-
with
hinged doors, pull the lamp
unit
towards you.
For
more
information
concerning
the
bulbs,
refer
to
the
"Types
of
bulb".
1.
Brake lamps / sidelamps
type B
,
P21/5W
-
21/5W
2.
d
irection indicators
type B
,
PY21W
-
21W
(amber)
3.
r
eversing lamps
type B
, P21W - 21W
4.
Foglamps
type B
, P21W - 21W
High pressure jet washing When using this type of washing
on stubborn dirt, do not persist on
the
headlamps,
the
other
lamps
and
their
edges
to
avoid
damaging
their
coating
and
seals. Chapter
9, "Changing a wheel"
section.
-
Identify the faulty bulb, then open
the
rear doors to 180°.
Chapter
3, "Access" section.
-
Remove
the two fixing bolts using
the
spanner provided.
-
Pull
the lamp unit from the outside.
-
Holding
the lamp, disconnect the
electrical
connector.
Changing a bulb
QUICk HELP
8
07
10.36
Berlingo_2_VP_en_Chap10b_RT6-2-8_ed02-2014
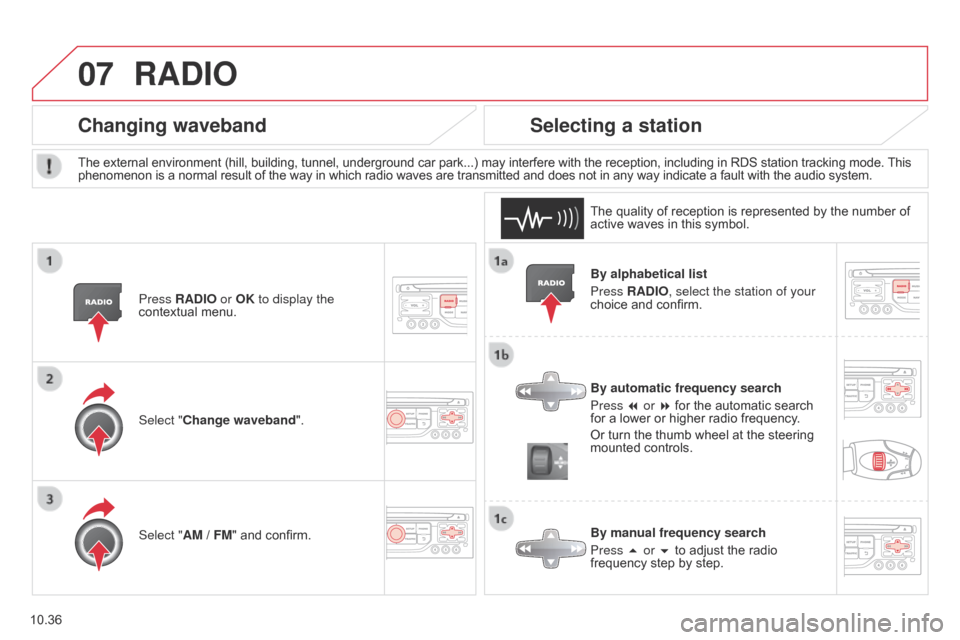
By alphabetical list
Press r A d IO, select the station of your
choice
and confirm.
By automatic frequency search
Press 7 or 8
for the automatic search
for
a lower or higher radio frequency.
Or
turn the thumb wheel at the steering
mounted
controls.
By manual frequency search
Press 5 or 6
to adjust the radio
frequency
step by step.
Selecting a station
The external environment (hill, building, tunnel, underground car park...) may interfere with the reception, including in RDS station tracking mode. This phenomenon is a normal result of the way in which radio waves are transmitted and does not in any way indicate a fault with the audio system.
The
quality of reception is represented by the number of
active
waves in this symbol.
Press
r A d IO or OK to display the
contextual
menu.
changing waveband
Select "change waveband".
Select " AM / FM" and confirm.
rAdIO

