lock Citroen BERLINGO MULTISPACE RHD 2014.5 2.G User Guide
[x] Cancel search | Manufacturer: CITROEN, Model Year: 2014.5, Model line: BERLINGO MULTISPACE RHD, Model: Citroen BERLINGO MULTISPACE RHD 2014.5 2.GPages: 276, PDF Size: 12.15 MB
Page 24 of 276

22
Berlingo_2_VP_en_Chap03_Pret-a-partir_ed02-2014
SLIdInG SIdE dOOrS
From the outside
Pull the handle towards you then
towards the rear and open the side
door guiding the rearward sliding to
beyond the point of resistance to hold
it
open.
A
mechanical system prevents opening
of the left-hand side door when the fuel
filler
flap is open.
From the inside
Unlock the side door using this handle and open it, guiding the rearward
sliding to the point of resistance. Pass
this
point to hold the door open.
Close the side door using the handle
to start the sliding and pass the point
of
resistance.
Then,
use the shaped
recess at the top of the door pilla
r to
guide
the door until it locks.
d
o not use the grab handle to slide the
door.
Good practice
Take care not to block the guide space on the floor to allow the door to slide
correctly
.
If
your vehicle is parked on a slope,
guide
the sliding of the side door. In
fact,
the door could open or close more
rapidly due to the slope of the ground
and
could cause injury.
For safety and operation reasons, do
not drive with the sliding side doors
open.
access
Page 25 of 276

23
Berlingo_2_VP_en_Chap03_Pret-a-partir_ed02-2014
Operation in the event of a
battery failure
Front and side passenger doors
In the event of a battery or of the
central locking fault, use the lock to
lock
the doors mechanically.
-
T
o open the door and get out of the
vehicle,
pull the interior control.
-
T
o lock the door, insert the key in
the
lock, located on the edge of the
door
, then turn it one eighth of a
turn.
d
river's door
-
Insert
the key in the lock, then turn
it
to the right to lock or to the left to
unlock.
tAILGAtE
From inside
Emergency control
In the event of a central unlocking
operating
fault, this permits unlocking
of
the tailgate from the inside.
Insert
a small screwdriver in the
opening, between the tailgate and the
floor
.
T
o unlock the lock, move the
catch
to the left then push the tailgate.
From outside
Locking/unlocking is by means of the remote control.
To open, press the control below the
trim
then raise the tailgate.
a pull strap is available to close the
tailgate
in the high position.
Guide the closing of the tailgate to the
balance point of its travel then apply
a
final press on the tailgate to close it
fully
.
access
REadY To Go
3
Page 26 of 276

24
Berlingo_2_VP_en_Chap03_Pret-a-partir_ed02-2014
HInGEd rEAr dOOrS
From outside
To open, pull the handle towards you. Pull the lever to open the right-hand
door
.
To close, start with the right-hand door
then close the left-hand door.
With the roof rear flap, the rear bumper
has been reinforced to serve as a
footrest
when entering the vehicle.
The hinged rear doors are
asymmetrical (2/3 - 1/3), with the
smaller
door on the right.
They are fitted with a central lock.
tailgate screen
The opening rear screen allows you to
access the rear of the vehicle directly,
without
having to open the tailgate.
Opening
After
unlocking the vehicle using the
remote
control or the key, press the
control and raise the rear screen to
open
it.
c
losing
Close the rear screen by pressing
the centre of the glass until it is fully
closed.
The tailgate and tailgate screen
cannot both be open at the
same
time, to prevent damage to
the screen.
access
Page 27 of 276
25
Berlingo_2_VP_en_Chap03_Pret-a-partir_ed02-2014
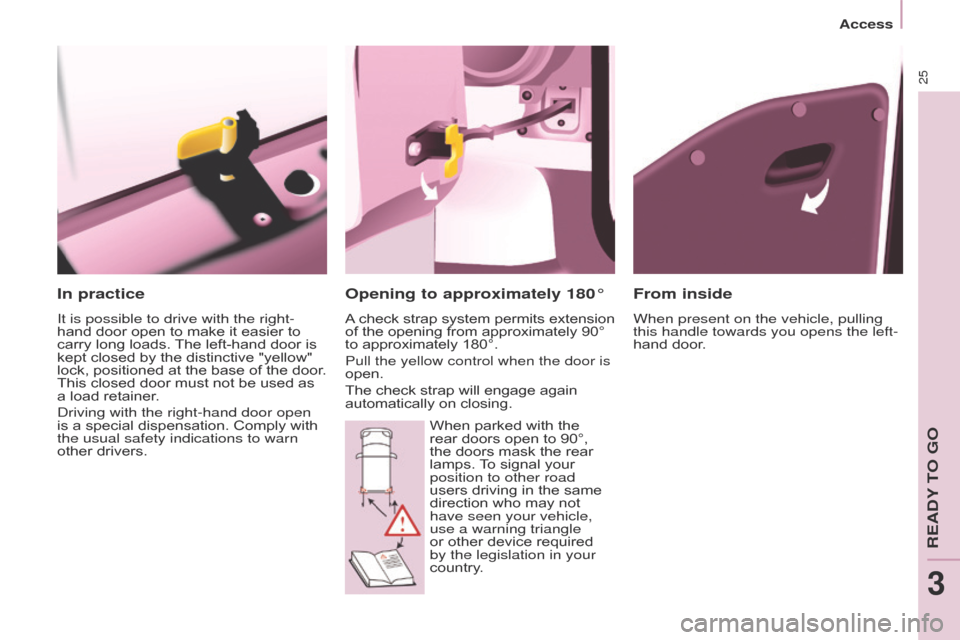
In practice
It is possible to drive with the right-
hand door open to make it easier to
carry
long loads.
The
left-hand door is
kept
closed by the distinctive "yellow"
lock,
positioned at the base of the door.
This
closed door must not be used as
a
load retainer.
d
riving with the right-hand door open
is
a special dispensation. Comply with
the usual safety indications to warn
other
drivers.
From inside
When present on the vehicle, pulling
this handle towards you opens the left-
hand door.
Opening to approximately 180°
A check strap system permits extension of
the opening from approximately 90°
to
approximately 180°.
Pull the yellow control when the door is
open.
The
check strap will engage again
automatically
on closing.
When parked with the rear doors open to 90°,
the
doors mask the rear
lamps.
T
o signal your
position to other road
users
driving in the same
direction
who may not
have seen your vehicle,
use a warning triangle
or
other device required
by the legislation in your
country
.
access
REadY To Go
3
Page 28 of 276
26
Berlingo_2_VP_en_Chap03_Pret-a-partir_ed02-2014
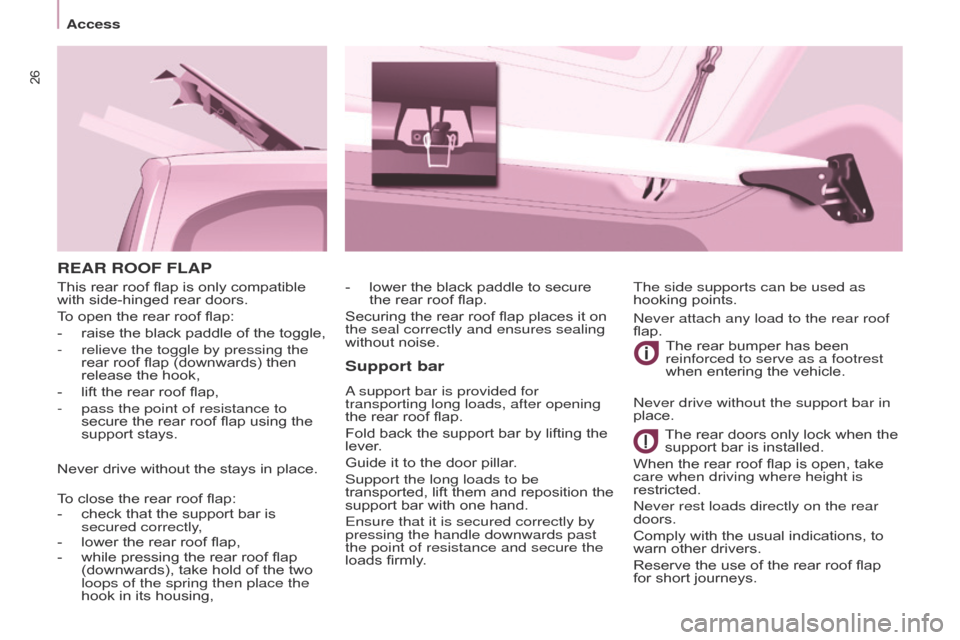
rEAr rOOF FLAPSupport bar
a support bar is provided for
transporting long loads, after opening
the
rear roof flap.
Fold
back the support bar by lifting the
lever
.
Guide
it to the door pillar.
Support the long loads to be
transported,
lift them and reposition the
support
bar with one hand.
Ensure that it is secured correctly by
pressing the handle downwards past
the point of resistance and secure the
loads
firmly. The
rear bumper has been
reinforced to serve as a footrest
when
entering the vehicle.
The rear doors only lock when the
support
bar is installed.
When
the rear roof flap is open, take
care when driving where height is
restricted.
n
ever rest loads directly on the rear
doors.
Comply
with the usual indications, to
warn
other drivers.
Reserve
the use of the rear roof flap
for
short journeys.
The side supports can be used as
hooking
points.
-
lower
the black paddle to secure
the
rear roof flap.
Securing the rear roof flap places it on
the seal correctly and ensures sealing
without
noise.
This
rear
roof
flap
is
only
compatible
with
side-hinged
rear
doors.
To
open
the
rear
roof
flap:
-
raise
the
black
paddle
of
the
toggle,
-
relieve the toggle by pressing the
rear
roof
flap
(downwards)
then
release
the
hook,
-
lift
the
rear
roof
flap,
-
pass the point of resistance to
secure
the
rear
roof
flap
using
the
support
stays.
Never
drive
without
the
stays
in
place.
To
close
the
rear
roof
flap:
-
check
that
the
support
bar
is
secured correctly
,
-
lower
the
rear
roof
flap,
-
while
pressing
the
rear
roof
flap
(downwards),
take
hold
of
the
two
loops of the spring then place the
hook
in
its
housing,
n
ever attach any load to the rear roof
flap.n ever drive without the support bar in
place.
access
Page 29 of 276
27
Berlingo_2_VP_en_Chap03_Pret-a-partir_ed02-2014
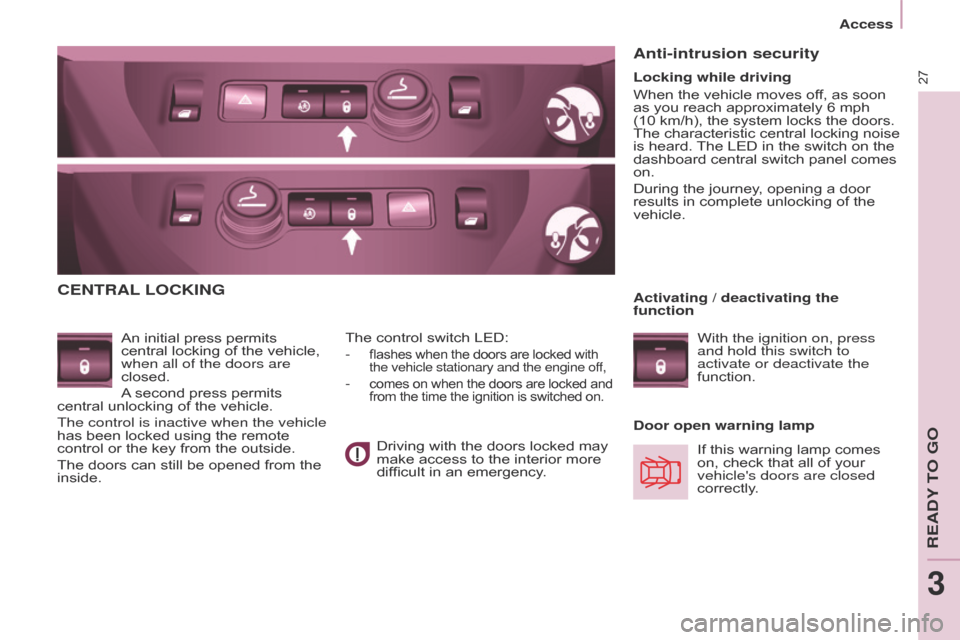
cEntrAL LOcKInG
An initial press permits central locking of the vehicle,
when all of the doors are
closed.
A
second press permits
central
unlocking of the vehicle.
The control is inactive when the vehicle
has
been
locked using the remote
control
or the key from the outside.
The
doors can still be opened from the
inside.
d
oor open warning lamp
The
control switch LED:
-
flashes when the doors are locked with the vehicle stationary and the engine of f,
- comes on when the doors are locked and from the time the ignition is switched on.
Anti-intrusion security
If this warning lamp comes on, check that all of your
vehicle's doors are closed
correctly
.
Locking while driving
When
the vehicle moves off, as soon
as
you
reach approximately 6 mph
(10 km/h),
the system locks the doors.
The
characteristic central locking noise
is
heard.
The
LED in the switch on the
dashboard
central switch panel comes
on.
During
the journey, opening a door
results
in
complete unlocking of the
vehicle.
Activating / deactivating the
function
With the ignition on, press
and hold this switch to
activate or deactivate the
function.
Driving
with
the
doors
locked
may
make
access
to
the
interior
more
difficult
in
an
emergency.
access
REadY To Go
3
Page 31 of 276
Berlingo_2_VP_en_Chap03_Pret-a-partir_ed02-2014
29
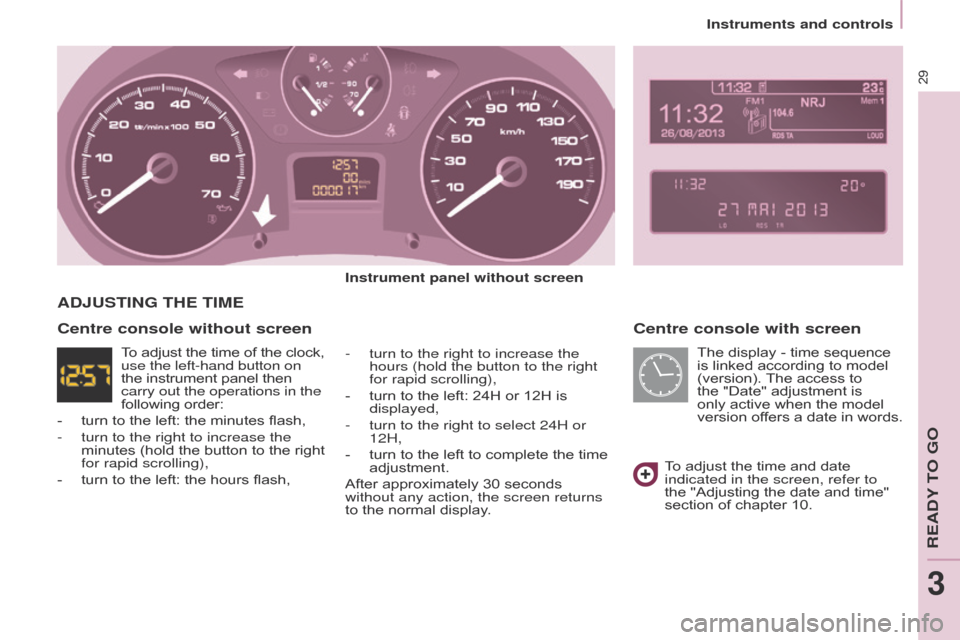
centre console with screen
Instrument panel without screen
-
turn to the right to increase the
hours (hold the button to the right
for rapid scrollin
g),
-
turn
to the left: 24H or 12H is
displayed,
-
turn to the right to select 24H or
12H,
-
turn
to the left to complete the time
adjustment.
After
approximately 30 seconds
without any action, the screen returns
to
the normal display.
AdJuStInG tHE tIME
To adjust the time and date indicated in the screen, refer to
the "Adjusting the date and time"
section
of chapter 10.
centre console without screen
The display - time sequence is linked according to model
(version).
The
access to
the
"Date" adjustment is
only
active when the model
version
of
fers
a
date
in
words.
T
o
adjust
the
time
of
the
clock, use the left-hand button on
the
instrument
panel
then
carry out the operations in the
following
order:
-
turn
to
the
left:
the
minutes
flash,
-
turn to the right to increase the
minutes
(hold
the
button
to
the
right
for rapid scrollin
g),
-
turn
to
the
left:
the
hours
flash,
Instruments and controls
REadY To Go
3
Page 35 of 276
+
ABS
Berlingo_2_VP_en_Chap03_Pret-a-partir_ed02-2014
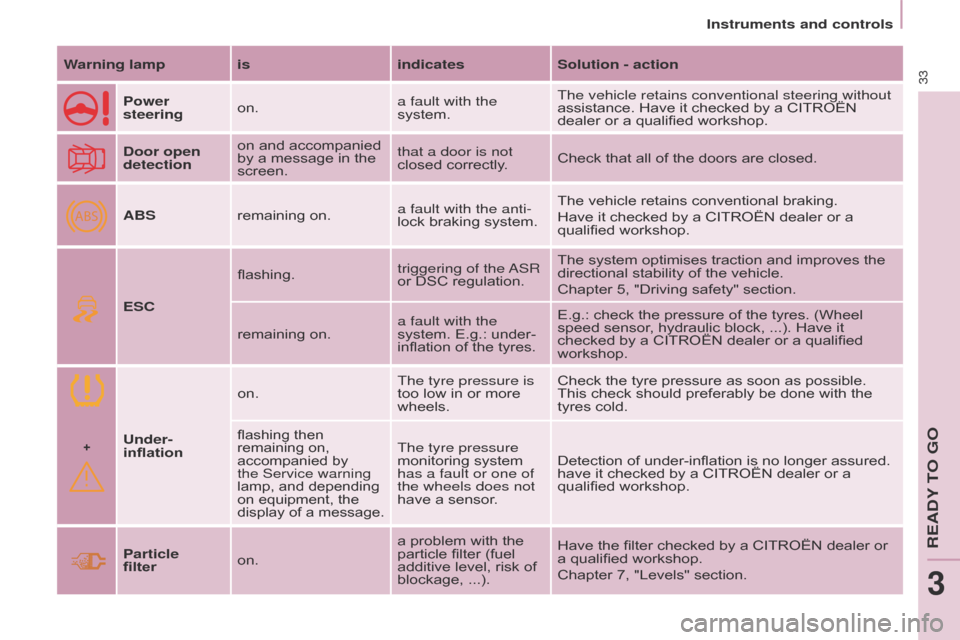
33Warning lamp isindicatesSolution - action
Power
steering on. a fault with the
system.The vehicle retains conventional steering without
assistance.
Have it checked by a CITROËN
dealer
or a qualified workshop.
d
oor open
detection on
and accompanied
by
a message in the
screen.that a door is not
closed
correctly.Check
that all of the doors are closed.
ABS remaining
on.a fault with the anti-
lock
braking system.The
vehicle retains conventional braking.
Have
it checked by a CITROËN dealer or a
qualified
workshop.
ES
c
flashing. triggering of the a
SR
or
DSC regulation.The
system optimises traction and improves the
directional
stability of the vehicle.
Chapter
5, "Driving safety" section.
remaining
on.a fault with the
system.
E.g.: under-
inflation
of the tyres.E.g.:
check the pressure of the tyres. (Wheel
speed
sensor, hydraulic block, ...). Have it
checked
by a CITROËN dealer or a qualified
workshop.
u
nder-
inflation on.
The tyre pressure is
too
low in or more
wheels.Check
the tyre pressure as soon as possible.
This
check should preferably be done with the
tyres
cold.
flashing then remaining on,
accompanied
by
the Service warning
lamp,
and depending
on
equipment, the
display
of
a
message.
The tyre pressure
monitoring system
has a fault or one of
the wheels does not
have
a sensor. Detection
of under-inflation is no longer assured.
have
it checked by a CITROËN dealer or a
qualified
workshop.
Particle
filter on. a
problem with the
particle
filter (fuel
additive
level, risk of
blockage, ...). Have
the filter checked by a CITROËN dealer or
a
qualified workshop.
Chapter
7, "Levels" section.
Instruments and controls
rEAdY tO GO
3
Page 44 of 276

Berlingo_2_VP_en_Chap03_Pret-a-partir_ed02-2014
42
trip recorder zero reset button
after this operation, if you wish
to disconnect the battery, lock
the vehicle and wait for at least
five minutes,
otherwise the zero re-set
will
not be registered.
Engine oil level indicator
depending on your vehicle's engine,
when the ignition is switched on, the
engine oil level is indicated for a few
seconds,
after the service information. Oil level correct
Low oil level
Flashing of "OIL",
linked
with the
service
warning lamp,
accompanied
by an
audible
signal and a message in the
screen, indicates a low oil level which
could
damage the engine.
If the low oil level is confirmed by a
check
using the dipstick, it is essential
that
the level is topped up.
Oil level gauge fault
Flashing of "OIL--"
indicates
a
malfunction of the engine oil level
indicator. Contact
a
CITROËN dealer or a qualified
workshop.
The level read will only be correct
if the vehicle is on level ground
and the engine has been of
f for
more
than 30 minutes.
d
ipstick
A = maximum, never exceed
this level as a surplus of oil
may
damage the engine.
Contact a CITR o Ë n dealer
or a qualified workshop
without
delay.
B
=
minimum,
top
up
the
level
via
the oil filler cap, using the
grade of oil suited to your
engine.
Lighting dimmer
With the ignition on, press
the button until the zeros
appear.
With the lighting on,
press the button to vary
the brightness of the
instruments
and controls.
When the lighting
reaches
the minimum (or
maximum)
setting, release the button
then press it again to increase (or
reduce)
the
brightness.
a
s soon as the lighting is of the
required
brightness, release the button.
Zero re-set
Your CITROËN dealer or a qualified workshop carries out this operation
after
each service.
However, if you carry out the service
yourself, the re-set procedure is as
follows:
-
switch of
f the ignition,
-
press and hold the trip recorder
reset button,
-
switch
on the ignition.
The
display begins a countdown.
When the display shows "=0", release
the
button; the spanner disappears.
Instruments and controls
Page 45 of 276
Berlingo_2_VP_en_Chap03_Pret-a-partir_ed02-2014
43
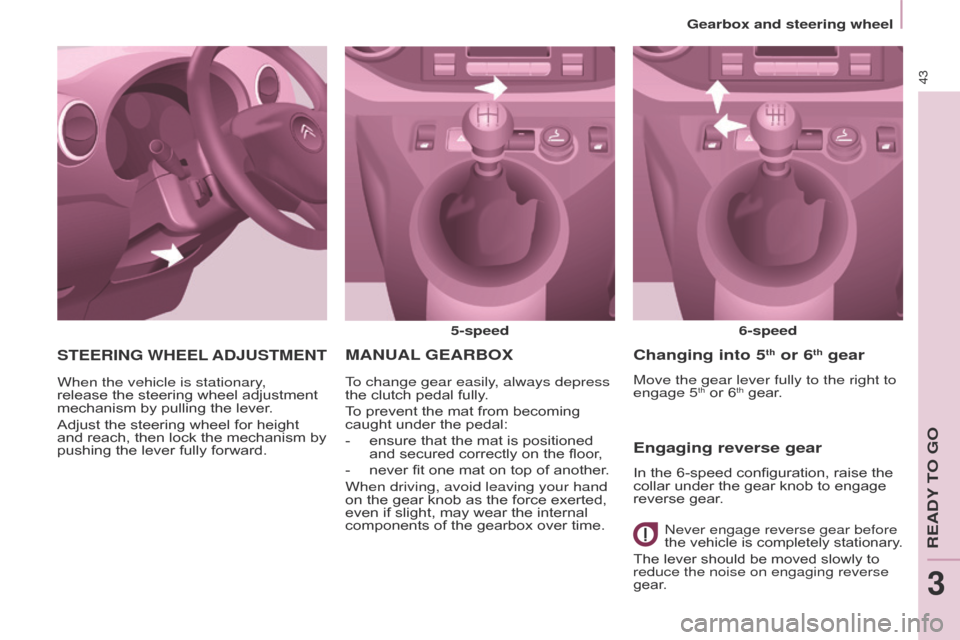
MAnuAL GEA r BOX
5-speed
6-speed
To change gear easily, always depress
the
clutch
pedal fully.
To
prevent
the
mat from becoming
caught
under
the pedal:
-
ensure
that
the mat is positioned
and
secured correctly on the floor,
-
never
fit
one mat on top of another.
When driving, avoid leaving your hand
on
the
gear
knob as the force exerted,
even
if
slight,
may wear the internal
components
of
the gearbox over time.
changing into 5th or 6th gear
Move the gear lever fully to the right to
engage 5th or 6th gear.
Engaging reverse gear
In the 6-speed configuration, raise the collar under the gear knob to engage
reverse
gear.
never engage reverse gear before
the vehicle is completely stationary .
The
lever should be moved slowly to
reduce the noise on engaging reverse
gear
.
StEErInG WHEEL AdJuStMEnt
When the vehicle is stationary,
release the steering wheel adjustment
mechanism
by pulling the lever.
Adjust
the steering wheel for height
and
reach, then lock the mechanism by
pushing
the lever fully forward.
Gearbox and steering wheel
REadY To Go
3