lock Citroen BERLINGO MULTISPACE RHD 2014.5 2.G Owner's Guide
[x] Cancel search | Manufacturer: CITROEN, Model Year: 2014.5, Model line: BERLINGO MULTISPACE RHD, Model: Citroen BERLINGO MULTISPACE RHD 2014.5 2.GPages: 276, PDF Size: 12.15 MB
Page 52 of 276

Berlingo_2_VP_en_Chap03_Pret-a-partir_ed02-2014
50
Good practice when stopping Good practice when starting
diesel pre-heating warning
lamp
If
the temperature is high
enough,
the warning lamp
comes
on for less than
one
second, you can start
without
waiting.
In cold weather, wait for this warning
lamp
to
go off then operate the starter
(Starting position) until the engine
starts.
d
oor or bonnet open
warning lamp
If this comes on, a door or the bonnet is not closed correctly, check!
Minimise engine and gearbox wear
When switching off the ignition, let the
engine run for a few seconds to allow
the turbocharger (
d iesel engine) to
return
to idle.
d
o not press the accelerator when
switching
off the ignition.
There is no need to engage a gear
after
parking the vehicle.
StArt I n G A nd S tOPPI n G
running and accessories position.
T o unlock the steering, turn the
steering wheel gently while turning the
key
, without forcing. In this position,
certain
accessories can be used.
Starting position.
The starter is operated, the engine
turns
over, release the key.
S
t
OP
position: steering lock.
The
ignition is off.
T
urn the steering
wheel
until the steering locks. Remove
the
key.
Starting and stopping
Page 70 of 276

Berlingo_2_VP_en_Chap04_Ergonomie_ed02-2014
68
dEMIStInG And dEF r OS t I n GGOO d P r A ct I c E
Vents
"Leave them open"
For optimum distribution and diffusion
of hot or cool air in the passenger
compartment,
there are adjustable
central and side vents which can
be directed sideways (right or left)
or
vertically (up or down). For your
comfort
while driving, do not close
them
and direct the flow of air towards
the
windows instead.
a
ir vents in the footwells and directed
towards
the windscreen complete the
equipment.
Do
not block the vents located at the
windscreen or the air extractor located
in
the boot.
dust filter, odour filter
(activated carbon)
This filter traps certain dust and limits odours.
Ensure
that this filter is in good
condition
and have all of the filter
elements
replaced regularly.
Refer to the "Checks" section of chapter 7.
Air conditioning
In all seasons, the air conditioning
should only be used with the windows
closed. However, if the interior
temperature
remains high after a
prolonged
period parked in the sun, do
not hesitate to ventilate the passenger
compartment
for a few minutes.
Use
the
AUT
O mode as much as
possible
as it permits optimised
control
of all of the functions: air flow,
passenger
compartment comfort
temperature,
air distribution, air
intake
mode or air recirculation in the
passenger
compartment.
Operate
the air conditioning system for
5
to
10
minutes,
once
or
twice
a
month,
to
keep it in good working order.
If
the system does not produce cold air,
do not use it and contact a CITR
o Ë n
dealer
or a qualified workshop.
Automatic mode: visibility
programme
The
comfort
programme
(AUTO)
may
not
be
sufficient
to
quickly
demist
or
defrost
the
windows
(humidity,
several
passengers,
ice).
In this case, select the visibility
programme.
The
visibility
programme
indicator
comes
on.
It activates the air conditioning, the air
flow
and
provides
optimum
distribution
of the ventilation to the windscreen and
side
windows.
It
deactivates
the
air
recirculation. It
is normal that the condensation
created
by the air conditioning system
results
in a flow of water which may
form
a puddle under the vehicle when
parked.
Ventilation
Page 72 of 276
Berlingo_2_VP_en_Chap04_Ergonomie_ed02-2014
70
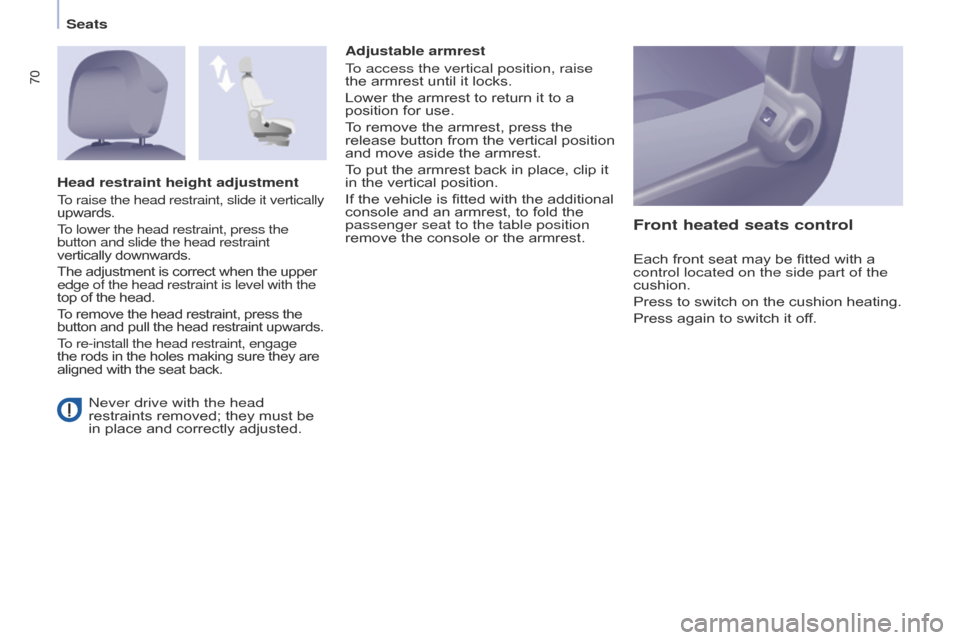
never drive with the head
restraints removed; they must be
in
place and correctly adjusted.Adjustable armrest
To access the vertical position, raise
the
armrest until it locks.
Lower the armrest to return it to a
position
for use.
To remove the armrest, press the
release
button
from
the
vertical
position
and
move aside the armrest.
To put the armrest back in place, clip it
in
the vertical position.
If the vehicle is fitted with the additional
console
and an armrest, to fold the
passenger seat to the table position
remove
the console or the armrest.
Front heated seats control
Each front seat may be fitted with a control located on the side part of the
cushion.
Press
to switch on the cushion heating.
Press
again to switch it off.
Head restraint height adjustment
To raise the head restraint, slide it vertically
upwards.
To lower the head restraint, press the
button and slide the head restraint
vertically
downwards.
The
adjustment is correct when the upper
edge of the head restraint is level with the
top
of the head.
To
remove the head restraint, press the
button
and pull the head restraint upwards.
To re-install the head restraint, engage
the
rods in the holes making sure they are
aligned
with the seat back.
Seats
Page 74 of 276
Berlingo_2_VP_en_Chap04_Ergonomie_ed02-2014
72
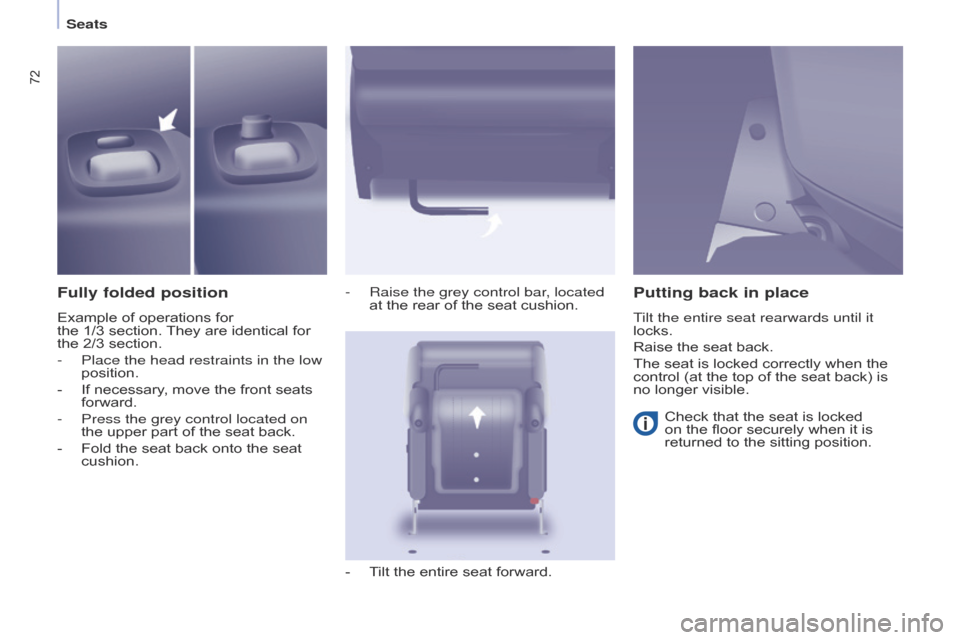
Fully folded position
Example of operations for the 1/3 section. They are identical for
the 2/3
section.
-
Place the head restraints in the low
position.
-
If
necessary, move the front seats
forward.
-
Press the grey control located on
the
upper part of the seat back.
-
Fold
the seat back onto the seat
cushion. -
Raise the grey control bar
, located
at the rear of the seat cushion.
-
T
ilt the entire seat forward.
Putting back in place
Tilt the entire seat rearwards until it
locks.
Raise the seat back.
The
seat is locked correctly when the
control
(at the top of the seat back) is
no
longer visible.
Check
that the seat is locked
on
the floor securely when it is
returned
to the sitting position.
Seats
Page 76 of 276
Berlingo_2_VP_en_Chap04_Ergonomie_ed02-2014
74
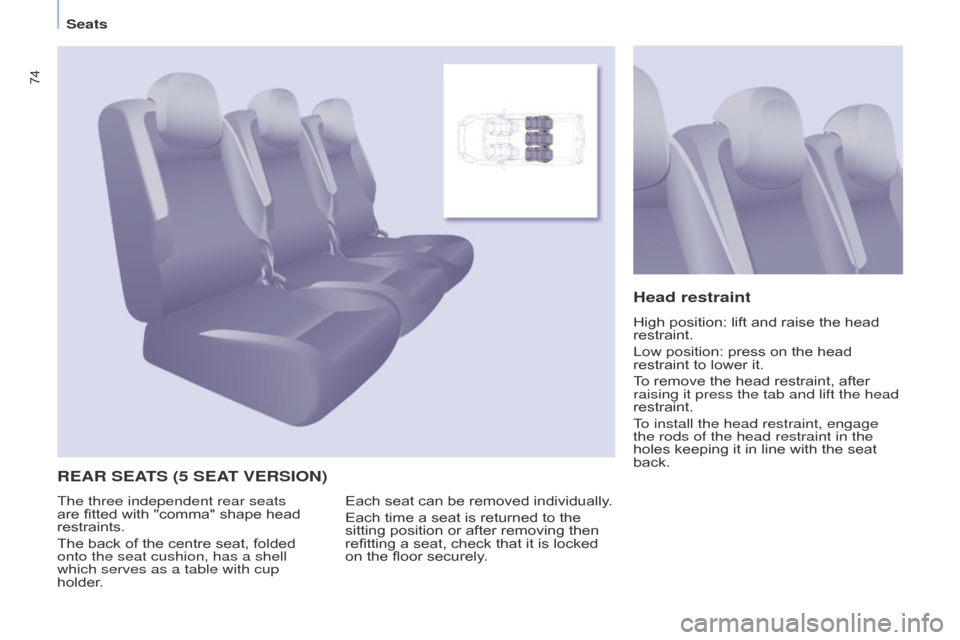
rEAr SEAtS (5 SEAt VE r SIO n) Head restraint
High position: lift and raise the head restraint.
Low
position: press on the head
restraint
to lower it.
To
remove the head restraint, after
raising it press the tab and lift the head
restraint.
T
o install the head restraint, engage
the rods of the head restraint in the
holes
keeping it in line with the seat
back.
Each
seat
can
be
removed
individually.
Each
time
a
seat
is
returned
to
the
sitting
position
or
after
removing
then
refitting
a
seat,
check
that
it
is
locked
on
the
floor
securely.
The three independent rear seats
are
fitted
with
"comma"
shape
head
restraints.
The
back
of
the
centre
seat,
folded
onto the seat cushion, has a shell
which serves as a table with cup
holder
.
Seats
Page 77 of 276
Berlingo_2_VP_en_Chap04_Ergonomie_ed02-2014
75
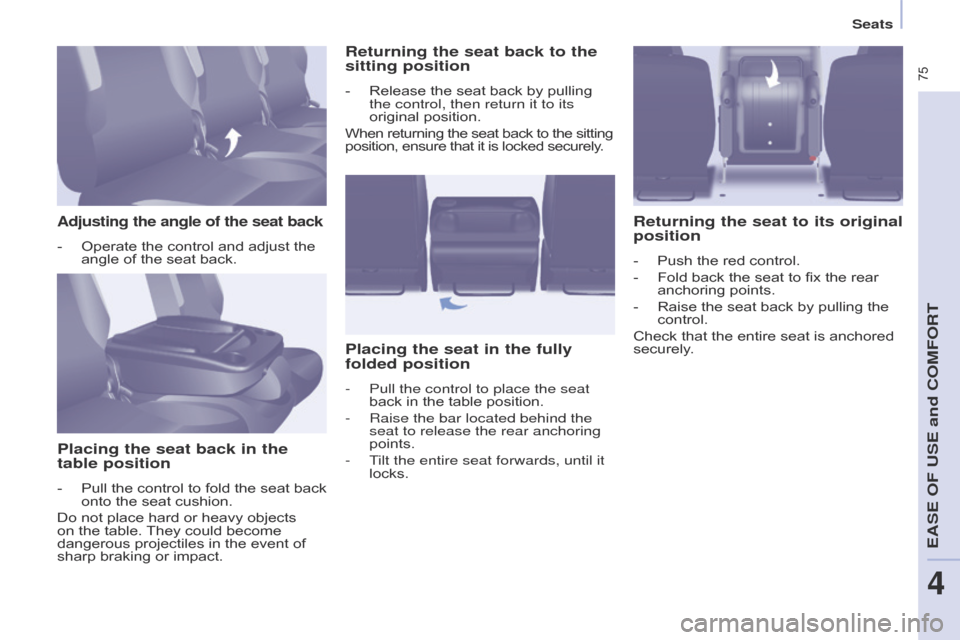
Adjusting the angle of the seat back
- Operate the control and adjust the angle
of the seat back.
Placing the seat back in the
table position
- Pull the control to fold the seat back onto
the seat cushion.
Do
not place hard or heavy objects
on
the table.
They
could become
dangerous
projectiles in the event of
sharp
braking or impact.
returning the seat back to the
sitting position
- Release the seat back by pulling the control, then return it to its
original
position.
When returning the seat back to the sitting position, ensure that it is locked securely.
Placing the seat in the fully
folded position
- Pull the control to place the seat
back in the table position.
-
Raise the bar located behind the
seat to release the rear anchoring
points.
-
T
ilt the entire seat forwards, until it
locks.
returning the seat to its original
position
- Push the red control.
-
Fold
back the seat to fix the rear
anchoring
points.
-
Raise
the seat back by pulling the
control.
Check
that the entire seat is anchored
securely
.
Seats
EASE OF uSE and cOMFOrt
4
Page 78 of 276
Berlingo_2_VP_en_Chap04_Ergonomie_ed02-2014
76
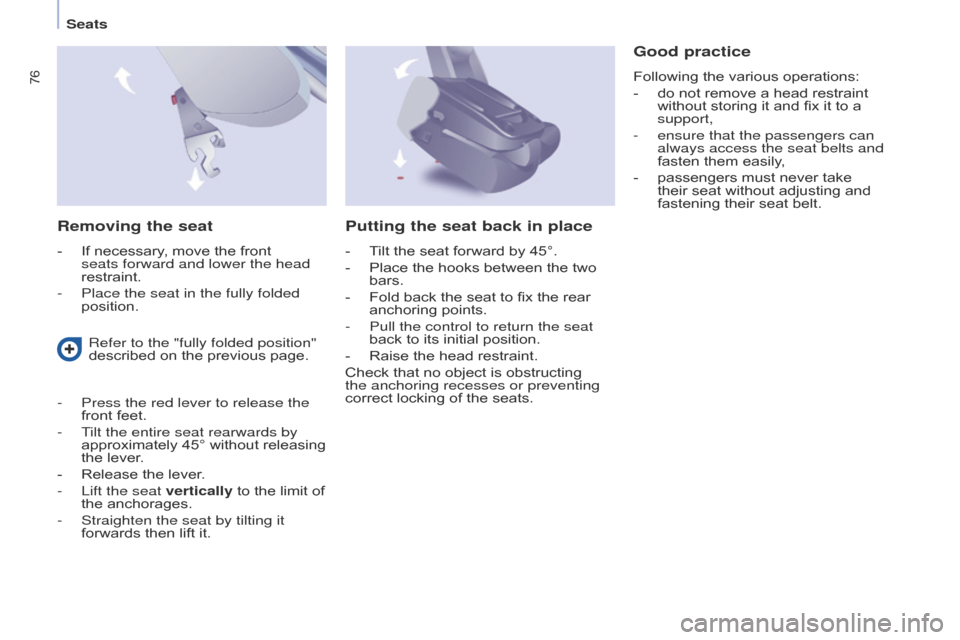
removing the seat
- If necessary, move the front seats forward and lower the head
restraint.
-
Place the seat in the fully folded
position.
Good practice
Following the various operations:
-
do
not remove a head restraint
without
storing it and fix it to a
support,
-
ensure that the passengers can
always access the seat belts and
fasten
them easily,
-
passengers
must never take
their
seat without adjusting and
fastening
their seat belt.
Refer to the "fully folded position"
described
on
the
previous
page.
-
Press the red lever to release the
front
feet.
-
T
ilt the entire seat rearwards by
approximately
45°
without
releasing
the
lever.
-
Release
the
lever.
-
Lift the seat
vertically
to
the
limit
of
the
anchorages.
-
Straighten the seat by tilting it
forwards
then
lift
it.
Putting the seat back in place
- Tilt the seat forward by 45°.
-
Place
the hooks between the two
bars.
-
Fold
back the seat to fix the rear
anchoring
points.
-
Pull the control to return the seat
back
to its initial position.
-
Raise
the head restraint.
Check
that no object is obstructing
the anchoring recesses or preventing
correct
locking of the seats.
Seats
Page 81 of 276
Berlingo_2_VP_en_Chap04_Ergonomie_ed02-2014
79
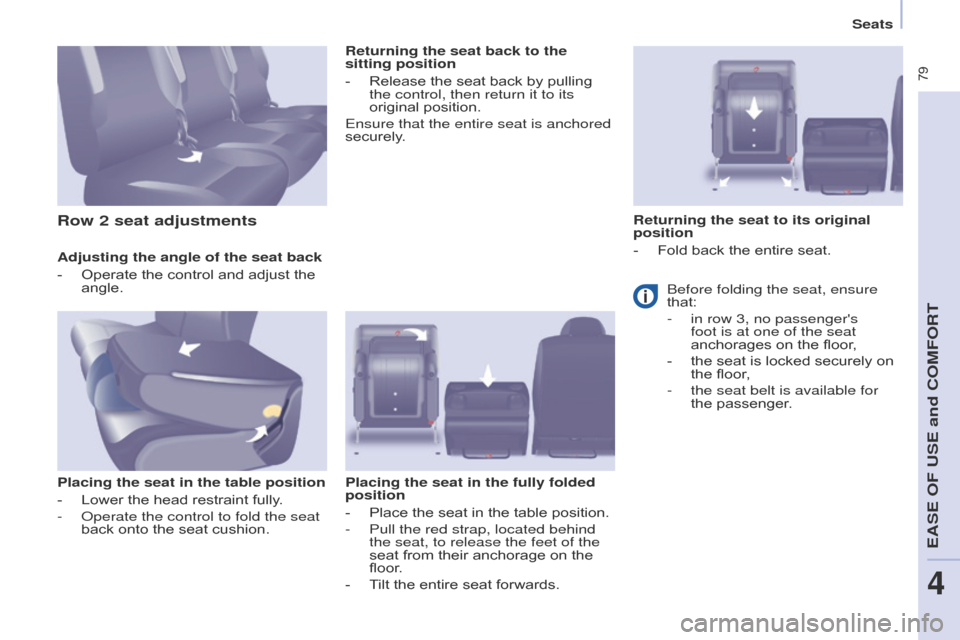
Adjusting the angle of the seat back
-
Operate
the control and adjust the
angle.
Placing the seat in the table position
-
Lower
the head restraint fully.
-
o perate the control to fold the seat
back
onto the seat cushion.
r
eturning the seat back to the
sitting position
-
Release
the seat back by pulling
the control, then return it to its
original
position.
Ensure that the entire seat is anchored
securely.
Placing the seat in the fully folded
position
-
Place
the seat in the table position.
-
Pull the red strap, located behind
the seat, to release the feet of the
seat
from their anchorage on the
floor
.
-
T
ilt the entire seat forwards.
row 2 seat adjustmentsreturning the seat to its original
position
-
Fold
back the entire seat.
Before folding the seat, ensure
that:
-
in row 3, no passenger's
foot is at one of the seat
anchorages
on the floor,
-
the
seat is locked securely on
the
floor,
-
the seat belt is available for
the
passenger.
Seats
EASE OF uSE and cOMFOrt
4
Page 82 of 276
Berlingo_2_VP_en_Chap04_Ergonomie_ed02-2014
80
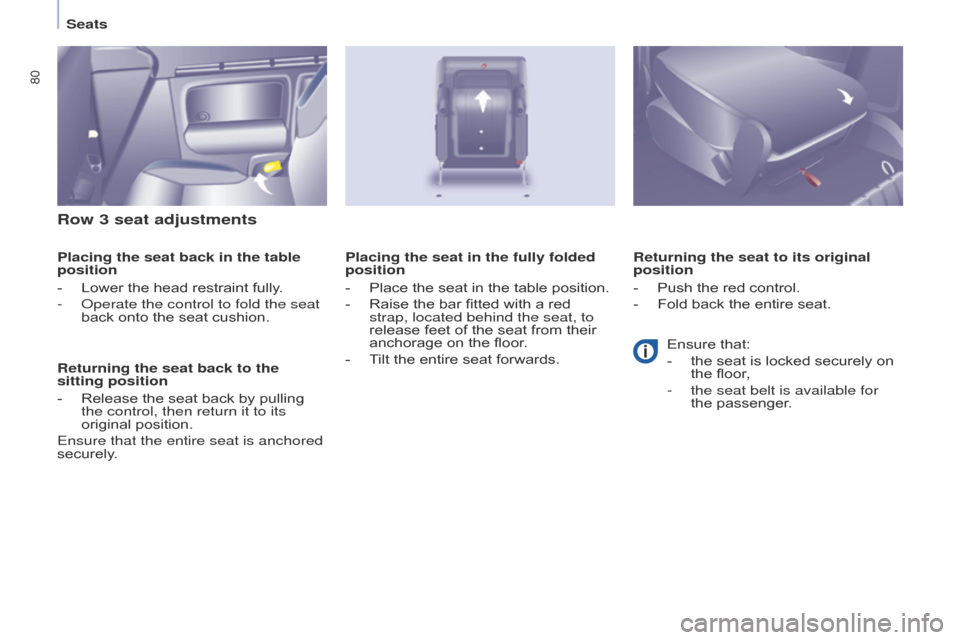
row 3 seat adjustments
Placing the seat back in the table
position
-
Lower
the head restraint fully.
-
o perate the control to fold the seat
back
onto the seat cushion.
r
eturning the seat back to the
sitting position
-
Release
the seat back by pulling
the control, then return it to its
original
position.
Ensure that the entire seat is anchored
securely.r eturning the seat to its original
position
-
Push
the red control.
-
Fold
back the entire seat.
Placing the seat in the fully folded
position
-
Place
the seat in the table position.
-
Raise
the bar fitted with a red
strap, located behind the seat, to
release
feet of the seat from their
anchorage
on the floor.
-
T
ilt the entire seat forwards.Ensure
that:
-
the
seat is locked securely on
the
floor,
-
the seat belt is available for
the
passenger.
Seats
Page 84 of 276

Berlingo_2_VP_en_Chap04_Ergonomie_ed02-2014
82
removing the seat
-
If
necessary, move the front seats
forward.
-
Lower
the head restraint.
-
Place the seat in the fully folded
position.
-
T
ilt the entire seat forwards then
lift it.r epositioning the seat
The label on the seat indicates the
position
in which it must be installed.
-
Place
the hooks of the front feet
between
the two bars.
-
Fold
back the seat to fix the rear
anchoring
points.
-
o perate the control to raise the
seat
back to its initial position.
-
Raise
the head restraint.Ensure
that no object or foot of a passenger seated in the rear
is obstructing the anchoring
recesses or preventing correct
locking
of the seat.
Handling the row 2 seat
Seats