fog light Citroen BERLINGO MULTISPACE RHD 2015 2.G Owner's Manual
[x] Cancel search | Manufacturer: CITROEN, Model Year: 2015, Model line: BERLINGO MULTISPACE RHD, Model: Citroen BERLINGO MULTISPACE RHD 2015 2.GPages: 276, PDF Size: 12.21 MB
Page 10 of 276

8
Berlingo_2_VP_en_Chap01_vue-ensemble_ed02-2014
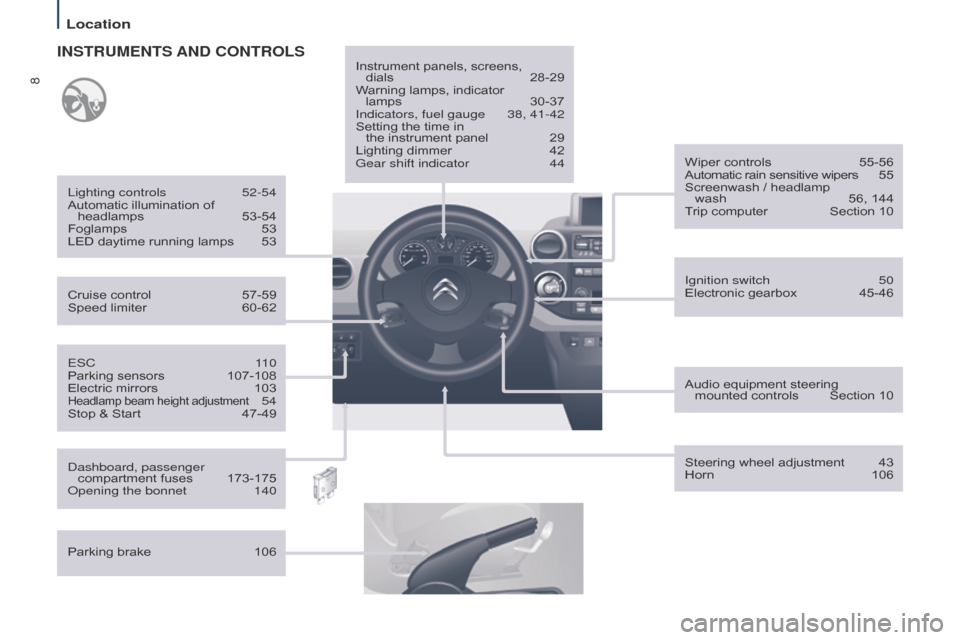
ESC 110
Parking sensors 107-108
Electric
mirrors
103Headlamp beam height adjustment 54
Stop
&
Start
47-49
Cruise
control
57-59
Speed
limiter
60-62
Lighting controls
52-54
Automatic
illumination
of
headlamps
53-54
Foglamps
53
LED
daytime
running
lamps
53
InStruMEntS And c
O ntr OLS
dashboard, passenger
compartment fuses 173-175o
pening the bonnet
140
Parking
brake
106 Instrument
panels, screens,
dials
28-29
W
arning lamps, indicator
lamps
30-37
Indicators, fuel gauge
38, 41-42
Setting
the time in
the instrument panel
29
Lighting
dimmer
42
Gear shift indicator
44
Ignition switch
50
Electronic
gearbox
45-46
Wiper
controls
55-56
Automatic
rain sensitive wipers
5
5
Screenwash / headlamp
wash
56,
144
Trip computer
Section
10
Audio equipment steering
mounted
controls
Section
10
Steering wheel adjustment 43
Horn 106
Location
Page 12 of 276

10
Berlingo_2_VP_en_Chap01_vue-ensemble_ed02-2014
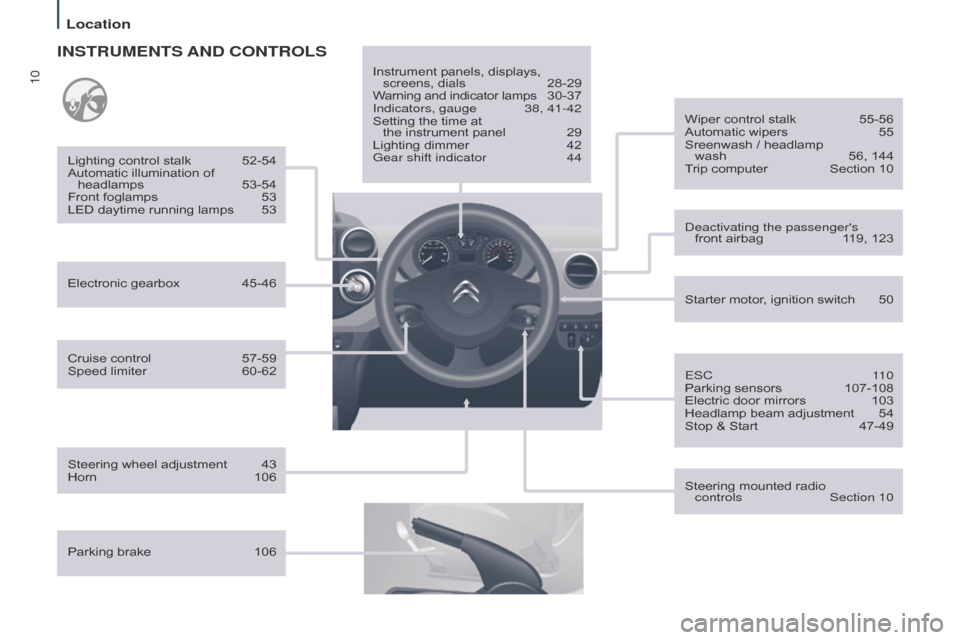
Cruise control 57-59
Speed limiter 60-62
Lighting
control stalk
52-54
Automatic
illumination of
headlamps
53-54
Front
foglamps
53
LED
daytime running lamps
53
InStruMEntS And c
O ntr OLS
Parking brake 106Instrument panels, displays,
screens,
dials
28-29
W
arning and indicator lamps
3
0-37
Indicators, gauge
38, 41-42
Setting
the time at
the instrument panel
29
Lighting
dimmer
42
Gear shift indicator
44
Steering
wheel adjustment
43
Horn
106 Starter
motor, ignition switch
50
Wiper
control stalk
55-56
Automatic
wipers
55
Sreenwash
/ headlamp
wash
56,
144
Trip computer
Section
10
Steering mounted radio
controls
Section 10
d
eactivating the passenger's
front airbag
1
19, 123
ESC
1
10
Parking sensors
107-108
Electric
door mirrors
103
Headlamp
beam adjustment
54
Stop
& Start
47-49
Electronic
gearbox
45-46
Location
Page 18 of 276

16Eco-driving is a range of everyday practices that allow the motorist to optimise their fuel consumption and CO2
emissions.
EcO-drIVInG
Optimise the use of your gearbox
With a manual gearbox, move off gently and change up without waiting. During acceleration change up early.
With
an automatic or electronic gearbox, give preference
to
automatic mode and avoid pressing the accelerator
pedal
heavily or suddenly.
The
gear shift indicator invites you engage the most
suitable
gear: as soon as the indication is displayed in the
instrument
panel, follow it straight away.
For
vehicles fitted with an electronic or automatic gearbox,
this
indicator appears only in manual mode.
drive smoothly
Maintain a safe distance between vehicles, use engine
braking rather than the brake pedal, and press the
accelerator
progressively.
These
practices contribute
towards
a reduction in fuel consumption and CO
2
emissions
and
also
helps
reduce
the
background traffic
noise.
If
your
vehicle
has
cruise
control,
make
use
of
the system
at
speeds
above
25
mph
(40
km/h)
when
the
traffic is
flowing
well.
control the use of your electrical equipment
Before moving off, if the passenger compartment is too warm, ventilate it by opening the windows and air vents
before
using the air conditioning.
Above
30 mph (50 km/h), close the windows and leave the
air
vents open.
Remember
to make use of equipment that can help keep
the
temperature in the passenger compartment down
(sunroof
and window blinds...).
Switch
off the air conditioning, unless it has automatic
regulation,
as soon as the desired temperature is attained.
Switch
off the demisting and defrosting controls, if not
automatic.
Switch
off the heated seat as soon as possible.
Switch
off the headlamps and front foglamps when the
level
of light does not require their use.
Avoid
running the engine before moving off, particularly in
winter;
your vehicle will warm up much faster while driving.
As
a passenger, if you avoid connecting your multimedia
devices
(film, music, video game...), you will contribute
towards
limiting the consumption of electrical energy, and
so
of fuel.
d
isconnect your portable devices before leaving the
vehicle.
Motoring & Environment
Page 38 of 276

Berlingo_2_VP_en_Chap03_Pret-a-partir_ed02-2014
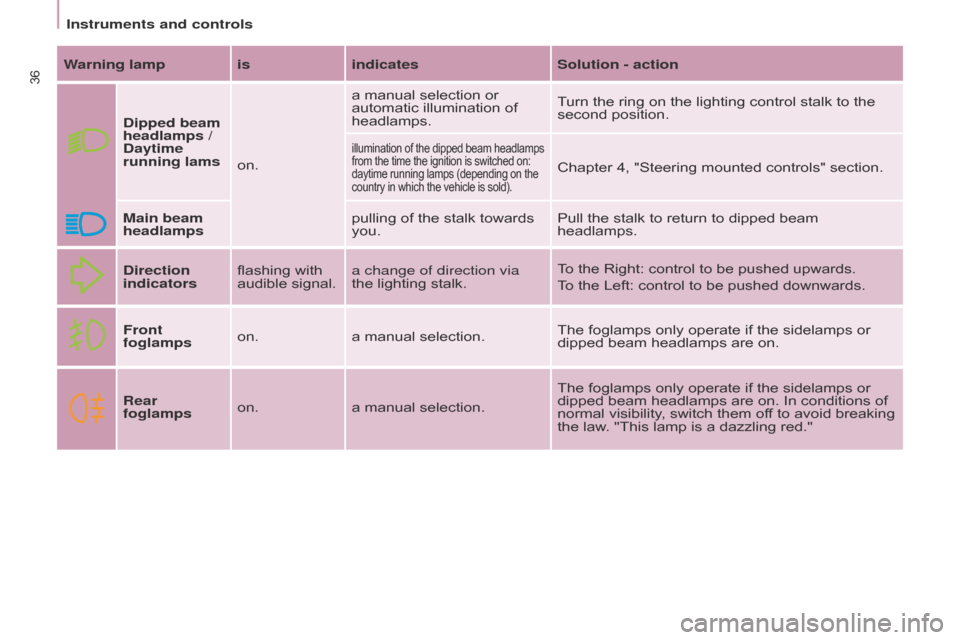
36Warning lamp isindicatesSolution - action
d
ipped beam
headlamps /
d
aytime
running lams on.a
manual selection or
automatic
illumination of
headlamps.T
urn the ring on the lighting control stalk to the
second
position.
illumination of the dipped beam headlamps from
the time the ignition is switched on: daytime
running lamps (depending on the
country
in which the vehicle is sold).
Chapter 4, "Steering mounted controls" section.
Main beam
headlamps pullin
g
of
the
stalk
towards
you. Pull
the stalk to return to dipped beam
headlamps.
d
irection
indicators flashing
with
audible
signal. a change of direction via
the
lighting
stalk. To
the Right: control to be pushed upwards.
To
the Left: control to be pushed downwards.
Front
foglamps on.
a
manual
selection. The
foglamps only operate if the sidelamps or
dipped
beam headlamps are on.
r
ear
foglamps on.
a
manual
selection. The
foglamps only operate if the sidelamps or
dipped
beam headlamps are on. In conditions of
normal
visibility, switch them off to avoid breaking
the
law. "This lamp is a dazzling red."
Instruments and controls
Page 55 of 276

53
Berlingo_2_VP_en_Chap04_Ergonomie_ed02-2014
LEd dAYtIME runnInG LAMPS
Rear foglamps (amber, 2nd rotation of the ring forwards).
Front
foglamps (green, 1st
rotation
of the ring forwards).
Front and rear foglamps
Rotate ring B forwards to switch on
and
rearwards to switch off.
The
status
is
confirmed by the warning lamps in
the
instrument panel.
They
operate with the sidelamps and
dipped
beam headlamps. Do not forget to switch them off
when
they are no longer needed.
Operation of the automatic illumination
of
headlamps switches off the rear
foglamps,
but the front foglamps
remain
on.
To switch off the front and rear
foglamps, turn the ring rearwards twice
in
succession.
Automatic illumination of headlamps
In foggy weather or in snow,
the sunshine sensor may detect
sufficient
light.
As
a consequence,
the
lighting will not come on
automatically
.
If
necessary, you must switch
on
the dipped beam headlamps
manually
.
d
o not cover the sunshine sensor
located on the windscreen, behind
the
mirror. It is used for the automatic
illu
mination of headlamps and for the
automatic
rain sensitive wipers.
Activation
Turn the ring to the A
ut
O
position.
The activation of this function is
accompanied
by a message in the
screen.
d
eactivation
Turn
the ring forwards or rearwards.
The deactivation of this function is
accompanied
by a message in the
screen.
The
function is deactivated temporarily
when
you use the manual lighting
control
stalk. The
sidelamps
and
dipped beam
headlamps
switch
on
automatically if
the light is poor
, or
during operation of the windscreen
wipers.
They
switch off as soon as the
light
becomes bright enough or the
windscreen
wipers stop.
This
function is not compatible with the
daytime
running lamps.
o
n starting the vehicle, in daylight the
LED
daytime
running
lamps
come
on
automatically
.
If
the
sidelamps
and
headlamps
are
switched
on
manually
or
automatically,
the
daytime
running
lamps
go
off.
Programming
For countries where exterior lighting by
day is not a legal requirement, you can
activate or deactivate the function via
the
configuration menu.
If the user does not operate any
equipment
for
30
minutes,
the
Economy
mode
engages
to
avoid
discharging
the
battery.
Electrical
functions are put on standby and the
battery
warning
lamp
flashes.
Sidelamp
operation
is
not
affected
by
Economy
mode.
In clear weather or in rain, both day
and
night,
rear
foglamps
dazzle
and
their
use
is
prohibited.
Refer to chapter 8, "Battery
section".
Steering mounted controls
EaSE oF USE and CoMFoRT
4
Page 56 of 276

54
Berlingo_2_VP_en_Chap04_Ergonomie_ed02-2014
If the sunshine sensor
does not function correctly,
the lighting comes on
accompanied
by the service
warning
lamp, an audible
signal
and a message in the screen.
Contact a CITR
o Ë n dealer or a
qualified
workshop.
Guide-me-home lighting
Keeping the dipped beam headlamps on temporarily with the ignition off,
makes
the driver's exit easier when the
light
is poor.
HEAdLAMP BEAM
depending on the load in your vehicle,
the beam setting must be adjusted.
0 -
No
load.
1 -
Partial
load.
2 -
A
verage load.
3 -
Maximum
authorised load.
Manual operation
-
With
the
ignition
off,
"flash"
the
headlamps
within
one
minute
after
switching
off
the
ignition.
The
guide-me-home
lighting
switches
of
f
automatically
after
a
set
time.
Automatic operation
Refer to chapter 10, "Screen
menu
map"
section. Initial setting is position 0.
a
ctivate the function via the
vehicle
configuration
menu. Programming
The
system
is
activated
or
deactivated
in
the
vehicle
configuration
menu.
The
system
is
activated
by
default.
Switching off
The
system
does
not
operate:
-
below a certain angle of rotation of
the steering wheel,
-
above
25
mph
(40
km/h),
-
when
reverse
gear
is
engaged.
Switching on
This
function
starts:
-
when the corresponding direction
indicator is switched on,
or
-
from
a
certain
angle
of
rotation
of
the
steering
wheel.
With
dipped
or
main
beam
headlamps,
this
function
makes
use
of
the
beam
from
a
front
foglamp
to
illuminate
the
inside of a bend, when the vehicle
speed
is
below
25
mph
(approximately
40
km/h)
(urban
driving,
winding
road,
intersections,
parking
manouevres...).
cornering lighting
travelling abroad
If using your vehicle in a country
that drives on the other side of the
road,
the headlamps must be adjusted
to
avoid dazzling on-coming drivers.
Contact a CITR
o Ë n dealer or a
qualified
workshop.
Steering mounted controls
Page 173 of 276

Berlingo_2_VP_en_Chap08_aide-rapide_ed02-2014
171
rEAr LAMPS
This procedure requires the use of the spanner supplied with the tools for
changing a wheel.
When
refitting, take care to
reposition the tabs and the supply
wire correctly to avoid trapping
the
wire.
a
fter changing the rear direction
indicator
bulb, the reinitialisation time
is
above 2 minutes.
-
Move aside the 4 tabs then extract
the
bulb holder.
-
Remove
the faulty bulb by
pressing it lightly while turning it
anticlockwise.
-
Change
the bulb.
When
removing the lamp unit:
-
with
tailgate, pull the lamp unit
towards the centre of the vehicle,
-
with
hinged doors, pull the lamp
unit
towards you.
For
more
information
concerning
the
bulbs,
refer
to
the
"Types
of
bulb".
1.
Brake lamps / sidelamps
type B
,
P21/5W
-
21/5W
2.
d
irection indicators
type B
,
PY21W
-
21W
(amber)
3.
r
eversing lamps
type B
, P21W - 21W
4.
Foglamps
type B
, P21W - 21W
High pressure jet washing When using this type of washing
on stubborn dirt, do not persist on
the
headlamps,
the
other
lamps
and
their
edges
to
avoid
damaging
their
coating
and
seals. Chapter
9, "Changing a wheel"
section.
-
Identify the faulty bulb, then open
the
rear doors to 180°.
Chapter
3, "Access" section.
-
Remove
the two fixing bolts using
the
spanner provided.
-
Pull
the lamp unit from the outside.
-
Holding
the lamp, disconnect the
electrical
connector.
Changing a bulb
QUICk HELP
8