steering wheel Citroen BERLINGO MULTISPACE RHD 2017 2.G Owner's Guide
[x] Cancel search | Manufacturer: CITROEN, Model Year: 2017, Model line: BERLINGO MULTISPACE RHD, Model: Citroen BERLINGO MULTISPACE RHD 2017 2.GPages: 292, PDF Size: 10.19 MB
Page 174 of 292

172
Berlingo2VP_en_Chap08_Aide-rapide_ed02-2016Berlingo2VP_en_Chap08_Aide-rapide_ed02-2016
The temporary tyre repair kit consists of a compressor and a bottle
(containing a sealant).
Using the kit
- Tick the deflated wheel on the speed
limitation sticker then affix
the
sticker to the vehicle's steering
wheel to remind you that a wheel is
in
temporary use.
-
Clip the bottle
1 on the
compressor
2.
-
Connect the bottle
1 to the valve of
the
tyre to be repaired.
-
T
ake care to unwind the
compressor pipe before connecting
it
to the bottle.
-
Connect the power lead to one of
the
vehicle's 12V sockets.
-
Switch on the compressor by
pressing button
A until the tyre
pressure
reaches 2.0 bars. If this
pressure cannot be reached, the
tyre
cannot be repaired.
-
Remove
and store the compressor.
-
Drive immediately
, for a few miles
(kilometres),
at reduced speed, to
fill
the puncture.
-
Adjust
the pressure using the
compressor in accordance with the
recommendation for the vehicle and
check
that the leak is filled correctly
(no
further loss of pressure).
-
Drive at reduced speed (50
mph
[80
km/h]).
The
tyre must be
examined and repaired by a
specialist
as soon as possible.After use, the bottle can be stored in
a
plastic bag, supplied in the kit, to avoid staining your vehicle with traces
of
fluid.
Warning:
the sealant product is
harmful if swallowed and causes
irritation
to the eyes.
Keep
it out of reach of children.
After use, do not discard the bottle into
the
environment, take it to a CITROËN
dealer or to an specialised waste
disposal
site.
Replacement bottles of sealant are
available
from CITROËN dealers.
TEMPORARY PUNCTURE
REP
AIR KIT
The kit is located in one of the two storage compartments located
under
the front seats.
Vehicles supplied with a temporary
puncture
repair kit do not have a spare
wheel
or tooling (jack, wheelbrace, ...).
Changing a wheel
Page 192 of 292

190
Berlingo2VP_en_Chap08_Aide-rapide_ed02-2016Berlingo2VP_en_Chap08_Aide-rapide_ed02-2016
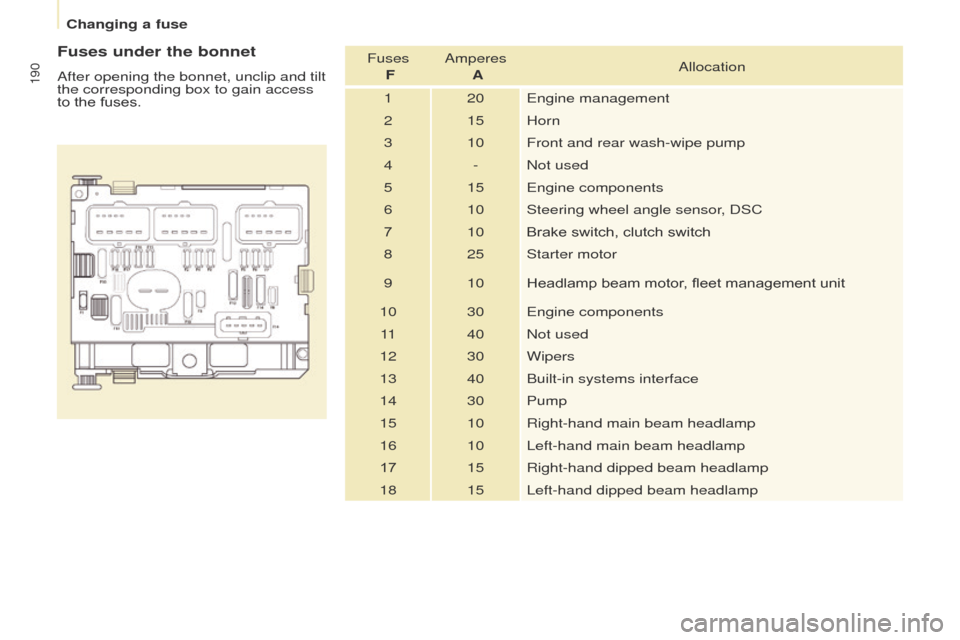
Fuses under the bonnet
After opening the bonnet, unclip and tilt
the corresponding box to gain access
to the fuses. Fuses
F Amperes
A Allocation
1 20 Engine management
2 15 Horn
3 10 Front and rear wash-wipe pump
4 - Not used
5 15 Engine components
6 10 Steering wheel angle sensor, DSC
7 10Brake
switch, clutch switch
8 25 Starter motor
9 10 Headlamp
beam motor, fleet management unit
10 30 Engine components 11 40 Not used
12 30 Wipers
13 40 Built-in systems interface
14 30 Pump
15 10 Right-hand main beam headlamp
16 10 Left-hand main beam headlamp
17 15 Right-hand dipped beam headlamp
18 15 Left-hand dipped beam headlamp
Changing a fuse
Page 194 of 292

192
Berlingo2VP_en_Chap08_Aide-rapide_ed02-2016Berlingo2VP_en_Chap08_Aide-rapide_ed02-2016
Without lifting (4 wheels on the
road)
You should always use a towing arm.
BEING TOWED
This procedure involves the use of
the towing eye supplied with the tools
for
changing a wheel.
From the front
- Unclip the cover by pressing the
bottom part.
-
Fully screw in the removable
towing eye.
From the rear
- Unclip the cover using a coin or the
flat part of the towing eye,
-
Fully screw in the removable
towing eye. When towing with the engine
switched
off, there is no braking or
steering
assistance.
Lifting (only 2 wheels on the
road)
It is preferable to raise the vehicle
using
professional lifting equipment.Vehicles fitted with a manual
gearbox (Diesel version)
In
the case of vehicles fitted with
a manual gearbox, the gear lever
must be in neutral, failure to observe
this special condition may result in
damage
to transmission and braking
components and the absence of
braking
assistance when the engine is
started
again.
Section
8,
"Changing
a
wheel".
Having your vehicle towed
Page 277 of 292

275
Berlingo2VP_en_Chap10b_RD45_ed02-2016
Receiving a call
An incoming call is announced by a ring and a
superimposed display in the screen.
Select the YES tab on the display
using
the buttons.
Confirm by pressing OK.
Press this button at the steering
mounted
controls to accept the call.
Making a call
From the "Bluetooth : Telephone - Audio "
menu.
Select " Manage the telephone call".
Select " Call".
Or
Select " Calls list ".
Or
Select " Directory ".
Press this button for more than two
seconds for access to your directory,
then
navigate using the thumbwheel.
Or
To
dial a number, use your telephone's keypad,
w
ith the vehicle stationary.
Ending a call
During a call, press this button for
more than 2 seconds.
Confirm with OK
to end the call.
The system accesses the telephone's
contacts directory, depending on its
compatibility, and while it is connected
by Bluetooth
®.
With certain telephones connected by
Bluetooth
® you can send a contact to
the
directory of the audio system.
Contacts imported in this way are
saved in a permanent directory
visible to all, whatever the telephone
connected.
The menu for the directory is not
accessible
if it is empty.
Audio and Telematics
TECHNOLOGY on BOARD
10