child lock CITROEN BERLINGO VAN 2022 Owners Manual
[x] Cancel search | Manufacturer: CITROEN, Model Year: 2022, Model line: BERLINGO VAN, Model: CITROEN BERLINGO VAN 2022Pages: 324, PDF Size: 9.41 MB
Page 4 of 324
2
Contents
■
OverviewOverview 4
Labels 6
■
Eco-driving
1InstrumentsInstrument panels 10
Digital instrument panel 11
Warning and indicator lamps 13
Indicators 20
Trip computer 27
Touch screen BLUETOOTH audio system 28
Touch screen 29
Setting the date and time 31
2AccessElectronic key with remote control function and
built-in key, 32
Back-up procedures 38
Central locking / unlocking 41
Doors 43
General recommendations for the sliding
side doors
43
Rear roof flap 44
Alarm 45
Electric windows 47
Tilting rear door windows 49
3Ease of use and comfortGeneral recommendations for the seats 50
Front seats 50
Steering wheel adjustment 53
Mirrors 53
2-seat front bench seat 55
Rear bench seat (row 2) 56
Rear seats (row 2) 57
Rear seats (row 3) 57
Interior fittings 60
Two-position luggage cover shelf (removable) 65
Luggage cover (7-seat) 66
Warning triangle 67
Extenso Cab 68
Crew cab 70
Heating and Ventilation 73
Heating 74
Manual air conditioning 74
Dual-zone automatic air conditioning 75
Front demisting - de-icing 77
Heated windscreen 78
Demisting/de-icing the rear screen and/or
the door mirrors
78
Rear heating and air conditioning 79
Additional heating/ventilation system 79
Temperature conditioning (Electric) 81
4Lighting and visibilityLighting control stalk 83
Direction indicators 84
Automatic illumination of headlamps 84
Daytime running lamps / Sidelamps 85
Guide-me-home and welcome lighting 85
Automatic lighting systems - General
recommendations
86
Automatic headlamp dipping 86
Headlamp beam height adjustment 88
Wiper control stalk 88
Changing a wiper blade 90
Automatic wipers 90
5SafetyGeneral safety recommendations 92
Emergency or assistance 92
Hazard warning lamps 94
Horn 95
Pedestrian horn (Electric) 95
Electronic stability control (ESC) 95
Advanced Grip Control 97
Hill Assist Descent Control 98
Seat belts 99
Airbags 103
Child seats 106
Deactivating the front passenger airbag 108
ISOFIX child seats 11 2
i-Size child seats 11 5
Manual child lock 11 6
Electric child lock 11 6
6DrivingDriving recommendations 11 7
Starting/switching off the engine 11 9
Manual parking brake 123
Electric parking brake 123
Hill start assist 126
5-speed manual gearbox 126
6-speed manual gearbox 127
Automatic gearbox 127
Drive selector (Electric) 132
Driving modes 133
Gear shift indicator 134
Stop & Start (Petrol or Diesel) 134
Tyre under-inflation detection 136
Head-up display 138
Driving and manoeuvring aids - General
recommendations
139
Road signs recognition 140
Speed limiter 143
Cruise control - Specific recommendations 146
Programmable cruise control 146
Adaptive cruise control 148
Memorising speeds 152
Active Safety Brake with Collision Risk Alert and
Intelligent emergency braking assistance
152
Active lane departure warning system 155
Blind spot monitoring 158
Page 7 of 324
5
Overview
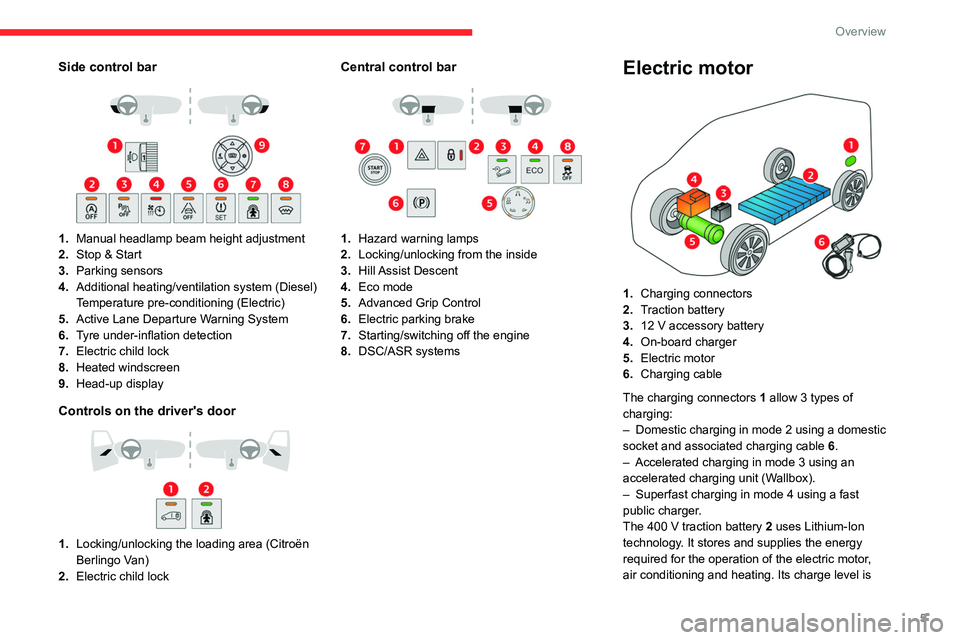
Side control bar
1.Manual headlamp beam height adjustment
2. Stop & Start
3. Parking sensors
4. Additional heating/ventilation system (Diesel)
Temperature pre-conditioning (Electric)
5. Active Lane Departure Warning System
6. Tyre under-inflation detection
7. Electric child lock
8. Heated windscreen
9. Head-up display
Controls on the driver's door
1.Locking/unlocking the loading area (Citroën
Berlingo Van)
2. Electric child lock
Central control bar
1.Hazard warning lamps
2. Locking/unlocking from the inside
3. Hill Assist Descent
4. Eco mode
5. Advanced Grip Control
6. Electric parking brake
7. Starting/switching off the engine
8. DSC/ASR systems
Electric motor
1.Charging connectors
2. Traction battery
3. 12
V accessory battery
4. On-board charger
5. Electric motor
6. Charging cable
The charging connectors
1
allow 3 types of
charging:
–
Domestic chargin
g in mode 2 using a domestic
socket and associated charging cable
6
.
–
Accelerated charging in mode
3 using an
accelerated charging unit (Wallbox).
–
Superfast charging in mode
4 using a fast
public charger.
The 400
V traction battery 2 uses Lithium-Ion
technology. It stores and supplies the energy
required for the operation of the electric motor,
air conditioning and heating. Its charge level is
Page 8 of 324
6
Overview
represented by an indicator and a reserve power
warning lamp on the instrument panel.
The 12 V accessory battery 3 powers the
vehicle’s conventional electrical system. It is
recharged automatically by the traction battery
via the on-board charger.
The on-board charger
4
provides domestic
charging (mode
2) and accelerated charging
(mode
3) of the traction battery as well as
recharging of the 12
V accessory battery.
The electric motor
5 provides propulsion in
accordance with the selected driving mode and
driving conditions. It recovers energy during
vehicle braking and deceleration phases.
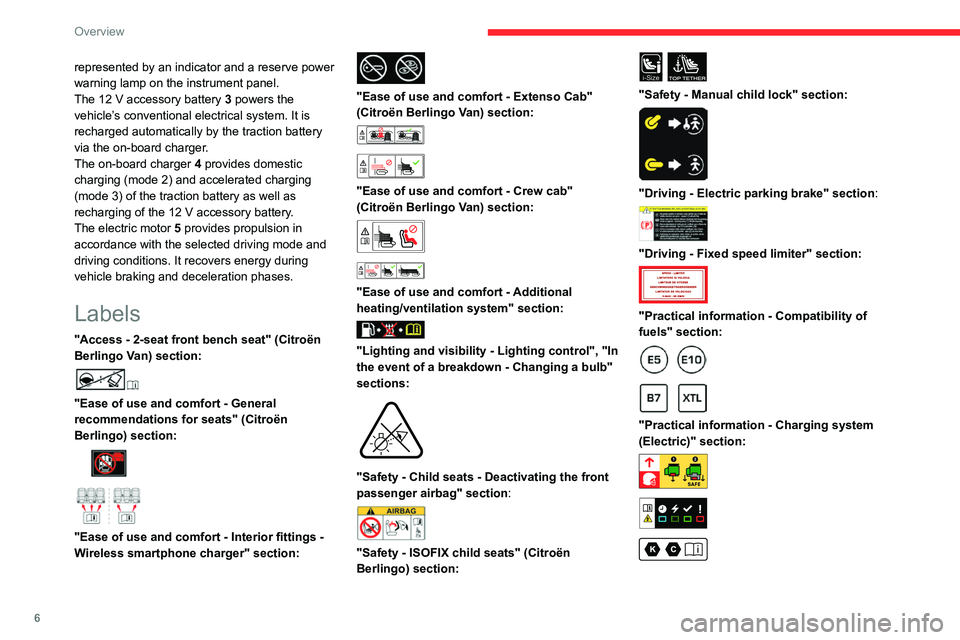
Labels
"Access - 2-seat front bench seat" (Citroën
Berlingo Van) section:
"Ease of use and comfort - General
recommendations for seats" (Citroën
Berlingo) section:
"Ease of use and comfort - Interior fittings -
Wireless smartphone charger" section:
"Ease of use and comfort - Extenso Cab"
(Citroën Berlingo Van) section:
"Ease of use and comfort - Crew cab"
(Citroën Berlingo Van) section:
"Ease of use and comfort - Additional
heating/ventilation system" section:
"Lighting and visibility - Lighting control", "In
the event of a breakdown - Changing a bulb"
sections:
"Safety - Child seats - Deactivating the front
passenger airbag" section:
"Safety - ISOFIX child seats" (Citroën
Berlingo) section:
i-SizeTOP TETHER
"Safety - Manual child lock" section:
"Driving - Electric parking brake" section:
"Driving - Fixed speed limiter" section:
"Practical information - Compatibility of
fuels" section:
"Practical information - Charging system
(Electric)" section:
Page 19 of 324
17
Instruments
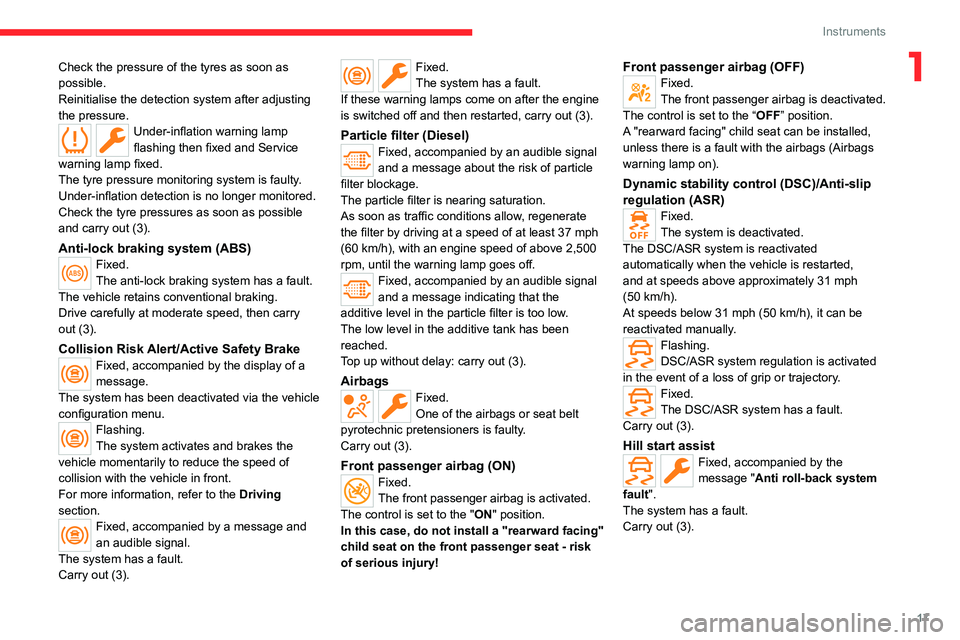
1Check the pressure of the tyres as soon as
possible.
Reinitialise the detection system after adjusting
the pressure.
Under-inflation warning lamp
flashing then fixed and Service
warning lamp fixed.
The tyre pressure monitoring system is faulty.
Under-inflation detection is no longer monitored.
Check the tyre pressures as soon as possible
and carry out (3).
Anti-lock braking system (ABS)Fixed.
The anti-lock braking system has a fault.
The vehicle retains conventional braking.
Drive carefully at moderate speed, then carry
out (3).
Collision Risk Alert/Active Safety BrakeFixed, accompanied by the display of a
message.
The system has been deactivated via the vehicle
configuration menu.
Flashing.
The system activates and brakes the
vehicle momentarily to reduce the speed of
collision with the vehicle in front.
For more information, refer to the Driving
section.
Fixed, accompanied by a message and
an audible signal.
The system has a fault.
Carry out (3).
Fixed.
The system has a fault.
If these warning lamps come on after the engine
is switched off and then restarted, carry out (3).
Particle filter (Diesel)Fixed, accompanied by an audible signal
and a message about the risk of particle
filter blockage.
The particle filter is nearing saturation.
As soon as traffic conditions allow, regenerate
the filter by driving at a speed of at least 37
mph
(60
km/h), with an engine speed of above 2,500
rpm, until the warning lamp goes off.
Fixed, accompanied by an audible signal
and a message indicating that the
additive level in the particle filter is too low.
The low level in the additive tank has been
reached.
Top up without delay: carry out (3).
AirbagsFixed.
One of the airbags or seat belt
pyrotechnic pretensioners is faulty.
Carry out (3).
Front passenger airbag (ON)Fixed.
The front passenger airbag is activated.
The control is set to the "ON" position.
In this case, do not install a "rearward facing"
child seat on the front passenger seat - risk
of serious injury!
Front passenger airbag (OFF)Fixed.
The front passenger airbag is deactivated.
The control is set to the “OFF ” position.
A "rearward facing" child seat can be installed,
unless there is a fault with the airbags (Airbags
warning lamp on).
Dynamic stability control (DSC)/Anti-slip
regulation (ASR)
Fixed.
The system is deactivated.
The DSC/ASR system is reactivated
automatically when the vehicle is restarted,
and at speeds above approximately 31 mph
(50
km/h).
At speeds below 31
mph (50 km/h), it can be
reactivated manually.
Flashing.
DSC/ASR system regulation is activated
in the event of a loss of grip or trajectory.
Fixed.
The DSC/ASR system has a fault.
Carry out (3).
Hill start assistFixed, accompanied by the
message "Anti roll-back system
fault".
The system has a fault.
Carry out (3).
Page 39 of 324
37
Access
2► Pull the side-hinged door handle or raise the
tailgate.
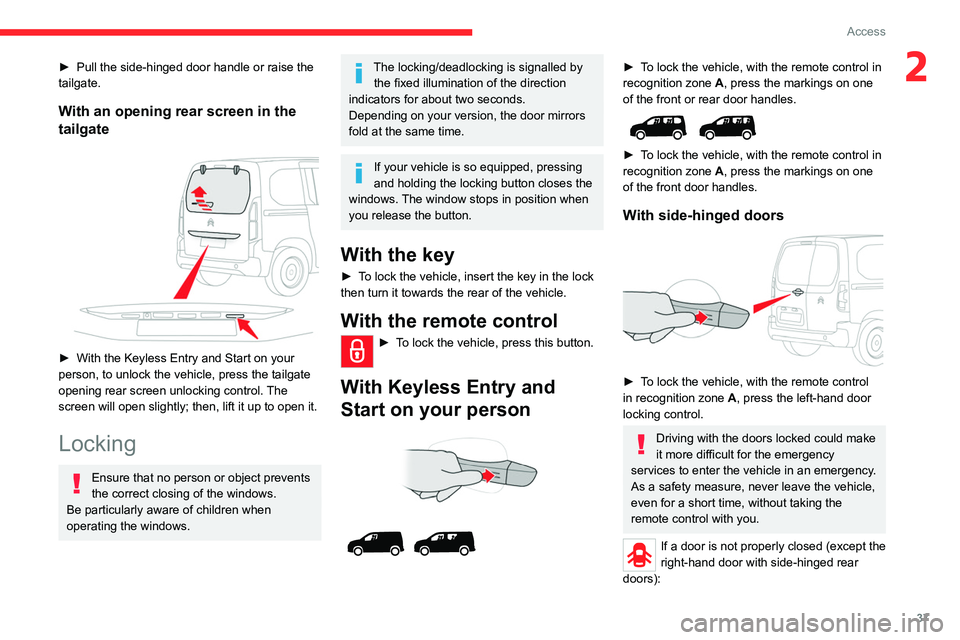
With an opening rear screen in the
tailgate
► With the Keyless Entry and Start on your
person, to unlock the vehicle, press the tailgate
opening rear screen unlocking control.
The
screen will open slightly; then, lift it up to open it.
Locking
Ensure that no person or object prevents
the correct closing of the windows.
Be particularly aware of children when
operating the windows.
The locking/deadlocking is signalled by the fixed illumination of the direction
indicators for about two seconds.
Depending on your version, the door mirrors
fold at the same time.
If your vehicle is so equipped, pressing
and holding the locking button closes the
windows. The window stops in position when
you release the button.
With the key
► To lock the vehicle, insert the key in the lock
then turn it towards the rear of the vehicle.
With the remote control
► To lock the vehicle, press this button.
With Keyless Entry and
Start on your person
► To lock the vehicle, with the remote control in
recognition zone A, press the markings on one
of the front or rear door handles.
► To lock the vehicle, with the remote control in
recognition zone A, press the markings on one
of the front door handles.
With side-hinged doors
► To lock the vehicle, with the remote control
in recognition zone A, press the left-hand door
locking control.
Driving with the doors locked could make
it more difficult for the emergency
services to enter the vehicle in an emergency.
As a safety measure, never leave the vehicle,
even for a short time, without taking the
remote control with you.
If a door is not properly closed (except the
right-hand door with side-hinged rear
doors):
Page 41 of 324

39
Access
2If the vehicle is fitted with an alarm, it will
not be activated when locking with the
key.
If the alarm is activated, the siren sounds
when the door is opened; switch on the
ignition to stop it.
If the vehicle is unlocked with the key in
the lock after locking it with the remote
control or the Keyless Entry and Start
system , all doors and the boot are
unlocked.
If the vehicle is unlocked with the key in the
lock after locking it with the key , only the
doors (front door and sliding side door(s)) are
unlocked. The side-hinged doors and tailgate
are not unlocked. Switching on the ignition
unlocks them.
Central locking not
functioning
Use these procedures in the following cases:
– Central locking malfunction.
–
Battery disconnected or discharged.
In the event of a malfunction of the
central locking system, the battery must
be disconnected to ensure that the vehicle is
locked fully.
Locking part of the vehicle (front
door/sliding side door/side-hinged
doors)
► If a sliding side door or side-hinged doors
are fitted to your vehicle, check that the electric
child lock is not activated.
►
Open the door
.
Front door
Sliding side door
Side-hinged doors
► Remove the cap located on the edge of the
door
.
► Insert the built-in key into the latch (without
forcing it) and then turn the assembly.
►
Remove the key and refit the cap.
►
Close the door(s) and check from the outside
that the vehicle is locked correctly
.
Unlocking of one part of the vehicle
(front passenger door/sliding side
door/side-hinged doors)
► Use the interior opening control.
or
►
With
side-hinged doors , insert the built-in
key into the (left-hand) door lock, then turn it.
For more information on the Child lock
on a sliding side door or side-hinged
doors, refer to the corresponding section.
Unlocking the tailgate
► From inside the vehicle, insert a small
screwdriver into hole A
on the lock to unlock the
tailgate.
►
Move the latch to the left.
Page 45 of 324
43
Access
2Activation/Deactivation
You can activate or deactivate this function
permanently.
►
With the ignition on, press the central locking
button until an audible signal is triggered and
a corresponding message of confirmation is
displayed.
The state of the system stays in the memory
when the ignition is switched off.
Driving with the doors locked may render
access by the emergency services to the
interior difficult in an emergency.
Carrying long or voluminous objects
If you want to drive with the boot open,
you should press the central locking button
to lock the doors. Otherwise, every time the
speed of the vehicle exceeds 6 mph (10
km/h), the locks will rebound and the alerts
mentioned above will appear.
Pressing the central locking button unlocks
the vehicle.
Above 6 mph (10 km/h), this unlocking is
temporary.
Side-hinged doors
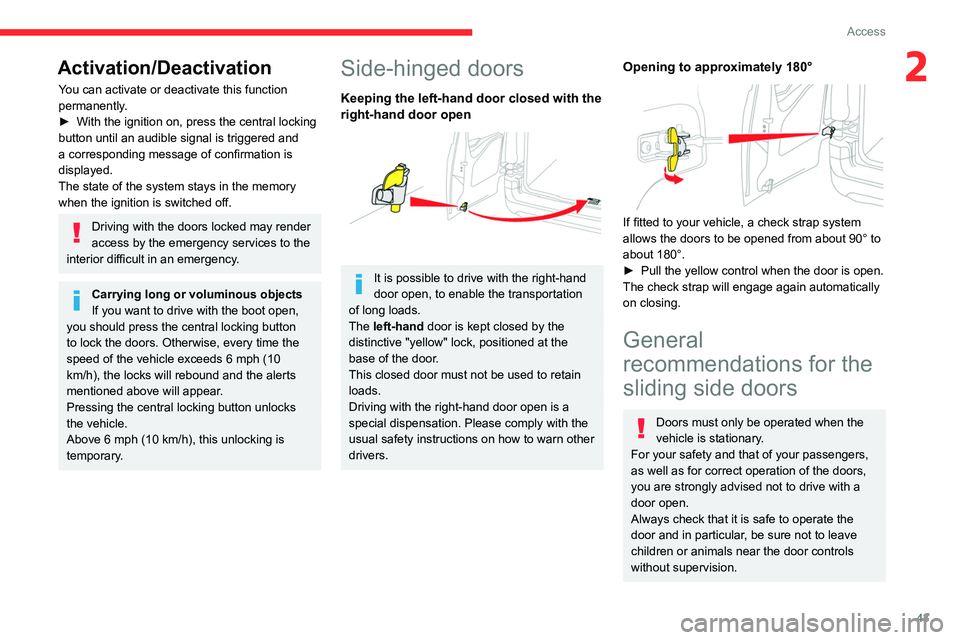
Keeping the left-hand door closed with the
right-hand door open
It is possible to drive with the right-hand
door open, to enable the transportation
of long loads.
The left-hand door is kept closed by the
distinctive "yellow" lock, positioned at the
base of the door.
This closed door must not be used to retain
loads.
Driving with the right-hand door open is a
special dispensation. Please comply with the
usual safety instructions on how to warn other
drivers.
Opening to approximately 180°
If fitted to your vehicle, a check strap system
allows the doors to be opened from about 90° to
about 180°.
►
Pull the yellow control when the door is open.
The check strap will engage again automatically
on closing.
General
recommendations for the
sliding side doors
Doors must only be operated when the
vehicle is stationary.
For your safety and that of your passengers,
as well as for correct operation of the doors,
you are strongly advised not to drive with a
door open.
Always check that it is safe to operate the
door and in particular, be sure not to leave
children or animals near the door controls
without supervision.
Page 50 of 324
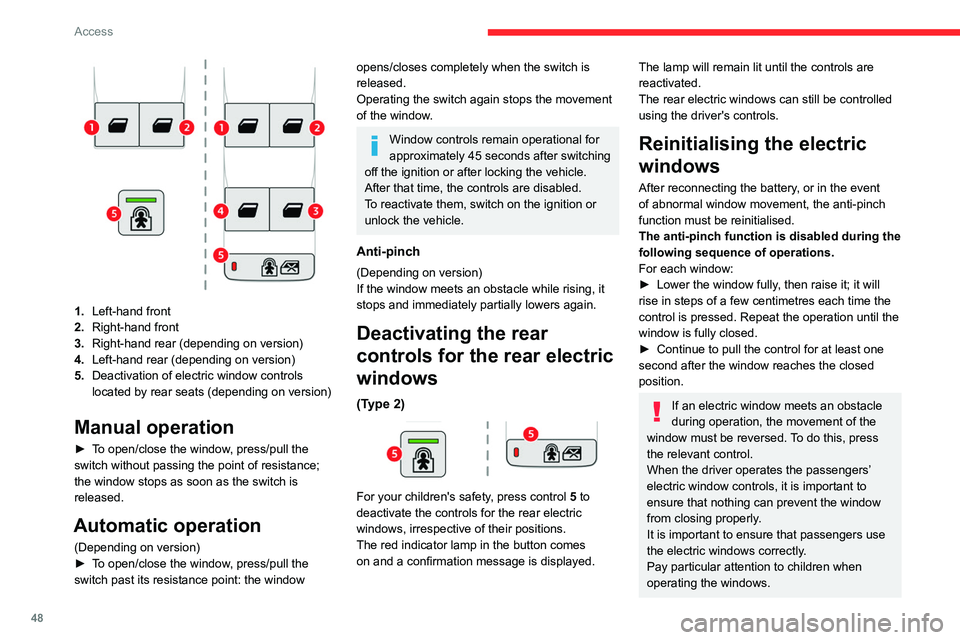
48
Access
1.Left-hand front
2. Right-hand front
3. Right-hand rear (depending on version)
4. Left-hand rear (depending on version)
5. Deactivation of electric window controls
located by rear seats (depending on version)
Manual operation
► To open/close the window, press/pull the
switch without passing the point of resistance;
the window stops as soon as the switch is
released.
Automatic operation
(Depending on version)
►
T o open/close the window, press/pull the
switch past its resistance point: the window
opens/closes completely when the switch is
released.
Operating the switch again stops the movement
of the window.
Window controls remain operational for
approximately 45 seconds after switching
off the ignition or after locking the vehicle.
After that time, the controls are disabled.
To reactivate them, switch on the ignition or
unlock the vehicle.
Anti-pinch
(Depending on version)
If the window meets an obstacle while rising, it
stops and immediately partially lowers again.
Deactivating the rear
controls for the rear electric
windows
(Type 2)
For your children's safety, press control 5 to
deactivate the controls for the rear electric
windows, irrespective of their positions.
The red indicator lamp in the button comes
on and a confirmation message is displayed.
The lamp will remain lit until the controls are
reactivated.
The rear electric windows can still be controlled
using the driver's controls.
Reinitialising the electric
windows
After reconnecting the battery, or in the event
of abnormal window movement, the anti-pinch
function must be reinitialised.
The anti-pinch function is disabled during the
following sequence of operations.
For each window:
►
Lower the window fully
, then raise it; it will
rise in steps of a few centimetres each time the
control is pressed. Repeat the operation until the
window is fully closed.
►
Continue to pull the control for at least one
second after the window reaches the closed
position.
If an electric window meets an obstacle
during operation, the movement of the
window must be reversed. To do this, press
the relevant control.
When the driver operates the passengers’
electric window controls, it is important to
ensure that nothing can prevent the window
from closing properly.
It is important to ensure that passengers use
the electric windows correctly.
Pay particular attention to children when
operating the windows.
Page 56 of 324
54
Ease of use and comfort
Manual folding
You can manually fold the mirrors (parking
obstruction, narrow garage, etc.)
►
T
urn the mirror towards the vehicle.
Electric folding
Depending on equipment, the door mirrors can
be folded electrically.
► From the inside, with the
ignition on, place control A
in the
central position.
►
Pull control A
backwards.
►
Lock the vehicle from the outside.
If the mirrors are folded using control A,
they will not unfold when the vehicle is
unlocked.
Electric unfolding
The door mirrors are unfolded electrically when
the vehicle is unlocked using the remote control
or key. Unless folding was selected with control
A, pull the control in the central position towards
the rear again.
Folding/unfolding when locking/unlocking
the vehicle can be deactivated. Contact a
CITROËN dealer or a qualified workshop.
If necessary, the mirrors can be folded
manually.
Heated mirrors
► Press one of these buttons.
For more information on Rear screen
demisting/de-icing , refer to the
corresponding section.
Interior rear view mirror
Equipped with an anti-dazzle system, which
darkens the mirror glass and reduces the
nuisance to the driver caused by the sun,
headlamps of other vehicles, etc.
Manual model
Day/night position
► Pull the lever to change to the anti-dazzle
"night" position.
► Push the lever to change to the normal "day"
position.
Adjustment
►
Adjust the mirror to the normal "day" position.
Automatic "electrochrome" model
The electrochrome system uses a sensor that
detects the level of exterior brightness and that
coming from the rear of the vehicle, in order to
automatically and gradually switch between day
and night usage.
To ensure optimum visibility while manoeuvring, the mirror automatically
brightens when reverse gear is engaged.
The system is deactivated if the load in the
boot exceeds the height of the load space
cover or if the load space cover has items
placed on it.
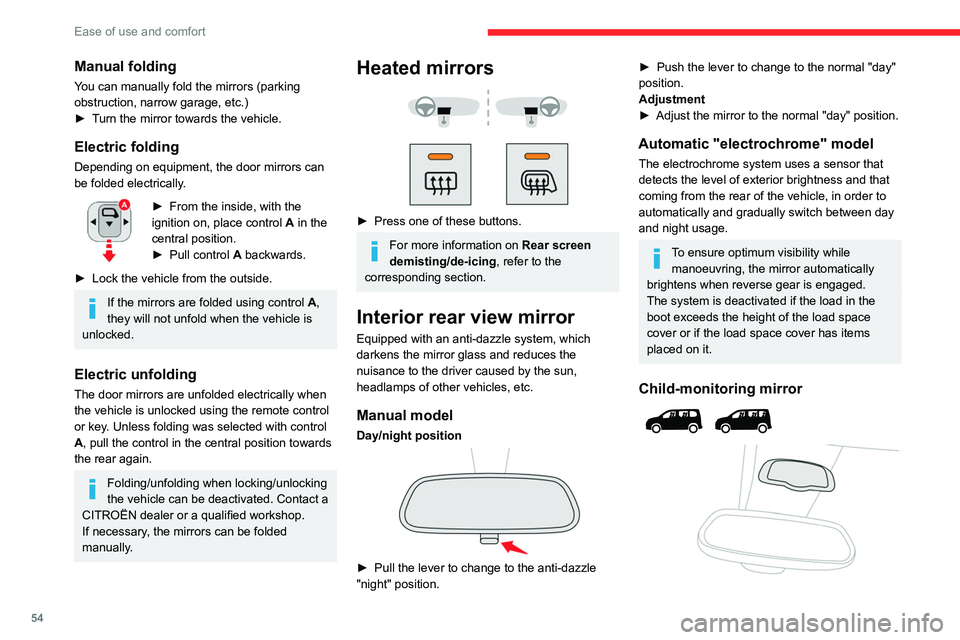
Child-monitoring mirror
Page 57 of 324
55
Ease of use and comfort
3A child-monitoring mirror is installed above
the interior rear view mirror. It allows the
vehicle's rear passengers to be observed and
facilitates discussion between the front and rear
passengers without changing the mirror setting
and without turning around. It can be folded
easily to avoid dazzle.
2-seat front bench seat
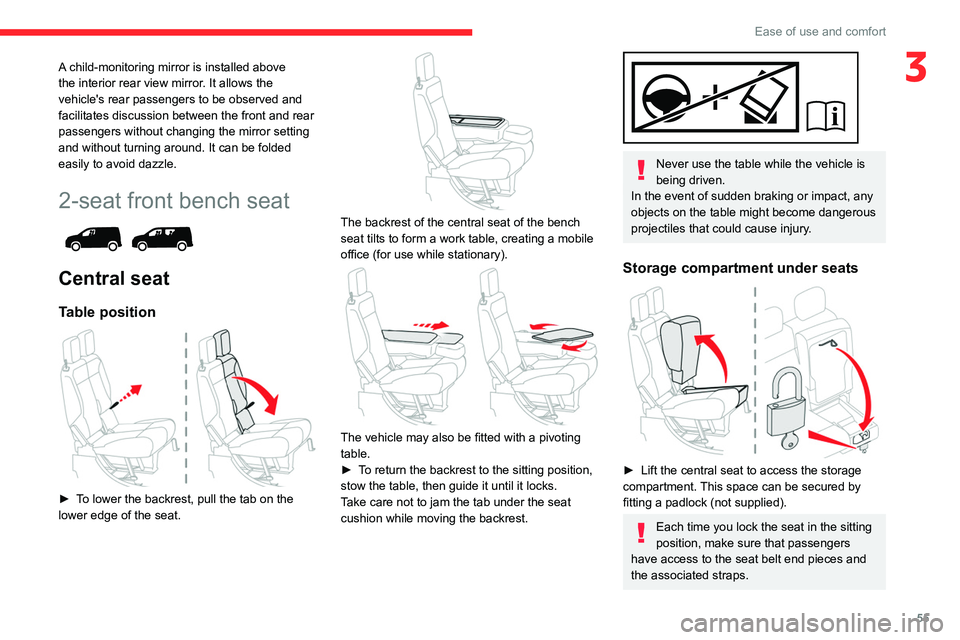
Central seat
Table position
► To lower the backrest, pull the tab on the
lower edge of the seat.
The backrest of the central seat of the bench
seat tilts to form a work table, creating a mobile
office (for use while stationary).
The vehicle may also be fitted with a pivoting
table.
►
T
o return the backrest to the sitting position,
stow the table, then guide it until it locks.
Take care not to jam the tab under the seat
cushion while moving the backrest.
Never use the table while the vehicle is
being driven.
In the event of sudden braking or impact, any
objects on the table might become dangerous
projectiles that could cause injury.
Storage compartment under seats
► Lift the central seat to access the storage
compartment. This space can be secured by
fitting a padlock (not supplied).
Each time you lock the seat in the sitting
position, make sure that passengers
have access to the seat belt end pieces and
the associated straps.