lock Citroen BX HATCHBACK 1992 2.G Workshop Manual
[x] Cancel search | Manufacturer: CITROEN, Model Year: 1992, Model line: BX HATCHBACK, Model: Citroen BX HATCHBACK 1992 2.GPages: 16, PDF Size: 0.47 MB
Page 6 of 16
Downloaded from www.Manualslib.com manuals search engine 0•6Roadside repairs
The following pages are intended to help in dealing with
common roadside emergencies and breakdowns. You will find
more detailed fault finding information at the back of the
manual, and repair information in the main chapters.
If your car won’t start
and the starter motor
doesn’t turn
MIf it’s a model with automatic transmission, make sure the
selector is in ‘P’ or ‘N’.
MOpen the bonnet and make sure that the battery terminals
are clean and tight.
MSwitch on the headlights and try to start the engine. If the
headlights go very dim when you’re trying to start, the
battery is probably flat. Get out of trouble by jump starting
(see next page) using a friend’s car.
If your car won’t start
even though the starter
motor turns as normal
MIs there fuel in the tank?
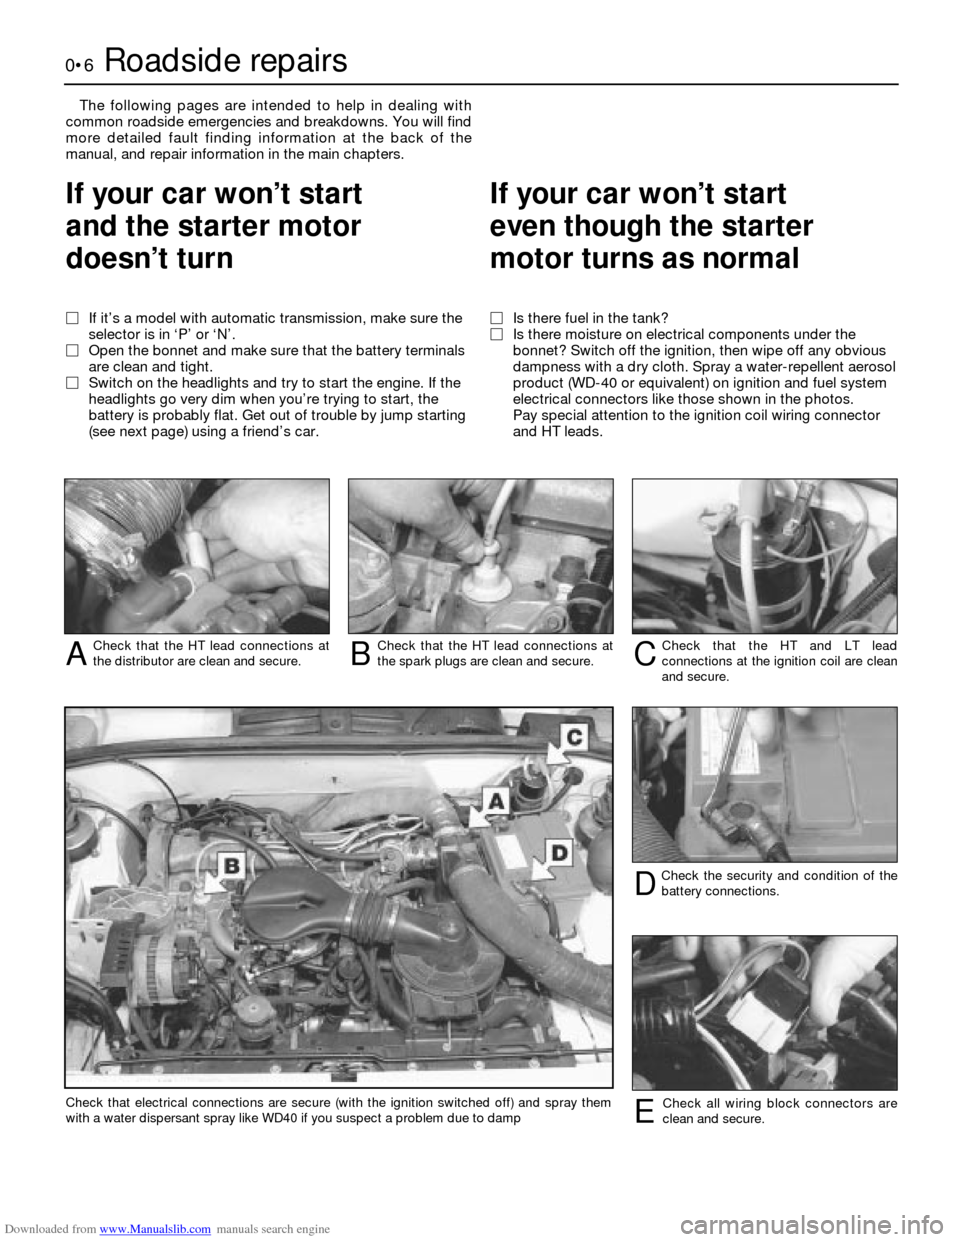
MIs there moisture on electrical components under the
bonnet? Switch off the ignition, then wipe off any obvious
dampness with a dry cloth. Spray a water-repellent aerosol
product (WD-40 or equivalent) on ignition and fuel system
electrical connectors like those shown in the photos.
Pay special attention to the ignition coil wiring connector
and HT leads.
Check that the HT lead connections at
the distributor are clean and secure.ACheck that the HT lead connections at
the spark plugs are clean and secure.BCheck that the HT and LT lead
connections at the ignition coil are clean
and secure.C
Check the security and condition of the
battery connections.D
Check all wiring block connectors are
clean and secure.ECheck that electrical connections are secure (with the ignition switched off) and spray them
with a water dispersant spray like WD40 if you suspect a problem due to damp
Page 7 of 16
Downloaded from www.Manualslib.com manuals search engine Roadside repairs0•7
When jump-starting a car using a
booster battery, observe the following
precautions:
4Before connecting the booster
battery, make sure that the ignition is
switched off.
4Ensure that all electrical equipment
(lights, heater, wipers, etc) is
switched off.
4Make sure that the booster battery is
the same voltage as the discharged
one in the vehicle.
4If the battery is being jump-started
from the battery in another vehicle,
the two vehcles MUST NOT TOUCH
each other.
4Make sure that the transmission is in
neutral (or PARK, in the case of
automatic transmission).
Jump starting will get you out
of trouble, but you must correct
whatever made the battery go
flat in the first place. There are
three possibilities:
1The battery has been drained by
repeated attempts to start, or by
leaving the lights on.
2The charging system is not working
properly (alternator drivebelt slack
or broken, alternator wiring fault or
alternator itself faulty).
3The battery itself is at fault
(electrolyte low, or battery worn out).
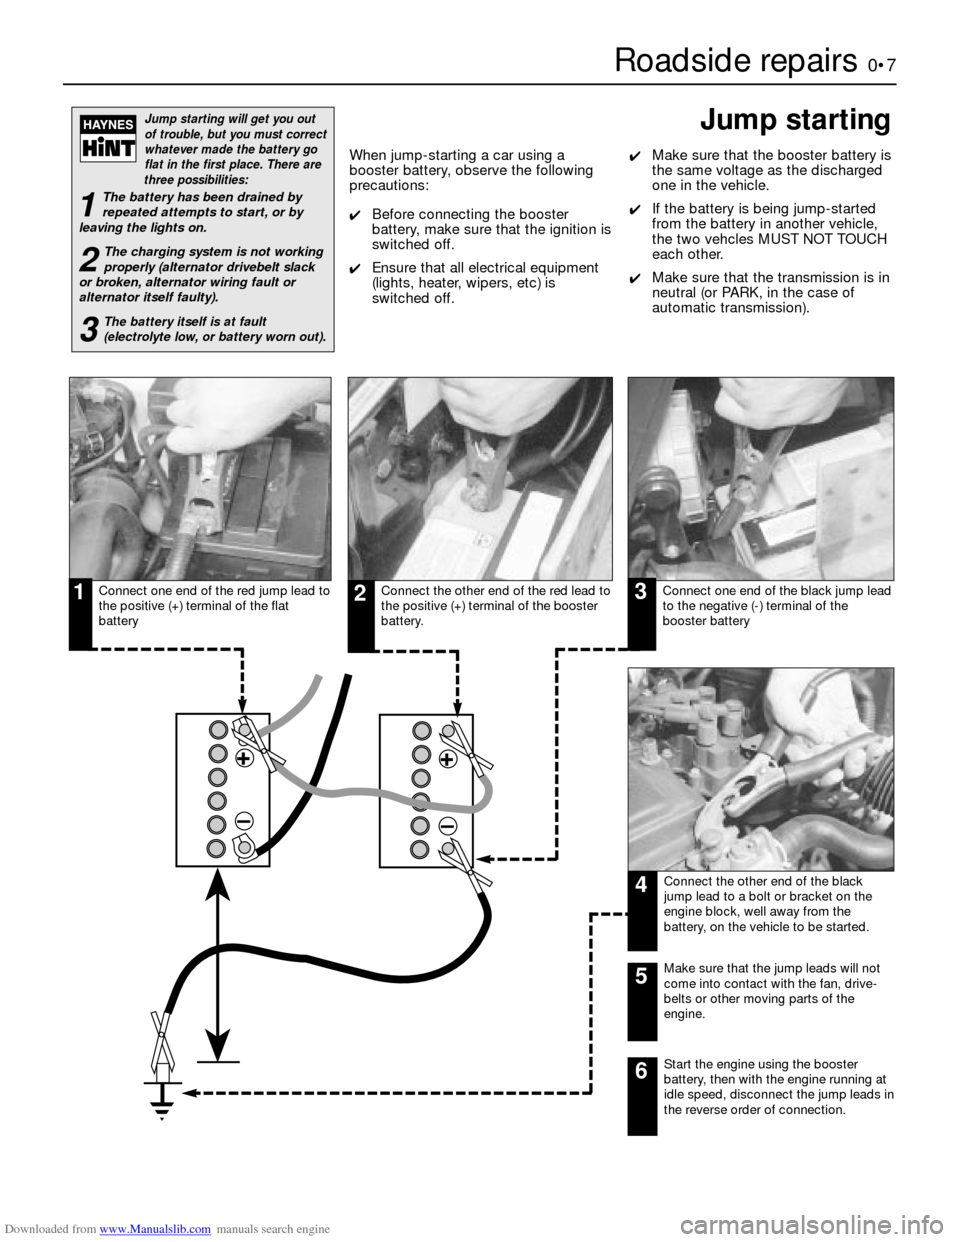
Connect one end of the red jump lead to
the positive (+) terminal of the flat
batteryConnect the other end of the red lead to
the positive (+) terminal of the booster
battery.Connect one end of the black jump lead
to the negative (-) terminal of the
booster battery
Connect the other end of the black
jump lead to a bolt or bracket on the
engine block, well away from the
battery, on the vehicle to be started.
123
4
Make sure that the jump leads will not
come into contact with the fan, drive-
belts or other moving parts of the
engine.5
Start the engine using the booster
battery, then with the engine running at
idle speed, disconnect the jump leads in
the reverse order of connection.6
Jump starting
Page 9 of 16
Downloaded from www.Manualslib.com manuals search engine Roadside repairs0•9
When all else fails, you may find yourself
having to get a tow home – or of course you
may be helping somebody else. Long-distance
recovery should only be done by a garage or
breakdown service. For shorter distances, DIY
towing using another car is easy enough, but
observe the following points:
MUse a proper tow-rope – they are not
expensive. The vehicle being towed must
display an ‘ON TOW’ sign in its rear window.
MAlways turn the ignition key to the ‘on’
position when the vehicle is being towed, so
that the steering lock is released, and that the
direction indicator and brake lights will work.
MOnly attach the tow-rope to the towing
eyes provided.MBefore being towed, release the handbrake
and select neutral on the transmission (Refer
to the Warningon the right).
MThe driver of the car being towed must
keep the tow-rope taut at all times to avoid
snatching.
MMake sure that both drivers know the route
before setting off.
MOnly drive at moderate speeds and keep
the distance towed to a minimum. Drive
smoothly and allow plenty of time for slowing
down at junctions.
MRemember that if the engine is not running,
there will be no hydraulic pressure (Refer to
the Warningon the right).Warning: BX, BX14 and Leader
with manual gearbox and all
automatic transmission models
should be towed with the front
wheels clear of the ground. If this is
impossible, restrict towing speed to 30
MPH and distance to 30 miles maximum.
Disregard of these instructions may cause
transmission damage due to lack of
lubrication. If in doubt, do not tow, or
transmission damage may result.
Once the reserve of hydraulic pressure has
been exhausted, the footbrake will not
work and the handbrake will have to be
used instead. Power steering assistance
(when applicable) will also be lost.
Towing
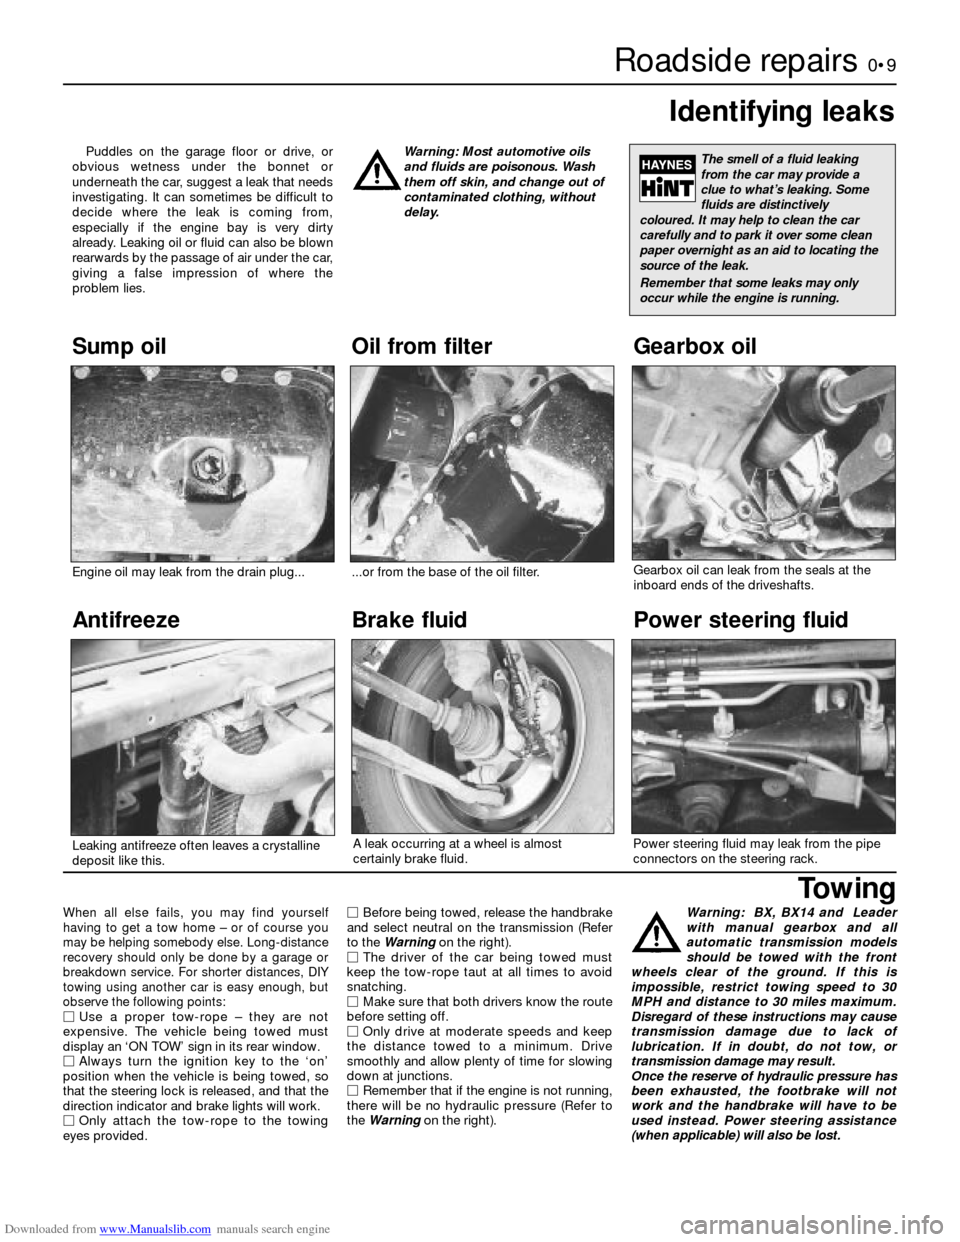
Puddles on the garage floor or drive, or
obvious wetness under the bonnet or
underneath the car, suggest a leak that needs
investigating. It can sometimes be difficult to
decide where the leak is coming from,
especially if the engine bay is very dirty
already. Leaking oil or fluid can also be blown
rearwards by the passage of air under the car,
giving a false impression of where the
problem lies.Warning: Most automotive oils
and fluids are poisonous. Wash
them off skin, and change out of
contaminated clothing, without
delay.
Identifying leaks
The smell of a fluid leaking
from the car may provide a
clue to what’s leaking. Some
fluids are distinctively
coloured. It may help to clean the car
carefully and to park it over some clean
paper overnight as an aid to locating the
source of the leak.
Remember that some leaks may only
occur while the engine is running.
Sump oil Gearbox oil
Brake fluid Power steering fluidOil from filter
Antifreeze
Engine oil may leak from the drain plug......or from the base of the oil filter.
Leaking antifreeze often leaves a crystalline
deposit like this.Gearbox oil can leak from the seals at the
inboard ends of the driveshafts.
A leak occurring at a wheel is almost
certainly brake fluid.Power steering fluid may leak from the pipe
connectors on the steering rack.
Page 12 of 16
Downloaded from www.Manualslib.com manuals search engine 0•12Weekly checks
Hydraulic fluid level
Warning:
l Use only LHM mineral
hydraulic fluid in the hydraulic
system of the Citroën BX. The
use of any other fluid will ruin
the rubber rings and seals. LHM
fluid is green in colour. Keep the
fluid, carefully sealed, in its
original container.
Safety First!
lIf the reservoir requires repeated topping-
up, this is an indication of a fluid leak
somewhere in the hydraulic system, which
should be investigated immediately. The
Citroën BX relies on the main hydraulic
reservoir to supply the hydropneumatic
suspension, the braking system and the
power steering (where fitted).
lIf a leak is suspected, the car should not be
driven until the suspension, braking and
steering systems have been checked. Never
take any risks where any of these systems are
concerned.
• Make sure that your car is
on level ground.
• Cleanliness is of great
importance when dealing
with the hydraulic system, so take care
to clean around the reservoir cap
before topping-up. Use only clean LHM
fluid.
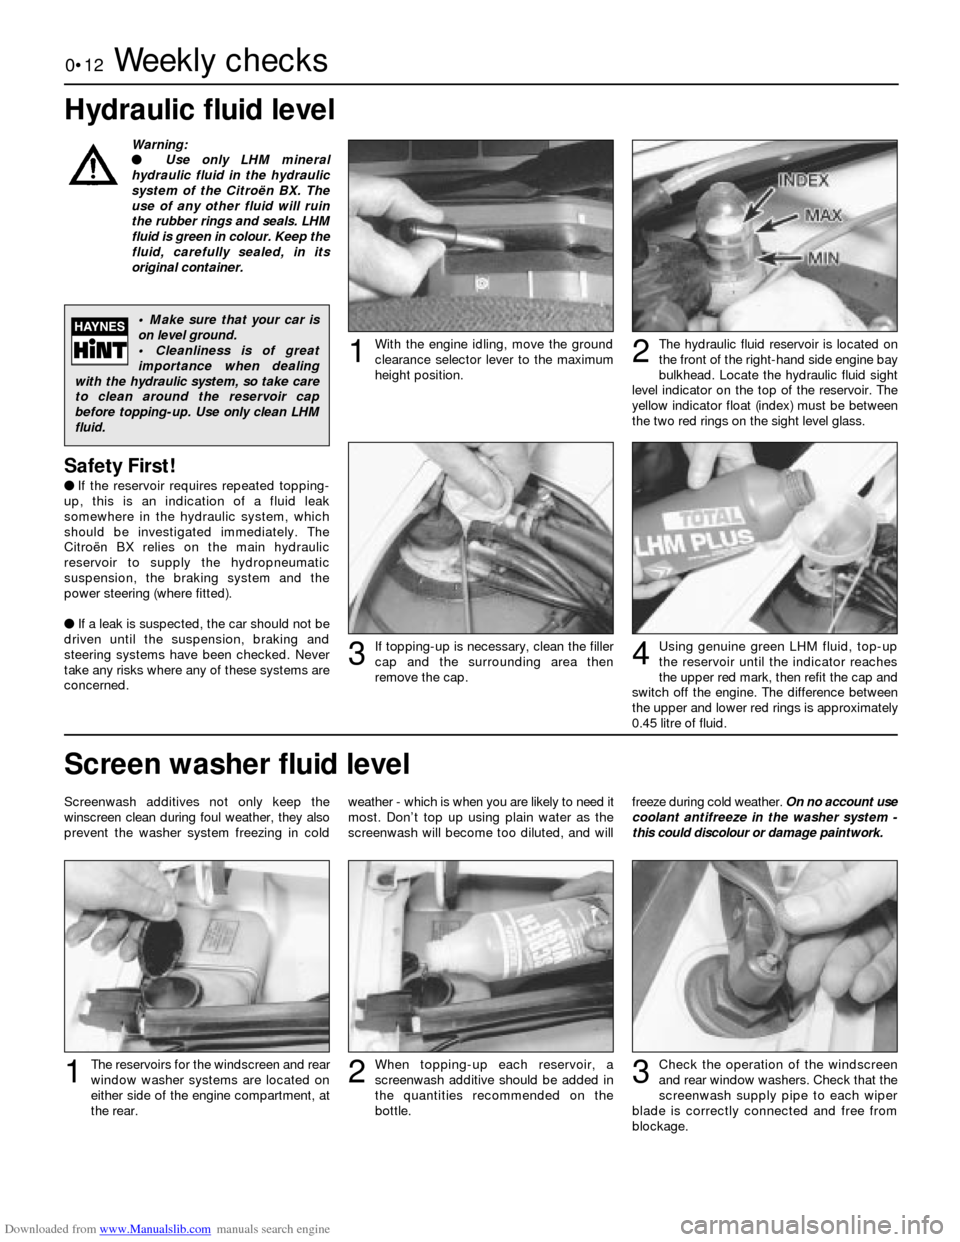
With the engine idling, move the ground
clearance selector lever to the maximum
height position.1The hydraulic fluid reservoir is located on
the front of the right-hand side engine bay
bulkhead. Locate the hydraulic fluid sight
level indicator on the top of the reservoir. The
yellow indicator float (index) must be between
the two red rings on the sight level glass.2
If topping-up is necessary, clean the filler
cap and the surrounding area then
remove the cap.3Using genuine green LHM fluid, top-up
the reservoir until the indicator reaches
the upper red mark, then refit the cap and
switch off the engine. The difference between
the upper and lower red rings is approximately
0.45 litre of fluid.4
Screenwash additives not only keep the
winscreen clean during foul weather, they also
prevent the washer system freezing in coldweather - which is when you are likely to need it
most. Don’t top up using plain water as the
screenwash will become too diluted, and willfreeze during cold weather. On no account use
coolant antifreeze in the washer system -
this could discolour or damage paintwork.
Screen washer fluid level
When topping-up each reservoir, a
screenwash additive should be added in
the quantities recommended on the
bottle.2The reservoirs for the windscreen and rear
window washer systems are located on
either side of the engine compartment, at
the rear.1Check the operation of the windscreen
and rear window washers. Check that the
screenwash supply pipe to each wiper
blade is correctly connected and free from
blockage.3
Page 15 of 16
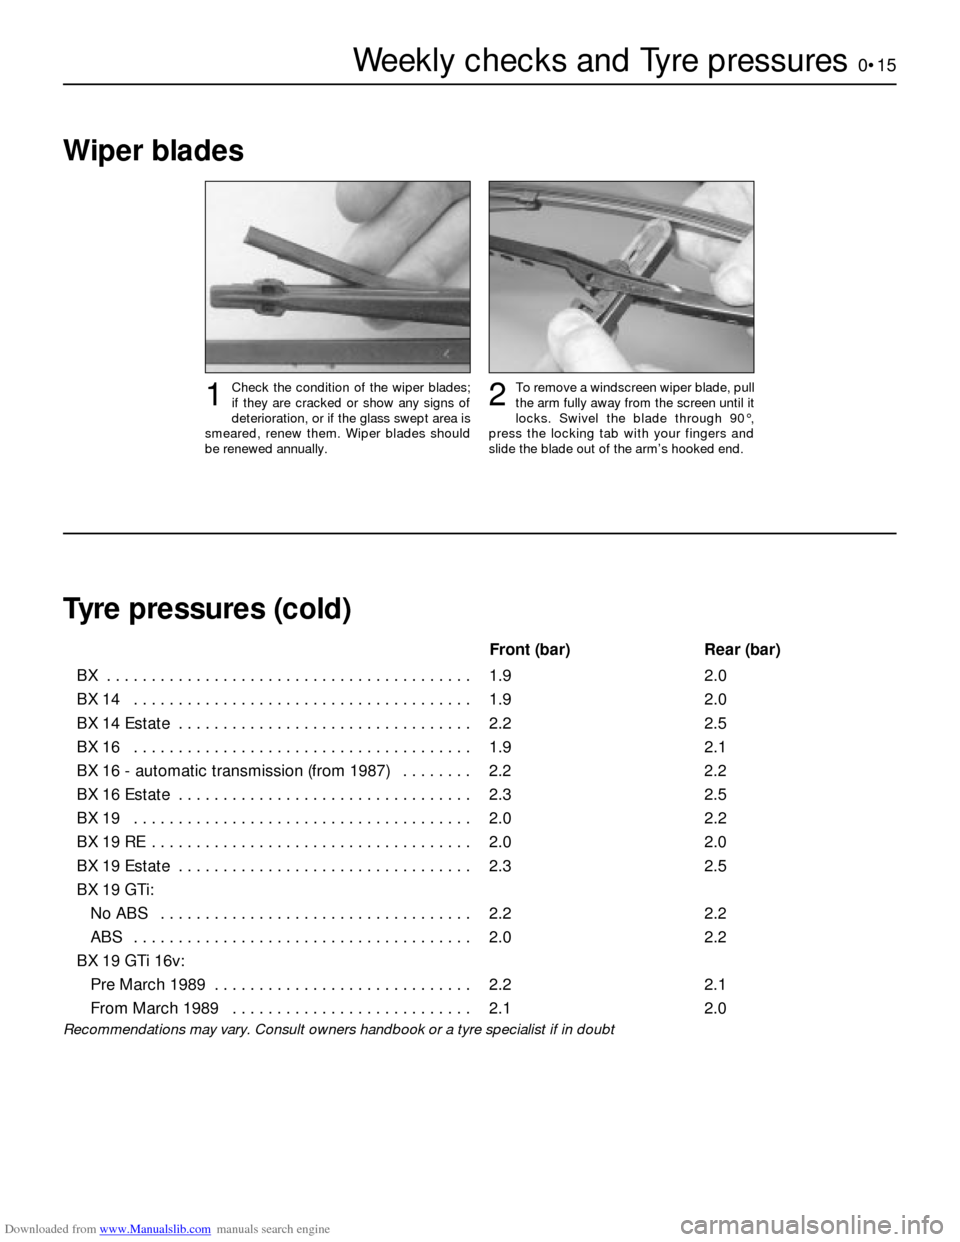
Downloaded from www.Manualslib.com manuals search engine Weekly checks and Tyre pressures0•15
Front (bar) Rear (bar)
BX . . . . . . . . . . . . . . . . . . . . . . . . . . . . . . . . . . . . . . . . . 1.9 2.0
BX 14 . . . . . . . . . . . . . . . . . . . . . . . . . . . . . . . . . . . . . . 1.9 2.0
BX 14 Estate . . . . . . . . . . . . . . . . . . . . . . . . . . . . . . . . . 2.2 2.5
BX 16 . . . . . . . . . . . . . . . . . . . . . . . . . . . . . . . . . . . . . . 1.9 2.1
BX 16 - automatic transmission (from 1987) . . . . . . . . 2.2 2.2
BX 16 Estate . . . . . . . . . . . . . . . . . . . . . . . . . . . . . . . . . 2.3 2.5
BX 19 . . . . . . . . . . . . . . . . . . . . . . . . . . . . . . . . . . . . . . 2.0 2.2
BX 19 RE . . . . . . . . . . . . . . . . . . . . . . . . . . . . . . . . . . . . 2.0 2.0
BX 19 Estate . . . . . . . . . . . . . . . . . . . . . . . . . . . . . . . . . 2.3 2.5
BX 19 GTi:
No ABS . . . . . . . . . . . . . . . . . . . . . . . . . . . . . . . . . . . 2.2 2.2
ABS . . . . . . . . . . . . . . . . . . . . . . . . . . . . . . . . . . . . . . 2.0 2.2
BX 19 GTi 16v:
Pre March 1989 . . . . . . . . . . . . . . . . . . . . . . . . . . . . . 2.2 2.1
From March 1989 . . . . . . . . . . . . . . . . . . . . . . . . . . . 2.1 2.0
Recommendations may vary. Consult owners handbook or a tyre specialist if in doubt
Wiper blades
Check the condition of the wiper blades;
if they are cracked or show any signs of
deterioration, or if the glass swept area is
smeared, renew them. Wiper blades should
be renewed annually.1To remove a windscreen wiper blade, pull
the arm fully away from the screen until it
locks. Swivel the blade through 90°,
press the locking tab with your fingers and
slide the blade out of the arm’s hooked end.2
Tyre pressures (cold)