remove seats Citroen C CROSSER 2008 1.G Owner's Manual
[x] Cancel search | Manufacturer: CITROEN, Model Year: 2008, Model line: C CROSSER, Model: Citroen C CROSSER 2008 1.GPages: 216, PDF Size: 4.85 MB
Page 47 of 216
C O M F O R T
II
50
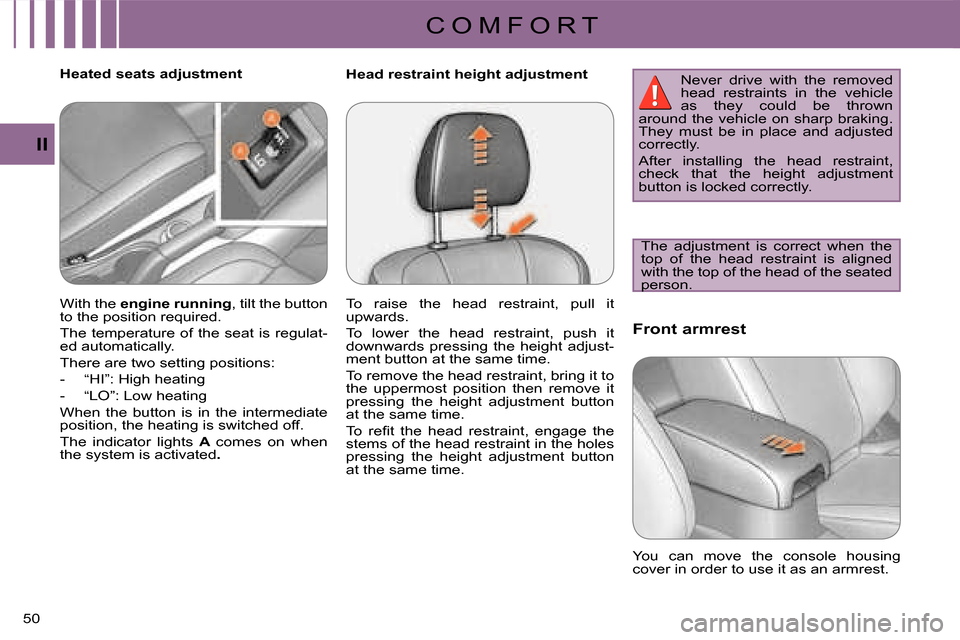
Head restraint height adjustment Front armrest
Heated seats adjustment
The adjustment is correct when the
top of the head restraint is aligned
with the top of the head of the seated
person. Never drive with the removed
head restraints in the vehicle
as they could be thrown
around the vehicle on sharp braking.
They must be in place and adjusted
correctly.
After installing the head restraint,
check that the height adjustment
button is locked correctly.
You can move the console housing
cover in order to use it as an armrest.
With the
engine running , tilt the button
to the position required.
The temperature of the seat is regulat-
ed automatically.
There are two setting positions:
- “HI”: High heating
- “LO”: Low heating
When the button is in the intermediate
position, the heating is switched off.
The indicator lights A comes on when
the system is activated . To raise the head restraint, pull it
upwards.
To lower the head restraint, push it
downwards pressing the height adjust-
ment button at the same time.
To remove the head restraint, bring it to
the uppermost position then remove it
pressing the height adjustment button
at the same time.
� �T�o� �r�e�fi� �t� �t�h�e� �h�e�a�d� �r�e�s�t�r�a�i�n�t�,� �e�n�g�a�g�e� �t�h�e�
stems of the head restraint in the holes
pressing the height adjustment button
at the same time.
Page 52 of 216
C O M F O R T
II
55
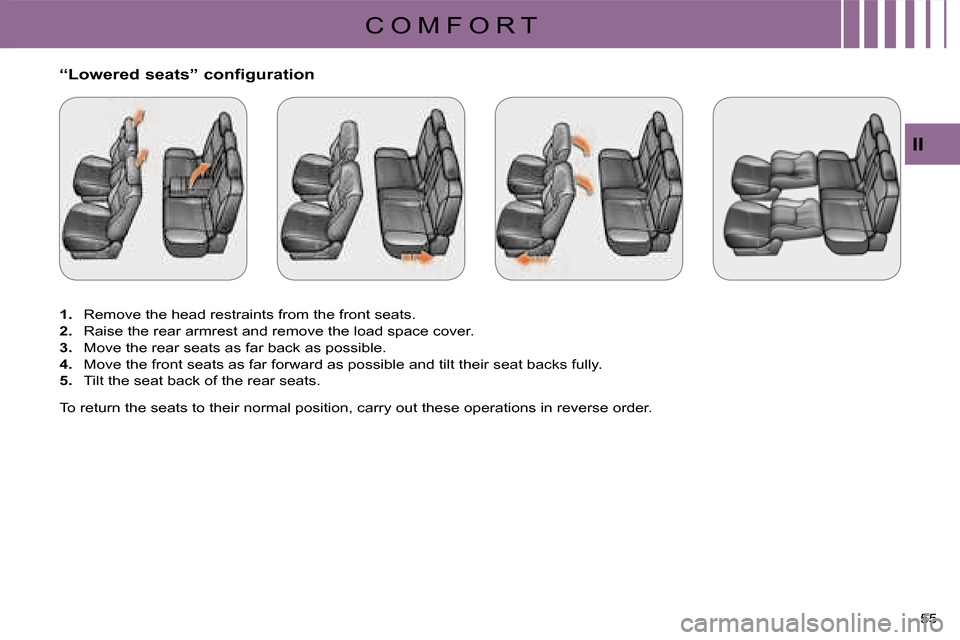
“Lowered seats” configuration
1. Remove the head restraints from the front seats.
2. Raise the rear armrest and remove the load space cover.
3. Move the rear seats as far back as possible.
4. Move the front seats as far forward as possible and tilt their s eat backs fully.
5. Tilt the seat back of the rear seats.
To return the seats to their normal position, carry out these o perations in reverse order.
Page 78 of 216
A C C E S S
III
81
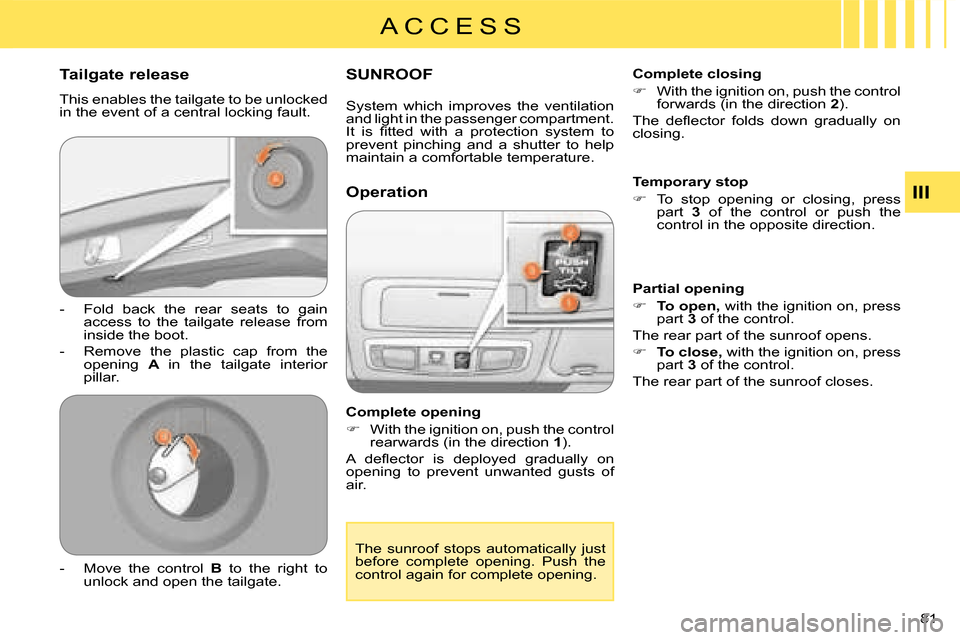
Tailgate release
This enables the tailgate to be unlocked
in the event of a central locking fault.
- Fold back the rear seats to gain access to the tailgate release from
inside the boot.
- Remove the plastic cap from the opening A in the tailgate interior
pillar. SUNROOF
Complete opening
�� � With the ignition on, push the control
rearwards (in the direction 1 ).
� �A� �d�e�fl� �e�c�t�o�r� �i�s� �d�e�p�l�o�y�e�d� �g�r�a�d�u�a�l�l�y� �o�n�
opening to prevent unwanted gusts of
air.
Operation
Complete closing
�� � With the ignition on, push the control
forwards (in the direction 2 ).
� �T�h�e� �d�e�fl� �e�c�t�o�r� �f�o�l�d�s� �d�o�w�n� �g�r�a�d�u�a�l�l�y� �o�n�
closing.
Temporary stop
�� To stop opening or closing, press
part 3 of the control or push the
control in the opposite direction.
Partial opening
�� �
To open , with the ignition on, press
part 3 of the control.
The rear part of the sunroof opens.
�� �
To close , with the ignition on, press
part
3 of the control.
The rear part of the sunroof closes.
- Move the control B to the right to
unlock and open the tailgate. The sunroof stops automatically just
before complete opening. Push the
control again for complete opening.
System which improves the ventilation
and light in the passenger compartment.
�I�t� �i�s� �fi� �t�t�e�d� �w�i�t�h� �a� �p�r�o�t�e�c�t�i�o�n� �s�y�s�t�e�m� �t�o�
prevent pinching and a shutter to help
maintain a comfortable temperature.
Page 79 of 216
A C C E S S
III
81
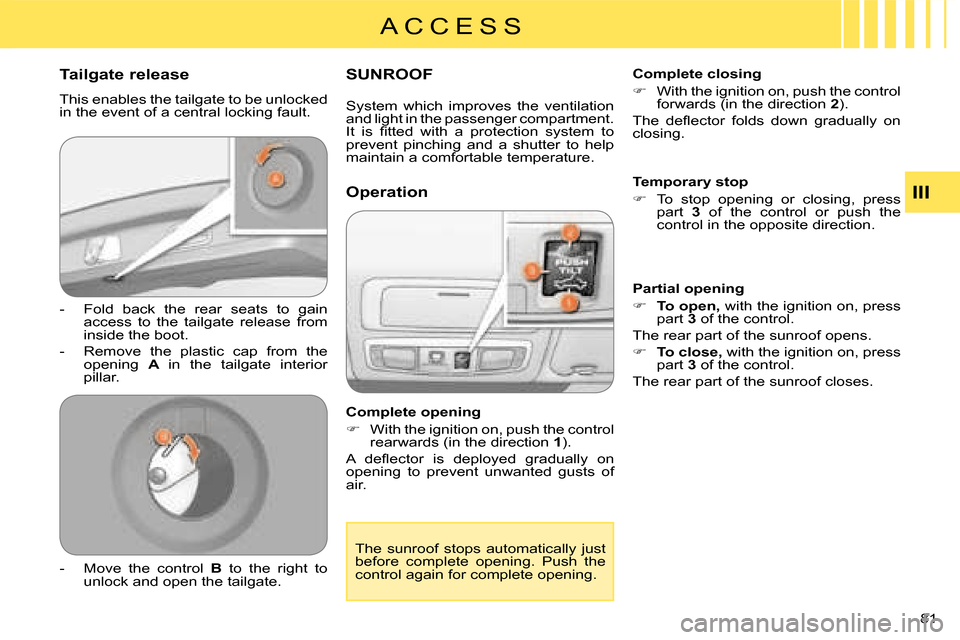
Tailgate release
This enables the tailgate to be unlocked
in the event of a central locking fault.
- Fold back the rear seats to gain access to the tailgate release from
inside the boot.
- Remove the plastic cap from the opening A in the tailgate interior
pillar. SUNROOF
Complete opening
�� � With the ignition on, push the control
rearwards (in the direction 1 ).
� �A� �d�e�fl� �e�c�t�o�r� �i�s� �d�e�p�l�o�y�e�d� �g�r�a�d�u�a�l�l�y� �o�n�
opening to prevent unwanted gusts of
air.
Operation
Complete closing
�� � With the ignition on, push the control
forwards (in the direction 2 ).
� �T�h�e� �d�e�fl� �e�c�t�o�r� �f�o�l�d�s� �d�o�w�n� �g�r�a�d�u�a�l�l�y� �o�n�
closing.
Temporary stop
�� To stop opening or closing, press
part 3 of the control or push the
control in the opposite direction.
Partial opening
�� �
To open , with the ignition on, press
part 3 of the control.
The rear part of the sunroof opens.
�� �
To close , with the ignition on, press
part
3 of the control.
The rear part of the sunroof closes.
- Move the control B to the right to
unlock and open the tailgate. The sunroof stops automatically just
before complete opening. Push the
control again for complete opening.
System which improves the ventilation
and light in the passenger compartment.
�I�t� �i�s� �fi� �t�t�e�d� �w�i�t�h� �a� �p�r�o�t�e�c�t�i�o�n� �s�y�s�t�e�m� �t�o�
prevent pinching and a shutter to help
maintain a comfortable temperature.
Page 95 of 216
C H I L D S A F E T Y
V
95
The incorrect installation of a child
seat in a vehicle compromises
the child’s protection in the event
of an accident.
For information regarding the ISOFIX
child seats which can be installed in
your vehicle, consult the summary
table for the location of the ISOFIX
child seats.
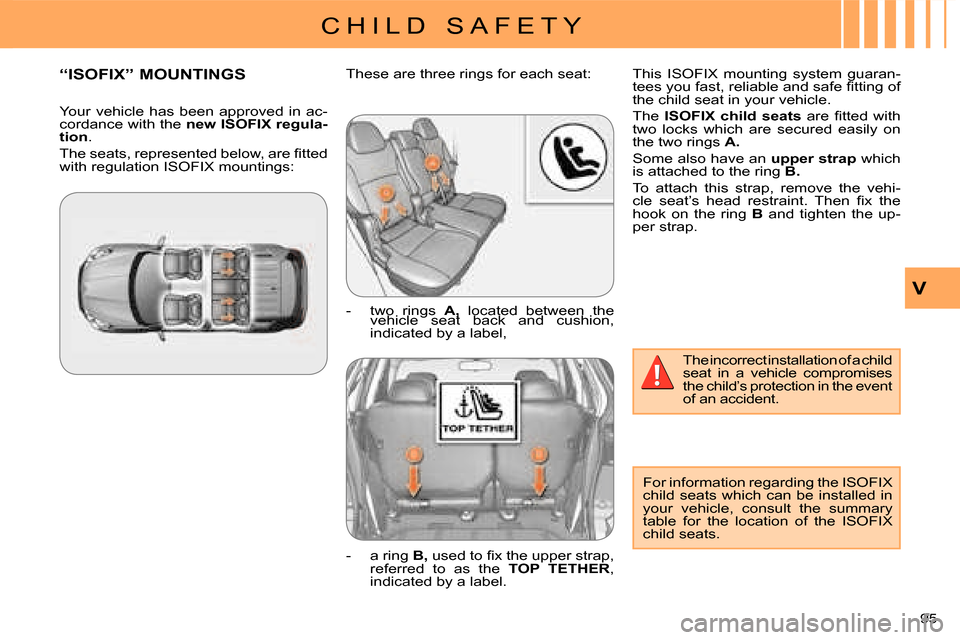
“ISOFIX” MOUNTINGS
These are three rings for each seat:
- two rings
A , located between the
vehicle seat back and cushion,
indicated by a label,
- a ring B , �u�s�e�d� �t�o� �fi� �x� �t�h�e� �u�p�p�e�r� �s�t�r�a�p�,�
referred to as the TOP TETHER ,
indicated by a label. This ISOFIX mounting system guaran-
�t�e�e�s� �y�o�u� �f�a�s�t�,� �r�e�l�i�a�b�l�e� �a�n�d� �s�a�f�e� �fi� �t�t�i�n�g� �o�f�
the child seat in your vehicle.
The
ISOFIX child seats � �a�r�e� �fi� �t�t�e�d� �w�i�t�h�
two locks which are secured easily on
the two rings A .
Some also have an upper strap which
is attached to the ring
B .
To attach this strap, remove the vehi-
�c�l�e� �s�e�a�t�’�s� �h�e�a�d� �r�e�s�t�r�a�i�n�t�.� �T�h�e�n� �fi� �x� �t�h�e�
hook on the ring B and tighten the up-
per strap.
Your vehicle has been approved in ac-
cordance with the
new ISOFIX regula-
tion .
� �T�h�e� �s�e�a�t�s�,� �r�e�p�r�e�s�e�n�t�e�d� �b�e�l�o�w�,� �a�r�e� �fi� �t�t�e�d�
with regulation ISOFIX mountings:
Page 97 of 216
C H I L D S A F E T Y
V
97
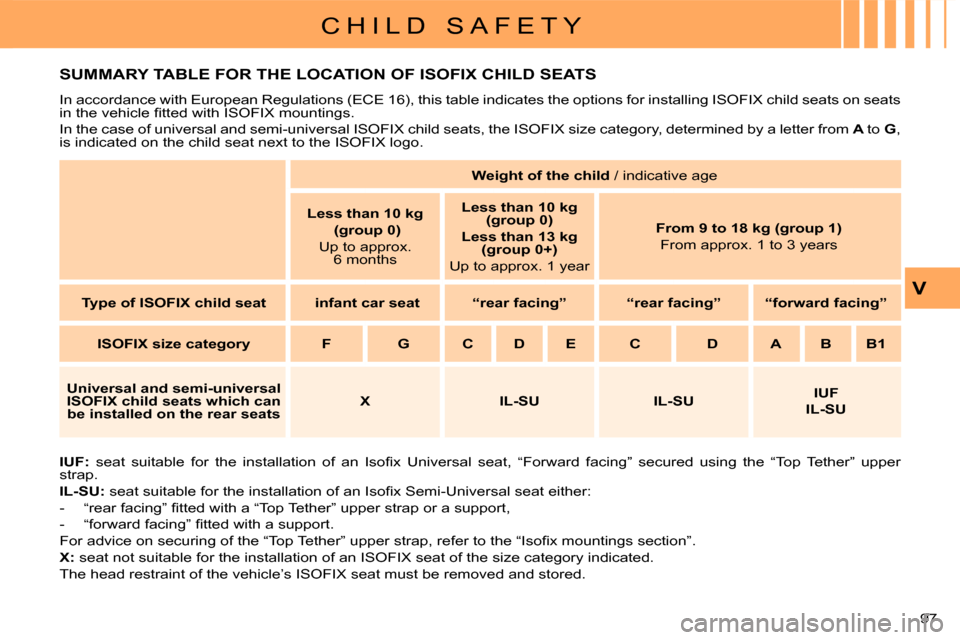
SUMMARY TABLE FOR THE LOCATION OF ISOFIX CHILD SEATS
IUF: �s�e�a�t� �s�u�i�t�a�b�l�e� �f�o�r� �t�h�e� �i�n�s�t�a�l�l�a�t�i�o�n� �o�f� �a�n� � �I� �s�o�fi� �x� � �U� �n�i�v�e�r�s�a �l� �s�e�a�t�,� �“� �F� �o�r�w�a�r�d� �f�a�c�i�n�g�”� �s�e�c�u�r�e�d� �u�s�i�n�g� �t�h�e� �“�T�o�p� �T�e�t�h�e�r�”� �u�p�p�e�r�
strap.
IL-SU: �s�e�a�t� �s�u�i�t�a�b�l�e� �f�o�r� �t�h�e� �i�n�s�t�a�l�l�a�t�i�o�n� �o�f� �a�n� �I�s�o�fi� �x� � �S� �e�m�i�-� �U� �n�i �v�e�r�s�a�l� �s�e�a�t� �e�i�t�h�e�r�:�
� � � �-� � �“�r�e�a�r� �f�a�c�i�n�g�”� �fi� �t�t�e�d� �w�i�t�h� �a� �“�T�o�p� �T�e�t�h�e�r�”� �u�p�p�e�r� �s�t�r�a�p� �o�r� �a� �s�u�p�p�o�r�t�,�
� � �-� � �“�f�o�r�w�a�r�d� �f�a�c�i�n�g�”� �fi� �t�t�e�d� �w�i�t�h� �a� �s�u�p�p�o�r�t�.� �
� �F�o�r� �a�d�v�i�c�e� �o�n� �s�e�c�u�r�i�n�g� �o�f� �t�h�e� �“�T�o�p� �T�e�t�h�e�r�”� �u�p�p�e�r� �s�t�r�a�p�,� �r�e�f�e�r� �t�o � �t�h�e� �“�I�s�o�fi� �x� �m�o�u�n�t�i�n�g�s� �s�e�c�t�i�o�n�”�.�
X: seat not suitable for the installation of an ISOFIX seat o f the size category indicated.
The head restraint of the vehicle’s ISOFIX seat must be removed and stored.
In accordance with European Regulations (ECE 16), this table i
ndicates the options for installing ISOFIX child seats on seats
�i�n� �t�h�e� �v�e�h�i�c�l�e� �fi� �t�t�e�d� �w�i�t�h� �I�S�O�F�I�X� �m�o�u�n�t�i�n�g�s�.�
In the case of universal and semi-universal ISOFIX child seats, th e ISOFIX size category, determined by a letter from A to G ,
�i�s� �i�n�d�i�c�a�t�e�d� �o�n� �t�h�e� �c�h�i�l�d� �s�e�a�t� �n�e�x�t� �t�o� �t�h�e� �I�S�O�F�I�X� �l�o�g�o�.�
Weight of the child / indicative age
Less than 10 kg
(group 0)
�U�p� �t�o� �a�p�p�r�o�x�.� 6 months
Less than 10 kg
(group 0)
Less than
13 kg
(group 0+)
�U�p� �t�o� �a�p�p�r�o�x�.� �1� �y�e�a�r� �
From 9 to 18 kg (group 1)
�F�r�o�m� �a�p�p�r�o�x�.� �1� �t�o� �3� �y�e�a�r�s� �
Type of ISOFIX child seat infant car seat “rear facing” “rear facing” “forward facing”
ISOFIX size category F G C D E C D A B B1
Universal and semi-universal ISOFIX child seats which can be installed on the rear seats X IL-SU IL-SU
IUF
IL-SU
Page 141 of 216
P R A C T I C A L I N F O R M A T I O N
IX
139
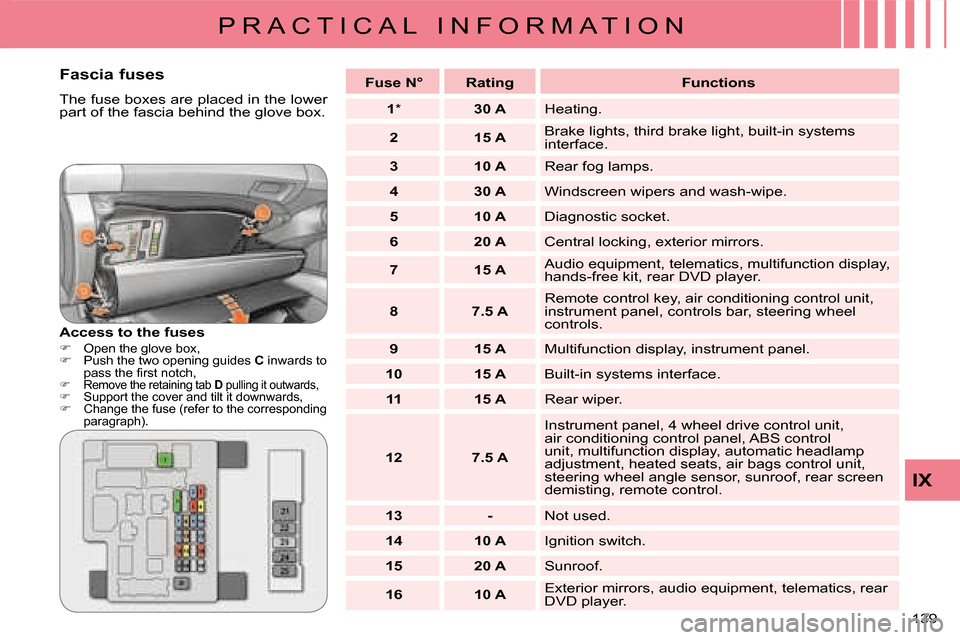
Fascia fuses
� �T�h�e� �f�u�s�e� �b�o�x�e�s� �a�r�e� �p�l�a�c�e�d� �i�n� �t�h�e� �l�o�w�e�r�
�p�a�r�t� �o�f� �t�h�e� �f�a�s�c�i�a� �b�e�h�i�n�d� �t�h�e� �g�l�o�v�e� �b�o�x�.�
Access to the fuses
�� � �O�p�e�n� �t�h�e� �g�l�o�v�e� �b�o�x�,�
�� � Push the two opening guides C inwards to
�p�a�s�s� �t�h�e� �fi� �r�s�t� �n�o�t�c�h�,�
�� � Remove the retaining tab D pulling it outwards,
� Support the cover and tilt it downwards,
� Change the fuse (refer to the corresponding
paragraph).
Fuse N° Rating Functions
1 � � �*� � �
30 A Heating.
2 15 A Brake lights, third brake light, built-in systems
interface.
3 10 A Rear fog lamps.
4 30 A Windscreen wipers and wash-wipe.
5 10 A Diagnostic socket.
6 20 A � �C�e�n�t�r�a�l� �l�o�c�k�i�n�g�,� �e�x�t�e�r�i�o�r� �m�i�r�r�o�r�s�.�
7 15 A Audio equipment, telematics, multifunction display,
hands-free kit, rear DVD player.
8 7.5 A Remote control key, air conditioning control unit,
instrument panel, controls bar, steering wheel
controls.
9 15 A Multifunction display, instrument panel.
10 15 A Built-in systems interface.
11 15 A Rear wiper.
12 7.5 A Instrument panel, 4 wheel drive control unit,
air conditioning control panel, ABS control
unit, multifunction display, automatic headlamp
adjustment, heated seats, air bags control unit,
steering wheel angle sensor, sunroof, rear screen
demisting, remote control.
13 - Not used.
14 10 A Ignition switch.
15 20 A Sunroof.
16 10 A � �E�x�t�e�r�i�o�r� �m�i�r�r�o�r�s�,� �a�u�d�i�o� �e�q�u�i�p�m�e�n�t�,� �t�e�l�e�m�a�t�i�c�s�,� �r�e�a�r�
DVD player.
Page 142 of 216
P R A C T I C A L I N F O R M A T I O N
IX
140
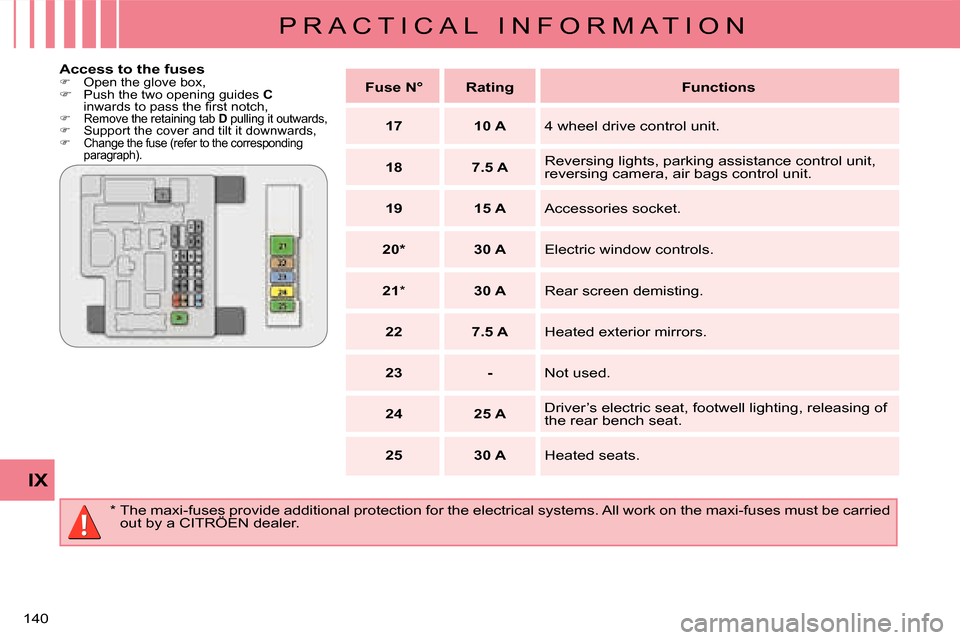
Access to the fuses
�� � �O�p�e�n� �t�h�e� �g�l�o�v�e� �b�o�x�,�
�� � Push the two opening guides �
C � �
�i�n�w�a�r�d�s� �t�o� �p�a�s�s� �t�h�e� �fi� �r�s�t� �n�o�t�c�h�,
�� � Remove the retaining tab D pulling it outwards,
� Support the cover and tilt it downwards,
� Change the fuse (refer to the corresponding
paragraph).
� � � �*� � �T�h�e� �m�a�x�i�-�f�u�s�e�s� �p�r�o�v�i�d�e� �a�d�d�i�t�i�o�n�a�l� �p�r�o�t�e�c�t�i�o�n� �f�o�r� �t�h�e� �e�l �e�c�t�r�i�c�a�l� �s�y�s�t�e�m�s�.� �A�l�l� �w�o�r�k� �o�n� �t�h�e� �m�a�x�i�-�f�u�s�e�s� �m�u�s�t� �b�e� �c�a�r�r�i�e�d�
out by a CITRÖEN dealer.
Fuse N° Rating Functions
17 10 A 4 wheel drive control unit.
18 7.5 A Reversing lights, parking assistance control unit,
reversing camera, air bags control unit.
19 15 A Accessories socket.
�2�0�* 30 A Electric window controls.
21 � �*� � �
30 A Rear screen demisting.
22 7.5 A � �H�e�a�t�e�d� �e�x�t�e�r�i�o�r� �m�i�r�r�o�r�s�.�
23 - Not used.
24 25 A Driver’s electric seat, footwell lighting, releasing of
the rear bench seat.
25 30 A Heated seats.