headlamp CITROEN C-ELYSÉE 2014 Handbook (in English)
[x] Cancel search | Manufacturer: CITROEN, Model Year: 2014, Model line: C-ELYSÉE, Model: CITROEN C-ELYSÉE 2014Pages: 257, PDF Size: 9.06 MB
Page 97 of 257

95
6
Visibility
Temporarily keeping the dipped beam
headlamps on after the vehicle's ignition has been switched off makes the driver's exit easier when the light is poor.
Manual guide-me-home
lighting
Switching on
�) With the ignition off, "flash" the headlamps using the lighting stalk.�)
A fur ther "headlamp flash" switches thefunction off.
Switching off
The manual guide-me-home lighting switchesoff automatically after a set time.
Daytime running lamps *
On star ting the vehicle, the daytime running
lamps come on automaticall
y, if the lighting control stalk is in the "0" position.
*
According to country. The da
ytime running laps go off if
the sidelamps and dipped beam
headlamps are switched on.
This function cannot be deactivated.
Page 98 of 257

96
Visibility
Headlamp adjustment
To avoid causing a nuisance to other road users, the headlamp beams should be adjustedaccording to the load in the vehicle.
This adjstment can be carried out using the control located:
- under the bonnet
,- below and to the left of the steering wheel (depending on version).
The initial setting is position "0".
01 or 2 people in the front seats.- 5 people. 15 people + maximum authorised load in the boot.-Driver + maximum authorised load in the boot.2Not used. -Not used. 3Not used.
Under the bonnet
�)Raise the bonnet for access to the control (one per headlamp). Adjustment is always done clockwise.
Tr a v e l l i ng abroad
If using your vehicle in a country thatdrives on the other side of the road, theheadlamps must be adjusted to avoid dazzling on-coming drivers. Contact a CITROËN dealer or a qualified workshop.
To the left of the steering wheel
Page 135 of 257

133
9
Practical information
Changing a bulb
Front lamps
In some weather conditions (e.g. low temperature or humidity), the presence of misting on the internal sur face of the glass of the headlamps and rear lampsis normal; it disappears after the lamps have been on for a few minutes.
The headlamps are fitted with polycarbonate glass with a protectivecoating:�)do not clean them using a dry or abrasive cloth, nor with a detergent or solvent product,�)
use a sponge and soapy water or apH neutral product,�)
when using a high pressure washer on persistent marks, do not keep the lance directed towards thelamps or their edges for too long, so as not to damage their protectivecoating and seals,�)
do not touch the bulb directly withyour fingers, use lint-free cloths.
Changing a bulb should only be doneafter the headlamp has been switched off for a few minutes (risk of serious burns). It is imperative to use only anti-ultraviolet (UV) type bulbs in order notto damage the headlamp. Always replace a failed bulb with a new bulb with the same type andspecification.1
.Direction indicators (PY21W amber).2. Main beam headlamps (H1- 55W).3.Dipped beam headlamps (H7-55W).4.Daytime running lamps / sidelamps(W21/5W).or
Sidelamps (W5W).5.Front foglamps (H11- 55W).
Page 136 of 257

134
Practical information
Amber coloured bulbs, such as thedirection indicators, must be replacedwith bulbs of identical specificationsand colour.
When refitting, close the protective cover carefully to preser ve the sealing of the headlamp.
Rapid flashing of the direction indicator warning lamp (right or left) indicates thefailure of a bulb on that side.
Changing direction indicator bulbs
�)Turn the bulb holder an eighth of a turn anti-clockwise and extract it.�)Remove the bulb and change it.
To reassemble, carry out these operations in
reverse order.
Changing main beam headlampbulbs
�)Remove the protective cover by pulling on
the tab. �)Disconnect the bulb connector. �)Push the spring to one side to release the bulb.�)Remove the bulb and change it.
To r e f i t , c a r ry out these operations in reverse order.
Page 137 of 257

135
9
Practical information
Changing dipped beamheadlamp bulbs
�)Remove the protective cover by pullingthe tab. �)Disconnect the bulb connector by lifting
it off.�)Pull the bulb out and change it.
To r e f i t , c a r ry out these operations in reverse order.
Changing daytime running lamp /
sidelamp bulbs
�) Pull the bulb holder pressing on the tabs on both sides. �)
Remove the bulb and change it.
To r efit, carry out these operations in reverse order.
Page 143 of 257

141
9
Practical information
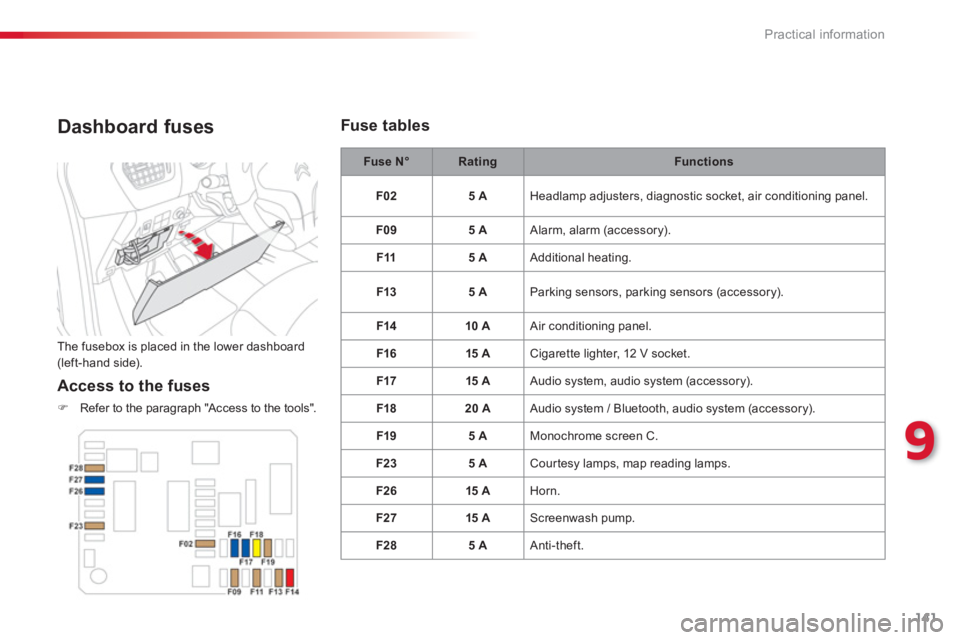
Dashboard fuses
The fusebox is placed in the lower dashboard(left-hand side).
Access to the fuses
�)Refer to the paragraph "Access to the tools".
Fuse N°RatingFunctions
F02
5 A Headlamp adjusters, diagnostic socket, air conditioning panel.
F09
5 A Alarm, alarm (accessory).
F1
15 A Additional heating.
F1
35 A Parking sensors, parking sensors (accessory).
F1410 A Air conditioning panel.
F1
615 A
Cigarette lighter, 12 V socket.
F17 15 A
Audio s
ystem, audio system (accessory).
F1
820 A Audio system / Bluetooth, audio system (accessory).
F1
95 A Monochrome screen C.
F2
35 A Courtesy lamps, map reading lamps.
F2
615 A
Horn.
F27 15 A
Screenwash pump.
F2
85 A Anti-theft.
Fuse tables
Page 145 of 257

143
9
Practical information
Fuse N°RatingFunctions
F14 15
A Heated lower windscreen.
F1
55 A Air conditioning compressor.
F1
615 A
Front foglamps.
F18 10 A
Ri
ght hand main beam headlamp.
F1
910 A
Left hand main beam headlamp.
F2
940 A Front wiper motor.
F3
080 A
Pre-heater plugs (Diesel).
Access to the fuses
�)Unclip the cover. �)Change the fuse (see corresponding
paragraph). �)When you have finished, close the cover carefully to ensure correct sealing of the
fusebox.
Fuse table
Engine compartment fuses
The fusebox is placed in the engine compartment near the battery (left-hand side).
Page 149 of 257

147
9
Practical information
System which manages the duration of use of certain functions to retain a sufficient level of charge in the battery.
After the engine has stopped, you can still use functions such as the audio andtelematics system, windscreen wipers, dipped
beam headlamps, cour tesy lamps, etc. for a maximum combined duration of about
thirty minutes.
Electrical energy economy mode
Switching to economy
mode
Once this time has elapsed, a message
appears in the screen indicating that the vehiclehas switched to economy mode and the activefunctions are put on standby.
If a telephone call is being made at this time, it will be maintained for around 10 minutes with
the Bluetooth hands-free system of your audio
system.
Exiting economy mode
These functions are reactivated automatically
next time the vehicle is driven.�) To restore these functions immediately,start the engine and let it run for at least five minutes.
A flat battery prevents the engine from starting (refer to the correspondingsection).
Page 202 of 257

200
07 SCREEN MENU MAP
Personalisation-
configuration
Defi ne the vehicle parameters
Driving assistance
Parking assistance
Vehicle lightin
g
Daytime lights
Interior lighting
Follow-me-home headlamps
Choice of lan
guage
Displa
y confi guration
Choice of unit
s
Date and time adjustment
Display parameters
Bri
ghtness
1
2
3
2
3
2
3
1
1
2
2
2
2
Page 224 of 257

222
Visual search
Exterior
Remote control key 42- 45 - opening / closing- anti-theft protection- starting- battery
Boot 49-50 - opening / closing- emergency releaseTemporary puncture repair kit 120 -125
Wipers 97-98
Changing a wiper blade 148
Changing bulbs 137-13 8 - rear lamps - 3rdbrake lamp- number plate lamps- foglamp
Fuel tank, misfuel prevention 52-54
Accessories 154-157
ESP/ASR 102
Tyre pressures 173 Changing a wheel 126 -132
- tools
- removing / refitting
Lighting controls 91-95 Daytime running lamps 95 Headlamp beam adjustment 96 Changing bulbs 133 -136 - front lamps- foglamps - direction indicator repeaters To w i ng 149 -15 0 Very cold climate screen(s) 15 3
Door mirrors 58-59
Doors 42- 45, 48 - opening / closing- central locking - secondary control Alarm 46-47 Electric windows 51
Rear parking sensors 89 -90
To w b a r 151