steering wheel CITROEN C-ELYSÉE 2015 Owners Manual
[x] Cancel search | Manufacturer: CITROEN, Model Year: 2015, Model line: C-ELYSÉE, Model: CITROEN C-ELYSÉE 2015Pages: 285, PDF Size: 13.42 MB
Page 4 of 285

.
.
Instrument panel 10
Indicator and warning lamps
1
1
Service indicator
2
0
Distance recorders
2
2
Setting the date and time
2
3
Trip computer
2
4
Monochrome screen C (Audio system / Bluetooth)
2
6
Monitoring
ove
r view
Remote control key 3
0
Alarm
3
4
Doors
3
6
Boot
3
7
Windows
3
9
access
Front seats 40
Rear seats
4
2
Mirrors
4
3
Steering wheel adjustment
4
5
Ventilation
4
6
Heating
4
8
Manual air conditioning
(without display screen)
4
8
Electronic air conditioning (with display screen)
5
0
Front demist - defrost
5
3
Rear screen demist - defrost
5
4
Comfort
Driving recommendations 60
Starting-switching off the engine
6
1
Parking brake
6
4
Manual gearbox
6
5
Electronic gearbox
6
6
Automatic gearbox
7
0
Gear shift indicator
7
4
Speed limiter
7
5
Cruise control
7
7
Rear parking sensors
7
9
Driving
Lighting control 81
Headlamp adjustment
8
6
Wiper control stalk
87
C
ourtesy lamps
8
9
Visibility
Eco-driving
Interior fittings 5
5
Boot fittings
5
8
Fittings
Contents
Page 8 of 285

6
C-Elysee_en_Chap00b_vue-ensemble_ed01-2014
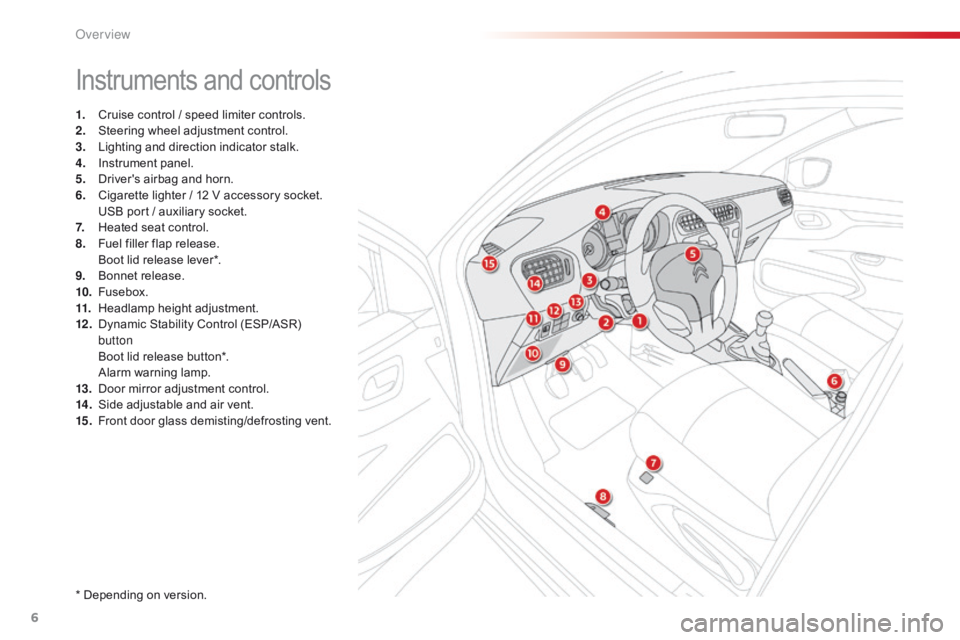
Instruments and controls
1. Cruise control / speed limiter controls.
2. Steering wheel adjustment control.
3.
L
ighting and direction indicator stalk.
4.
I
nstrument panel.
5.
D
river's airbag and horn.
6.
C
igarette lighter / 12 V accessory socket.
U
SB port / auxiliary socket.
7.
H
eated seat control.
8.
F
uel filler flap release.
B
oot lid release lever*.
9.
B
onnet release.
10.
F
usebox.
11.
H
eadlamp height adjustment.
12 .
D
ynamic Stability Control (ESP/ASR)
button
B
oot lid release button*.
A
larm warning lamp.
13.
D
oor mirror adjustment control.
14 .
S
ide adjustable and air vent.
15.
F
ront door glass demisting/defrosting vent.
* Depending on version.
Over view
Page 36 of 285

34
C-Elysee_en_Chap02_ouvertures_ed01-2014
System which protects and provides a deterrent
against theft and break-ins. It provides
perimeter protection as well as a self-protection
function.
Alarm
Perimeter protection
The system checks for opening of the vehicle.
The alarm is triggered if anyone tries to open a
door, the boot, the bonnet...
Self-protection function
The system checks for the putting out of
service of its components.
The alarm is triggered if the battery, the
central control or the wires of the siren
are put out of service or damaged.
Locking the vehicle with
alarm
Activation
F Switch off the ignition and get out of the vehicle.
F Press the locking button on the remote control.
The perimeter protection is activated 5 seconds
after pressing the locking button on the remote
control.
If an opening (door, boot...) is not closed
fully, the vehicle is not locked but the alarm is
activated. F
P
ress the unlocking button on
the remote control.
Deactivation
The alarm is deactivated: the
indicator lamp goes off.
The alarm is activated: a indicator
lamp in the switch panel to the
left of the steering wheel flashes
once per second.
For all work on the alarm system,
contact a CITROËN dealer or a
qualified workshop.
access
Page 47 of 285

45
Steering wheel adjustment
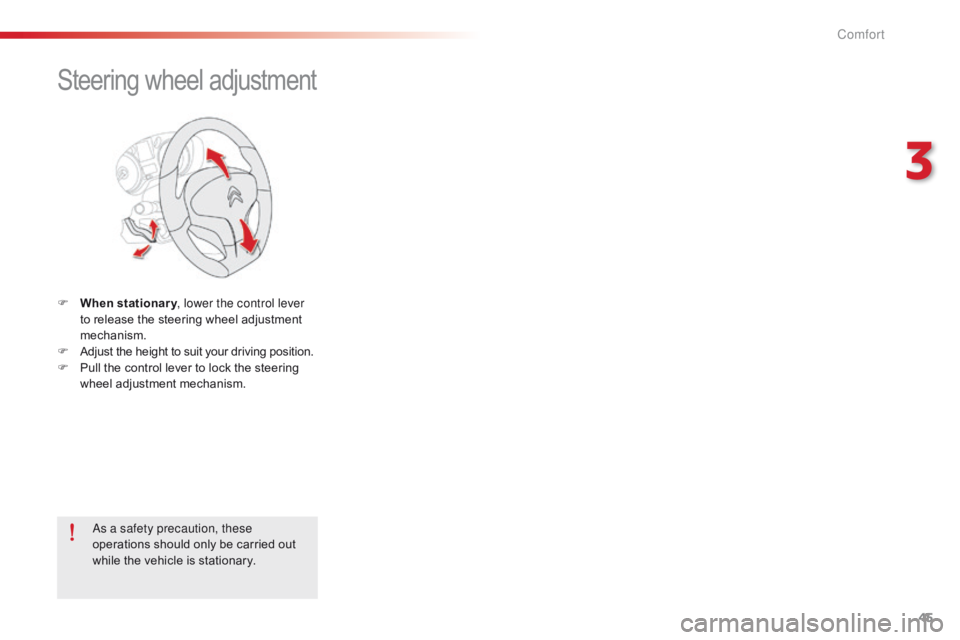
F When stationary, lower the control lever
to release the steering wheel adjustment
mechanism.
F
A
djust the height to suit your driving position.
F
P
ull the control lever to lock the steering
wheel adjustment mechanism.
as a s
afety precaution, these
operations should only be carried out
while the vehicle is stationary.
3
Comfort
Page 64 of 285

62
In certain cases, you may have to apply
more force to the steering (wheels on
full lock, for example).
Starting the engine
F With a petrol engine, operate the starter motor by turning the key to position 3
without pressing the accelerator pedal,
until the engine starts. Once the engine is
running, release the key. F
W
ith a Diesel engine, turn the key to
position 2 , ignition on, to operate the
engine pre-heating system.
With the parking brake applied and the gearbox
in neutral or position N or P
:
F
d
epress the clutch pedal fully (manual
gearbox),
or
F
p
ress the brake pedal firmly (electronic or
automatic gearbox),
F
i
nsert the key into the ignition switch; the
system recognises the code,
F
u
nlock the steering column by
simultaneously turning the steering and the
key.
Wait until this warning lamp goes off in the
instrument panel then operate the starter
motor by turning the key to position
3
without pressing the accelerator pedal,
until the engine starts. Once the engine is
running, release the key.
If the engine does not start straight
away, switch off the ignition. Wait a
few moments before operating the
starter motor again. If the engine does
not start after several attempts, do not
keep trying: you risk damaging the
starter motor or the engine. Contact
a CITROËN dealer or a qualified
workshop. In wintry conditions, the warning lamp
can stay on for a longer period. When
the engine is hot, the warning lamp
does not come on. Never leave the engine running in
an enclosed area without adequate
ventilation: internal combustion
engines emit toxic exhaust gases,
such as carbon monoxide. Danger of
intoxication and death.
In very severe wintry conditions
(temperatures below -23°C), to ensure
the correct operation and durability of
the mechanical components of your
vehicle, engine and gearbox, it is
necessary to leave the engine running
for 4 minutes before moving off. In temperate conditions, do not leave
the engine at idle to warm up but move
off straight away and drive at moderate
speed.
Driving
Page 65 of 285

63
Never switch off the ignition before the
vehicle is at a complete stop. With the
engine off, the braking and steering
assistance systems are also cut off: risk
of loss of control of the vehicle.
For more information, refer to the
"Practical information" section, under
"Energy economy mode". When you leave the vehicle, keep the
key with you and lock the vehicle.
To facilitate unlocking of the steering
column, it is recommended that the
wheels be returned to the straight ahead
position before switching off the engine.
Switching off the engine
F Check that the parking brake is correctly
applied, particularly on sloping ground.
F
S
top the vehicle.
F
W
ith the engine running at idle, turn the key
to position 1 .
F
R
emove the key from the ignition switch.
F
T
o lock the steering column, turn the
steering until it locks.
Energy economy mode
After switching off the engine (position 1- Stop ),
for a maximum of 30 minutes you can still use
functions such as the audio and telematic
system, the wipers, dipped beam headlamps,
courtesy lamps, ...
Key left in the "Ignition on"
position
On opening the driver's door, an alert
message is displayed, accompanied by an
audible signal, to remind you that the key is
still in the ignition switch at position 1 (Stop).
If the key has been left in the ignition
switch at position 2 (Ignition on) ,
the ignition will be switched off
automatically after one hour.
To switch the ignition back on, turn the
key to position 1 (Stop) , then back to
position 2 (Ignition on) .
5
driving
Page 77 of 285

75
Speed limiter
System which prevents the vehicle from
exceeding the speed programmed by the driver.
When the programmed speed limit is reached,
pressing the accelerator pedal in the normal
manner no longer has any effect.
The speed limiter is switched on manually:
it requires a programmed speed of at least
20 mph (30 km/h).
The speed limiter is switched off by manual
operation of the control.
The programmed speed can be exceeded
temporarily by pressing the accelerator firmly.
To return to the programmed speed, simply
slow down to a speed below the programmed
speed.
The speed limiter cannot, in any
circumstances, replace the need to
respect speed limits, nor can it replace the
need for vigilance on the part of the driver. The controls of this system are grouped
together on stalk A
.
1.
S
peed limiter mode selection thumb wheel.
2.
V
alue decrease button.
3.
V
alue increase button.
4.
S
peed limiter on / off button.Steering mounted controls
The programmed information is grouped
together in the instrument panel screen.
5.
S
peed limiter on / off indication.
6.
S
peed limiter mode selection indication.
7.
P
rogrammed speed value.
Displays in the instrument panel
The programmed speed remains in the memory
when the ignition is switched off.
5
Driving
Page 79 of 285

77
Cruise control
System which automatically maintains the
speed of the vehicle at the value programmed
by the driver, without any action on the
accelerator pedal.
The cruise control is switched on manually: it
requires a minimum vehicle speed of 25 mph
(40 km/h), as well as the engagement of:
-
f
ourth gear on a manual gearbox,
-
s
econd gear on a or automatic or electronic
gearbox, in sequential mode,
-
p
osition A on an electronic gearbox or
position D on an automatic gearbox.
The cruise control is switched off manually
or by pressing the brake or clutch pedal or
on triggering of the ESP system for safety
reasons.
It is possible to exceed the programmed speed
temporarily by pressing the accelerator pedal.
To return to the programmed speed, simply
release the accelerator pedal.
Switching off the ignition cancels any
programmed speed value. The controls of this system are grouped
together on stalk A
.
1.
C
ruise control mode selection thumb
wheel.
2.
V
alue decrease button.
3.
V
alue increase button.
4.
C
ruise control off/resume button.Steering mounted controls
The cruise control cannot, in any
circumstances, replace the need to
respect speed limits, nor can it replace the
need for vigilance on the part of the driver.The programmed information is grouped
together in the instrument panel screen.
5.
C
ruise control off/resume indication.
6.
C
ruise control mode selection indication.
7.
P
rogrammed speed value.
Displays in the instrument panel
5
driving
Page 88 of 285

86
Headlamp adjustment
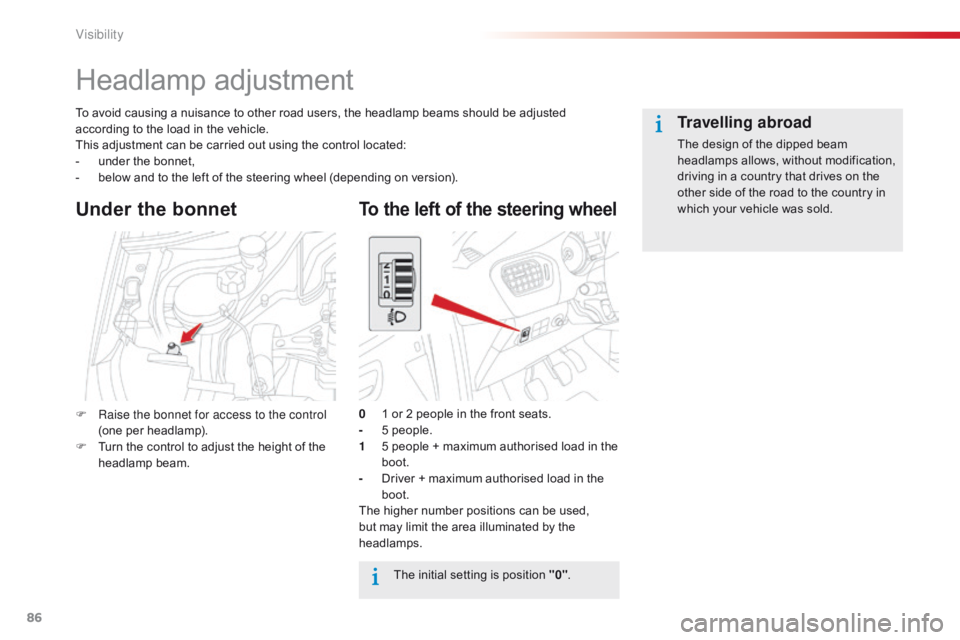
To avoid causing a nuisance to other road users, the headlamp beams should be adjusted
according to the load in the vehicle.
This adjustment can be carried out using the control located:
-
u
nder the bonnet,
-
b
elow and to the left of the steering wheel (depending on version).
The initial setting is position "0".
0
1 o
r 2 people in the front seats.
-
5 p
eople.
1
5 p
eople + maximum authorised load in the
boot.
-
D
river + maximum authorised load in the
boot.
The higher number positions can be used,
but may limit the area illuminated by the
headlamps.
Under the bonnet
F Raise the bonnet for access to the control (one per headlamp).
F
T
urn the control to adjust the height of the
headlamp beam.
Travelling abroad
The design of the dipped beam
headlamps allows, without modification,
driving in a country that drives on the
other side of the road to the country in
which your vehicle was sold.
To the left of the steering wheel
Visibility
Page 92 of 285

90
C-Elysee_en_Chap07_securite_ed01-2014
Direction indicators
Selection of the left or right direction indicators
to signal a change of direction of the vehicle.
F
L
eft: lower the lighting stalk beyond the
point of resistance.
F
R
ight: raise the lighting stalk beyond the
point of resistance.
Three flashes of the direction
indicators
F Press briefly upwards or downwards, without going beyond the point of
resistance; the direction indicators will
flash 3 times.
Hazard warning lamps
Automatic operation of
hazard warning lamps
When braking in an emergency, depending on
the deceleration, the hazard warning lamps
come on automatically.
They switch off automatically the first time you
accelerate.
F
Y
ou can also switch them off by pressing
the button.
F
P
ress this button, the direction indicators
flash.
They can operate with the ignition off.
Horn
F Press the central part of the steering wheel.
Audible warning system to alert other road
users to an imminent danger.
A visual warning by means of the direction
indicators to alert other road users to a vehicle
breakdown, towing or accident.
Safety