bonnet CITROEN C-ELYSÉE 2018 Handbook (in English)
[x] Cancel search | Manufacturer: CITROEN, Model Year: 2018, Model line: C-ELYSÉE, Model: CITROEN C-ELYSÉE 2018Pages: 260, PDF Size: 8.4 MB
Page 6 of 260

4
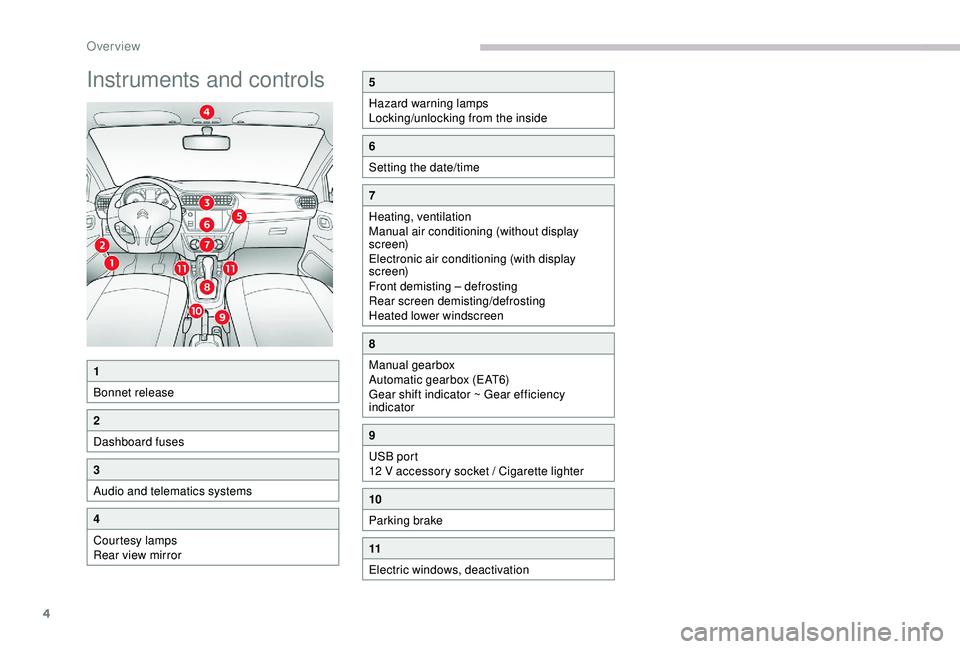
Instruments and controls5
Hazard warning lamps
Locking/unlocking from the inside
6
Setting the date/time
7
Heating, ventilation
Manual air conditioning (without display
screen)
Electronic air conditioning (with display
screen)
Front demisting – defrosting
Rear screen demisting/defrosting
Heated lower windscreen
8
Manual gearbox
Automatic gearbox (EAT6)
Gear shift indicator ~ Gear efficiency
indicator
9
USB port
12 V accessory socket / Cigarette lighter
10
Parking brake
11
Electric windows, deactivation
1
Bonnet release
2
Dashboard fuses
3
Audio and telematics systems
4
Courtesy lamps
Rear view mirror
Over view
Page 34 of 260

32
Alarm
System which protects and provides a deterrent
against theft and break-ins. It provides
perimeter protection and a self-protection
function.
Perimeter protection
The system checks for opening of the vehicle.
The alarm is triggered if anyone tries to open a
door, the boot, the bonnet, etc.Self-protection function
The system checks for the putting out of
ser vice of its components.
The alarm is triggered if the battery, the
central control or the siren wiring are put
out of ser vice or damaged.
For all work on the alarm system,
contact a CITROËN dealer or a qualified
workshop.
Locking the vehicle with
alarm
Activation
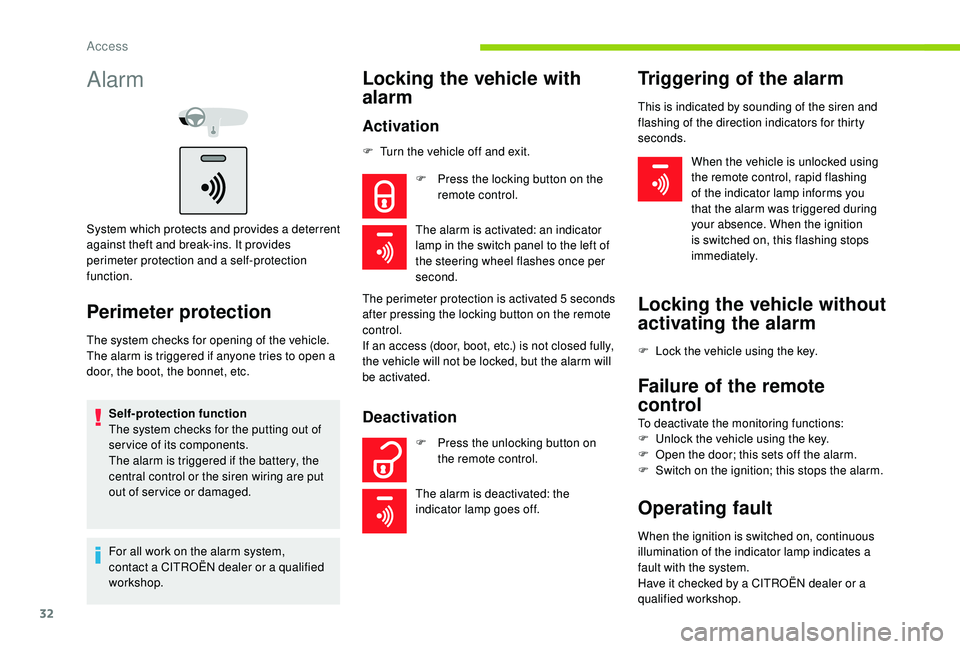
F Press the locking button on the remote control.
The alarm is activated: an indicator
lamp in the switch panel to the left of
the steering wheel flashes once per
second.
Deactivation
F Press the unlocking button on the remote control.
The alarm is deactivated: the
indicator lamp goes off.
Triggering of the alarm
F Turn the vehicle off and exit.
The perimeter protection is activated 5
seconds
after pressing the locking button on the remote
control.
If an access (door, boot, etc.) is not closed fully,
the vehicle will not be locked, but the alarm will
be activated. When the vehicle is unlocked using
the remote control, rapid flashing
of the indicator lamp informs you
that the alarm was triggered during
your absence. When the ignition
is switched on, this flashing stops
immediately.
This is indicated by sounding of the siren and
flashing of the direction indicators for thirty
seconds.
Locking the vehicle without
activating the alarm
F Lock the vehicle using the key.
Failure of the remote
control
To deactivate the monitoring functions:
F
U nlock the vehicle using the key.
F
O
pen the door; this sets off the alarm.
F
S
witch on the ignition; this stops the alarm.
Operating fault
When the ignition is switched on, continuous
illumination of the indicator lamp indicates a
fault with the system.
Have it checked by a CITROËN dealer or a
qualified workshop.
Access
Page 56 of 260

54
Headlamp adjustment
To avoid causing a nuisance to other road
users, the height of the headlamp beams
should be adjusted according to the load in the
vehicle.
Depending on the version, this adjustment can
be carried out using the control located:
-
U
nder the bonnet.
-
T
o the left of the steering wheel
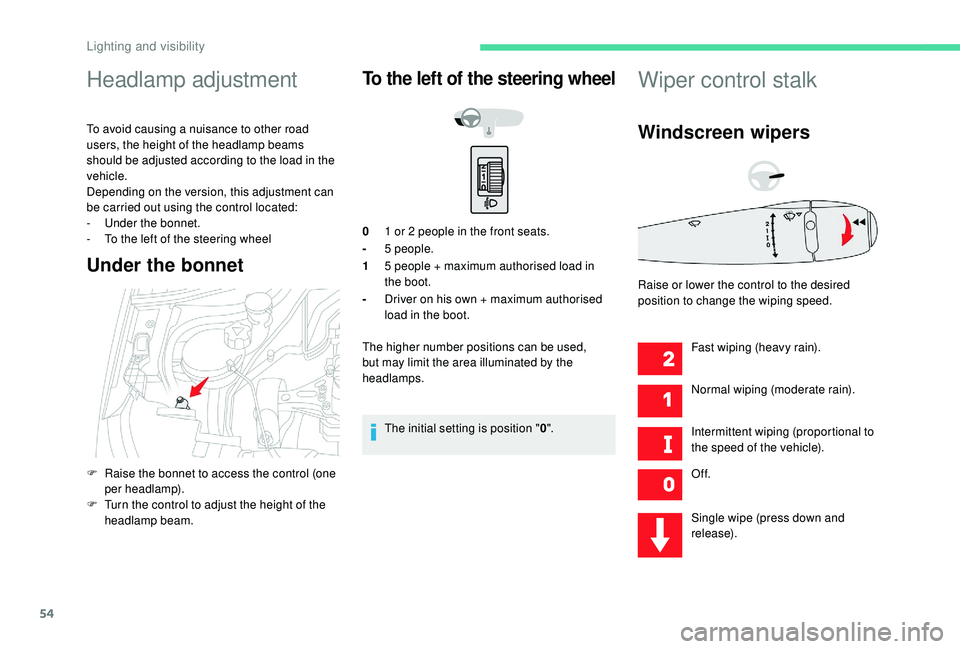
Under the bonnet
To the left of the steering wheel
01 or 2 people in the front seats.
- 5
people.
1 5
people + maximum authorised load in
the boot.
- Driver on his own + maximum authorised
load in the boot.
The higher number positions can be used,
but may limit the area illuminated by the
headlamps.
The initial setting is position " 0".
Wiper control stalk
Windscreen wipers
Fast wiping (heavy rain).
Normal wiping (moderate rain).
Intermittent wiping (proportional to
the speed of the vehicle).
Of f.
Single wipe (press down and
release).
F
R
aise the bonnet to access the control (one
per headlamp).
F
T
urn the control to adjust the height of the
headlamp beam. Raise or lower the control to the desired
position to change the wiping speed.
Lighting and visibility
Page 92 of 260

90
If the engine is in STOP mode, it restarts
immediately.
The Stop & Start system is reactivated
automatically every time the ignition is switched
on.
With button
Press this button to deactivate the system.
Deactivation is confirmed by the illumination of
the button indicator lamp and the display of a
message.
Pressing this button again reactivates the
function.
The button indicator lamp goes off and a
message is displayed.
With touch screen
The Stop & Start setting can be
configured in the menu Driving /
Vehicle. Opening the bonnet
Before doing anything under the bonnet,
deactivate the Stop & Start system to
avoid the risk of injury related to an
automatic change to START mode.
Driving on flooded roads
Before driving through a flooded road, it is
strongly recommended that you deactivate
the Stop & Start.
For more information on Driving
recommendations
, particularly on
flooded roads, refer to the corresponding
section.
Malfunction
In the event of a fault in the system,
the indicator lamp in the "ECO OFF"
button flashes for a moment, then
illuminates continuously.
Have them checked by a CITROËN dealer or a
qualified workshop. In the event of a fault in STOP mode, the
vehicle may stall. All of the instrument panel
warning lamps come on. It is then necessary to
switch the ignition off and to restart the engine
using the key.
The Stop & Start system requires a
12 V battery of specific technology and
specification.
All work on this type of battery must be
carried out only by a CITROËN dealer or a
qualified workshop.
For more information on the 12 V batter y
,
refer to the corresponding section.
Driving
Page 114 of 260

112
Bonnet
Opening
Do not open the bonnet when there is a
very strong wind.
When the engine is hot, handle the
exterior safety catch and the stay with
care (risk of burns).
Closing
F Take the stay out of the support slot.
F C lip the stay in its housing.
F
L
ower the bonnet and release it near the
end of its travel.
F
P
ull on the bonnet to check that it is fully
latched. The location of the interior bonnet release
lever prevents opening of the bonnet when
the left-hand front door is shut.
When the engine is hot, handle the
exterior safety catch and the stay with
care (risk of burns), using the protected
area.
When the bonnet is open, take care not to
damage the safety catch.
Do not open the bonnet in very windy
conditions.
Before doing anything under the bonnet,
deactivate the Stop & Start system to
avoid any risk of injury resulting from an
automatic change to START mode.
The cooling fan may star t after
switching off the engine: take care
with articles and clothing that might be
caught by the fan blades.
Due to the presence of electrical
equipment under the bonnet, it is
recommended that exposure to water
(rain, washing, etc.) be limited.
F
P
ull the interior release lever, located in the
lower dashboard, towards you.
F
P
ush the exterior safety catch to the left and
raise the bonnet. F
U
nclip the bonnet stay from its housing.
F
F
ix the stay in the notch to hold the bonnet
open.
Practical information
Page 115 of 260

113
Engines
Petrol
Diesel
These engines are examples provided as a
guide.
The locations of the following elements may
vary:
-
E
ngine oil dipstick.
-
E
ngine oil filler cap.
-
P
riming pump. 6.
A i r f i l t e r.
7. Engine oil dipstick.
8. Engine oil filler cap.
9. Priming pump*
To avoid damaging the electrical units,
never use a high-pressure jet wash in the
engine compartment.
The diesel circuit is under very high
pressure.
All work on this circuit must be carried out
only by a CITROËN dealer or a qualified
workshop.
*
D
epending on engine.
1.
Screenwash fluid reservoir.
2. Engine coolant reservoir.
3. Brake fluid reser voir.
4. Battery.
5. Fusebox.
Checking levels
Check all of these levels regularly, in line with
the manufacturer's service schedule. Top them
up if necessary, unless other wise indicated.
If a level drops significantly, have the
corresponding system checked by a CITROËN
dealer or a qualified workshop.
The fluids must comply with the
manufacturer's recommendations and with
the vehicle's engine.
Take care when working under the bonnet,
as certain areas of the engine may be
extremely hot (risk of burns) and the
cooling fan could start at any time (even
with the ignition off).
Used products
Avoid prolonged contact of used oil or
fluids with the skin.
Most of these fluids are harmful to health
or indeed very corrosive.
7
Practical information
Page 116 of 260

114
Do not discard used oil or fluids into
sewers or onto the ground.
Take used oil to a CITROËN dealer or
a qualified workshop and dispose of
it in the containers reser ved for this
purpose.
Engine oil level
This level is checked using the
dipstick located under the bonnet. To
find this dipstick, see the description
of the engine compartment.
To ensure the accuracy of the reading, your
vehicle must be parked on a level sur face, with
the engine off for at least 30
minutes.
It is normal to top up the oil level between
ser vices (or oil changes). CITROËN
recommends that you check the level, and
top up if necessary, every 3,000 miles
(5,000 km).
Checking using the dipstick
The location of the dipstick is shown in the
corresponding underbonnet layout view.
F
H
old the dipstick by its coloured grip and
remove it completely.
F
W
ipe the end of the dipstick using a clean
non-fluffy cloth.
F
R
e-insert the dipstick and push it fully down,
then pull it out again for a visual check: the
level must be between the two marks A and
B .
A = MA X
B = MIN -
I
f the level is below the MIN
mark, you must
top up the engine oil.
Topping up the engine oil level
Oil grade
The oil must be the correct grade for your
engine and comply with the manufacturer's
recommendations.
Refer to the under-bonnet view for the location
of the oil filler cap on your vehicle.
F
U
nscrew the oil filler cap to access the filler
opening.
F
A
dd oil in small quantities, avoiding any
spills on engine components (risk of fire).
F
W
ait a few minutes before checking the
level again using the dipstick.
F
A
dd more oil if necessary.
F
A
fter checking and topping up, carefully refit
the oil filler cap and return the dipstick to its
housing.
Engine oil changeIf you find that the level is above the A mark or
below the B mark, do not star t the engine.
-
I
f the level is above the MAX mark (risk of
damage to the engine), contact a CITROËN
dealer or a qualified workshop. Refer to the manufacturer’s service schedule
for details of the inter val for this operation.
In order to maintain the reliability of the engine
and emissions control system, never use
additives in the engine oil.
Practical information
Page 120 of 260

118
Running out of fuel
(Diesel)
On vehicles fitted with an HDi engine, the fuel
system must be primed if you run out of fuel.
For more information about the Engines, in
particular the location of the different parts
under the bonnet, refer to the corresponding
section.
For more information on Diesel misfuel
prevention , refer to the corresponding section.
If the engine does not start the first time,
don't keep trying, but start the procedure
again from the beginning.
HDi 92 engine
F If the engine does not start after a few
attempts, operate the priming pump again
then start the engine.
F
C
lose the bonnet.
BlueHDi engines
F Fill the fuel tank with at least five litres of Diesel.
F
S
witch on the ignition (without starting the
engine).
F
W
ait around 6 seconds and switch off the
ignition.
F
R
epeat the operation 10
times.
F
O
perate the starter to run the engine.
Temporary puncture
repair kit
Comprising a compressor and a sealant
cartridge, it allows the temporary repair of
a tyre so that you can drive to the nearest
garage.
It is designed to repair most punctures which
could affect the tyre, located on the tyre tread
or shoulder.
Access to the kit
F Fill the fuel tank with at least five litres of diesel.
F
O
pen the bonnet.
F
O
perate the priming pump repeatedly until
resistance is felt (there may be resistance at
the first press).
F
O
perate the starter until the engine starts (if
the engine does not start at the first attempt,
wait around 15
seconds before trying
again). This kit is installed in the storage box, under
the boot floor.
In the event of a breakdown
Page 138 of 260

136
Versions equipped with Stop & Start are
fitted with a 12 V lead-acid battery of
specific technology and specification.
Its replacement should be carried out
only by a CITROËN dealer or a qualified
workshop.
If your vehicle has an automatic gearbox,
do not try to start the engine by pushing
the vehicle.
Access to the battery Starting using another
battery
When your vehicle's battery is discharged, the
engine can be started using a backup battery
(external or from another vehicle) and jump
leads or a battery booster.
Never try to start the engine by connecting
a battery charger.
Never use a 24V or higher battery booster.
Check beforehand that the backup
battery has a nominal voltage of 12V and
a capacity at least equal to that of the
discharged battery.
The two vehicles must not be in contact
with each other.
Switch off all the electrical consumers
on both vehicles (audio system, wipers,
lighting, etc.).
Make sure that the jump leads are not
close to moving parts of the engine (fan,
belts, etc.).
Do not disconnect the (+) terminal while
the engine is running. F
S
tart the engine of the vehicle with the
good battery and leave it running for a few
minutes.
F
O
perate the starter on the broken down
vehicle and let the engine run.
If the engine does not start straight away,
switch off the ignition and wait a few moments
before trying again.
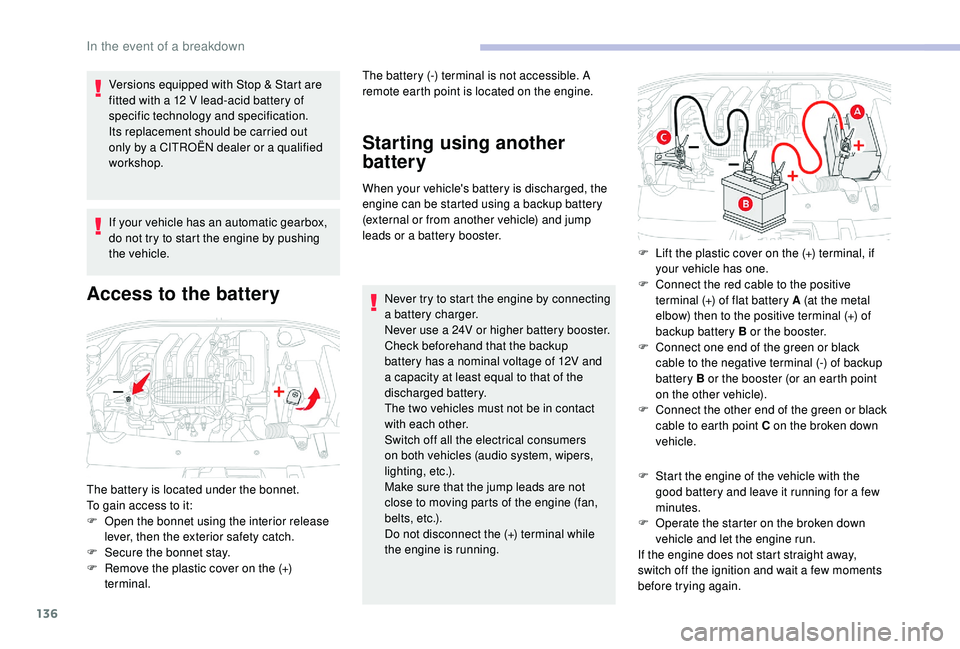
The battery is located under the bonnet.
To gain access to it:
F
O
pen the bonnet using the interior release
lever, then the exterior safety catch.
F
S
ecure the bonnet stay.
F
R
emove the plastic cover on the (+)
terminal. The battery (-) terminal is not accessible. A
remote earth point is located on the engine.
F
L
ift the plastic cover on the (+) terminal, if
your vehicle has one.
F
C
onnect the red cable to the positive
terminal (+) of flat battery A (at the metal
elbow) then to the positive terminal (+) of
backup battery B or the booster.
F
C
onnect one end of the green or black
cable to the negative terminal (-) of backup
battery B or the booster (or an earth point
on the other vehicle).
F
C
onnect the other end of the green or black
cable to earth point C on the broken down
vehicle.
In the event of a breakdown
Page 147 of 260

145
Identification markings
The vehicle may be originally equipped
with tyres with higher load and speed
indices than those indicated on the label,
without affecting inflation pressure.Checking tyre pressures
The tyre pressures should be checked when
cold at least once a month.
The pressures indicated on the label are valid
for cold tyres. If you have driven for more than
10
minutes or more than 6 miles (10 kilometres)
at more than 30 mph (50 km/h), the tyres will be
warm; in this case 0.3 bar (30 kPa) should be
added to the pressures given on the label.
Never reduce the pressure of a warm tyre.
Low tyre pressures increase fuel
consumption.
Various visible markings for the identification of
your vehicle.
A.
V
ehicle identification number (VIN),
under the bonnet.
The number is engraved on the body structure.
B.
V
ehicle identification number (VIN), on
the dashboard.
The number is on a label, visible through the
windscreen.
C. Manufacturer's label.
This self-destructing label is affixed to the right-
hand door.
It bears the following information:
-
t
he name of the manufacturer,
-
t
he European Whole Vehicle Type Approval
number,
-
t
he vehicle identification number (VIN),
-
G
ross vehicle weight (GV W) D. Tyres/paint code label.
This label is affixed to the driver's door
aperture.
It bears the following information about the
tyres:
-
t
he tyre pressures, unladen and laden,
-
t
he tyre specification, made up of the
dimensions and type as well as the load and
speed indices,
-
t
he spare tyre pressure.
-
t
he gross authorised train weight (GTW),
-
t
he maximum weight on the front axle,
-
t
he maximum weight on the rear axle.
9
Technical data