display CITROEN C-ELYSÉE 2023 Owner's Manual
[x] Cancel search | Manufacturer: CITROEN, Model Year: 2023, Model line: C-ELYSÉE, Model: CITROEN C-ELYSÉE 2023Pages: 180, PDF Size: 4.77 MB
Page 58 of 180
56
Driving
As a safety precaution and to facilitate engine starting:
►
Always select neutral.
►
Press the clutch pedal.
6-speed automatic
gearbox
6-speed automatic gearbox which offers a choice
between the comfort of automatic operation or
manual gear changing.
Two driving modes are available:
–
Automatic
operation for electronic
management of the gears by the gearbox: •
With the
Sport programme for a more
dynamic driving style.
•
Or the
Snow programme to improve driving
in the event of poor grip.*
–
Manual
operation for sequential changing of
the gears by the driver.
* Snow programme : depending on the country of sale.
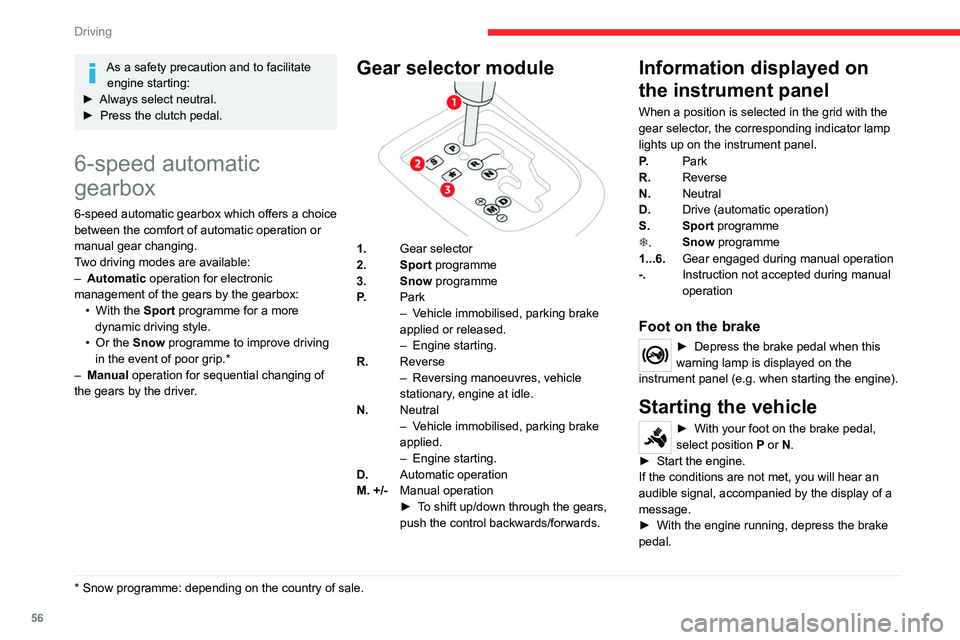
Gear selector module
1.Gear selector
2. Sport programme
3. Snow programme P. Park
–
V
ehicle immobilised, parking brake
applied or released.
–
Engine starting.
R. Reverse
–
Reversing manoeuvres, vehicle
stationary
, engine at idle.
N. Neutral
–
V
ehicle immobilised, parking brake
applied.
–
Engine starting.
D. Automatic operation
M. +/- Manual operation
►
T
o shift up/down through the gears,
push the control backwards/forwards.
Information displayed on
the instrument panel
When a position is selected in the grid with the
gear selector, the corresponding indicator lamp
lights up on the instrument panel.
P. Park
R. Reverse
N. Neutral
D. Drive (automatic operation)
S. Sport programme
T. Snow programme
1...6. Gear engaged during manual operation
-. Instruction not accepted during manual
operation
Foot on the brake
► Depress the brake pedal when this
warning lamp is displayed on the
instrument panel (e.g. when starting the engine).
Starting the vehicle
► With your foot on the brake pedal,
select position P
or N.
►
Start the engine.
If the conditions are not met, you will hear an
audible signal, accompanied by the display of a
message.
►
With the engine running, depress the brake
pedal.
Page 60 of 180
58
Driving
If the engine speed is too low or too high, the
selected gear flashes for a few seconds, then the
gear actually engaged is shown.
It is possible to change from position D to
position M
at any time.
When the vehicle is stationary or moving very
slowly, the gearbox selects gear 1 automatically.
The Sport and Snow programmes are inactive
in manual operation.
This symbol is displayed if a gear is not engaged correctly (gear selector between
two positions).
Switching off the vehicle
Before switching off the engine, it is possible to
engage position P or N to place the gearbox in
neutral.
In both cases, apply the parking brake to
immobilise the vehicle.
If the gear selector is not in position P ,
when the driver's door is opened or
approximately 45
seconds after the ignition is
switched off, an audible signal sounds and a
message appears.
►
Return the gear selector to
P
; the audible
signal stops and the message disappears.
Malfunction
In the event of a malfunction, this warning
lamp comes on accompanied by an
audible signal and a message is displayed, when
the ignition is switched on.
In this case, the gearbox goes into back-up
mode and is locked in 3
rd gear. You may feel a
significant jolt (without risk to the gearbox) when
changing from
P
to R and from N to R.
Do not exceed 62 mph (100
km/h), local speed
restrictions permitting.
Have it checked by a CITROËN dealer or a
qualified workshop.
There is a risk of damaging the gearbox: – If the accelerator and brake pedals are
depressed simultaneously
.
–
In the event of a battery failure, forcing the
selector from position P
to another position.
Gear shift indicator
(Depending on engine)
This system is designed to reduce fuel
consumption by recommending the most suitable
gear.
Operation
Depending on the driving situation and
the vehicle's equipment, the system may
recommend skipping one or more gears.
Gear engagement recommendations are
not to be considered mandatory. Indeed, the
configuration of the road, the traffic density and
safety remain determining factors when choosing
the best gear. Therefore, the driver remains
responsible for deciding whether or not to follow
the system’s advice.
The system cannot be deactivated.
With an automatic gearbox, the system is
only active in manual operation.
The information appears on the instrument panel, in the form of an arrow
and the recommended gear.
The system adapts the gear change instructions according to the driving
conditions (e.g.
slope, load) and driving style
(e.g.
power demand, acceleration, braking).
The system never suggests:
–
engaging first gear
.
–
engaging reverse gear
.
Stop & Start
The Stop & Start function puts the engine temporarily into standby - STOP mode - during
phases when the vehicle is stationary (e.g.
red
lights, traffic jams). The engine automatically
restarts - START mode - as soon as the driver
indicates the intention of moving off again.
Primarily designed for urban use, the function
is intended to reduce fuel consumption and
exhaust emissions as well as the noise level
when stationary.
The function does not affect the functionalities of
the vehicle, in particular the braking.
Page 63 of 180
61
Driving
6Otherwise, add 0.3 bar to the pressures
shown on the label.
Snow chains
The system does not have to be
reinitialised after fitting or removing snow
chains.
Under-inflation alert
This is signalled by the fixed illumination of this warning lamp, accompanied by an
audible signal and the display of a message.
►
Reduce speed immediately
, avoid excessive
steering movements and avoid sudden braking.
►
Stop the vehicle as soon as it is safe to do
so.
The loss of pressure detected may not always cause visible deformation of the
tyre.
Do not rely on just a visual check.
►
Using a compressor
, such as the one in
the temporary puncture repair kit, check the
pressures of all four tyres when cold.
►
If it is not possible to carry out this check
immediately
, drive carefully at reduced speed.
►
In the event of a puncture, use the
temporary puncture repair kit or the spare wheel
(depending on equipment).
Driving too slowly may not ensure
optimum monitoring.
The alert is not immediately triggered in the
event of a sudden loss of pressure or tyre
blow-out. This is because analysis of the
values read by the wheel's speed sensors
can take several minutes.
The alert may be delayed at speeds below
25 mph (40 km/h), or when adopting a sporty
driving mode.
The alert is kept active until the system is reinitialised.
Reinitialisation
► The system must be reinitialised after any
adjustment to the pressure of one or more tyres,
and after changing one or more wheels.
Before reinitialising the system, make
sure that the pressures of the four tyres
are correct for the conditions of use of the
vehicle and conform to the values written on
the tyre pressure label.
Check the pressures of the four tyres before
performing the reinitialisation.
The system does not advise if a pressure is
incorrect at the time of reinitialisation.
Without audio system
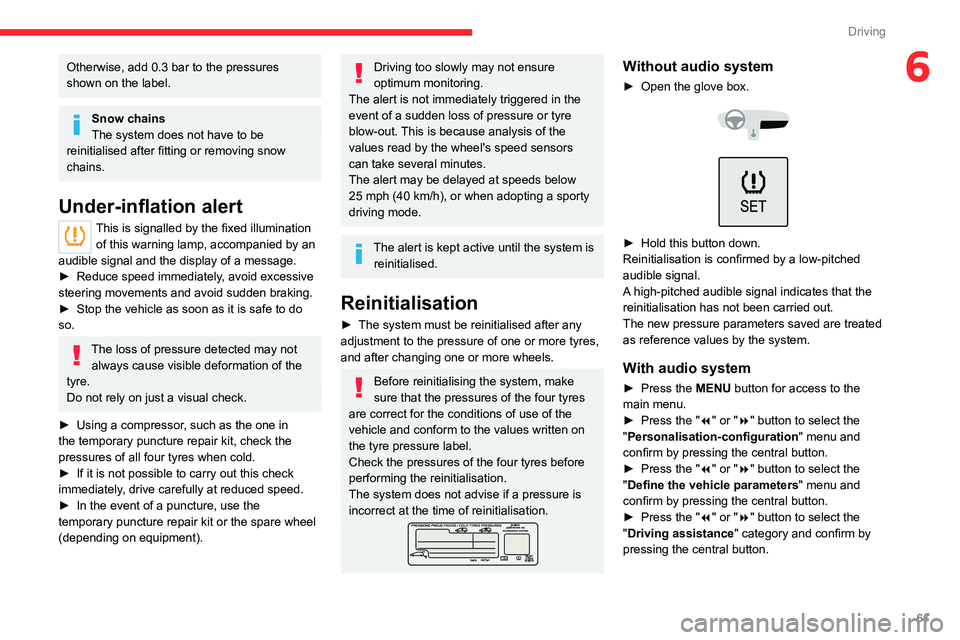
► Open the glove box.
► Hold this button down.
Reinitialisation is confirmed by a low-pitched
audible signal.
A
high-pitched audible signal indicates that the
reinitialisation has not been carried out.
The new pressure parameters saved are treated
as reference values by the system.
With audio system
► Press the MENU button for access to the
main menu.
►
Press the "
7" or "8" button to select the
"Personalisation-configuration " menu and
confirm by pressing the central button.
►
Press the "
7" or "8" button to select the
"Define the vehicle parameters " menu and
confirm by pressing the central button.
►
Press the "
7" or "8" button to select the
"Driving assistance" category and confirm by
pressing the central button.
Page 64 of 180

62
Driving
► Press the "7" or "8" button to select "Tyre
pressures" , then "Reinitialisation ", then
confirm by pressing the central button.
A message confirms the reinitialisation.
With touch screen
The request to reinitialise the system is made in the
Driving/Vehicle menu.
Malfunction
In the event of a malfunction,
these warning lamps light up on
the instrument panel.
A message appears, accompanied by an audible
signal.
In this case, the tyre under-inflation monitoring
function is no longer performed.
Have it checked by a CITROËN dealer or a
qualified workshop.
Non-standard or 'space-saver' spare
wheel
The use of this type of spare wheel may
suspend tyre pressure monitoring.
In this case, the malfunction warning lamp
comes on and disappears once the wheel
has been replaced by one of uniform size (the
same as the others), the pressure readjusted
and the
reinitialisation carried out.
Driving and manoeuvring
aids - General
recommendations
Driving and manoeuvring aids cannot, in
any circumstances, replace the need for
vigilance on the part of the driver.
The driver must comply with the Highway
Code, must remain in control of the vehicle in
all circumstances and must be able to retake
control of it at all times. The driver must adapt
the speed to climatic conditions, traffic and
the state of the road.
It is the driver's responsibility to constantly
monitor traffic conditions, assess the distance
and relative speed of other vehicles, and
anticipate their manoeuvres before using the
direction indicator and changing lanes.
These systems do not make it possible to
exceed the laws of physics.
Driving aids
You should hold the steering wheel with
both hands, always use the door and interior
mirrors, always leave your feet close to the
pedals and take a break every 2 hours.
Manoeuvring aids
The driver must always check the
surroundings of the vehicle before and during
the whole manoeuvre, in particular using the
mirrors.
Other cameras
The images from the camera(s)
displayed on the touch screen or on the
instrument panel may be distorted by the
terrain.
In the presence of areas in shade, or in
conditions of bright sunlight or inadequate
lighting, the image may be darkened and with
lower contrast.
Obstacles may appear further away than they
actually are.
Sensors
The operation of the sensors, as well as
any associated functions, may be disrupted
by noise pollution such as that emitted by
noisy vehicles and machinery (e.g. lorries,
pneumatic drills), by the accumulation of
snow or dead leaves on the road or in the
event of damaged bumpers and mirrors.
When reverse gear is engaged, an audible
signal (long beep) indicates that the sensors
may be dirty.
A front or rear impact to the vehicle can
upset the sensors’ settings, which is not
always detected by the system: distance
measurements may be distorted.
Page 65 of 180
63
Driving
6The sensors do not systematically detect
obstacles that are too low (pavements, studs)
or too thin (trees, posts, wire fences).
Certain obstacles located in the sensors’ blind
spots may not be detected or may no longer
be detected during the manoeuvre.
Certain materials (fabrics) absorb sound
waves: pedestrians may not be detected.
Maintenance
Clean the bumpers and door mirrors and
the field of vision of the cameras regularly.
When washing your vehicle at high pressure,
direct the spray from at least 30
cm away
from the radar, sensors and cameras.
Mats/Pedal trims
The use of mats or pedal trims not
approved by CITROËN may interfere with
the operation of the speed limiter or cruise
control.
To avoid any risk of jamming the pedals:
–
Ensure that the mat is secured correctly
.
–
Never fit one mat on top of another
.
Units of speed
Ensure that the units of speed displayed
on the instrument panel (mph or km/h) are
those for the country you are driving in.
If this is not the case, when the vehicle is
stationary, set the display to the required
units of speed so that it complies with what is
authorised locally.
In case of doubt, contact a CITROËN dealer
or a qualified workshop.
Speed limiter
For more information, refer to the
General recommendations on the use
of driving and manoeuvring aids .
This system prevents the vehicle from
exceeding the speed programmed by the
driver (speed setting).
The speed limiter is switched on manually.
The minimum speed setting is 19 mph (30
km/h).
The speed setting remains in the system
memory when the ignition is switched off.
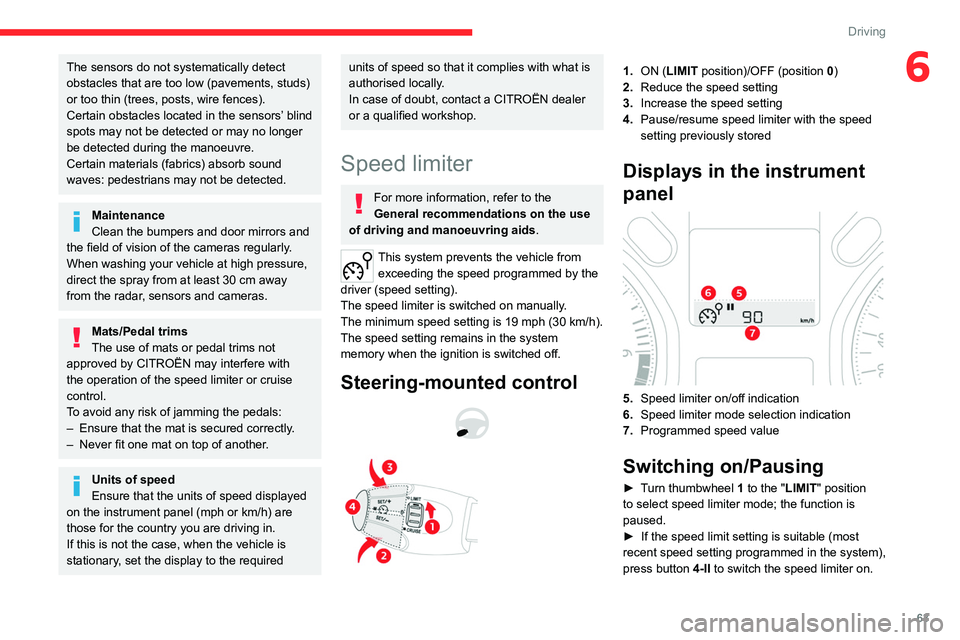
Steering-mounted control
1. ON (LIMIT position)/OFF (position 0)
2. Reduce the speed setting
3. Increase the speed setting
4. Pause/resume speed limiter with the speed
setting previously stored
Displays in the instrument
panel
5.Speed limiter on/off indication
6. Speed limiter mode selection indication
7. Programmed speed value
Switching on/Pausing
► Turn thumbwheel 1 to the "LIMIT" position
to select speed limiter mode; the function is
paused.
►
If the speed limit setting is suitable (most
recent speed setting programmed in the system),
press button
4-II to switch the speed limiter on.
Page 66 of 180
64
Driving
► Pressing 4-II again temporarily pauses the
function (pause).
Adjusting the limit speed setting
You do not have to switch the speed limiter on in
order to set the speed.
To modify the limit speed setting based on the
vehicle’s current speed:
►
For steps of +/- 1
mph (1 km/h), briefly
press
2-SET- or 3-SET+ repeatedly.
►
For steps of +/- 5
mph (5 km/h), press and
hold
2-SET- or 3-SET+.
Temporarily exceeding the
speed setting
► Fully depress the accelerator pedal.
The speed limiter is temporarily deactivated and
the displayed speed setting flashes.
►
Release the accelerator pedal to return to
below the speed setting.
When exceeding the speed is not due to the
driver's action (e.g.
in case of a steep slope), an
audible signal is triggered immediately.
On a steep descent or in the event of
sharp acceleration, the speed limiter will
not be able to prevent the vehicle from
exceeding the speed setting.
If necessary, apply the brakes to control your
vehicle’s speed.
When the vehicle speed returns to the speed
setting level, the speed limiter operates again:
the speed setting display becomes fixed again.
Switching off
► Turn the thumbwheel 1 to the "OFF" position:
speed limiter information is no longer displayed.
Malfunction
In the event of a malfunction, dashes are
displayed flashing and then fixed instead of the
speed setting.
Have it checked by a CITROËN dealer or a
qualified workshop.
Cruise control - Specific
recommendations
The cruise control function does not
guarantee compliance with the maximum
authorised speed and the safety distance
between vehicles, the driver remains
responsible for their driving.
In the interest of public safety, only use cruise
control if the traffic conditions enable vehicles
to drive at a steady speed and maintain an
adequate safety distance.
Remain vigilant while cruise control is
activated. If you press and hold one of the
speed setting modification buttons, your
vehicle may change speed very abruptly.
When descending a steep hill , the cruise
control system cannot prevent the vehicle
from exceeding the set speed. Brake if
necessary to control the vehicle speed.
On steep climbs or when towing, the set
speed may not be reached or maintained.
Exceeding the programmed speed
setting
You can temporarily exceed the speed
setting by pressing the accelerator pedal (the
programmed speed flashes).
To return to the speed setting, release the
accelerator pedal (when the set speed is
reached again, the displayed speed stops
flashing).
Operating limits
Never use the system in the following
situations:
–
In an urban area with the risk of
pedestrians crossing the road.
–
In heavy traffic (except versions with the
Stop & Go function).
–
On winding or steep roads.
–
On slippery or flooded roads.
–
In poor weather conditions.
–
In the event of restricted visibility for the
driver
.
–
Driving on a speed circuit.
–
Driving on a rolling road.
Page 67 of 180
65
Driving
6– When using a ‘space-saver’ type spare
wheel.
–
When using snow chains, non-slip covers
or studded tyres.
Cruise control
For more information, refer to the
General recommendations on the use
of driving and manoeuvring aids and the
Specific recommendations on cruise
control.
This system automatically maintains the vehicle’s speed at the value programmed
by the driver (speed setting), without the use of
the accelerator pedal.
Cruise control is switched on manually.
It requires a minimum vehicle speed of 25 mph
(40
km/h).
With a manual gearbox, fourth gear must be
engaged.
With an automatic gearbox, mode
D
or second
gear or higher in mode
M
must be engaged.
Cruise control remains active after
changing gear on engines fitted with a
manual gearbox and the Stop & Start
function.
Switching off the ignition cancels any
speed setting.
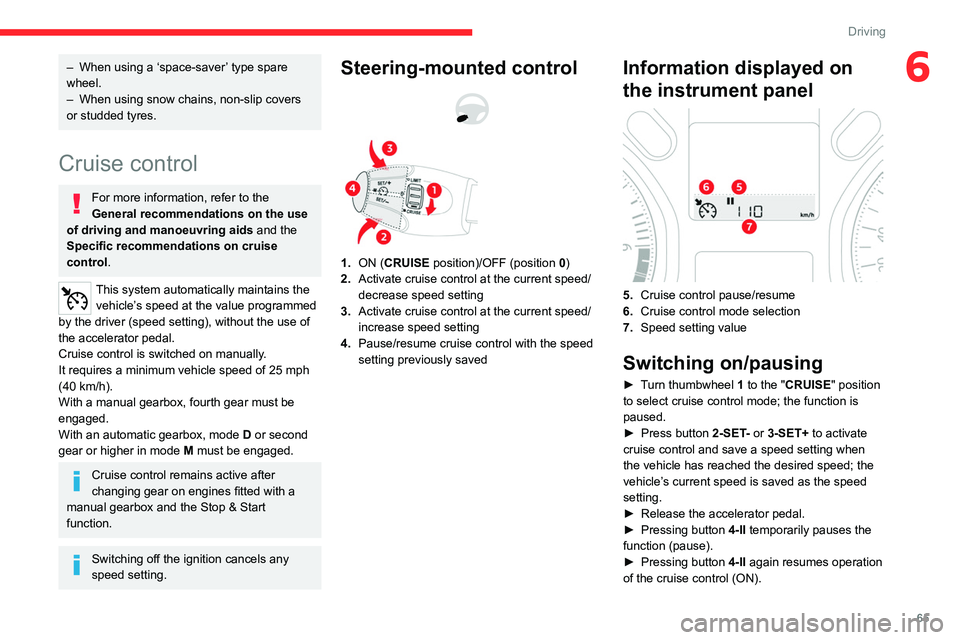
Steering-mounted control
1. ON (CRUISE position)/OFF (position 0)
2. Activate cruise control at the current speed/
decrease speed setting
3. Activate cruise control at the current speed/
increase speed setting
4. Pause/resume cruise control with the speed
setting previously saved
Information displayed on
the instrument panel
5.Cruise control pause/resume
6. Cruise control mode selection
7. Speed setting value
Switching on/pausing
► Turn thumbwheel 1 to the "CRUISE" position
to select cruise control mode; the function is
paused.
►
Press button
2-SET- or 3-SET+ to activate
cruise control and save a speed setting when
the vehicle has reached the desired speed; the
vehicle’s current speed is saved as the speed
setting.
►
Release the accelerator pedal.
►
Pressing button 4-II
temporarily pauses the
function (pause).
►
Pressing button 4-II
again resumes operation
of the cruise control (ON).
Page 68 of 180
66
Driving
Cruise control can also be paused
temporarily:
–
by pressing the brake pedal.
–
automatically
, if the electronic stability
control (ESC) system is triggered.
Changing the cruise speed
setting
The cruise control must be active.
To change the cruise speed setting, based on
the vehicle’s current speed:
►
For steps of +/- 1
mph (1 km/h), briefly
press
2-SET- or 3-SET+ repeatedly.
►
For steps of +/- 5
mph (5 km/h), press and
hold
2-SET- or 3-SET+.
Pressing and holding 2-SET - or 3-SET+
results in a rapid change in the speed of
the vehicle.
As a precaution, we recommend setting a cruise speed fairly close to the current
speed of your vehicle, to avoid any sudden
acceleration or deceleration of the vehicle.
Switching off
► Turn the thumbwheel 1 to the "OFF" position:
the cruise control information disappears from
the screen.
Malfunction
In the event of a malfunction, dashes are
displayed flashing and then fixed instead of the
speed setting.
Have it checked by a CITROËN dealer or a
qualified workshop.
Rear parking sensors
For more information, refer to the
General recommendations on the use
of driving and manoeuvring aids .
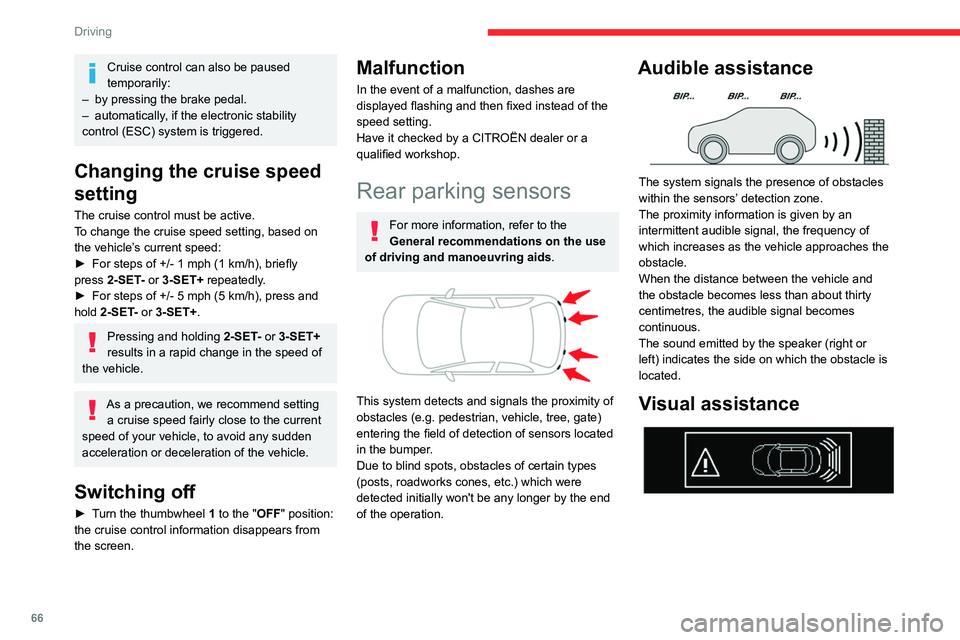
This system detects and signals the proximity of
obstacles (e.g.
pedestrian, vehicle, tree, gate)
entering the field of detection of sensors located
in the bumper.
Due to blind spots, obstacles of certain types
(posts, roadworks cones, etc.) which were
detected initially won't be any longer by the end
of the operation.
Audible assistance
The system signals the presence of obstacles
within the sensors’ detection zone.
The proximity information is given by an
intermittent audible signal, the frequency of
which increases as the vehicle approaches the
obstacle.
When the distance between the vehicle and
the obstacle becomes less than about thirty
centimetres, the audible signal becomes
continuous.
The sound emitted by the speaker (right or
left) indicates the side on which the obstacle is
located.
Visual assistance
Page 69 of 180
67
Driving
6
This supplements the audible signal by
displaying bars on the screen whose location
represents the distance between the obstacle
and the vehicle (white: more distant, orange:
close, red: very close).
When the obstacle is very close, the "Danger"
symbol is displayed on the screen.
Deactivation/Activation
The function is deactivated or activated via the
vehicle configuration menu.
With audio system
The parking sensors can be configured in the "Personalisation - Configuration "
menu.
With touch screen
The parking sensors can be configured in the Driving/Vehicle
menu.
The function will be deactivated automatically if a trailer is being towed or
a bicycle carrier is fitted (vehicle fitted with a
tow bar or bicycle carrier recommended by
CITROËN).
Malfunction
In the event of a malfunction when
changing into reverse gear, this warning
lamp lights up on the instrument panel and/or a
message appears in the screen, accompanied
by an audible signal (short beep).
Have it checked by a CITROËN dealer or a
qualified workshop.
Reversing Camera
For more information, refer to the
General recommendations on the use
of driving and manoeuvring aids .
The reversing camera is automatically activated
when reverse gear is engaged.
The image is displayed on the touch screen.
The reversing camera function may be
supplemented with parking sensors.
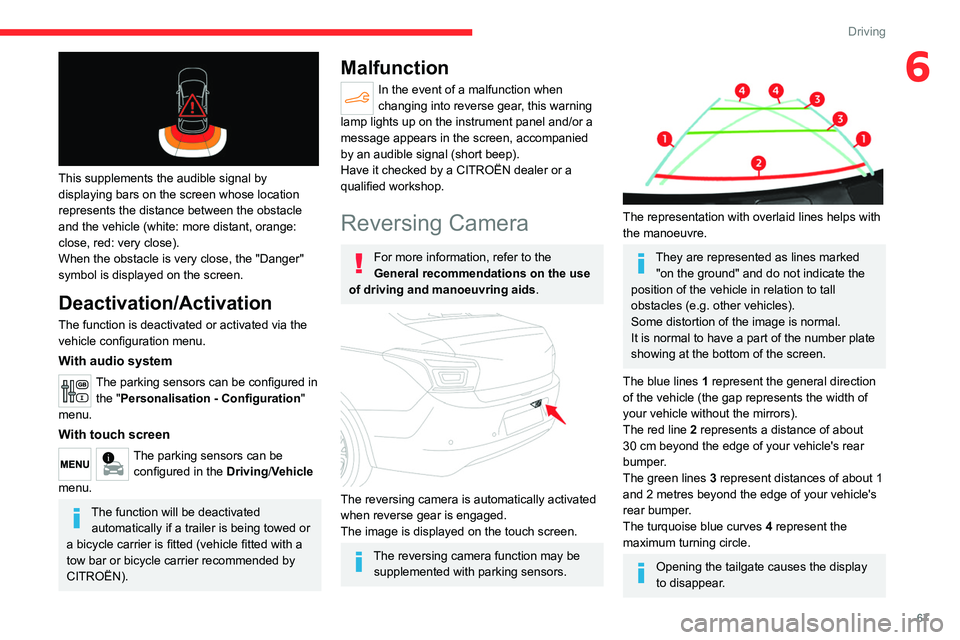
The representation with overlaid lines helps with
the manoeuvre.
They are represented as lines marked "on the ground" and do not indicate the
position of the vehicle in relation to tall
obstacles (e.g. other vehicles).
Some distortion of the image is normal.
It is normal to have a part of the number plate
showing at the bottom of the screen.
The blue lines
1
represent the general direction
of the vehicle (the gap represents the width of
your vehicle without the mirrors).
The red line
2
represents a distance of about
30
cm beyond the edge of your vehicle's rear
bumper.
The green lines
3
represent distances of about 1
and 2
metres beyond the edge of your vehicle's
rear bumper.
The turquoise blue curves
4
represent the
maximum turning circle.
Opening the tailgate causes the display
to disappear.
Page 75 of 180
73
Practical information
7“Top up AdBlue: Starting impossible” – it is
essential to add at least 10 litres.
Top-up detection may not be instantaneous
after addition. It may take a few minutes of
driving before the top-up detection is effective.
Do not dispose of AdBlue® bottles or
containers in the household waste.
Place them in a container reserved for this
purpose or take them back to where you
purchased them.
Snow chains
In wintry conditions, snow chains improve
traction as well as the behaviour of the vehicle
when braking.
Snow chains must be fitted only to the
front wheels. They must never be fitted to
"space-saver" type spare wheels.
Observe the legislation in force in your
country relating to the use of snow
chains and maximum authorised speeds.
Use only the chains designed to be fitted to the
type of wheel fitted to your vehicle :
Original tyre size Maximum link size 185/65 R15 9 mm
195/55 R16
For more information on snow chains, contact a
CITROËN dealer or a qualified workshop.
Installation tips
► To fit the snow chains during a journey, stop
the vehicle on a flat surface at the side of the
road.
►
Apply the parking brake and position any
wheel chocks under the wheels to prevent
movement of the vehicle.
►
Fit the snow chains following the instructions
provided by the manufacturer
.
►
Move off gently and drive for a few moments,
without exceeding 31
mph (50 km/h).
►
Stop the vehicle and check that the snow
chains are correctly tightened.
It is strongly recommended that you
practise fitting the snow chains on a level
and dry surface before setting off.
Avoid driving with snow chains on roads that have been cleared of snow to avoid
damaging the vehicle's tyres and the road
surface. If the vehicle is fitted with alloy
wheels, check that no part of the chain or its
fixings is in contact with the wheel rim.
Energy economy mode
This system manages the duration of use of
certain functions, in order to conserve a sufficient
level of charge in the battery with the ignition off.
After switching off the engine and for a maximum
cumulative period of around 30 minutes, you can
continue to use functions such as the audio and
telematics system, dipped beam headlamps or
courtesy lamps.
Selecting the mode
A confirmation message is displayed when
energy economy mode is entered, and the active
functions are placed on standby.
If a telephone call is in progress at the
time, it will be maintained for around 10
minutes via the audio system’s hands-free
system.
Exiting the mode
These functions are automatically reactivated the
next time the vehicle is used.
To restore the use of these functions
immediately, start the engine and let it run:
–
For less than 10 minutes, to use the
equipment for approximately 5 minutes.
–
For more than 10 minutes, to use the
equipment for approximately 30 minutes.
Let the engine run for the specified duration to
ensure that the battery charge is sufficient.