mirror CITROEN C-ELYSÉE 2023 Owners Manual
[x] Cancel search | Manufacturer: CITROEN, Model Year: 2023, Model line: C-ELYSÉE, Model: CITROEN C-ELYSÉE 2023Pages: 180, PDF Size: 4.77 MB
Page 4 of 180
2
Contents
■
Overview
■
Eco-driving
1Dashboard instrumentsInstrument panel 7
Warning and indicator lamps 7
Indicators 11
Distance recorders 13
Setting the date and time 14
Trip computer 14
2AccessRemote control / Key 17
Central locking 18
Back-up procedures 19
Doors 20
Boot 20
Alarm 21
Electric windows 22
3Ease of use and comfortFront seats 23
Rear bench seat 24
Steering wheel adjustment 25
Mirrors 25
Heating and Ventilation 26
Air conditioning, manual (without display screen) 27
Electronic air conditioning (with display screen) 28
Front demisting - defrosting 29
Demisting/de-icing the rear screen
and/or the door mirrors
30
Interior fittings 30
Courtesy lamps 32
4Lighting and visibilityExterior lighting control stalk 33
Direction indicators 34
Headlamp beam height adjustment 35
Wiper control stalk 35
Changing a wiper blade 36
5SafetyGeneral safety recommendations 37
Hazard warning lamps 37
Horn 38
Electronic stability control (ESC) 38
Seat belts 39
Airbags 41
Child seats 43
Deactivating the front passenger airbag 45
ISOFIX child seats 47
Child lock 50
6DrivingDriving recommendations 51
Starting-switching off the engine 53
Parking brake 54
Hill start assist 54
5-speed manual gearbox 55
6-speed manual gearbox 55
6-speed automatic gearbox 56
Gear shift indicator 58
Stop & Start 58
Tyre under-inflation detection 60
Driving and manoeuvring aids -
General recommendations 62
Speed limiter 63
Cruise control - Specific recommendations 64
Cruise control 65
Rear parking sensors 66
Reversing Camera 67
7Practical informationCompatibility of fuels 69
Refuelling 69
Misfuel prevention (Diesel) 70
AdBlue® (BlueHDi) 70
Snow chains 73
Energy economy mode 73
Towing device 74
Very cold climate screen 74
Roof bars 75
Bonnet 75
Engine compartment 76
Checking levels 77
Checks 79
Free-wheeling 80
Advice on care and maintenance 81
8In the event of a breakdownWarning triangle 83
Running out of fuel (Diesel) 83
Tool kit 83
Spare wheel 84
Changing a bulb 87
Fuses 91
12 V battery 92
Towing the vehicle 95
Page 6 of 180
4
Overview
Presentation
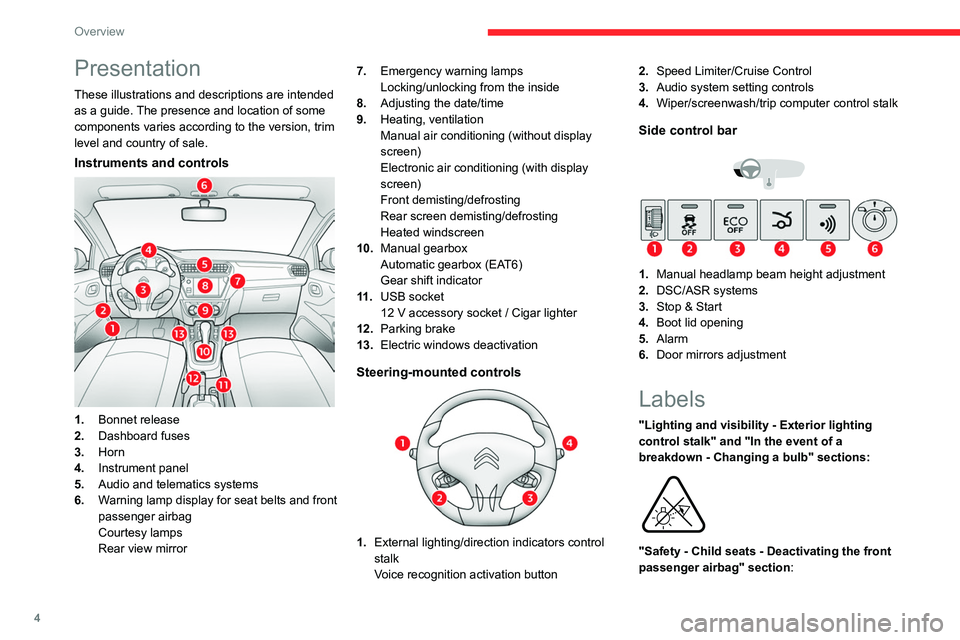
These illustrations and descriptions are intended
as a guide. The presence and location of some
components varies according to the version, trim
level and country of sale.
Instruments and controls
1.Bonnet release
2. Dashboard fuses
3. Horn
4. Instrument panel
5. Audio and telematics systems
6. Warning lamp display for seat belts and front
passenger airbag
Courtesy lamps
Rear view mirror 7.
Emergency warning lamps
Locking/unlocking from the inside
8. Adjusting the date/time
9. Heating, ventilation
Manual air conditioning (without display
screen)
Electronic air conditioning (with display
screen)
Front demisting/defrosting
Rear screen demisting/defrosting
Heated windscreen
10. Manual gearbox
Automatic gearbox (EAT6)
Gear shift indicator
11 . USB socket
12 V accessory socket / Cigar lighter
12. Parking brake
13. Electric windows deactivation
Steering-mounted controls
1.External lighting/direction indicators control
stalk
Voice recognition activation button 2.
Speed Limiter/Cruise Control
3. Audio system setting controls
4. Wiper/screenwash/trip computer control stalk
Side control bar
1.Manual headlamp beam height adjustment
2. DSC/ASR systems
3. Stop & Start
4. Boot lid opening
5. Alarm
6. Door mirrors adjustment
Labels
"Lighting and visibility - Exterior lighting
control stalk" and "In the event of a
breakdown - Changing a bulb" sections:
"Safety - Child seats - Deactivating the front
passenger airbag" section:
Page 25 of 180
23
Ease of use and comfort
3Correct driving position
For safety reasons, adjustments must
only be made when the vehicle is
stationary.
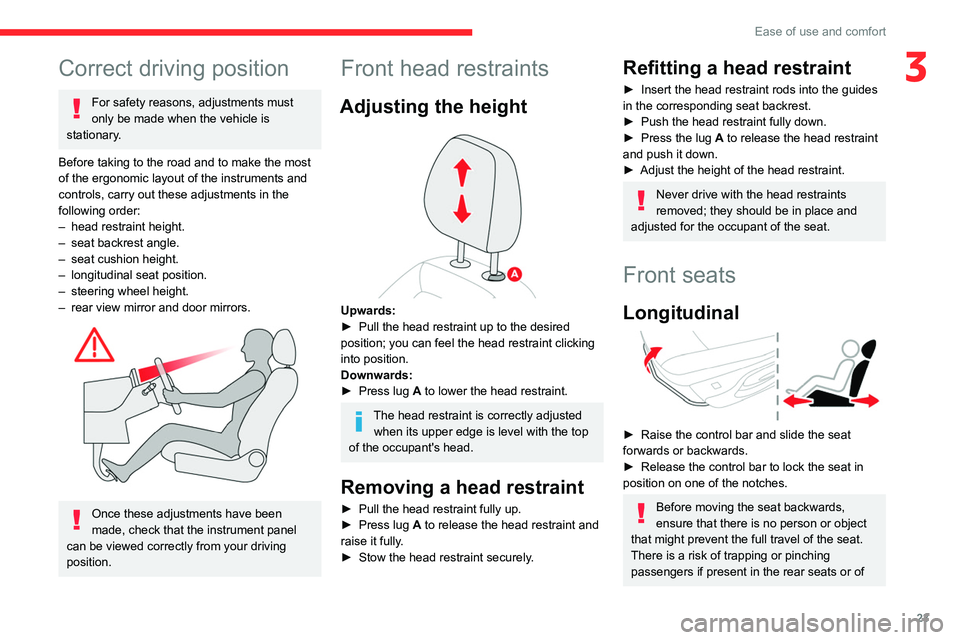
Before taking to the road and to make the most
of the ergonomic layout of the instruments and
controls, carry out these adjustments in the
following order:
–
head restraint height.
–
seat backrest angle.
–
seat cushion height.
–
longitudinal seat position.
–
steering wheel height.
–
rear view mirror and door mirrors.
Once these adjustments have been
made, check that the instrument panel
can be viewed correctly from your driving
position.
Front head restraints
Adjusting the height
Upwards:
► Pull the head restraint up to the desired
position; you can feel the head restraint clicking
into position.
Downwards:
►
Press lug
A to lower the head restraint.
The head restraint is correctly adjusted when its upper edge is level with the top
of the occupant's head.
Removing a head restraint
► Pull the head restraint fully up.
► Press lug A to release the head restraint and
raise it fully.
►
Stow the head restraint securely
.
Refitting a head restraint
► Insert the head restraint rods into the guides
in the corresponding seat backrest.
►
Push the head restraint fully down.
►
Press the lug
A to release the head restraint
and push it down.
►
Adjust the height of the head restraint.
Never drive with the head restraints
removed; they should be in place and
adjusted for the occupant of the seat.
Front seats
Longitudinal
► Raise the control bar and slide the seat
forwards or backwards.
►
Release the control bar to lock the seat in
position on one of the notches.
Before moving the seat backwards,
ensure that there is no person or object
that might prevent the full travel of the seat.
There is a risk of trapping or pinching
passengers if present in the rear seats or of
Page 27 of 180
25
Ease of use and comfort
3Please note: an incorrectly latched
backrest compromises the safety of
passengers in the event of sudden braking or
an accident.
When repositioning the seat backrest, take
care not to trap the seat belts.
The contents of the boot may be thrown
forwards - risk of serious injury!
Adjustable head restraints
These have just one position for use (up) and
one position for storage (down).
They can be removed and are interchangeable
side to side.
To remove a head restraint:
► Pull it upwards as far as possible.
► Press on lug A.
Never drive with the headrests removed;
they must be fitted and correctly
adjusted.
Steering wheel
adjustment
► When stationary , lower the control to release
the steering wheel.
►
Adjust the height and reach to suit your
driving position.
►
Pull the control to lock the steering wheel.
For safety reasons, these adjustments
must only be carried out with the vehicle
stationary.
Mirrors
Door mirrors
As a safety measure, the mirrors should be adjusted to reduce the "blind spots".
The objects that you see in the mirrors are
in fact closer than they appear. Take this
into account in order to correctly judge the
distance of vehicles approaching from behind.
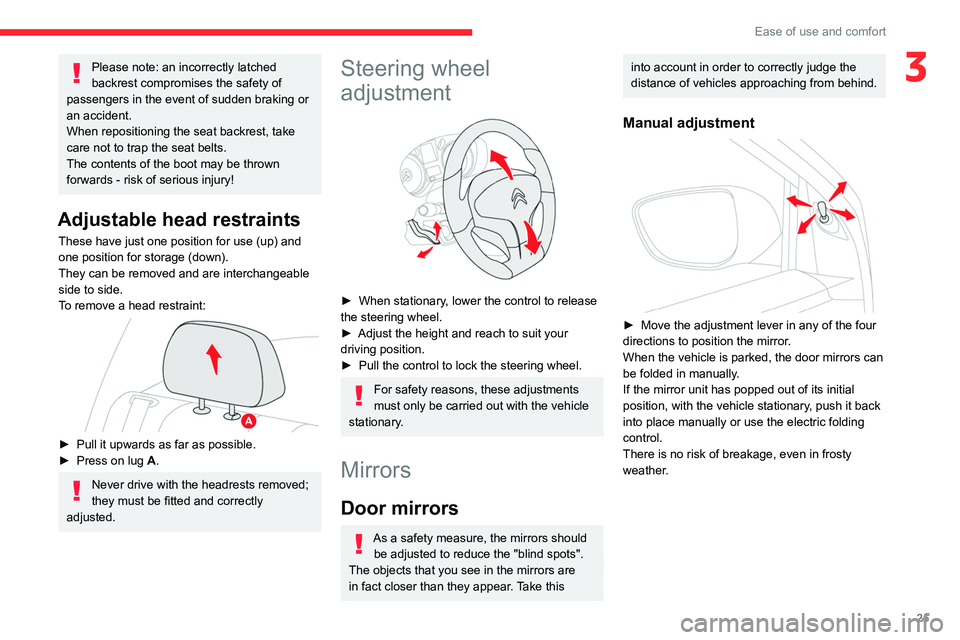
Manual adjustment
► Move the adjustment lever in any of the four
directions to position the mirror .
When the vehicle is parked, the door mirrors can
be folded in manually.
If the mirror unit has popped out of its initial
position, with the vehicle stationary, push it back
into place manually or use the electric folding
control.
There is no risk of breakage, even in frosty
weather.
Page 28 of 180
26
Ease of use and comfort
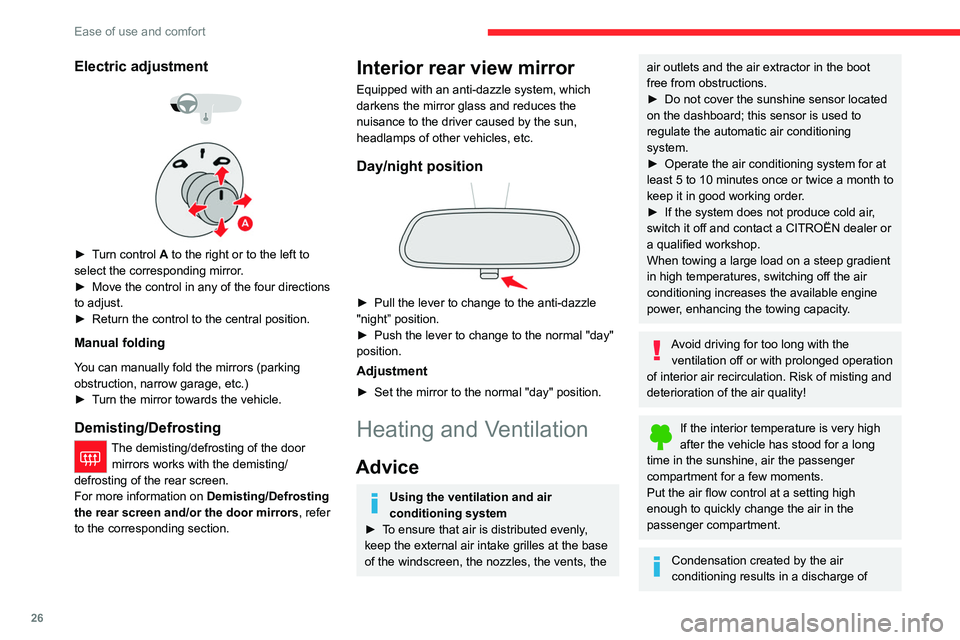
Electric adjustment
► Turn control A to the right or to the left to
select the corresponding mirror.
►
Move the control in any of the four directions
to adjust.
►
Return the control to the central position.
Manual folding
You can manually fold the mirrors (parking
obstruction, narrow garage, etc.)
►
T
urn the mirror towards the vehicle.
Demisting/Defrosting
The demisting/defrosting of the door mirrors works with the demisting/
defrosting of the rear screen.
For more information on Demisting/Defrosting
the rear screen and/or the door mirrors, refer
to the corresponding section.
Interior rear view mirror
Equipped with an anti-dazzle system, which
darkens the mirror glass and reduces the
nuisance to the driver caused by the sun,
headlamps of other vehicles, etc.
Day/night position
► Pull the lever to change to the anti-dazzle
"night” position.
►
Push the lever to change to the normal "day"
position.
Adjustment
► Set the mirror to the normal "day" position.
Heating and Ventilation
Advice
Using the ventilation and air
conditioning system
►
T
o ensure that air is distributed evenly,
keep the external air intake grilles at the base
of the windscreen, the nozzles, the vents, the
air outlets and the air extractor in the boot
free from obstructions.
►
Do not cover the sunshine sensor located
on the dashboard; this sensor is used to
regulate the automatic air conditioning
system.
►
Operate the air conditioning system for at
least 5 to 10 minutes once or twice a month to
keep it in good working order
.
►
If the system does not produce cold air
,
switch it off and contact a CITROËN dealer or
a qualified workshop.
When towing a large load on a steep gradient
in high temperatures, switching off the air
conditioning increases the available engine
power, enhancing the towing capacity.
Avoid driving for too long with the ventilation off or with prolonged operation
of interior air recirculation. Risk of misting and
deterioration of the air quality!
If the interior temperature is very high
after the vehicle has stood for a long
time in the sunshine, air the passenger
compartment for a few moments.
Put the air flow control at a setting high
enough to quickly change the air in the
passenger compartment.
Condensation created by the air
conditioning results in a discharge of
Page 32 of 180
30
Ease of use and comfort
► With the engine running, press this button to
activate/deactivate the function.
Demisting/de-icing the
rear screen and/or the
door mirrors
► Press this button to switch on/off rear screen
and door mirror demisting/de-icing (depending
on version).
The indicator lamp in the button comes on
when
the function is activated.
Demisting/de-icing switches off automatically to
prevent excessive power consumption.
Switch off demisting/de-icing as soon
as you no longer consider it necessary,
as decreased power consumption in turn
reduces energy consumption.
Demisting/de-icing only operates with the
engine running.
Interior fittings
Sun visor
The passenger's sun visor is fitted with a vanity
mirror with concealing flap and a card holder (or
ticket holder).
Glove box
Depending on version, it may have a lid. In this
case:
►
T
o open the glove box, pull the handle
towards you.
It contains the front passenger airbag
deactivation switch.
Never drive with the glove box open
when a passenger is at the front. It may
cause injury during sharp deceleration!
Removable ashtray
► Raise the cover to open the ashtray .
► T o empty it, with the cover raised, pull the
ashtray upward.
To avoid any problem of interference or risk of overturning, do not place the
ashtray near the gear lever.
Front armrest
It includes a storage space.
Page 64 of 180

62
Driving
► Press the "7" or "8" button to select "Tyre
pressures" , then "Reinitialisation ", then
confirm by pressing the central button.
A message confirms the reinitialisation.
With touch screen
The request to reinitialise the system is made in the
Driving/Vehicle menu.
Malfunction
In the event of a malfunction,
these warning lamps light up on
the instrument panel.
A message appears, accompanied by an audible
signal.
In this case, the tyre under-inflation monitoring
function is no longer performed.
Have it checked by a CITROËN dealer or a
qualified workshop.
Non-standard or 'space-saver' spare
wheel
The use of this type of spare wheel may
suspend tyre pressure monitoring.
In this case, the malfunction warning lamp
comes on and disappears once the wheel
has been replaced by one of uniform size (the
same as the others), the pressure readjusted
and the
reinitialisation carried out.
Driving and manoeuvring
aids - General
recommendations
Driving and manoeuvring aids cannot, in
any circumstances, replace the need for
vigilance on the part of the driver.
The driver must comply with the Highway
Code, must remain in control of the vehicle in
all circumstances and must be able to retake
control of it at all times. The driver must adapt
the speed to climatic conditions, traffic and
the state of the road.
It is the driver's responsibility to constantly
monitor traffic conditions, assess the distance
and relative speed of other vehicles, and
anticipate their manoeuvres before using the
direction indicator and changing lanes.
These systems do not make it possible to
exceed the laws of physics.
Driving aids
You should hold the steering wheel with
both hands, always use the door and interior
mirrors, always leave your feet close to the
pedals and take a break every 2 hours.
Manoeuvring aids
The driver must always check the
surroundings of the vehicle before and during
the whole manoeuvre, in particular using the
mirrors.
Other cameras
The images from the camera(s)
displayed on the touch screen or on the
instrument panel may be distorted by the
terrain.
In the presence of areas in shade, or in
conditions of bright sunlight or inadequate
lighting, the image may be darkened and with
lower contrast.
Obstacles may appear further away than they
actually are.
Sensors
The operation of the sensors, as well as
any associated functions, may be disrupted
by noise pollution such as that emitted by
noisy vehicles and machinery (e.g. lorries,
pneumatic drills), by the accumulation of
snow or dead leaves on the road or in the
event of damaged bumpers and mirrors.
When reverse gear is engaged, an audible
signal (long beep) indicates that the sensors
may be dirty.
A front or rear impact to the vehicle can
upset the sensors’ settings, which is not
always detected by the system: distance
measurements may be distorted.
Page 65 of 180
63
Driving
6The sensors do not systematically detect
obstacles that are too low (pavements, studs)
or too thin (trees, posts, wire fences).
Certain obstacles located in the sensors’ blind
spots may not be detected or may no longer
be detected during the manoeuvre.
Certain materials (fabrics) absorb sound
waves: pedestrians may not be detected.
Maintenance
Clean the bumpers and door mirrors and
the field of vision of the cameras regularly.
When washing your vehicle at high pressure,
direct the spray from at least 30
cm away
from the radar, sensors and cameras.
Mats/Pedal trims
The use of mats or pedal trims not
approved by CITROËN may interfere with
the operation of the speed limiter or cruise
control.
To avoid any risk of jamming the pedals:
–
Ensure that the mat is secured correctly
.
–
Never fit one mat on top of another
.
Units of speed
Ensure that the units of speed displayed
on the instrument panel (mph or km/h) are
those for the country you are driving in.
If this is not the case, when the vehicle is
stationary, set the display to the required
units of speed so that it complies with what is
authorised locally.
In case of doubt, contact a CITROËN dealer
or a qualified workshop.
Speed limiter
For more information, refer to the
General recommendations on the use
of driving and manoeuvring aids .
This system prevents the vehicle from
exceeding the speed programmed by the
driver (speed setting).
The speed limiter is switched on manually.
The minimum speed setting is 19 mph (30
km/h).
The speed setting remains in the system
memory when the ignition is switched off.
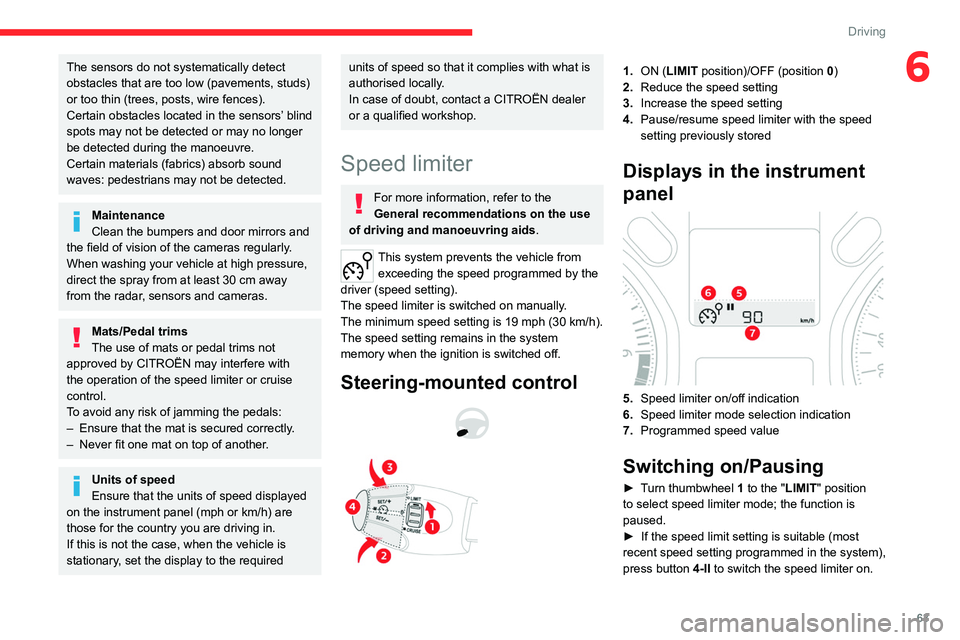
Steering-mounted control
1. ON (LIMIT position)/OFF (position 0)
2. Reduce the speed setting
3. Increase the speed setting
4. Pause/resume speed limiter with the speed
setting previously stored
Displays in the instrument
panel
5.Speed limiter on/off indication
6. Speed limiter mode selection indication
7. Programmed speed value
Switching on/Pausing
► Turn thumbwheel 1 to the "LIMIT" position
to select speed limiter mode; the function is
paused.
►
If the speed limit setting is suitable (most
recent speed setting programmed in the system),
press button
4-II to switch the speed limiter on.
Page 69 of 180
67
Driving
6
This supplements the audible signal by
displaying bars on the screen whose location
represents the distance between the obstacle
and the vehicle (white: more distant, orange:
close, red: very close).
When the obstacle is very close, the "Danger"
symbol is displayed on the screen.
Deactivation/Activation
The function is deactivated or activated via the
vehicle configuration menu.
With audio system
The parking sensors can be configured in the "Personalisation - Configuration "
menu.
With touch screen
The parking sensors can be configured in the Driving/Vehicle
menu.
The function will be deactivated automatically if a trailer is being towed or
a bicycle carrier is fitted (vehicle fitted with a
tow bar or bicycle carrier recommended by
CITROËN).
Malfunction
In the event of a malfunction when
changing into reverse gear, this warning
lamp lights up on the instrument panel and/or a
message appears in the screen, accompanied
by an audible signal (short beep).
Have it checked by a CITROËN dealer or a
qualified workshop.
Reversing Camera
For more information, refer to the
General recommendations on the use
of driving and manoeuvring aids .
The reversing camera is automatically activated
when reverse gear is engaged.
The image is displayed on the touch screen.
The reversing camera function may be
supplemented with parking sensors.
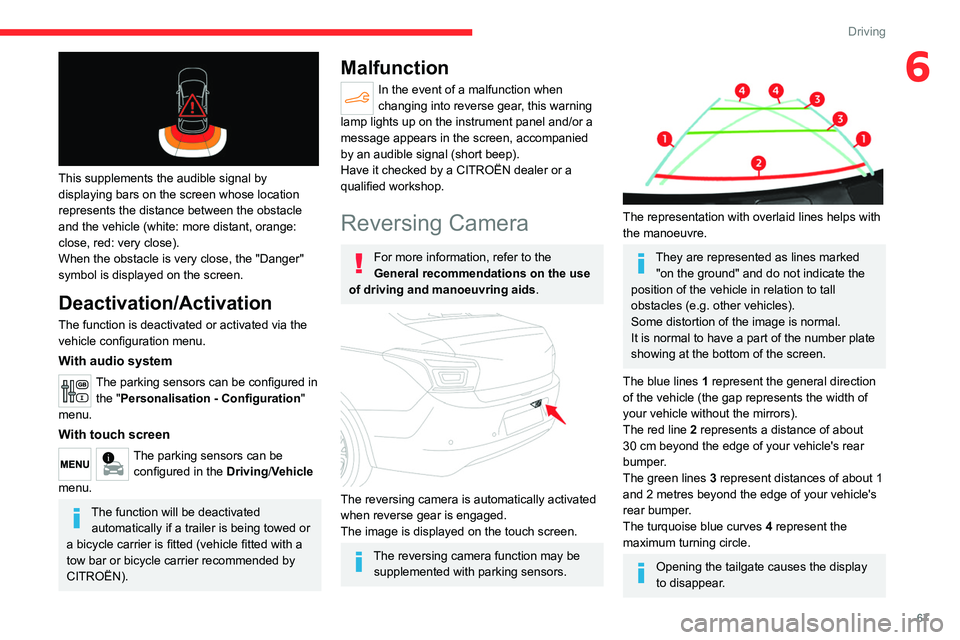
The representation with overlaid lines helps with
the manoeuvre.
They are represented as lines marked "on the ground" and do not indicate the
position of the vehicle in relation to tall
obstacles (e.g. other vehicles).
Some distortion of the image is normal.
It is normal to have a part of the number plate
showing at the bottom of the screen.
The blue lines
1
represent the general direction
of the vehicle (the gap represents the width of
your vehicle without the mirrors).
The red line
2
represents a distance of about
30
cm beyond the edge of your vehicle's rear
bumper.
The green lines
3
represent distances of about 1
and 2
metres beyond the edge of your vehicle's
rear bumper.
The turquoise blue curves
4
represent the
maximum turning circle.
Opening the tailgate causes the display
to disappear.
Page 127 of 180
125
CITROËN Connect Nav
12CITROËN Connect Nav
GPS navigation -
Applications - Multimedia
audio system - Bluetooth
®
telephone
The functions and settings described
vary according to the vehicle version and
configuration.
For safety reasons and because they
require sustained attention by the driver,
the following operations must be carried out
with the vehicle stationary and the ignition
on:
–
Pairing the smartphone with the system in
Bluetooth mode.
–
Using the smartphone.
–
Connection to the CarPlay®, MirrorLinkTM
or Android Auto applications (certain
applications interrupt their display while the
vehicle is moving).
–
Changing the system settings and
configuration.
The system is protected so that it only operates in the vehicle.
The message Energy Economy Mode is
displayed when the system is about to enter
the corresponding mode.
System and map updates can be
downloaded from the Brand’s website.
The update procedure is also available on the
website.
The system’s Open Source Software (OSS) source codes are available at the
following addresses:
https://www.groupe-psa.com/fr/oss/
https://www.groupe-psa.com/en/oss/
First steps
With the engine running, a press mutes
the sound.
With the ignition off, a press turns the system on.
Adjustment of the volume.
Use the buttons either side of or below the touch
screen for access to the menus, then press the
virtual buttons in the touch screen.
Depending on the model, use the "Source" or
"Menu" buttons on the left of the touch screen
for access to the menus, then press the virtual
buttons in the touch screen.
You can display the menus at any time by
pressing the screen briefly with three fingers.
All of the touch areas of the screen are white.
Press the cross to go back a level.
Press "OK" to confirm.
The touch screen is of the "capacitive" type.
To clean the screen, use a soft, non-abrasive
cloth (e.g. spectacles cloth) with no additional
product.
Do not use sharp objects on the screen.
Do not touch the screen with wet hands.
Certain information is displayed permanently in
the upper band of the touch screen:
–
Reminder of the air conditioning information
(depending on version), and direct access to the
corresponding menu.
–
Go directly to the selection of the audio
source, to the list of radio stations (or list of titles
depending on the source).
–
Go to the message notifications, emails, map
updates and, depending on the services, the
navigation notifications.
–
Go to the settings for the touch screen and the
digital instrument panel.