headlamp Citroen C ZERO 2014.5 1.G Owner's Manual
[x] Cancel search | Manufacturer: CITROEN, Model Year: 2014.5, Model line: C ZERO, Model: Citroen C ZERO 2014.5 1.GPages: 176, PDF Size: 5.22 MB
Page 4 of 176
.
.
Instrument panel 9
I ndicator and warning lamps
1
0
Main battery state of charge indicator
1
8
Energy consumption
/ generation indicator
1
9
Distance recorder
2
0
Trip distance recorder
2
0
Lighting dimmer
2
1
Service indicator
2
1
Range indicator
2
3
Monitoring
ove
r view
Eco-driving
Remote control key 2 4
Doors
2
7
Boot
2
8
Electric windows
2
9
Charging flaps
3
0
access
Front seats 31
Rear seats
3
3
Mirrors
35
I
nterior fittings
3
7
Ventilation
4
0
Heating
4
2
Air conditioning
4
2
Front demist - defrost
4
5
Rear screen demist - defrost
4
5
Comfort
Driving recommendations 46
Starting - stopping the vehicle
4
7
Parking brake
4
8
Drive selector
4
9
Driving
Lighting controls 5 1
Automatic illumination of headlamps
5
3
Headlamp adjustment
5
3
Wiper control
5
4
Courtesy lamp
5
5
Visibility
Contents
Page 13 of 176
11
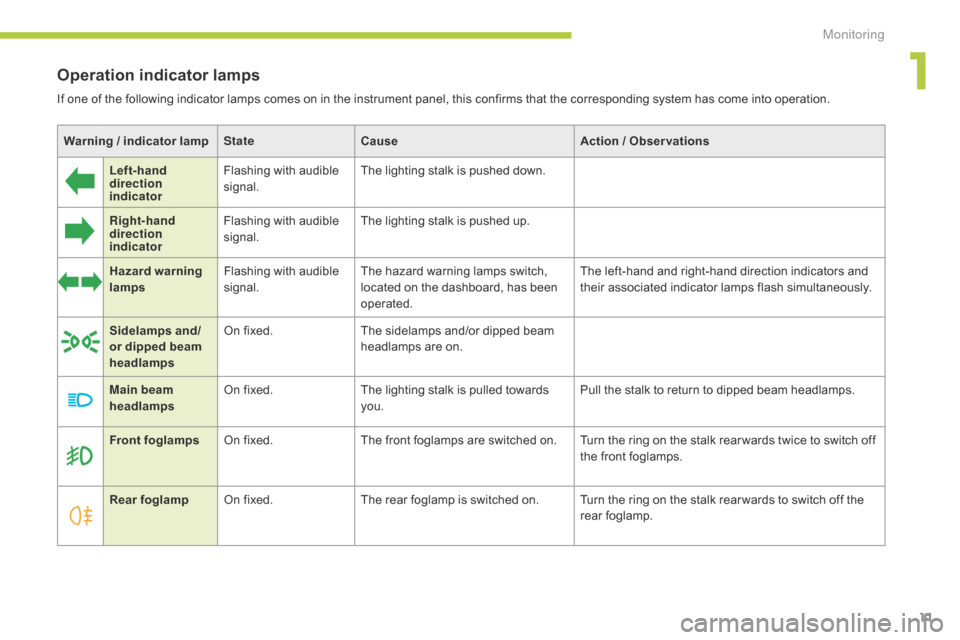
Warning / indicator lampSt ateCause Action / Observations
Left-hand
direction
indicato r Flashing with audible
signal.
The lighting stalk is pushed down.
Right-hand
direction
indicator Flashing with audible
signal.
The lighting stalk is pushed up.
Hazard warning
lamps Flashing with audible
signal. The hazard warning lamps switch,
located on the dashboard, has been
operated. The left-hand and right-hand direction indicators and
their associated indicator lamps flash simultaneously.
Sidelamps and/
or dipped beam
headlamps On fixed.
The sidelamps and/or dipped beam
headlamps are on.
Front foglamps On fixed. The front foglamps are switched on. Turn the ring on the stalk rear wards twice to switch off
the front foglamps.
Rear foglamp On fixed. The rear foglamp is switched on. Turn the ring on the stalk rear wards to switch off the
rear foglamp.
Main beam
headlamps
On fixed.
The lighting stalk is pulled towards
you. Pull the stalk to return to dipped beam headlamps.
Operation indicator lamps
If one of the following indicator lamps comes on in the instrument panel, this confirms that the corresponding system has come into operation.
1
Monitoring
Page 53 of 176
51
Lighting controls
Main lighting
The various front and rear lamps of the vehicle
are designed to adapt the lighting progressively
in relation to the climatic conditions and so
ensure the best visibility for the driver:
-
s
idelamps, to be seen,
-
d
ipped beam headlamps to see without
dazzling other drivers,
-
m
ain beam headlamps to see clearly when
the road is clear.
Additional lighting
Other lamps are provided to fulfil the
requirements of particular driving conditions:
-
a r
ear foglamp to be seen from a distance,
-
f
ront foglamps for even better visibility,
-
d
aytime running lamps to be seen during
the day.
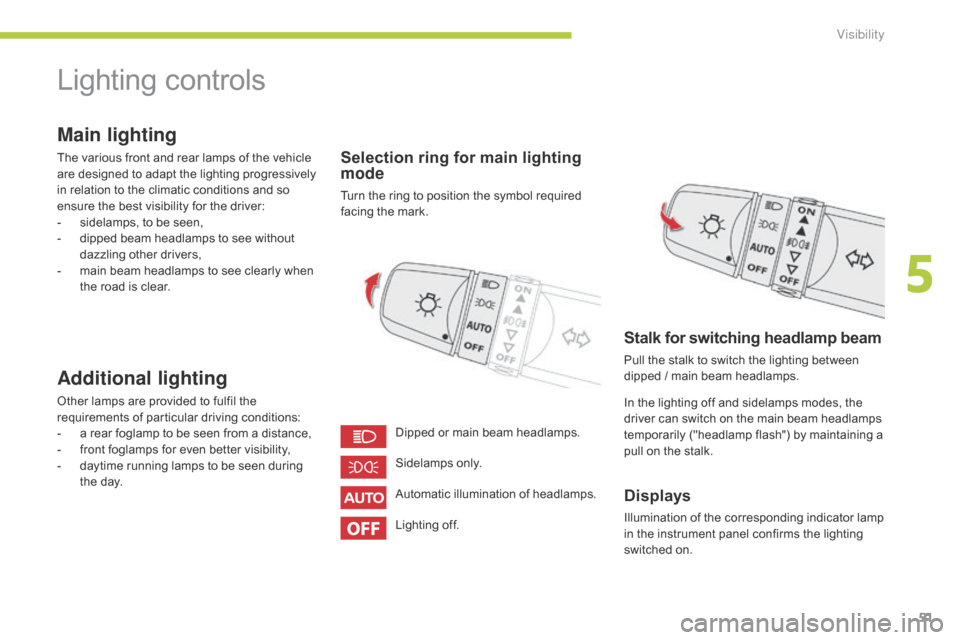
Selection ring for main lighting
mode
Turn the ring to position the symbol required
facing the mark.
Automatic illumination of headlamps. Sidelamps only.
Dipped or main beam headlamps.
Stalk for switching headlamp beam
Pull the stalk to switch the lighting between
dipped / main beam headlamps.
In the lighting off and sidelamps modes, the
driver can switch on the main beam headlamps
temporarily ("headlamp flash") by maintaining a
pull on the stalk.
Displays
Illumination of the corresponding indicator lamp
in the instrument panel confirms the lighting
switched on.
Lighting off.
5
Visibility
Page 54 of 176
52
Front and rear foglamps
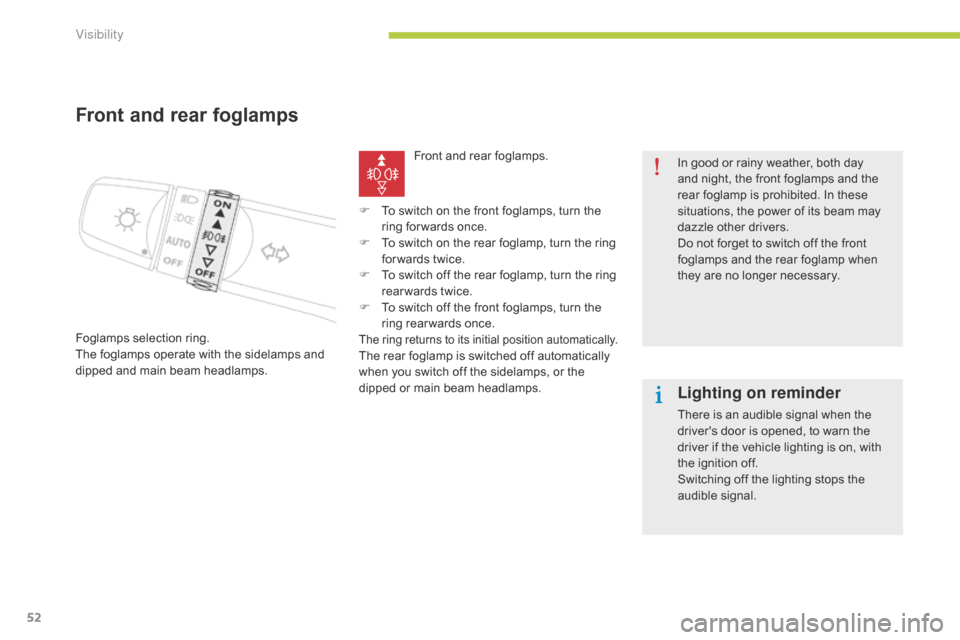
Foglamps selection ring.
The foglamps operate with the sidelamps and
dipped and main beam headlamps.Front and rear foglamps.
In good or rainy weather, both day
and night, the front foglamps and the
rear foglamp is prohibited. In these
situations, the power of its beam may
dazzle other drivers.
Do not forget to switch off the front
foglamps and the rear foglamp when
they are no longer necessary.
Lighting on reminder
There is an audible signal when the
driver's door is opened, to warn the
driver if the vehicle lighting is on, with
the ignition off.
Switching off the lighting stops the
audible signal.
F
T
o switch on the front foglamps, turn the
ring for wards once.
F
T
o switch on the rear foglamp, turn the ring
for wards twice.
F
T
o switch off the rear foglamp, turn the ring
rear wards twice.
F
T
o switch off the front foglamps, turn the
ring rear wards once.
The ring returns to its initial position automatically.The rear foglamp is switched off automatically
when you switch off the sidelamps, or the
dipped or main beam headlamps.
Visibility
Page 55 of 176
53
Daytime running lamps
Special daytime lighting so that the vehicle can
be seen more easily.
The daytime running lamps come on
automatically when starting the motor, if no
other lighting is on.
They cannot be deactivated.Automatic illumination of headlamps
With the main lighting control ring in the AUTO
position, the sidelamps and dipped beam headlamps
come on automatically, without any action by the
driver, when a low level of ambient light is detected.
When the light returns to a sufficient level or the
wipers are switched off, the lighting is switched off
automatically.
The sensor is located at the base of the windscreen.
Automatic illumination of
headlamps
Automatic lighting off
When the lighting stalk is in the
"AUTO" position, if the ignition switch is in
the "LOCK" or "ACC" position or if the key
has been removed, the lighting switches off
automatically when the driver's door is
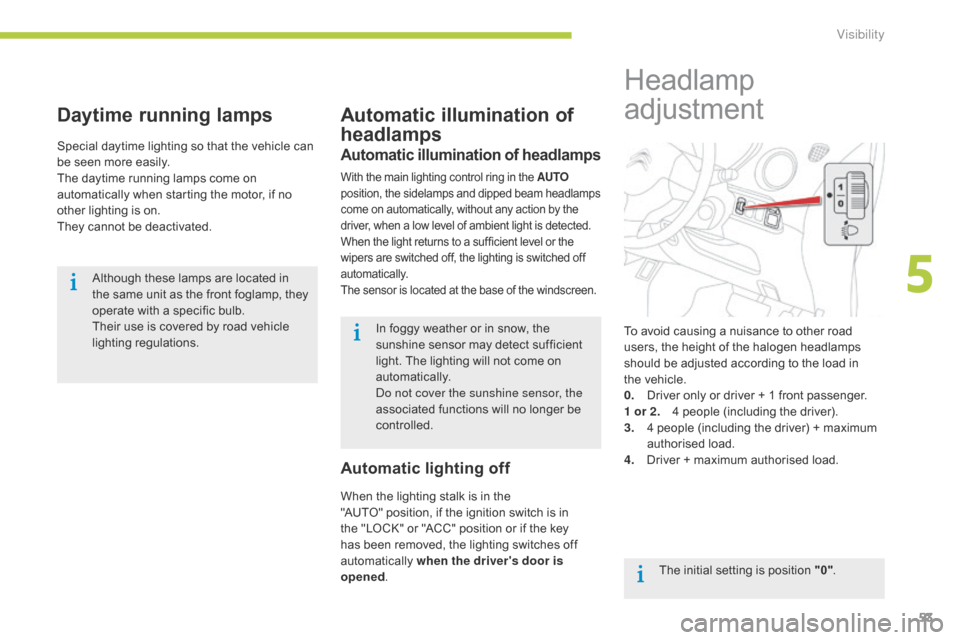
opened . The initial setting is position "0"
.
Headlamp
adjustment
To avoid causing a nuisance to other road
users, the height of the halogen headlamps
should be adjusted according to the load in
the
vehicle.
0.
D
river only or driver + 1 front passenger.
1 or 2.
4 p
eople (including the driver).
3.
4 p
eople (including the driver) + maximum
authorised load.
4.
D
river + maximum authorised load.
Although these lamps are located in
the same unit as the front foglamp, they
operate with a specific bulb.
Their use is covered by road vehicle
lighting regulations.
In foggy weather or in snow, the
sunshine sensor may detect sufficient
light. The lighting will not come on
automatically.
do n
ot cover the sunshine sensor, the
associated functions will no longer be
controlled.
5
Visibility
Page 108 of 176
106
Changing a bulb
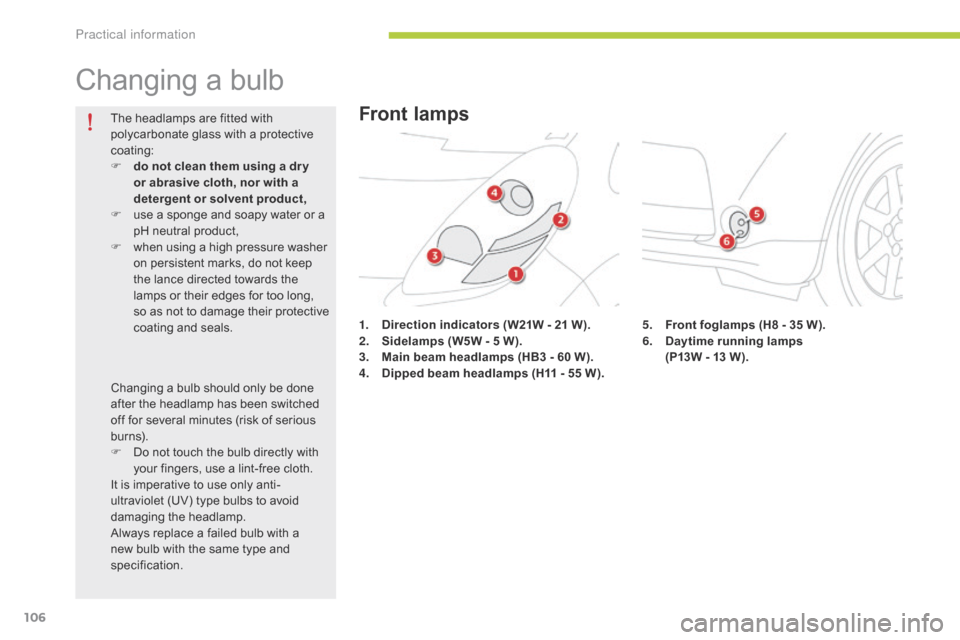
1. Direction indicators (W21W - 21 W).
2. S idelamps (W5W - 5 W).
3.
M
ain beam headlamps (HB3 - 60 W).
4.
D
ipped beam headlamps (H11 - 55 W) .
The headlamps are fitted with
polycarbonate glass with a protective
coating:
F
d
o not clean them using a dr y
or abrasive cloth, nor with a
detergent or solvent product,
F
u
se a sponge and soapy water or a
pH neutral product,
F
w
hen using a high pressure washer
on persistent marks, do not keep
the lance directed towards the
lamps or their edges for too long,
so as not to damage their protective
coating and seals.
Changing a bulb should only be done
after the headlamp has been switched
off for several minutes (risk of serious
burns).
F
D
o not touch the bulb directly with
your fingers, use a lint-free cloth.
It is imperative to use only anti-
ultraviolet (UV) type bulbs to avoid
damaging the headlamp.
Always replace a failed bulb with a
new bulb with the same type and
specification.
Front lamps
5. Front foglamps (H8 - 35 W).
6. D aytime running lamps
(P13W - 13 W).
Practical information
Page 111 of 176
109
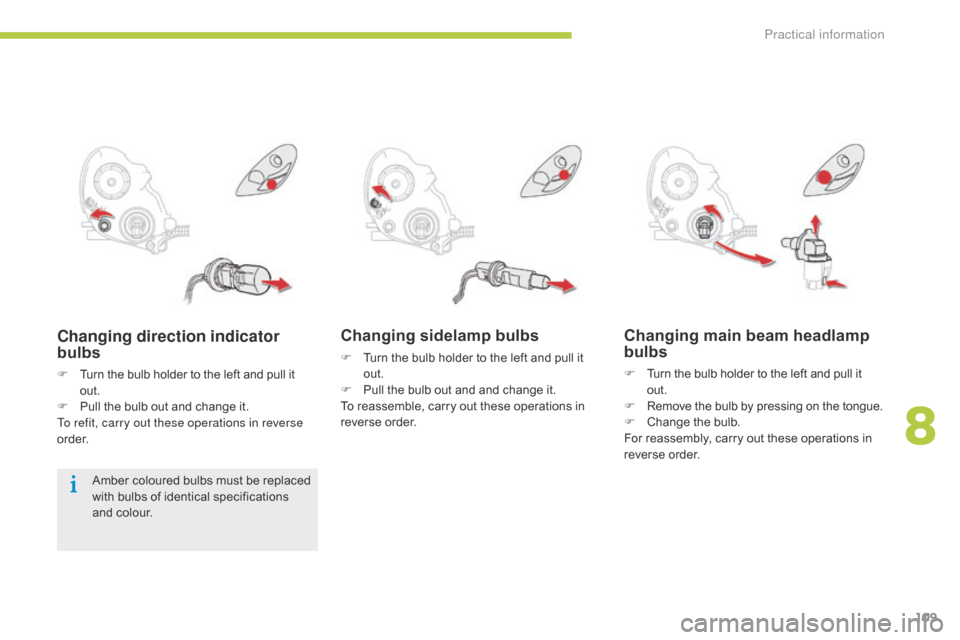
Changing sidelamp bulbs
F Turn the bulb holder to the left and pull it out.
F
P
ull the bulb out and and change it.
To reassemble, carry out these operations in
reverse order.
Changing main beam headlamp
bulbs
F Turn the bulb holder to the left and pull it out.
F
R
emove the bulb by pressing on the tongue.
F
C
hange the bulb.
For reassembly, carry out these operations in
reverse order.
Changing direction indicator
bulbs
F Turn the bulb holder to the left and pull it out.
F
P
ull the bulb out and change it.
To refit, carry out these operations in reverse
o r d e r.
Amber coloured bulbs must be replaced
with bulbs of identical specifications
and colour.
8
Practical information
Page 112 of 176
110
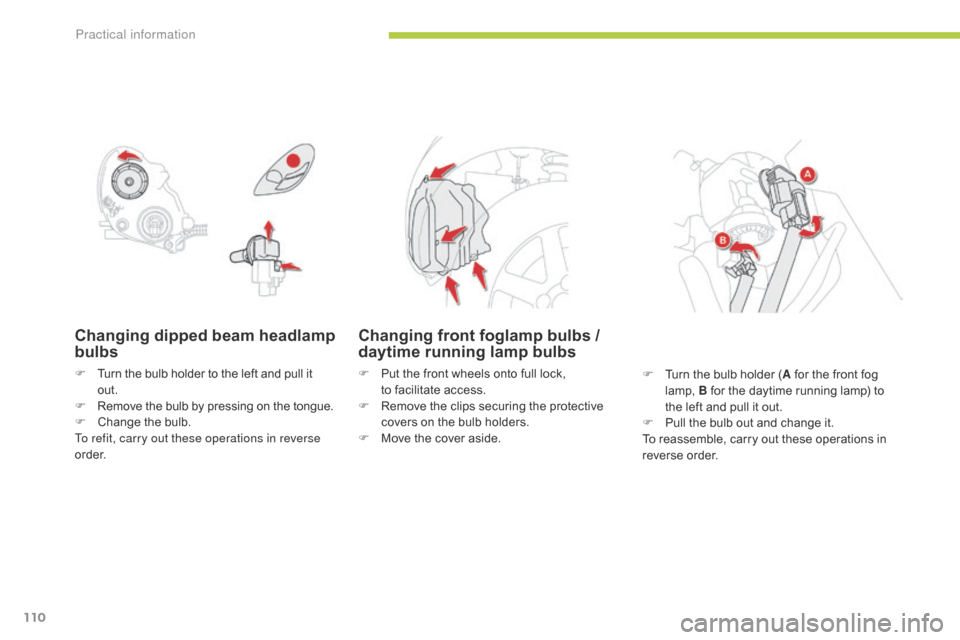
Changing dipped beam headlamp
bulbs
F Turn the bulb holder to the left and pull it out.
F
R
emove the bulb by pressing on the tongue.
F
C
hange the bulb.
To refit, carry out these operations in reverse
o r d e r.
Changing front foglamp bulbs /
daytime running lamp bulbs
F Put the front wheels onto full lock, to facilitate access.
F
R
emove the clips securing the protective
covers on the bulb holders.
F
M
ove the cover aside. F
T urn the bulb holder (A for the front fog
lamp, B for the daytime running lamp) to
the left and pull it out.
F
P
ull the bulb out and change it.
To reassemble, carry out these operations in
reverse order.
Practical information
Page 113 of 176
111
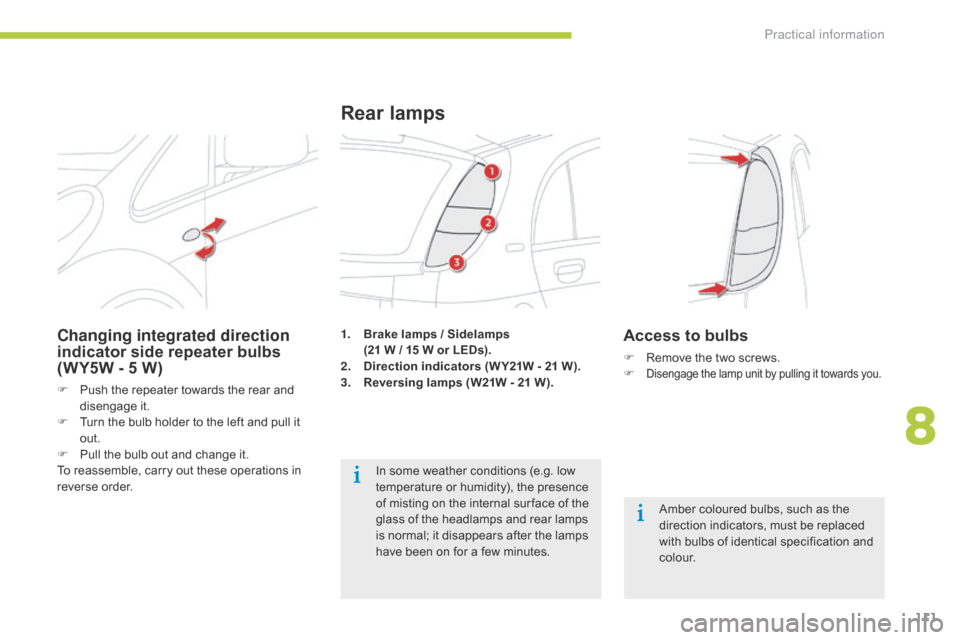
1. Brake lamps / Sidelamps
(21 W / 15 W or LEDs).
2.
D
irection indicators (W Y21W - 21 W).
3.
R
eversing lamps (W21W - 21 W).
Rear lamps
Amber coloured bulbs, such as the
direction indicators, must be replaced
with bulbs of identical specification and
c o l o u r.
In some weather conditions (e.g. low
temperature or humidity), the presence
of misting on the internal sur face of the
glass of the headlamps and rear lamps
is normal; it disappears after the lamps
have been on for a few minutes.
Changing integrated direction
indicator side repeater bulbs
(WY5W - 5
W)
F Push the repeater towards the rear and disengage it.
F
T
urn the bulb holder to the left and pull it
out.
F
P
ull the bulb out and change it.
To reassemble, carry out these operations in
reverse order.
Access to bulbs
F Remove the two screws.
F Disengage the lamp unit by pulling it towards you.
8
Practical information
Page 120 of 176
118
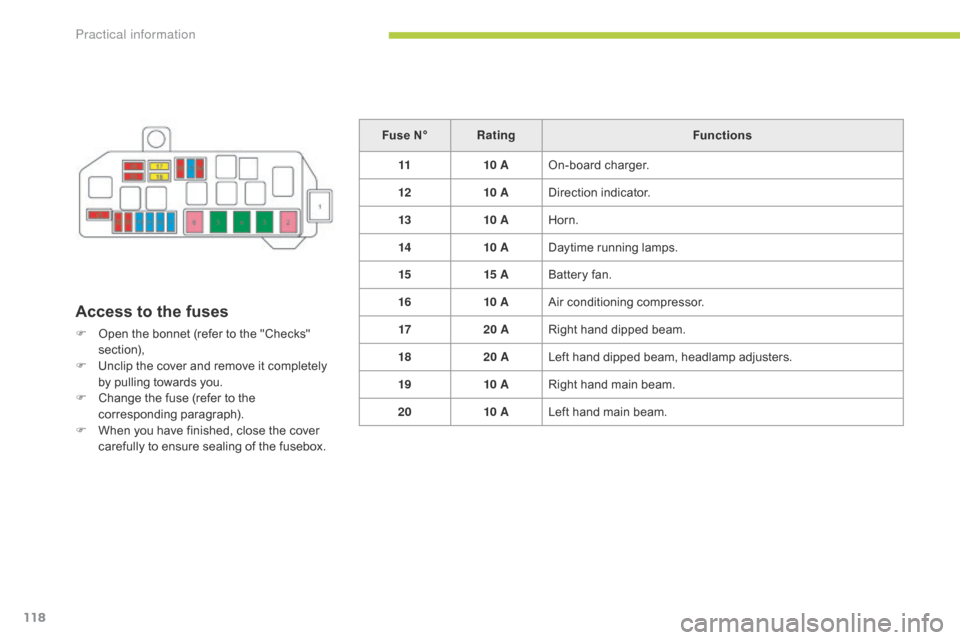
Access to the fuses
F Open the bonnet (refer to the "Checks" section),
F
U
nclip the cover and remove it completely
by pulling towards you.
F
C
hange the fuse (refer to the
corresponding paragraph).
F
W
hen you have finished, close the cover
carefully to ensure sealing of the fusebox. Fuse N°
Rating Functions
11 10 AOn-board charger.
12 10 ADirection indicator.
13 10 AHorn.
14 10 ADaytime running lamps.
15 15 ABattery fan.
16 10 AAir conditioning compressor.
17 20 ARight hand dipped beam.
18 20 ALeft hand dipped beam, headlamp adjusters.
19 10 ARight hand main beam.
20 10 ALeft hand main beam.
Practical information