display CITROEN C-ZERO 2017 Handbook (in English)
[x] Cancel search | Manufacturer: CITROEN, Model Year: 2017, Model line: C-ZERO, Model: CITROEN C-ZERO 2017Pages: 174, PDF Size: 4.15 MB
Page 21 of 174

19
Main battery state of charge indicator
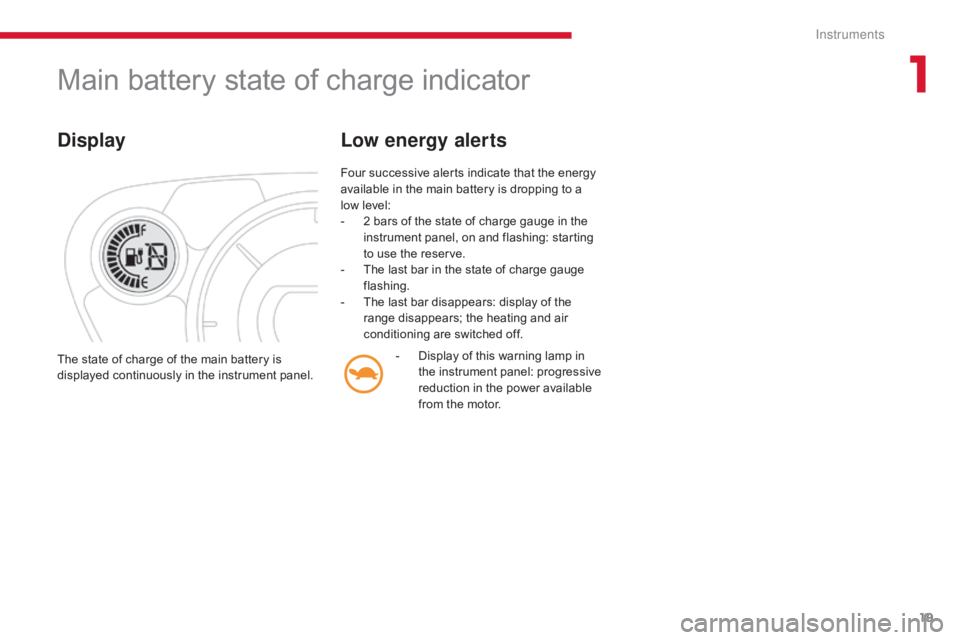
Display
Four successive alerts indicate that the energy
available in the main battery is dropping to a
low level:
-
2 b
ars of the state of charge gauge in the
instrument panel, on and flashing: starting
to use the reserve.
-
T
he last bar in the state of charge gauge
flashing.
-
T
he last bar disappears: display of the
range disappears; the heating and air
conditioning are switched off.
Low energy alerts
- Display of this warning lamp in the instrument panel: progressive
reduction in the power available
from the motor.
The state of charge of the main battery is
displayed continuously in the instrument panel.
1
Instruments
Page 23 of 174

21
Instrument panel screenWhen the ignition switch is in the "ON" position, press button A repeatedly to display the following information in turn.
Distance recorder
System for measuring the total distance
travelled by the vehicle during its life.
Press button A .
The total distance appears in the screen.Reset to zero
With the ignition on and either trip A or B
displayed, press the button for more than
2
seconds.
Trip distance recorder (Trip A or B)
Each of these trip recorders indicates the
distance travelled since the last reset.
Press button A to display the desired trip.
Changing the speedometer units
With the total distance recorder displayed,
press and hold button A for a few seconds to
change the speedometer units (mph or km/h).
The range indicator is displayed in the units
(miles or km) corresponding to those of the
speedometer (mph or km/h).
1
Instruments
Page 24 of 174

22
Service indicator
When the ignition is switched on, press
button A several times in succession until the
service indicator is displayed in the desired
units. This point can be indicated in one of two ways:
-
t
he miles (km) remaining,
-
t
he time remaining to the next service.
Operation
1. The screen indicates that 620 miles
(1000 km) or 1 month remain before the
next service.
2.
T
he screen indicates that the date for the
service has been exceeded.
E
very time the ignition is switched on,
the service spanner is displayed for a
few seconds to remind you that a service
should be carried out as soon as possible.
3.
O
nce the service has been carried out, the
distance or the number of months to the
next service is displayed again.
System which informs the driver when the
next service is due in accordance with the
manufacturer's servicing schedule.
The point at which the next service is due
is calculated from the last service indicator
zero
reset.
System for manual adjustment of the
brightness of the instruments and controls in
relation to the exterior brightness.
With the lighting on or off, press button A to
select the function, then hold down to change
the intensity of the lighting of the instruments
and controls in "day" or "night" mode.
The intensity of the lighting increases each time
button A is pressed.
When the lighting reaches the maximum
setting, press again to change to the minimum
setting.
When the lighting reaches the required
intensity, release button A .
The setting is saved when you release button A
and retained when the ignition switch is turned
to OFF.
Lighting dimmer
Instruments
Page 25 of 174

23
The display of "---", indicating that the
service date has arrived, comes on
automatically after a certain time and
distance travelled. The screen then
indicates the time remaining before the
next service is due.
Resetting the service indicator to zero
After each service, the service indicator should
be rest to zero.
The procedures is as follows:
F
S
witch off the ignition (switch in the LOCK
or ACC position).
F
P
ress the reset button A several times in
succession until the service indicator is
displayed.
F
P
ress and hold the reset button for a few
seconds until the spanner flashes .
F
P
ress the reset button while the spanner is
flashing to change the display from "---" to
"CLEAR" .
T
he distance (or time) remaining before the
next service is due is displayed.
1
Instruments
Page 26 of 174

24
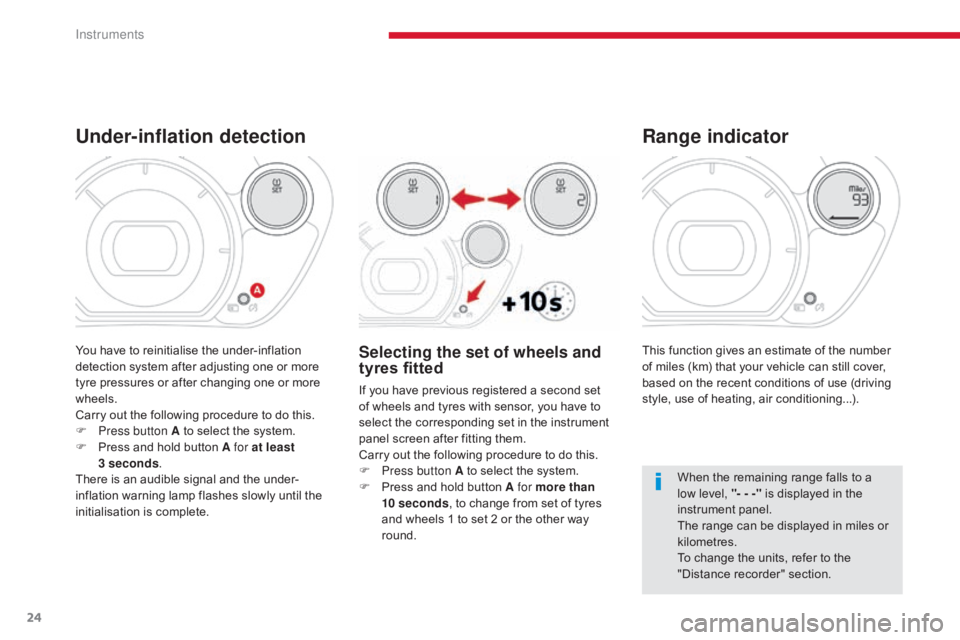
This function gives an estimate of the number
of miles (km) that your vehicle can still cover,
based on the recent conditions of use (driving
style, use of heating, air conditioning...).
Range indicator
When the remaining range falls to a
low level, "- - -" is displayed in the
instrument panel.
The range can be displayed in miles or
kilometres.
To change the units, refer to the
"Distance recorder" section.
Under-inflation detection
Selecting the set of wheels and
tyres fitted
If you have previous registered a second set
of wheels and tyres with sensor, you have to
select the corresponding set in the instrument
panel screen after fitting them.
Carry out the following procedure to do this.
F
P
ress button A to select the system.
F
P
ress and hold button A for more than
10
seconds , to change from set of tyres
and wheels 1 to set 2 or the other way
round.
You have to reinitialise the under-inflation
detection system after adjusting one or more
tyre pressures or after changing one or more
wheels.
Carry out the following procedure to do this.
F
P
ress button A to select the system.
F
P
ress and hold button A for at least
3
seconds .
There is an audible signal and the under-
inflation warning lamp flashes slowly until the
initialisation is complete.
Instruments
Page 41 of 174

39
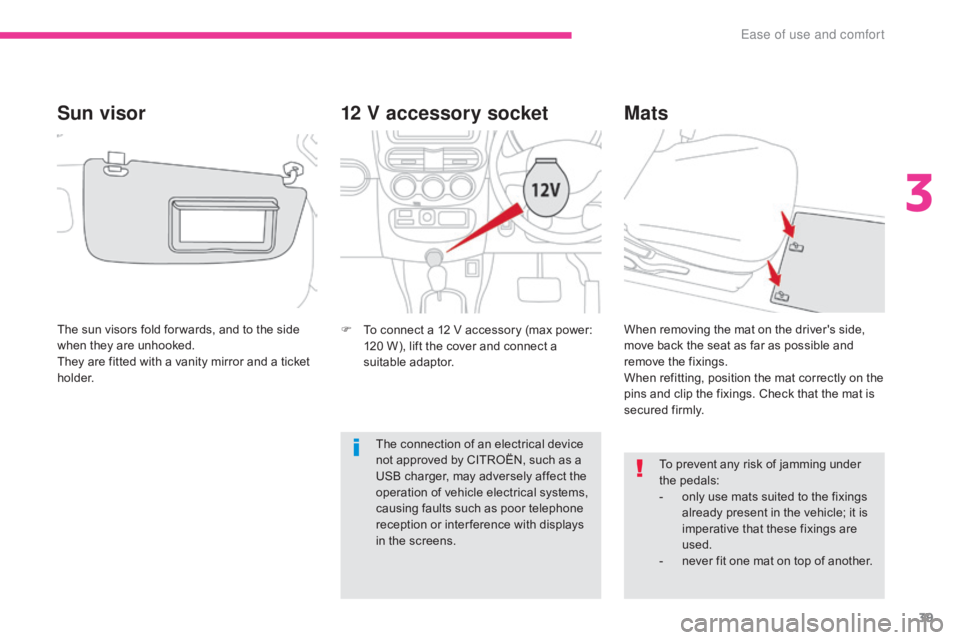
12 V accessory socket
F To connect a 12 V accessory (max power: 120 W), lift the cover and connect a
suitable adaptor.
Mats
To prevent any risk of jamming under
the pedals:
-
o
nly use mats suited to the fixings
already present in the vehicle; it is
imperative that these fixings are
used.
-
n
ever fit one mat on top of another.
When removing the mat on the driver's side,
move back the seat as far as possible and
remove the fixings.
When refitting, position the mat correctly on the
pins and clip the fixings. Check that the mat is
secured firmly.
The sun visors fold for wards, and to the side
when they are unhooked.
They are fitted with a vanity mirror and a ticket
h o l d e r.
Sun visor
The connection of an electrical device
not approved by CITROËN, such as a
USB charger, may adversely affect the
operation of vehicle electrical systems,
causing faults such as poor telephone
reception or inter ference with displays
in the screens.
3
Ease of use and comfort
Page 49 of 174

47
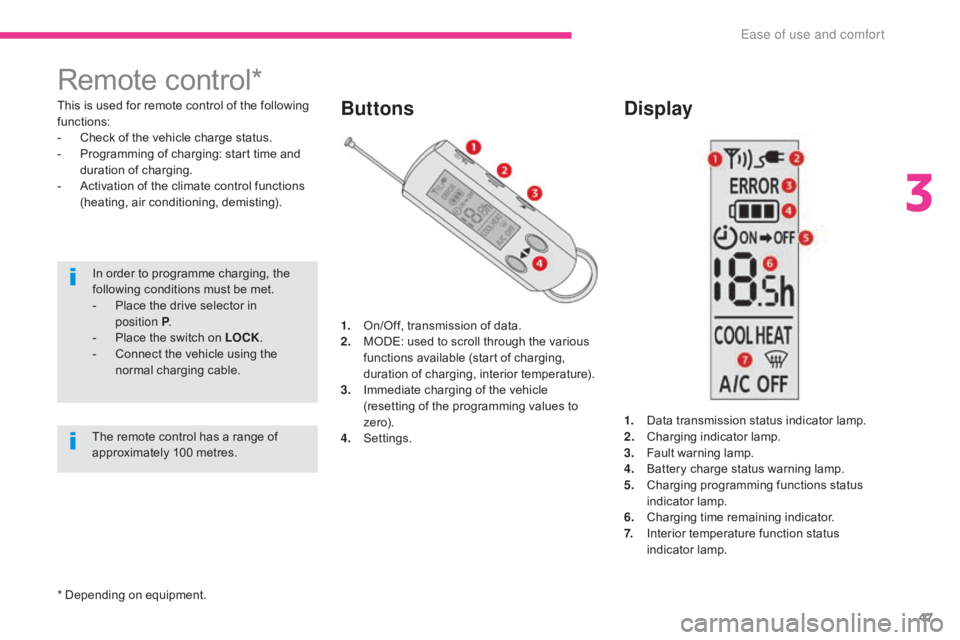
Remote control*
This is used for remote control of the following
functions:
-
C
heck of the vehicle charge status.
-
P
rogramming of charging: start time and
duration of charging.
-
A
ctivation of the climate control functions
(heating, air conditioning, demisting).
In order to programme charging, the
following conditions must be met.
-
P
lace the drive selector in
position
P.
-
P
lace the switch on LOCK .
-
C
onnect the vehicle using the
normal charging cable.Buttons Display
1. On/Off, transmission of data.
2. M
ODE: used to scroll through the various
functions available (start of charging,
duration of charging, interior temperature).
3.
I
mmediate charging of the vehicle
(resetting of the programming values to
ze r o).
4.
S
ettings. 1.
D
ata transmission status indicator lamp.
2.
C
harging indicator lamp.
3.
F
ault warning lamp.
4.
B
attery charge status warning lamp.
5.
C
harging programming functions status
indicator lamp.
6.
C
harging time remaining indicator.
7.
I
nterior temperature function status
indicator lamp.
The remote control has a range of
approximately 100 metres.
* Depending on equipment.
3
Ease of use and comfort
Page 50 of 174

48
If there is no action on the remote
control within 30 seconds, it will switch
off automatically.If the start of charging is programmed
without programming the duration of
charging, the battery will be charged
fully.The duration of charging can be
programmed between 0.5 and
19.5
hours. However, you can also
select the duration "-h": in this case,
charging will stop when the battery
is fully charged. This duration is the
default value.
On / Off Programming the duration
of charging
This function is used to programme the
duration of charging of your vehicle.
Switch on the remote control.
Press the MODE button to select the
programming of the duration of charging.
Extend the aerial.
Press and hold this button to switch
the remote control on or off.
Programming the start of
charging
This function is used to set the time remaining
before starting the charging of your vehicle.
(e.g. it is 19:00 at the time of programming, the
programmed charging start time is 2:00 hours:
charging will begin at 21:00).
Switch on the remote control.
This symbol is displayed on the screen.
Use the arrows to set the charging start time:
each press changes the time in steps of half
an hour.
Press the on/off button briefly to transmit the
data to the vehicle.
This symbol is displayed on the screen.
Use the arrows to set the charging time: each
press changes the time in steps of half an hour.
Press the on/off button briefly to transmit the
data to the vehicle.
If the duration of charging is
programmed without programming
the start time, the battery will be
charged immediately for the duration
programmed.
Ease of use and comfort
Page 51 of 174

49
In order to programme the heating, air
conditioning or demisting functions, the
following conditions must be met.
-
T
he drive selector is in position P .
-
T
he switch is on LOCK .
-
T
he vehicle is connected using the
normal charging cable.
-
A
ll of the doors are closed correctly.
-
T
he battery charge level is
sufficient (one bar minimum).
Cancelling the programmed
settings
Using the remote control
Using the switch
Place the vehicle's switch in the ON position
then return it to the LOCK position.
Programming the interior temperature
Activation of the functions
Switch on the remote control.
Press the MODE button to select the interior
temperature programming.
This function is used to programme the
switching on of:
- t
he heating.
-
t
he air conditioning.
-
t
he demisting.
Press the immediate charging button,
then press the on/off button briefly to
transmit the data to the vehicle.
One of these symbols is displayed on the
screen. It indicates the current status of the
interior temperature.
Use the arrows to select the function required.
Press the on/off button briefly to transit the data
to the vehicle.
The progammed values set using
the remote control are cancelled
automatically each time the vehicle is
started.
For maximum effectiveness of
the programming of the interior
temperature, ensure that all of the
vehicle's windows are closed.
3
Ease of use and comfort
Page 55 of 174

53
Lighting controls
Main lighting
The various front and rear lamps of the vehicle
are designed to adapt the lighting progressively
in relation to the climatic conditions and so
ensure the best visibility for the driver:
-
s
idelamps, to be seen,
-
d
ipped beam headlamps to see without
dazzling other drivers,
-
m
ain beam headlamps to see clearly when
the road is clear.
Additional lighting
Other lamps are provided to fulfil the
requirements of particular driving conditions:
-
a r
ear foglamp to be seen from a distance,
-
f
ront foglamps for even better visibility,
-
d
aytime running lamps to be seen during
the day.
Selection ring for main lighting
mode
Turn the ring to position the symbol required
facing the mark.
Automatic illumination of headlamps. Sidelamps only.
Dipped or main beam headlamps.
Stalk for switching headlamp beam
Pull the stalk to switch the lighting between
dipped / main beam headlamps.
In the lighting off and sidelamps modes, the
driver can switch on the main beam headlamps
temporarily ("headlamp flash") by maintaining a
pull on the stalk.
Displays
Illumination of the corresponding indicator lamp
in the instrument panel confirms the lighting
switched on.
Lighting off.
4
Lighting and visibility