low beam Citroen C1 2016 1.G Owner's Manual
[x] Cancel search | Manufacturer: CITROEN, Model Year: 2016, Model line: C1, Model: Citroen C1 2016 1.GPages: 269, PDF Size: 7.63 MB
Page 23 of 269
21
C1_en_Chap01_instrument- de-bord_ed01-2016
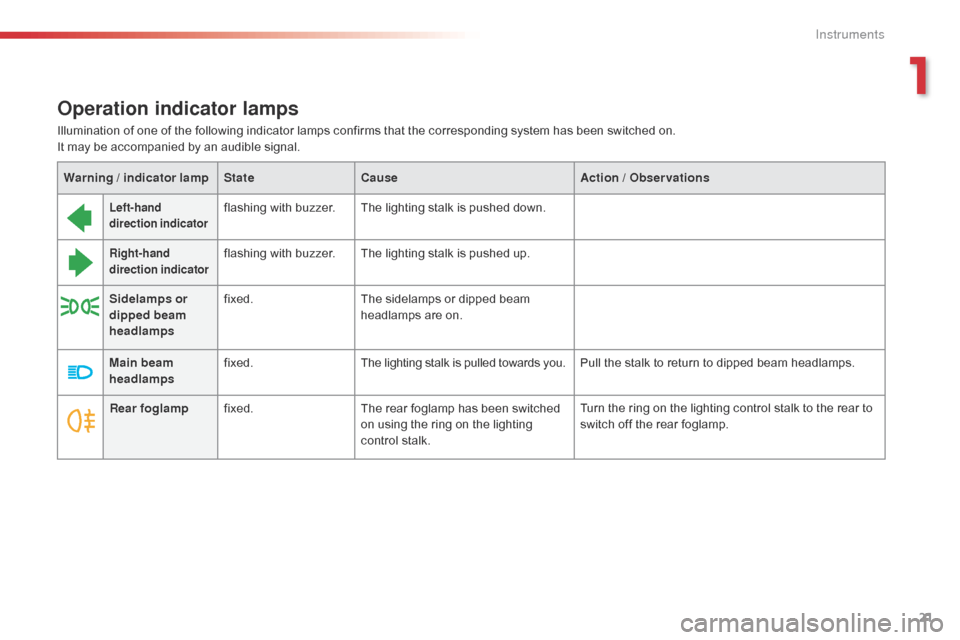
Operation indicator lamps
Left-hand
direction indicatorflashing with buzzer.The lighting stalk is pushed down.
Right-hand
direction indicatorflashing with buzzer.The lighting stalk is pushed up.
Sidelamps or
dipped beam
headlamps fixed.
The
sidelamps or dipped beam
h
eadlamps are on.
Main beam
headlamps fixed.
The
lighting stalk is pulled towards you.Pull
the stalk to return to dipped beam headlamps.
Warning
/ indicator lamp
State Cause Action
/ Observations
Illumination
of
one
of
the
following indicator lamps confirms that the corresponding system has been switched on.
It
may
be
accompanied
by
an
audible signal.
Rear foglamp fixed. The
rear foglamp has been switched
o
n using the ring on the lighting
c
ontrol stalk. Turn
the ring on the lighting control stalk to the rear to
s
witch off the rear foglamp.
1
Instruments
Page 100 of 269
98
C1_en_Chap05_eclairage-visibilite_ed01-2016
Exterior lighting control stalk
Main lighting
The various front and rear lamps of the vehicle are designed to adapt the driver's visibility
p
rogressively according to the ambient light
l
evel and weather:
-
s
idelamps, to be seen,
-
d
ipped beam headlamps to see without
d
azzling
o
ther
d
rivers,
-
m
ain beam headlamps to see clearly when
t
he road is clear.
Additional lighting
Other lamps are provided to meet the requirements of particular driving conditions:
-
a
rear foglamp,
-
d
aytime running lamps to be more visible
d
uring the day. In
some weather conditions (e.g. low
t
emperature or humidity), the presence
o
f misting on the internal sur face of the
g
lass of the headlamps and rear lamps
i
s normal; it disappears after the lamps
h
ave been on for a few minutes.Travelling abroad
If using your vehicle in a country that d
rives on the other side of the road, the
h
eadlamps must be adjusted to avoid
d
azzling on-coming drivers.
Contact
a CITROËN dealer or a
q
ualified
w
orkshop.
Lighting and visibility
Page 103 of 269
101
C1_en_Chap05_eclairage-visibilite_ed01-2016
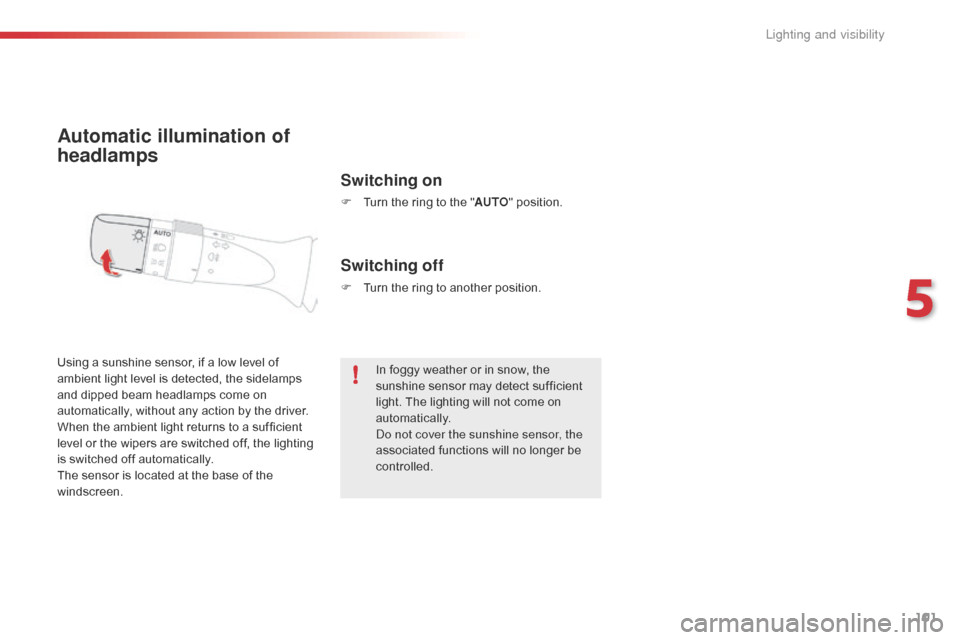
Automatic illumination of
headlamps
Switching on
F Turn the ring to the "AUTO " position.
Using
a
sunshine
sensor,
if
a
low
level
of
a
mbient
light
level
is
detected,
the
sidelamps
a
nd
dipped
beam
headlamps
come
on
a
utomatically,
without
any
action
by
the
driver.
When
the
ambient
light
returns
to
a
sufficient
l
evel
or
the
wipers
are
switched
off,
the
lighting
i
s
switched
off
automatically.
The
sensor
is
located
at
the
base
of
the
w
indscreen.
Switching off
F Turn the ring to another position.
In foggy weather or in snow, the
s
unshine sensor may detect sufficient
l
ight. The lighting will not come on
au
tomatically.
Do not cover the sunshine sensor, the
associated
functions will no longer be
c
ontrolled.
5
Lighting and visibility
Page 105 of 269

103
C1_en_Chap05_eclairage-visibilite_ed01-2016
Headlamp beam
h
eight
ad
justment
To avoid causing a nuisance to other road u
sers, the height of the headlamp beams
s
hould be adjusted according to the load in the
v
ehicle.
0.
D
river only.
0.5.
D
river + front passenger.
1.5 .
4
people.
3.
4
people + maximum authorised load.
3.5.
D
river + maximum authorised load.
The
initial setting is position "0".
Direction indicators
F Left: lower the lighting stalk passing the p
oint of resistance.
F
R
ight: raise the lighting stalk passing the
p
oint of resistance.
Three flashes of the direction
indicators
F Press briefly upwards or downwards, w
ithout going beyond the point of
r
esistance; the direction indicators will
f
lash 3 times.
5
Lighting and visibility
Page 165 of 269
163
C1_en_Chap08_en-cas-pannes_ed01-2016
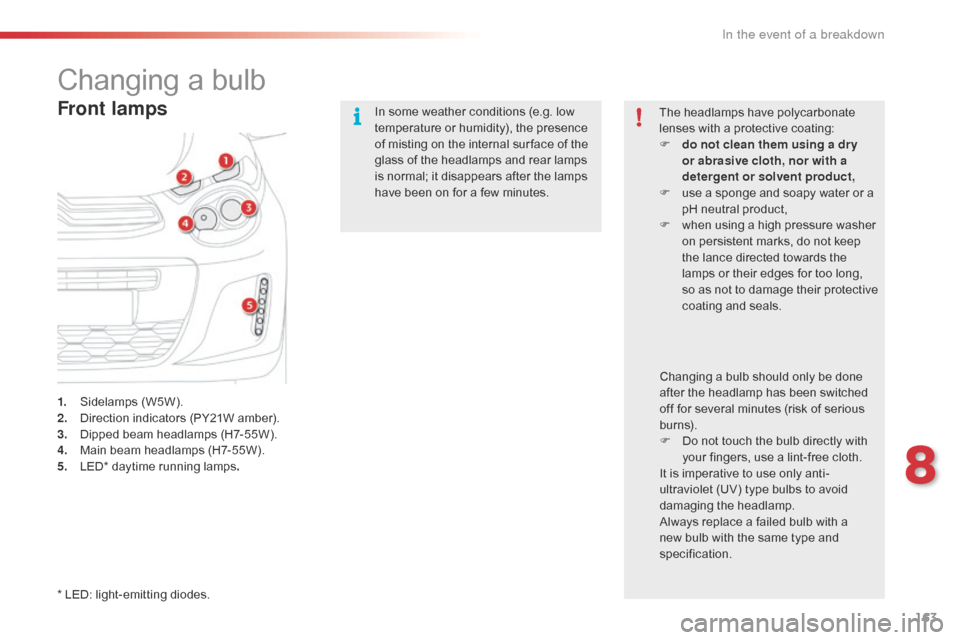
Changing a bulb
Front lamps
1. Sidelamps (W5W).
2. D irection indicators (PY21W amber).
3.
D
ipped beam headlamps (H7-55W).
4.
M
ain beam headlamps (H7-55W).
5.
L
ED* daytime running lamps. In
some weather conditions (e.g. low
t
emperature or humidity), the presence
o
f misting on the internal sur face of the
g
lass of the headlamps and rear lamps
i
s normal; it disappears after the lamps
h
ave been on for a few minutes.
The headlamps have polycarbonate
l
enses with a protective coating:
F
d
o not clean them using a dr y
or abrasive cloth, nor with a
detergent or solvent product,
F
u
se a sponge and soapy water or a
p
H neutral product,
F
w
hen using a high pressure washer
o
n persistent marks, do not keep
t
he lance directed towards the
l
amps or their edges for too long,
s
o as not to damage their protective
c
oating
a
nd
sea
ls.
Changing a bulb should only be done a
fter the headlamp has been switched o
ff for several minutes (risk of serious
b
urns).
F
D
o not touch the bulb directly with
y
our fingers, use a lint-free cloth.
It
is imperative to use only anti-
ultraviolet
(UV) type bulbs to avoid
d
amaging
t
he
h
eadlamp.
Always
replace a failed bulb with a
n
ew bulb with the same type and
s
pecification.
*
LED: light-emitting diodes.
8
In the event of a breakdown
Page 175 of 269
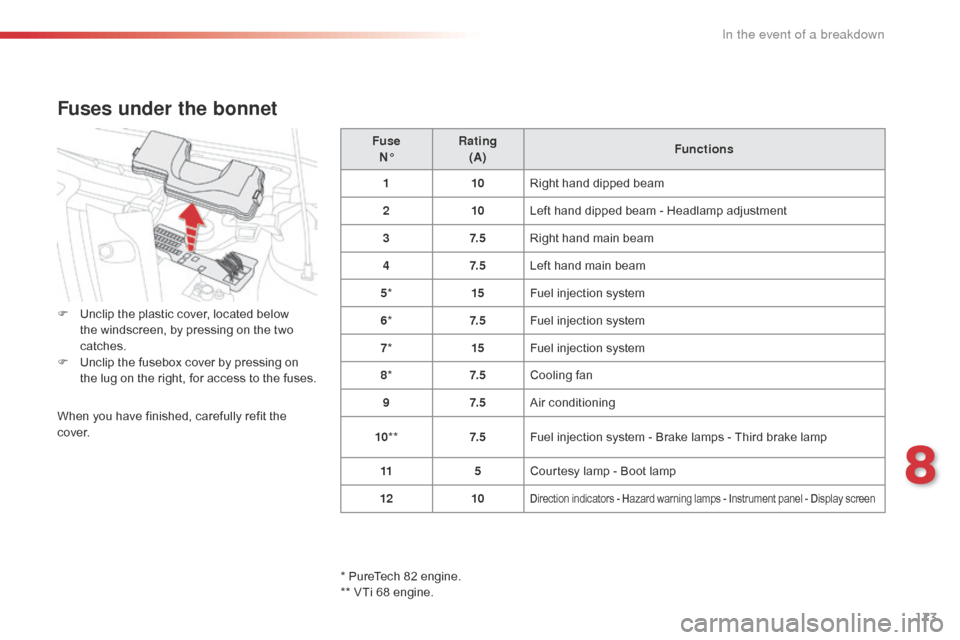
173
C1_en_Chap08_en-cas-pannes_ed01-2016
Fuse
N° Rating
(A) Functions
1 10Right
hand dipped beam
2 10Left
hand dipped beam - Headlamp adjustment
3 7. 5Right
hand main beam
4 7. 5Left
hand main beam
5 * 15Fuel
injection system
6 * 7. 5Fuel
injection system
7 * 15Fuel
injection system
8 * 7. 5Cooling
fan
9 7. 5Air
c
onditioning
10 ** 7. 5Fuel
injection system - Brake lamps - Third brake lamp
11 5Courtesy
lamp - Boot lamp
12 10
Direction indicators - Hazard warning lamps - Instrument panel - Display screen
Fuses under the bonnet
F Unclip the plastic cover, located below t
he windscreen, by pressing on the two
c
atches.
F
U
nclip the fusebox cover by pressing on
t
he lug on the right, for access to the fuses.
When
you have finished, carefully refit the
c
ove r.
*
PureTech 82 engine.
**
VTi 68 engine.
8
In the event of a breakdown