light CITROEN C1 2018 User Guide
[x] Cancel search | Manufacturer: CITROEN, Model Year: 2018, Model line: C1, Model: CITROEN C1 2018Pages: 269, PDF Size: 7.63 MB
Page 57 of 269
55
C1_en_Chap03_ergonomie-confort_ed01-2016
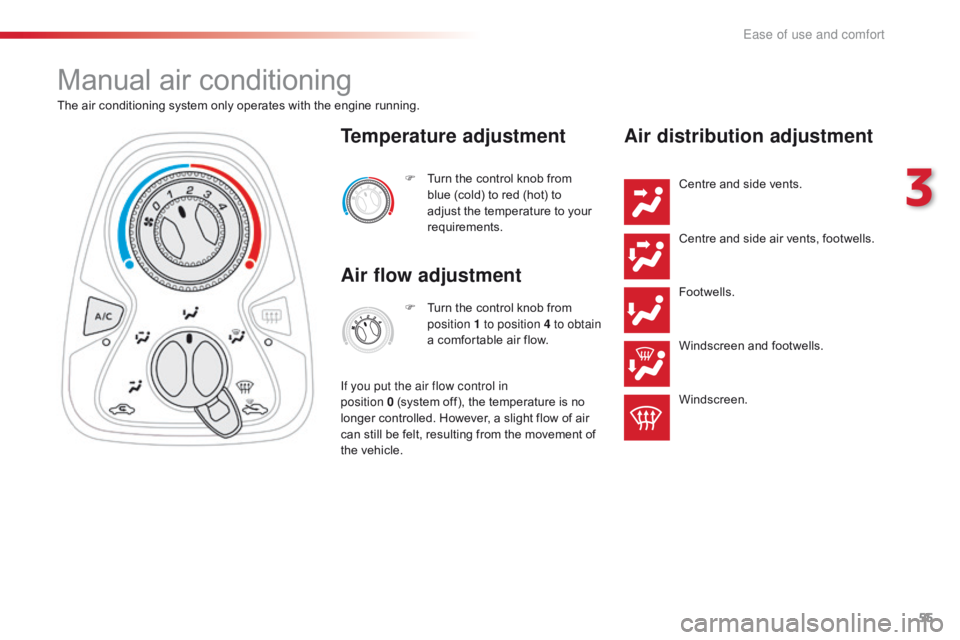
Manual air conditioning
The air conditioning system only operates with the engine running.
F
T
urn the control knob from
b
lue (cold) to red (hot) to
a
djust the temperature to your
r
equirements.
Temperature adjustment
Air flow adjustment
F Turn the control knob from p
osition 1 to position 4 to obtain
a
comfortable air flow.
If you put the air flow control in
position
0 (system off), the temperature is no
l
onger
controlled. However, a slight flow of air
c
an
still
be
felt, resulting from the movement of
t
he
vehicle.
Air distribution adjustment
Centre and side vents.
C entre and side air vents, footwells.
Footwells.
Windscreen
and footwells.
Windscreen.
3
Ease of use and comfort
Page 61 of 269
59
C1_en_Chap03_ergonomie-confort_ed01-2016
Avoid driving for long periods with the air conditioning switched off (risk of misting a
nd reduction of the air quality in the cabin).
This action switches off all of the functions of
the air conditioning system.
Thermal
comfort is no longer controlled.
A s
light flow of air resulting from the movement
o
f the vehicle, remains perceptible however.
Pressing
the "AUTO"
button again reactivates
t
he system with the values set before it was
s
witched off.
Switching the system off
F Press the air flow adjustment b
utton until the fan symbol
d
isappears.
F
P
ress this button to stop the air
conditioning.
Air conditioning on / off
Stopping the air conditioning may cause some p roblems (humidity, misting).
Automatic
operation of the air conditioning is
r
esumed when the button is pressed again.
The "A /C "
symbol is displayed.
3
Ease of use and comfort
Page 72 of 269
70
C1_en_Chap04_conduite_ed01-2016
A few driving recommendations
Observe the driving regulations at all times and remain vigilant whatever the traffic conditions.
Pay
close attention to the traffic and keep your
h
ands on the wheel so that you are ready to
r
eact at any time to any eventuality.
On
a long journey, a break every two hours is
s
trongly
re
commended.
In
difficult weather, drive smoothly, anticipate
t
he need to brake and increase the distance
f
rom other vehicles. Never
drive with the parking brake
a
pplied - Risk of overheating and
d
amage to the braking system!
Do
not park or run the engine when
s
tationary in areas where inflammable
s
ubstances and materials (dry grass,
d
ead leaves...) might come into
c
ontact with the hot exhaust system -
R
isk of fire!
Never
leave a vehicle unsupervised
w
ith the engine running. If you have
t
o leave your vehicle with the engine
r
unning, apply the parking brake
a
nd put the gearbox into neutral or
p
osition
N,
depending on the type of
g
earbox.
Driving on flooded
roads
We strongly advise against driving on flooded roads, as this could cause serious damage
t
o the engine or gearbox, as well as to the
e
lectrical systems of your vehicle.
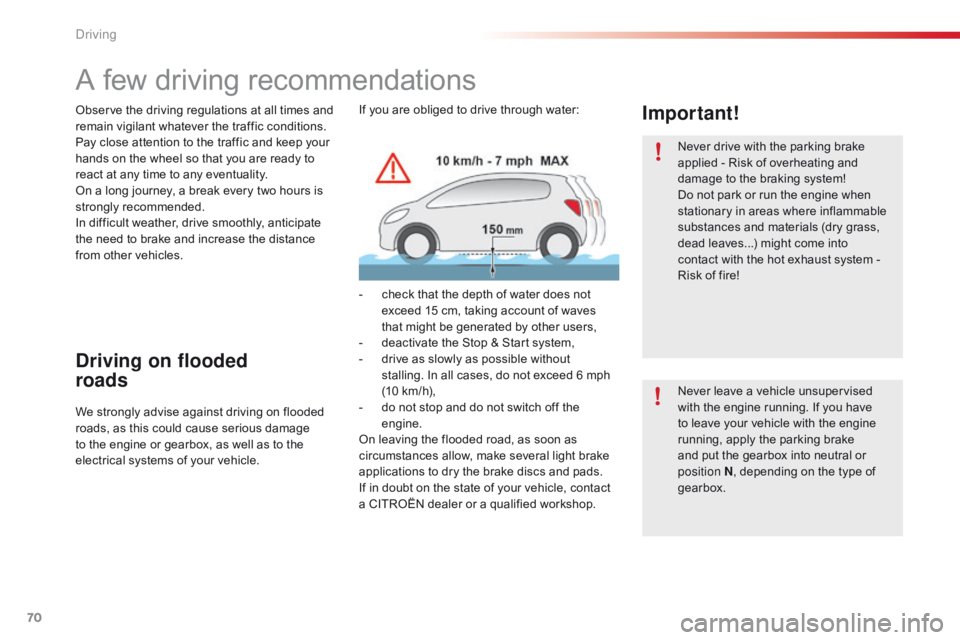
Important!If you are obliged to drive through water:
-
c
heck that the depth of water does not
e
xceed 15 cm, taking account of waves
t
hat might be generated by other users,
-
d
eactivate the Stop & Start system,
-
d
rive as slowly as possible without
s
talling. In all cases, do not exceed 6 mph
(
10 km/h),
-
d
o not stop and do not switch off the
e
ngine.
On
leaving the flooded road, as soon as
c
ircumstances allow, make several light brake
a
pplications to dry the brake discs and pads.
If
in doubt on the state of your vehicle, contact
a
CITROËN dealer or a qualified workshop.
Driving
Page 73 of 269
71
C1_en_Chap04_conduite_ed01-2016
Starting - switching off the engine with the key
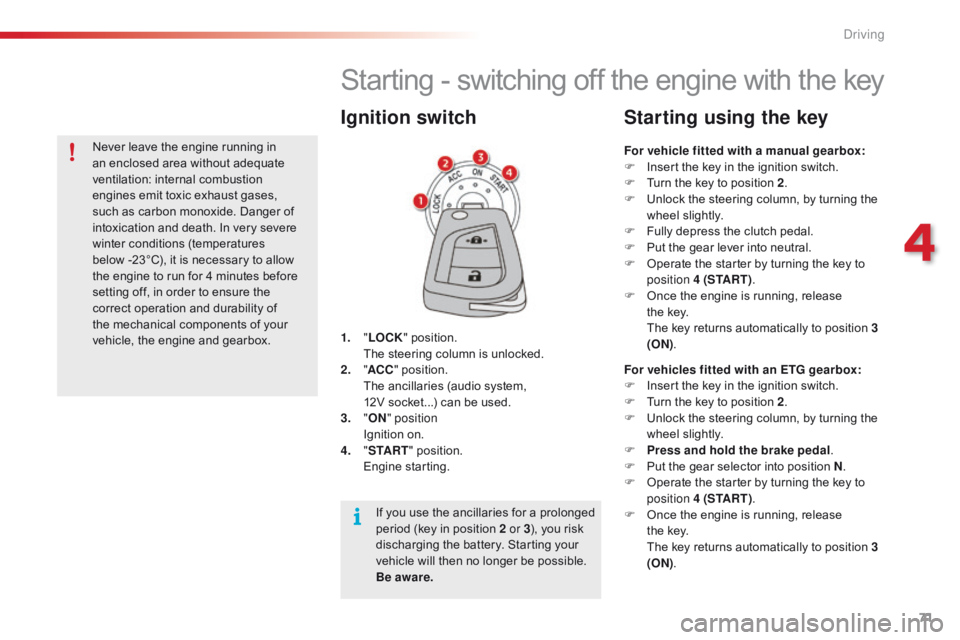
1. "LOCK " position. T
he steering column is unlocked.
2.
" AC
C"
position.
T
he ancillaries (audio system,
1
2V socket...) can be used.
3.
"ON " position
I
gnition on.
4.
" S
TA R T"
position.
E
ngine
s
tarting.
Ignition switch
For vehicle fitted with a manual gearbox:
F I nsert the key in the ignition switch.
F
T
urn the key to position 2.
F
U
nlock the steering column, by turning the
w
heel slightly.
F
F
ully depress the clutch pedal.
F
P
ut the gear lever into neutral.
F
O
perate the starter by turning the key to
p
osition 4 (S TA R T ) .
F
O
nce the engine is running, release
t
he key.
T
he key returns automatically to position 3
(ON) .
Starting using the key
For vehicles fitted with an ETG gearbox:
F
I nsert the key in the ignition switch.
F
T
urn the key to position 2.
F
U
nlock the steering column, by turning the
w
heel slightly.
F
P
ress and hold the brake pedal .
F
P
ut the gear selector into position N.
F
O
perate the starter by turning the key to
p
osition 4 (S TA R T ) .
F
O
nce the engine is running, release
t
he key.
T
he key returns automatically to position 3
(ON) .
If
you
use
the
ancillaries
for
a
prolonged
p
eriod
(key
in
position
2 or 3 ),
you
risk
d
ischarging
the
battery.
Starting
your
v
ehicle
will
then
no
longer
be
possible.
B
e aware.
Never
leave
the
engine
running
in
a
n
enclosed
area
without
adequate
v
entilation:
in
ternal
c
ombustion
e
ngines
emit
toxic
exhaust
gases,
s
uch
as
carbon
monoxide.
Danger
of
i
ntoxication
and
death.
In
very
severe
w
inter
conditions
(temperatures
b
elow -23°C),
it
is
necessary
to
allow
t
he
engine
to
run
for
4
minutes
before
s
etting
off,
in
order
to
ensure
the
c
orrect
operation
and
durability
of
t
he
mechanical
components
of
your
v
ehicle,
the
engine
and
gearbox.
4
Driving
Page 75 of 269
73
C1_en_Chap04_conduite_ed01-2016
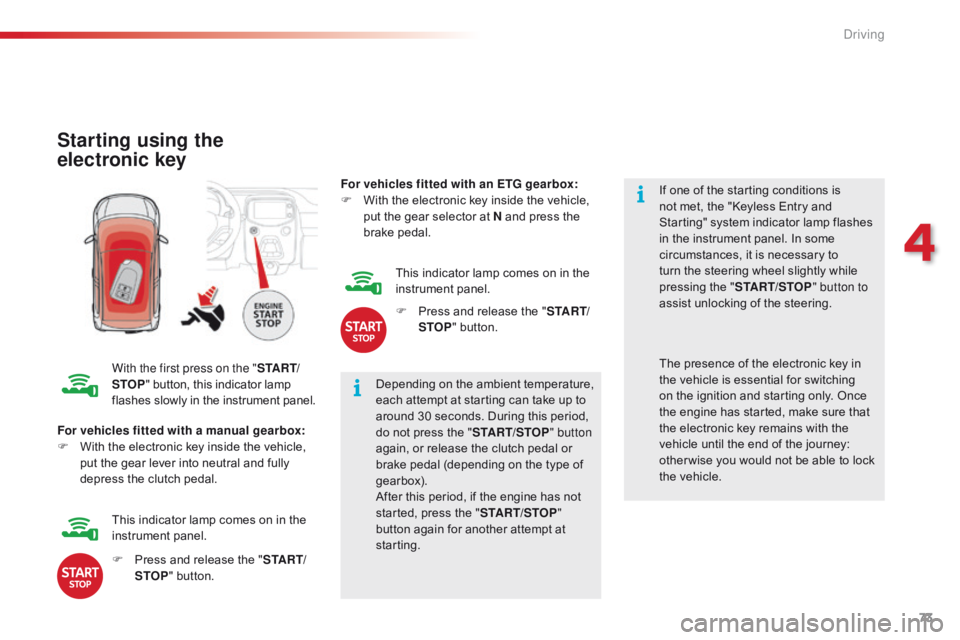
Starting using the
electronic key
With the first press on the "S TA R T/
STOP "
button, this indicator lamp f
lashes slowly in the instrument panel.Depending
on the ambient temperature,
e
ach attempt at starting can take up to
a
round 30 seconds. During this period,
d
o not press the "START/STOP " button
again,
or release the clutch pedal or
b
rake pedal (depending on the type of
g
earbox).
After
this period, if the engine has not
s
tarted, press the "START/STOP "
button
again for another attempt at
s
tarting. If
one of the starting conditions is
n
ot met, the "Keyless Entry and
S
tarting" system indicator lamp flashes
i
n the instrument panel. In some
c
ircumstances, it is necessary to
t
urn the steering wheel slightly while
p
ressing the "
START/STOP " button to
assist unlocking of the steering.
For vehicles fitted with a manual gearbox:
F
W
ith
the electronic key inside the vehicle,
p
ut
the gear lever into neutral and fully
d
epress the clutch pedal. The
presence of the electronic key in t
he vehicle is essential for switching
o
n the ignition and starting only. Once
t
he engine has started, make sure that
t
he electronic key remains with the
v
ehicle until the end of the journey:
o
ther wise you would not be able to lock
t
he vehicle.
F
P
ress and release the "S TA R T/
STOP "
button.
This
indicator lamp comes on in the
in
strument
pan
el. For vehicles fitted with an ETG gearbox:
F
W
ith the electronic key inside the vehicle,
p
ut the gear selector at N and press the
b
rake
ped
al.
This indicator lamp comes on in the
in
strument
pan
el.
F
P
ress and release the "
S TA R T/
STOP " button.
4
Driving
Page 85 of 269
83
C1_en_Chap04_conduite_ed01-2016
Stop & Start (VTi 68 S&S engine)
Operation
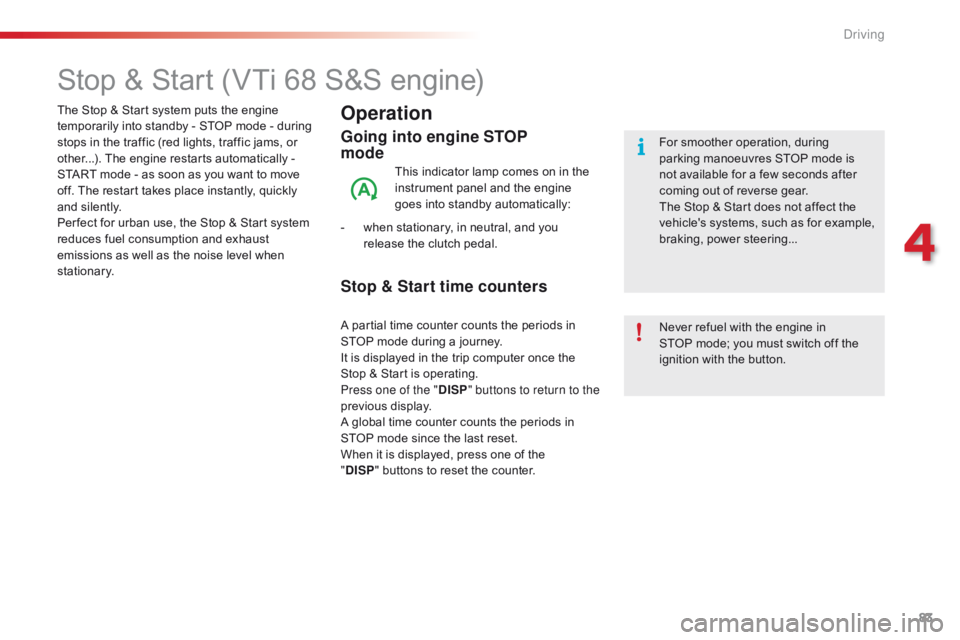
Going into engine STOP
mode
This indicator lamp comes on in the instrument panel and the engine
g
oes into standby automatically:
-
w
hen
stationary, in neutral, and you
r
elease the clutch pedal.
Never
refuel with the engine in
S
TOP mode; you must switch off the
i
gnition with the button.
For
smoother operation, during p
arking manoeuvres STOP mode is n
ot available for a few seconds after
c
oming out of reverse gear.
The
Stop & Start does not affect the
v
ehicle's systems, such as for example,
b
raking, power steering...
The
Stop
&
Start system
puts
the
engine
t
emporarily
into
standby
-
STOP
mode
-
during
s
tops
in
the
traffic
(red
lights,
traffic
jams,
or
o
ther...).
The
engine
restarts
automatically
-
S
TART
mode
-
as
soon
as
you
want
to
move
o
ff.
The
restart
takes
place
instantly,
quickly
a
nd
silently.
Per fect
for
urban
use,
the
Stop
&
Start
system
r
educes
fuel
consumption
and
exhaust
e
missions
as
well
as
the
noise
level
when
s
tationary.
Stop & Start time counters
A partial time counter counts the periods in S TOP mode during a journey.
It
is displayed in the trip computer once the
S
top & Start is operating.
Press one of the " DISP" buttons to return to the
previous
d
isplay.
A
global time counter counts the periods in
S
TOP mode since the last reset.
When
it is displayed, press one of the
"D
ISP " buttons
to reset the counter.
4
Driving
Page 96 of 269
94
C1_en_Chap04_conduite_ed01-2016
Deactivation
Operating faultDisplays in the instrument panel
The detection may be impeded:
- i f the ground markings are worn,
-
i
f there is little contrast between the markings on the ground and the road sur face,
-
i
f the windscreen is dirty,
-
i
n certain extreme weather conditions: fog, heavy showers, bright sunlight or direct
e
xposure to the sun (low sun, leaving a tunnel...) and shadows.F
P
ress this button again.
The status of the system remains in the
m
emory when the ignition is switched off.
In the event of a malfunction, this (orange) w
arning lamp comes on in the instrument panel.
Contact a CITROËN dealer or a qualified workshop without delay.
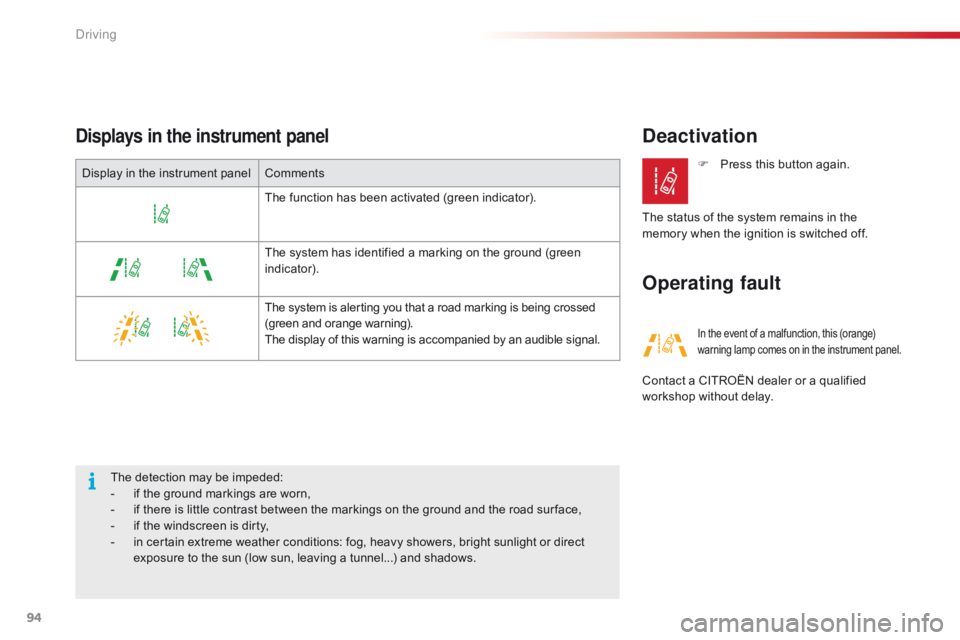
Display
in
the
instrument
panel
Comments
The
function
has
been
activated
(green
indicator).
The
system
has
identified
a
marking
on
the
ground
(green
i
ndicator).
The
system
is
alerting
you
that
a
road
marking
is
being
crossed
(
green
and
orange
warning).
The
display
of
this
warning
is
accompanied
by
an
audible
signal.
Driving
Page 100 of 269
98
C1_en_Chap05_eclairage-visibilite_ed01-2016
Exterior lighting control stalk
Main lighting
The various front and rear lamps of the vehicle are designed to adapt the driver's visibility
p
rogressively according to the ambient light
l
evel and weather:
-
s
idelamps, to be seen,
-
d
ipped beam headlamps to see without
d
azzling
o
ther
d
rivers,
-
m
ain beam headlamps to see clearly when
t
he road is clear.
Additional lighting
Other lamps are provided to meet the requirements of particular driving conditions:
-
a
rear foglamp,
-
d
aytime running lamps to be more visible
d
uring the day. In
some weather conditions (e.g. low
t
emperature or humidity), the presence
o
f misting on the internal sur face of the
g
lass of the headlamps and rear lamps
i
s normal; it disappears after the lamps
h
ave been on for a few minutes.Travelling abroad
If using your vehicle in a country that d
rives on the other side of the road, the
h
eadlamps must be adjusted to avoid
d
azzling on-coming drivers.
Contact
a CITROËN dealer or a
q
ualified
w
orkshop.
Lighting and visibility
Page 101 of 269
99
C1_en_Chap05_eclairage-visibilite_ed01-2016
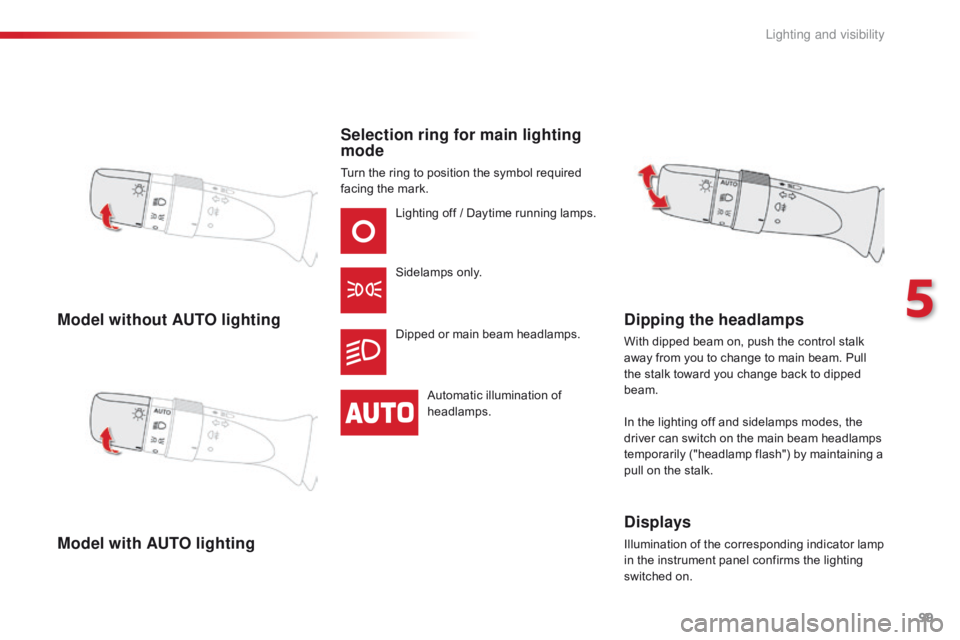
Model without AUTO lighting
Model with AUTO lightingSelection ring for main lighting
mode
Turn the ring to position the symbol required f
acing the mark.
Lighting
off / Daytime running lamps.
Sidelamps
o
nly.
Dipped
or main beam headlamps.
Automatic
illumination of
h
eadlamps.
Dipping the headlamps
With dipped beam on, push the control stalk away from you to change to main beam. Pull
t
he stalk toward you change back to dipped
b
eam.
In
the lighting off and sidelamps modes, the
d
river can switch on the main beam headlamps
t
emporarily ("headlamp flash") by maintaining a
p
ull on the stalk.
Displays
Illumination of the corresponding indicator lamp in the instrument panel confirms the lighting
s
witched on.
5
Lighting and visibility
Page 102 of 269

100
C1_en_Chap05_eclairage-visibilite_ed01-2016
Foglamp selection ring
The foglamp operates with the dipped and main beam h eadlamps.
F
T
urn the ring for ward and release to switch
o
n the rear foglamp.
When
the lighting is switched off automatically
(
with AUTO model) or when the dipped beam
h
eadlamps are switched off manually, the
f
oglamp and the sidelamps will remain on.
F
T
urn the ring rear ward and release to
s
witch off all the lamps.
Rear
fo
glamp. In
good or rainy weather, both day
a
nd night, use of the rear foglamp is
p
rohibited. In these situations, the
p
ower of its beam may dazzle other
d
rivers. It should only be used in fog or
s
now.
In these weather conditions, it is your
r
esponsibility to switch on the foglamp
a
nd dipped beam headlamps manually
a
s the sunshine sensor may detect
s
ufficient light.
Do not forget to switch off the rear f
oglamp when it is no longer needed.
Switching off the lamps when
the ignition is switched off
On switching off the ignition, all of the l
amps turn off immediately, except for
d
ipped beam if guide-me-home lighting
i
s activated.
Switching on the lamps
after the ignition is
switched off
To reactivate the lighting control, rotate the ring to the "0" position - lamps off,
t
hen to the desired position.
On
opening the driver's door a
c
ontinuous audible signal warns the
d
river that the lighting is on.
Lighting and visibility