mirror controls CITROEN C3 AIRCROSS 2021 Handbook (in English)
[x] Cancel search | Manufacturer: CITROEN, Model Year: 2021, Model line: C3 AIRCROSS, Model: CITROEN C3 AIRCROSS 2021Pages: 244, PDF Size: 6.29 MB
Page 6 of 244
4
Overview
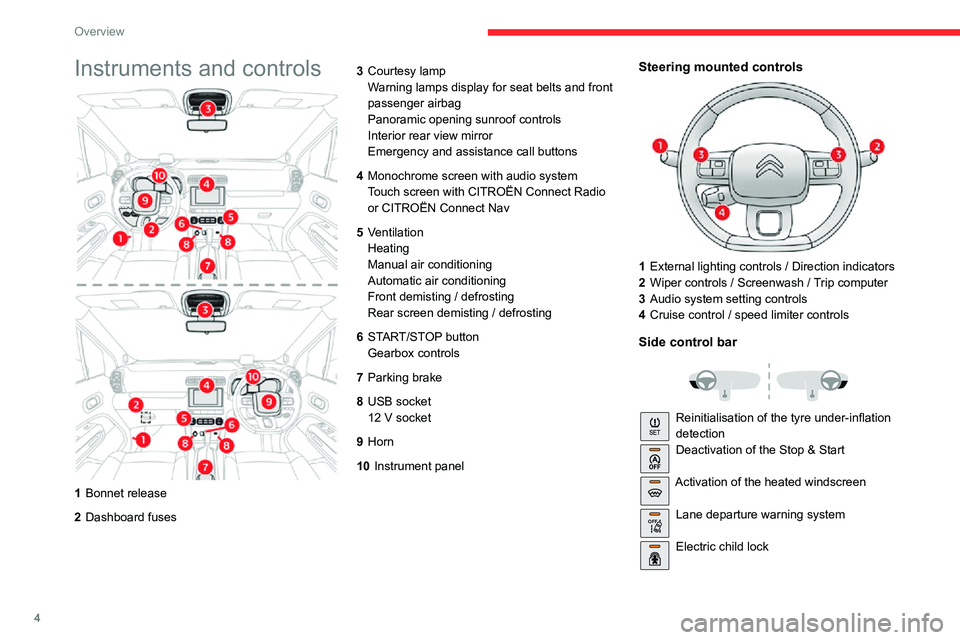
Instruments and controls
1Bonnet release
2 Dashboard fuses 3
Courtesy lamp
Warning lamps display for seat belts and front
passenger airbag
Panoramic opening sunroof controls
Interior rear view mirror
Emergency and assistance call buttons
4 Monochrome screen with audio system
Touch screen with CITROËN Connect Radio
or CITROËN Connect Nav
5 Ventilation
Heating
Manual air conditioning
Automatic air conditioning
Front demisting / defrosting
Rear screen demisting / defrosting
6 START/STOP button
Gearbox controls
7 Parking brake
8 USB socket
12 V socket
9Horn
10 Instrument panel
Steering mounted controls
1External lighting controls / Direction indicators
2 Wiper controls / Screenwash / Trip computer
3 Audio system setting controls
4 Cruise control / speed limiter controls
Side control bar
Reinitialisation of the tyre under-inflation
detectionDeactivation of the Stop & Start
Activation of the heated windscreen
OFF Lane departure warning system
Electric child lock
Page 20 of 244
18
Instruments
Menus
Radio Media.
See “Audio equipment and telematics”
section..
Mirror Screen or Connected navigation
(depending on equipment) .
See “Audio equipment and telematics” section..
Air conditioning.Allows adjustment of the various settings
for temperature, air flow, etc.
For more information on Heating, Manual air
conditioning and Automatic air conditioning ,
please refer to the corresponding sections.
Telephone.See “Audio equipment and telematics”
section..
Applications.
Allows the display of the connected
services available.
See “Audio equipment and telematics” section.
Vehicle or Driving (depending on
equipment) .
Allows the activation, deactivation and
adjustment of settings for certain functions.
For more information about the "Connections” application, refer to the "Audio equipment and
telematics” section.
“Personalisation-
configuration" menu
This menu gives access to the following
functions:
– “Define the vehicle parameters".– “Display configuration".
Define the vehicle parameters
This menu allows the following equipment to be
activated / deactivated, depending on the version
and/or country of sale:
"Lighting "
– "Directional headlamps",– "Follow-me-home headlamps",– "Welcome lighting"."Comfort"– "Rear wipe in reverse gear".
"Driving assistance"– Auto. emergency braking,– Fatigue Detection System,– Speed recommendation.For more information on the different equipment,
refer to the corresponding sections.
Display configuration
This menu allows you to change the language
used by the display from a defined list.
This menu gives access to the following settings:– “Choice of units".– “Date and time adjustment".– “Display personalisation".– “Choice of language".
As a safety measure, the driver must only
carry out operations that require
sustained attention when stationary.
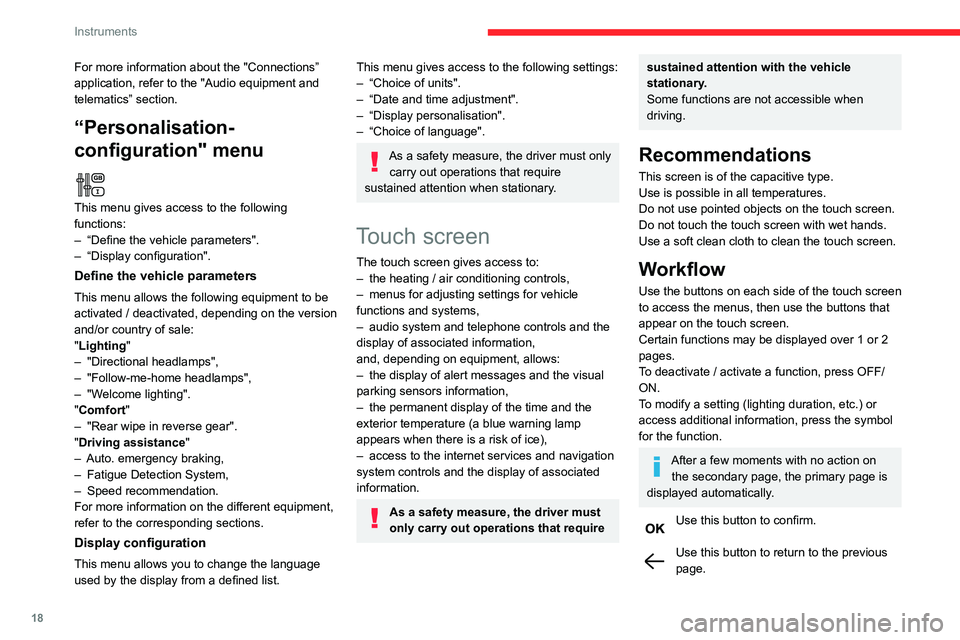
Touch screen
The touch screen gives access to:– the heating / air conditioning controls,– menus for adjusting settings for vehicle functions and systems,– audio system and telephone controls and the display of associated information,
and, depending on equipment, allows:
– the display of alert messages and the visual parking sensors information,– the permanent display of the time and the exterior temperature (a blue warning lamp
appears when there is a risk of ice),
– access to the internet services and navigation system controls and the display of associated
information.
As a safety measure, the driver must
only carry out operations that require
sustained attention with the vehicle
stationary.
Some functions are not accessible when
driving.
Recommendations
This screen is of the capacitive type.
Use is possible in all temperatures.
Do not use pointed objects on the touch screen.
Do not touch the touch screen with wet hands.
Use a soft clean cloth to clean the touch screen.
Workflow
Use the buttons on each side of the touch screen
to access the menus, then use the buttons that
appear on the touch screen.
Certain functions may be displayed over 1 or 2
pages.
To deactivate / activate a function, press OFF/
ON.
To modify a setting (lighting duration, etc.) or
access additional information, press the symbol
for the function.
After a few moments with no action on the secondary page, the primary page is
displayed automatically.
Use this button to confirm.
Use this button to return to the previous page.
Page 38 of 244
36
Ease of use and comfort
Correct driving position
For safety reasons, adjustments must
only be made when the vehicle is
stationary.
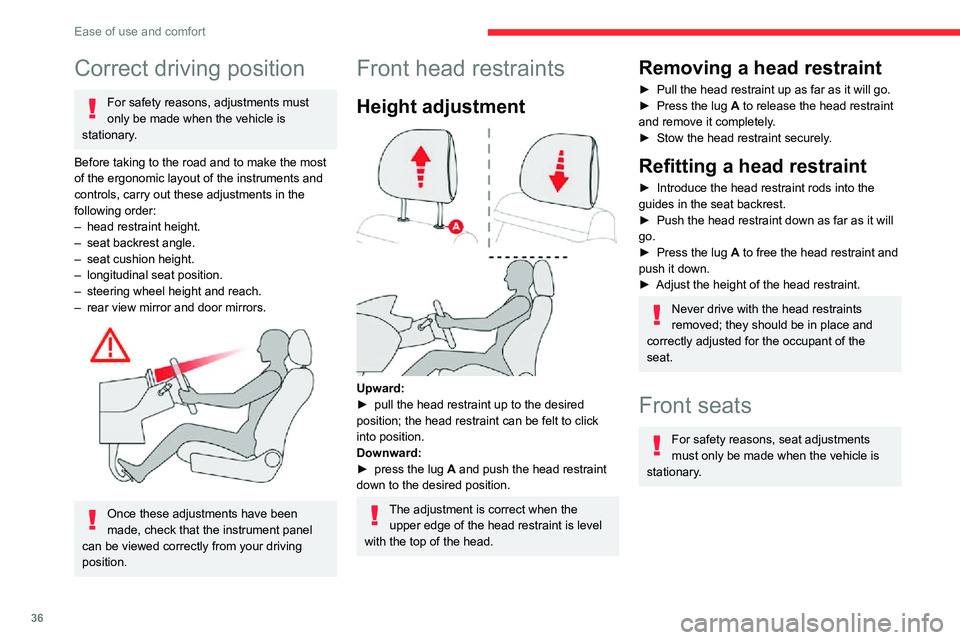
Before taking to the road and to make the most
of the ergonomic layout of the instruments and
controls, carry out these adjustments in the
following order:
– head restraint height.– seat backrest angle.– seat cushion height.– longitudinal seat position.– steering wheel height and reach.– rear view mirror and door mirrors.
Once these adjustments have been
made, check that the instrument panel
can be viewed correctly from your driving
position.
Front head restraints
Height adjustment
Upward:► pull the head restraint up to the desired position; the head restraint can be felt to click
into position.
Downward:
► press the lug A and push the head restraint
down to the desired position.
The adjustment is correct when the upper edge of the head restraint is level
with the top of the head.
Removing a head restraint
► Pull the head restraint up as far as it will go.► Press the lug A to release the head restraint
and remove it completely.
► Stow the head restraint securely .
Refitting a head restraint
► Introduce the head restraint rods into the guides in the seat backrest.► Push the head restraint down as far as it will go.► Press the lug A to free the head restraint and
push it down.
► Adjust the height of the head restraint.
Never drive with the head restraints
removed; they should be in place and
correctly adjusted for the occupant of the
seat.
Front seats
For safety reasons, seat adjustments
must only be made when the vehicle is
stationary.
Adjustments
Forwards-backwards
► Raise the control bar and slide the seat forwards or backwards.► Release the bar to lock the seat in position on one of the notches.
Before moving the seat backwards,
ensure that there is no person or object
that might prevent the full travel of the seat.
There is a risk of trapping or pinching
passengers if present in the rear seats or of
jamming the seat if large objects are placed
on the floor behind the seat.
Height
(driver only)
Page 44 of 244
42
Ease of use and comfort
► Turn the mirror towards the vehicle.
Electric folding
Depending on equipment, the mirrors can be
folded electrically, when the vehicle is parked.
► From the inside, with the ignition on, place control A in the
central position.
► Pull control A backwards.
► Lock the vehicle from the outside.
Electric unfolding
Door mirrors are unfolded electrically with the
remote control or the Keyless Entry and Starting
system when the vehicle is unlocked. Unless
folding was selected with control A, pull the
control backwards in the centre position.
Folding/unfolding during locking/
unlocking can be disabled. Contact a
CITROËN dealer or a qualified workshop.
If necessary, the mirrors can be folded
manually.
Rear view mirror
Equipped with an anti-dazzle system, which
darkens the mirror glass and reduces the
nuisance to the driver caused by the sun,
headlights of other vehicles, etc.
Manual model
Day/night position
► Pull the lever to change to the anti-dazzle "night” position.
► Push the lever to change to the normal "day" position.
Adjustment
► Set the mirror to the normal “day” position.
Automatic "electrochrome" model
This system automatically and progressively
transitions between day and night modes, using
a sensor that measures the light entering from
the rear of the vehicle.
To ensure optimum visibility during your manoeuvres, the mirror lightens
automatically when reverse gear is engaged.
Ventilation
Air intake
The air circulating in the passenger compartment
is filtered and originates either from the
exterior, via the grille located at the base of the
windscreen, or from the inside in air recirculation
mode.
Controls
Depending on version, the controls are
accessible in the " Air conditioning" touch
screen menu or are grouped together in the
control panel on the centre console.
The demisting/defrosting controls for the
windscreen and the rear screen are located
below the touch screen, or on the centre console
panel located below the audio system.
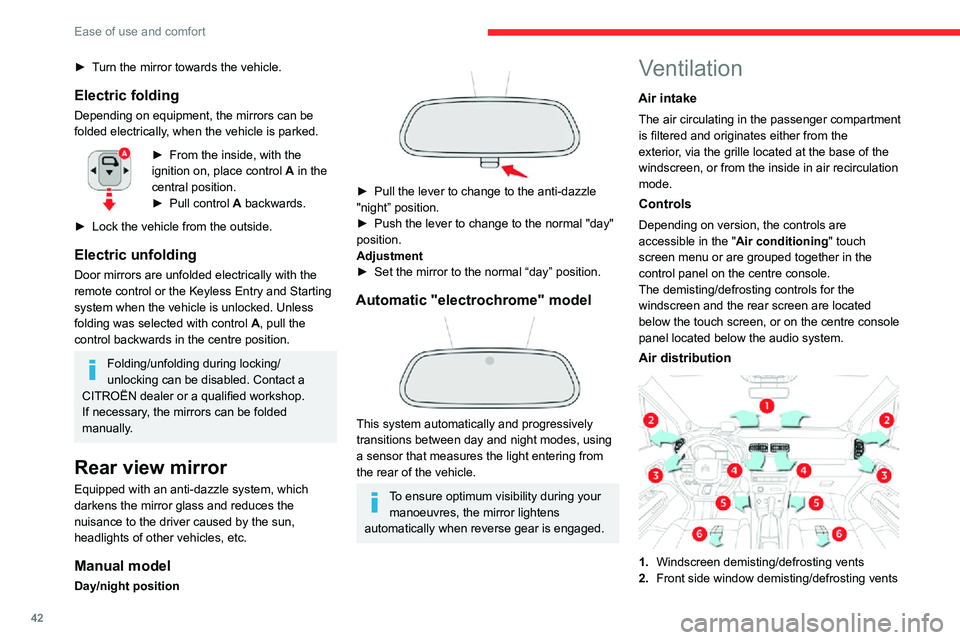
Air distribution
1. Windscreen demisting/defrosting vents
2. Front side window demisting/defrosting vents
3.Adjustable and closable side air vents
4. Adjustable and closable central air vents
5. Air outlets to the front footwells
6. Air outlets to the rear footwells
Advice
Using the ventilation and air
conditioning system
► To ensure that air is distributed evenly, keep the external air intake grilles at the base
of the windscreen, the nozzles, the vents, the
air outlets and the air extractor in the boot
free from obstructions.
► Do not cover the sunshine sensor located on the dashboard; this sensor is used to
regulate the automatic air conditioning
system.
► Operate the air conditioning system for at least 5 to 10 minutes once or twice a month to
keep it in perfect working order.
► If the system does not produce cold air, switch it off and contact a CITROËN dealer or
a qualified workshop.
When towing the maximum load on a steep
gradient in high temperatures, switching off
the air conditioning increases the available
engine power, enhancing the towing capacity.
Avoid driving for too long with the
ventilation off or with prolonged operation
Page 48 of 244
46
Ease of use and comfort
Front demist - defrost
These markings on the control panels indicate the control positions for rapid
demisting or defrosting of the windscreen and
side windows.
During the winter period, direct the side air
vents towards the side windows to optimise their
demisting and defrosting.
With control panel on the
centre console
On / Off
► Put the temperature and air flow controls to the appropriately marked position.► Press this button to distribute the air to the "Windscreen" position, its indicator
lamp comes on.
► Check that recycling of interior air is deactivated: its indicator lamp must be off.► Put the air flow control to the 0 position.
With touch screen
On / Off
► Press this button, its indicator lamp comes on.
The system automatically manages the air
conditioning, air flow and air intake, and provides
optimum distribution towards the windscreen and
side windows.
► To switch it off, press this button again; its indicator lamp goes off.
With Stop & Start, when demisting
- defrosting has been activated, STOP
mode is not available.
Heated windscreen
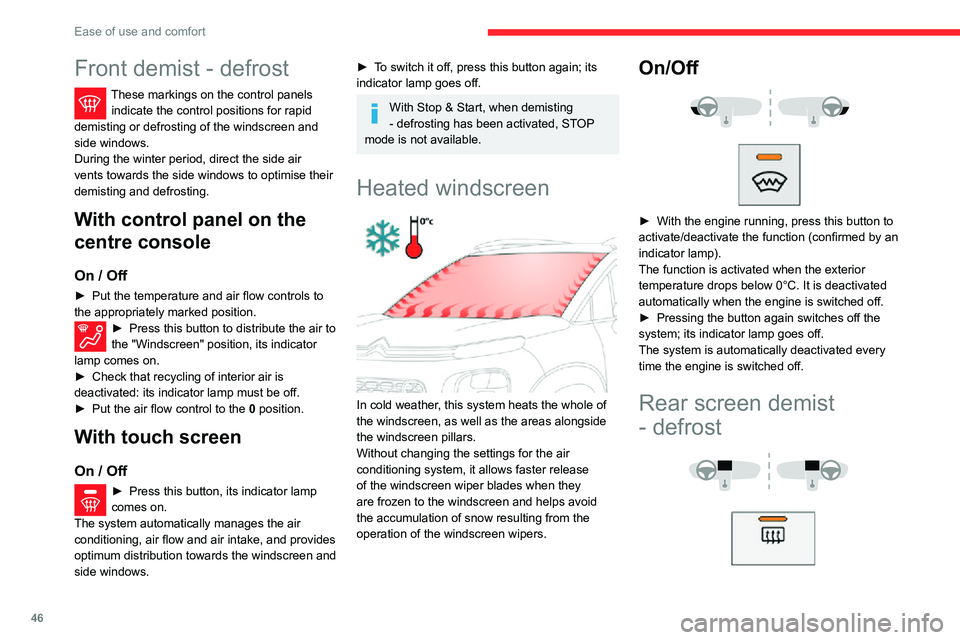
In cold weather, this system heats the whole of
the windscreen, as well as the areas alongside
the windscreen pillars.
Without changing the settings for the air
conditioning system, it allows faster release
of the windscreen wiper blades when they
are frozen to the windscreen and helps avoid
the accumulation of snow resulting from the
operation of the windscreen wipers.
On/Off
► With the engine running, press this button to activate/deactivate the function (confirmed by an
indicator lamp).
The function is activated when the exterior
temperature drops below 0°C. It is deactivated
automatically when the engine is switched off.
► Pressing the button again switches off the system; its indicator lamp goes off.
The system is automatically deactivated every
time the engine is switched off.
Rear screen demist
- defrost
On / Off
► Press this button to demist/defrost the rear screen and, depending on version, the door
mirrors. The button indicator lamp comes on.
Defrosting switches off automatically to prevent
excessive electrical consumption.
► It is possible to stop the demisting / defrosting operation before it is switched off automatically
by pressing this button again. The button
indicator lamp goes off.
Switch off the demisting/defrosting of the rear screen and door mirrors as
soon as appropriate, as lower current
consumption results in reduced fuel
consumption.
Rear screen demisting - defrosting can
only be operated when the engine is
running.
Page 120 of 244
11 8
Driving
Obstacles may appear further away than
they actually are in reality.
It is important to check the sides of the
vehicle during the manoeuvre, using the
mirrors.
The rear parking sensors also provide
information on the vehicle's surroundings.
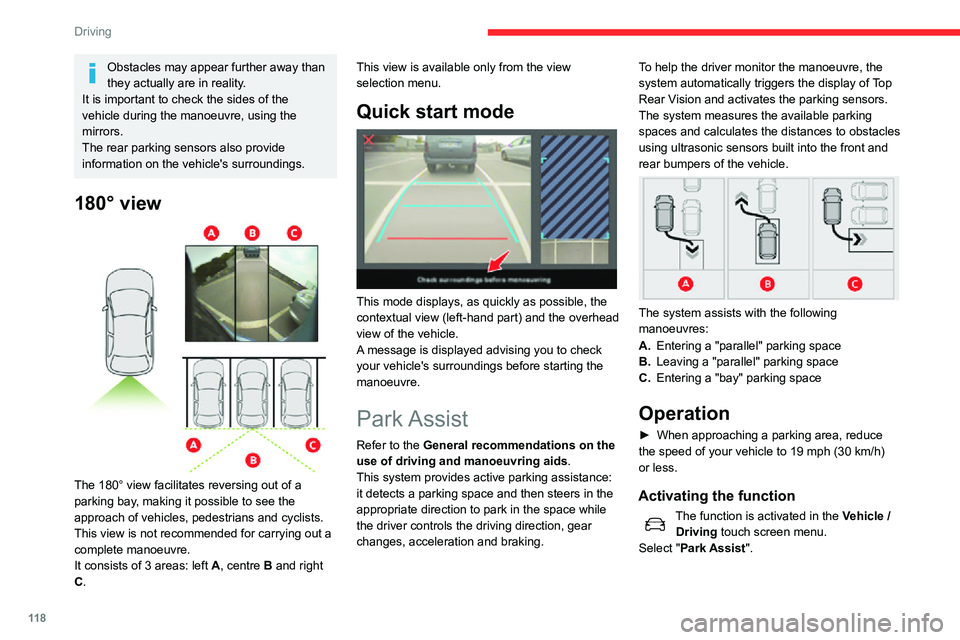
180° view
The 180° view facilitates reversing out of a
parking bay, making it possible to see the
approach of vehicles, pedestrians and cyclists.
This view is not recommended for carrying out a
complete manoeuvre.
It consists of 3 areas: left A, centre B and right
C. This view is available only from the view
selection menu.
Quick start mode
This mode displays, as quickly as possible, the
contextual view (left-hand part) and the overhead
view of the vehicle.
A message is displayed advising you to check
your vehicle's surroundings before starting the
manoeuvre.
Park Assist
Refer to the General recommendations on the
use of driving and manoeuvring aids .
This system provides active parking assistance:
it detects a parking space and then steers in the
appropriate direction to park in the space while
the driver controls the driving direction, gear
changes, acceleration and braking. To help the driver monitor the manoeuvre, the
system automatically triggers the display of T
op Rear Vision and activates the parking sensors.
The system measures the available parking
spaces and calculates the distances to obstacles
using ultrasonic sensors built into the front and
rear bumpers of the vehicle.
The system assists with the following
manoeuvres:
A.Entering a "parallel" parking space
B. Leaving a "parallel" parking space
C. Entering a "bay" parking space
Operation
► When approaching a parking area, reduce the speed of your vehicle to 19 mph (30 km/h) or less.
Activating the function
The function is activated in the Vehicle /
Driving touch screen menu.
Select "Park Assist ".
Activating the function deactivates the Blind Spot Monitoring System.
You can deactivate the function at any
time until the parking space entry or exit
manoeuvre begins, by pressing the arrow
located in the top left-hand corner of the
display page.
Selecting the type of manoeuvre
A manoeuvre selection page is displayed on the
touch screen: by default, the "Entry" page if the
vehicle has been running since the ignition was
switched on, otherwise, the "Exit" page.
► Select the type and side of the manoeuvre to activate the parking space search.
The selected manoeuvre can be changed at
any time, even while searching for an available
space.
Page 184 of 244
182
CITROËN Connect Radio
Playlists are updated whenever the ignition
is switched off or a USB memory stick is
connected. The audio system memorises these
lists, which will subsequently load faster if they
have not been changed.
Auxiliary (AUX) jack socket
Depending on equipmentConnect a portable device (MP3 player, etc.) to the auxiliary jack socket using an
audio cable (not supplied).
This source is only available if "Auxiliary input"
has been selected in the audio settings.
First adjust the volume on the portable device
(to a high level). Then adjust the volume of the
audio system.
Controls are managed via the portable device.
Selecting the source
Press Radio Media to display the main
page.
Press the "SOURCES" button.
Select the source.
BluetoothStreaming®
Streaming allows you to listen to the audio feed
from your smartphone.
The Bluetooth profile must be activated.
First adjust the volume on the portable device
(to a high level). Then adjust the volume of the
system.
If play does not start automatically, it may be
necessary to start the audio playback from the
smartphone.
Control is from the portable device or by using
the system's touch buttons.
Once connected in Streaming mode, the
smartphone is considered to be a media
source.
Connecting Apple® players
Connect the Apple® player to the USB socket
using a suitable cable (not supplied).
Play starts automatically.
Control is via the audio system.
The classifications available are those of the portable device connected (artists/
albums/genres/playlists/audio books/
podcasts). It is also possible to use a
classification structured in the form of a
library.
The default classification used is by artist. To
modify the classification used, return to the
first level of the menu then select the desired
classification (playlists for example) and
confirm to go down through the menu to the
desired track.
The version of software in the audio system may
not be compatible with the generation of the
Apple
® player.
Information and advice
The system supports USB mass storage
devices, BlackBerry® devices or Apple® players
via the USB ports. The adapter cable is not
supplied.
Devices are managed using the audio system
controls.
Other devices, not recognised on connection,
must be connected to the auxiliary socket using
a jack cable (not supplied) or via Bluetooth
streaming, if compatible.
To protect the system, do not use a USB hub.
The audio system will only play audio files with
".wav", ".wma", ".aac", ".ogg" and ".mp3" file
extensions, at bit rates between 32 Kbps and
320 Kbps.
It also supports VBR (Variable Bit Rate) mode.
No other file types (".mp4", etc.) can be read.
All ".wma" files must be standard WMA 9 files.
The supported sampling rates are 11, 22, 44 and
48 KHz.
To avoid reading and display problems, we
recommend choosing file names less than 20
characters long that do not contain any special
characters (e.g. “ ? . ; ù).Use only USB memory sticks in FAT32 format
(File Allocation Table).
We recommend using the original USB
cable for the portable device.
Telephone
USB sockets
Depending on equipment, for more information
on the USB sockets compatible with the
CarPlay
®, MirrorLinkTM or Android Auto
applications, refer to the "Ease of use and
comfort" section.
The synchronisation of a smartphone allows users to display applications
adapted to the CarPlay
®, MirrorLinkTM or Android Auto technology of the smartphone on the vehicle screen. For the CarPlay®
technology, the CarPlay® function must be
activated on the smartphone beforehand.
For the communication process between
the smartphone and the system to work, it is
essential in all cases that the smartphone is
unlocked.
As the principles and standards are
constantly changing, it is recommended
that you keep the smartphone's operating
system up-to-date, as well as the date and
time of the smartphone and of the system .
For the list of eligible smartphones, go to the
Brand's national website.
Page 193 of 244
191
CITROËN Connect Nav
1212:13
18,5 21,5
23 °C
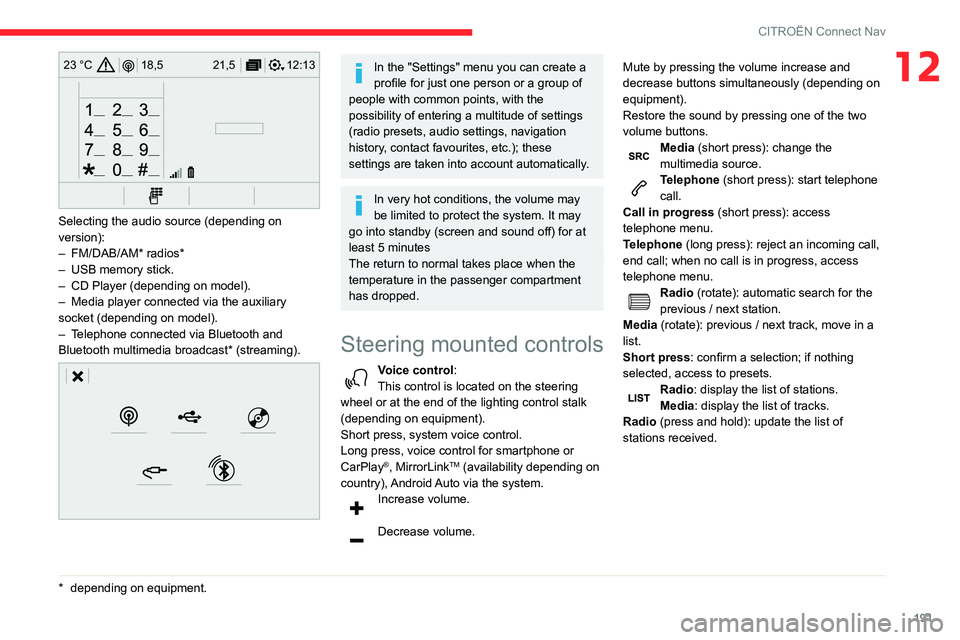
Selecting the audio source (depending on
version):
– FM/DAB/AM* radios*– USB memory stick.– CD Player (depending on model).– Media player connected via the auxiliary socket (depending on model).– Telephone connected via Bluetooth and Bluetooth multimedia broadcast* (streaming).
* depending on equ ipment.
In the "Settings" menu you can create a
profile for just one person or a group of
people with common points, with the
possibility of entering a multitude of settings
(radio presets, audio settings, navigation
history, contact favourites, etc.); these
settings are taken into account automatically.
In very hot conditions, the volume may
be limited to protect the system. It may
go into standby (screen and sound off) for at
least 5 minutes
The return to normal takes place when the
temperature in the passenger compartment
has dropped.
Steering mounted controls
Voice control:
This control is located on the steering
wheel or at the end of the lighting control stalk
(depending on equipment).
Short press, system voice control.
Long press, voice control for smartphone or
CarPlay
®, MirrorLinkTM (availability depending on
country), Android Auto via the system.
Increase volume.
Decrease volume. Mute by pressing the volume increase and
decrease buttons simultaneously (depending on
equipment).
Restore the sound by pressing one of the two
volume buttons.
Media (short press): change the
multimedia source.
Telephone (short press): start telephone
call.
Call in progress (short press): access
telephone menu.
Telephone (long press): reject an incoming call,
end call; when no call is in progress, access
telephone menu.
Radio (rotate): automatic search for the
previous / next station.
Media (rotate): previous / next track, move in a
list.
Short press: confirm a selection; if nothing
selected, access to presets.
Radio: display the list of stations.
Media: display the list of tracks.
Radio (press and hold): update the list of
stations received.
Page 194 of 244
192
CITROËN Connect Nav
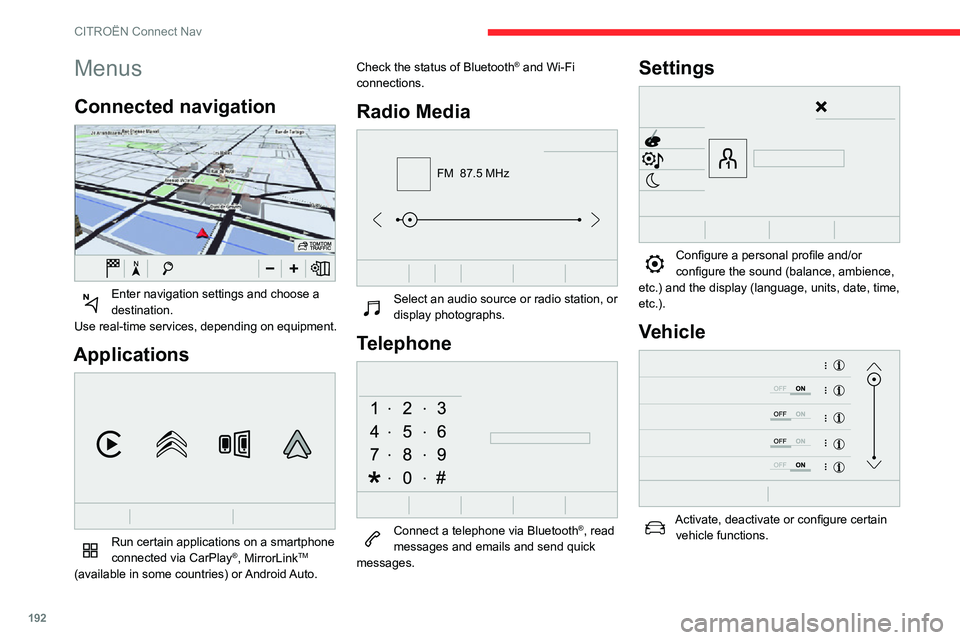
Menus
Connected navigation
Enter navigation settings and choose a destination.
Use real-time services, depending on equipment.
Applications
Run certain applications on a smartphone
connected via CarPlay®, MirrorLinkTM
(available in some countries) or Android Auto. Check the status of Bluetooth
® and Wi-Fi
connections.
Radio Media
FM 87.5 MHz
Select an audio source or radio station, or display photographs.
Telephone
Connect a telephone via Bluetooth®, read
messages and emails and send quick
messages.
Settings
Configure a personal profile and/or configure the sound (balance, ambience,
etc.) and the display (language, units, date, time,
etc.).
Vehicle
Activate, deactivate or configure certain vehicle functions.
Air conditioning
21,518,5
Manage various temperature and air flow settings.
Voice commands
Steering-mounted controls
Voice commands:
Voice commands can be issued from any
screen page after briefly pressing the "Voice
commands" button, located on the steering
wheel or at the end of the lighting control stalk
(depending on equipment), as long as there is no
telephone call in progress.
To ensure that voice commands are always recognised by the system, please
observe the following recommendations:
– speak in a normal tone without breaking up words or raising your voice.– always wait for the "beep" (audible signal) before speaking.