buttons CITROEN C3 AIRCROSS 2022 Owners Manual
[x] Cancel search | Manufacturer: CITROEN, Model Year: 2022, Model line: C3 AIRCROSS, Model: CITROEN C3 AIRCROSS 2022Pages: 308, PDF Size: 9.13 MB
Page 6 of 308
4
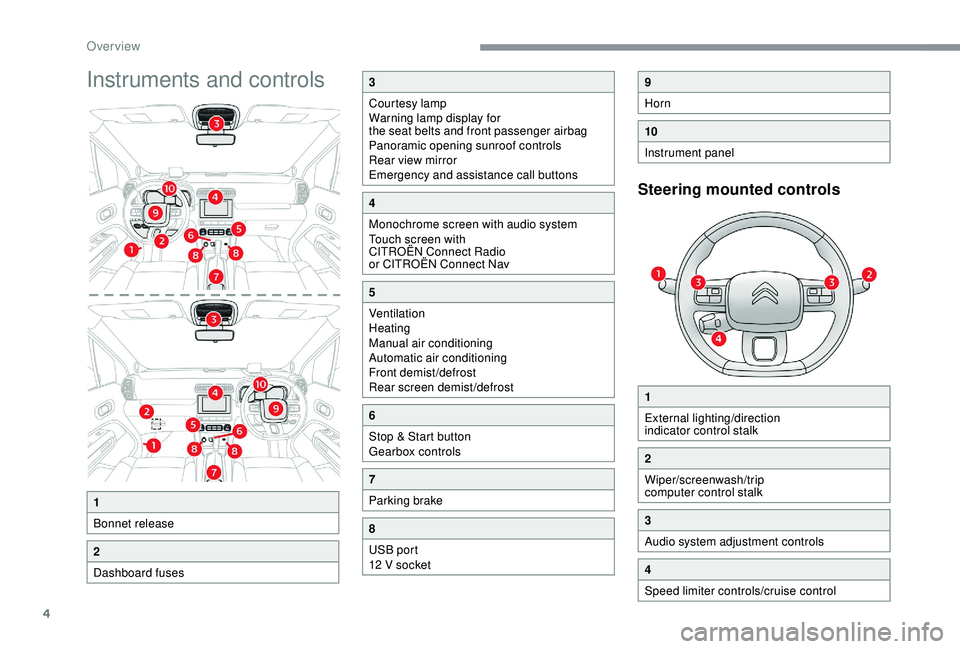
Instruments and controls
Steering mounted controls
1
Bonnet release
2
Dashboard fuses
3
Courtesy lamp
Warning lamp display for
the seat belts and front passenger airbag
Panoramic opening sunroof controls
Rear view mirror
Emergency and assistance call buttons
4
Monochrome screen with audio system
Touch screen with
CITROËN Connect Radio
or CITROËN Connect Nav
5
Ventilation
Heating
Manual air conditioning
Automatic air conditioning
Front demist/defrost
Rear screen demist/defrost
6
Stop & Start button
Gearbox controls
7
Parking brake
8
USB port
12 V socket
9
Horn
10
Instrument panel
1
External lighting/direction
indicator control stalk
2
Wiper/screenwash/trip
computer control stalk
3
Audio system adjustment controls
4
Speed limiter controls/cruise control
Over view
Page 10 of 308
8
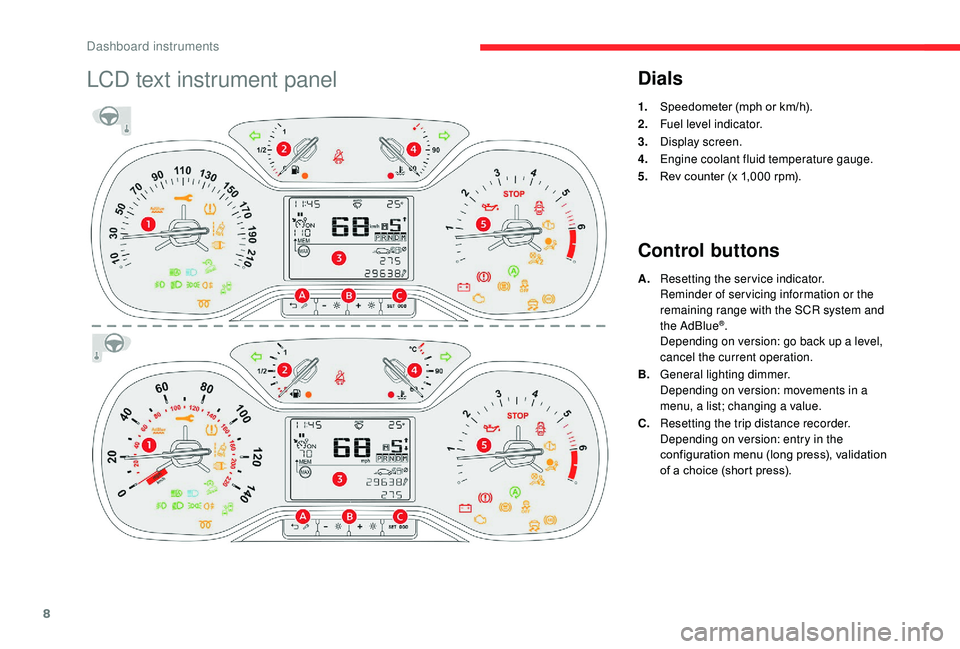
LCD text instrument panelDials
1.Speedometer (mph or km/h).
2. Fuel level indicator.
3. Display screen.
4. Engine coolant fluid temperature gauge.
5. Rev counter (x 1,000
rpm).
Control buttons
A.Resetting the service indicator.
Reminder of servicing information or the
remaining range with the SCR system and
the AdBlue
®.
Depending on version: go back up a level,
cancel the current operation.
B. General lighting dimmer.
Depending on version: movements in a
menu, a list; changing a value.
C. Resetting the trip distance recorder.
Depending on version: entry in the
configuration menu (long press), validation
of a choice (short press).
Dashboard instruments
Page 11 of 308
9
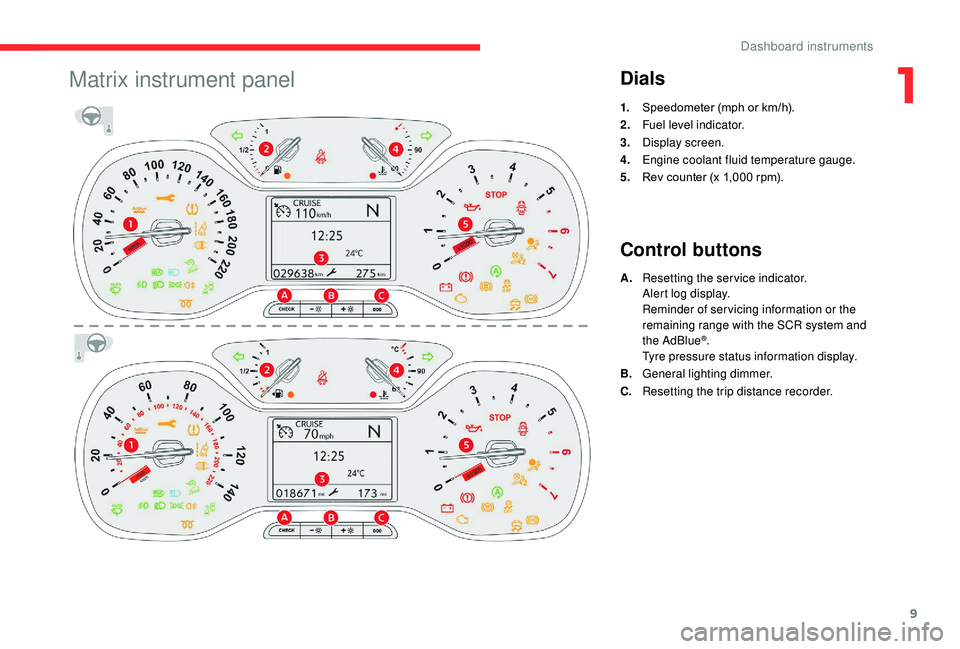
Matrix instrument panelDials
1.Speedometer (mph or km/h).
2. Fuel level indicator.
3. Display screen.
4. Engine coolant fluid temperature gauge.
5. Rev counter (x 1,000
rpm).
Control buttons
A.Resetting the service indicator.
Alert log display.
Reminder of servicing information or the
remaining range with the SCR system and
the AdBlue
®.
Tyre pressure status information display.
B. General lighting dimmer.
C. Resetting the trip distance recorder.
1
Dashboard instruments
Page 33 of 308
31
When travelling abroad, you may have to
change the units of distance: the display
of road speed must be in the official units
(miles or km) for the country.
The change of units is done via the screen
configuration menu, with the vehicle
stationary.
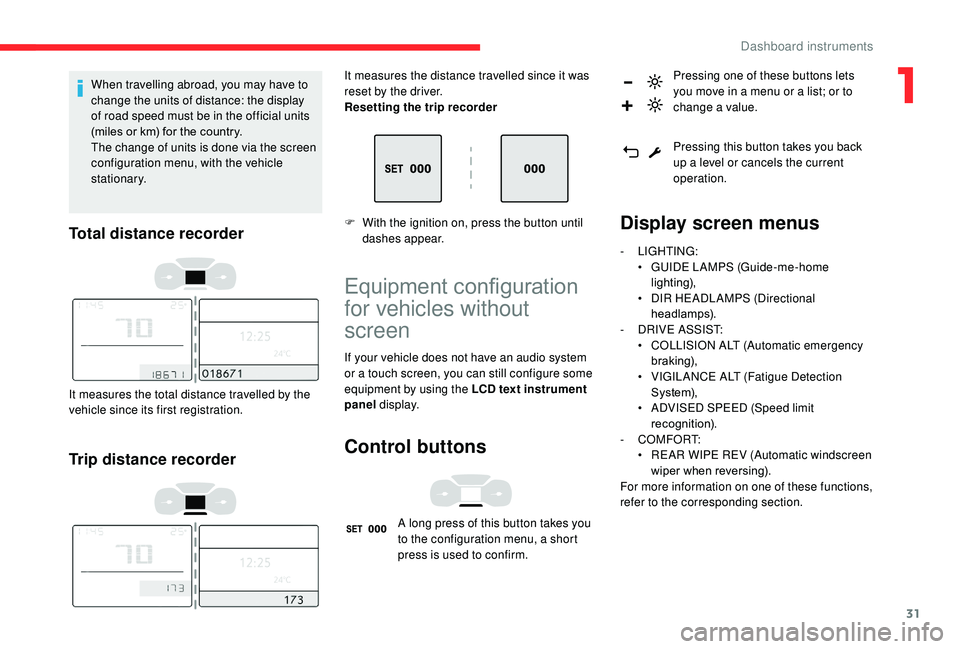
Total distance recorder
It measures the total distance travelled by the
vehicle since its first registration.
Trip distance recorder
It measures the distance travelled since it was
reset by the driver.
Resetting the trip recorder
F
W
ith the ignition on, press the button until
dashes appear.
Equipment configuration
for vehicles without
screen
If your vehicle does not have an audio system
or a touch screen, you can still configure some
equipment by using the LCD text instrument
panel display.
Control buttons
A long press of this button takes you
to the configuration menu, a short
press is used to confirm. Pressing one of these buttons lets
you move in a menu or a list; or to
change a value.
Pressing this button takes you back
up a level or cancels the current
operation.
Display screen menus
-
LIGHTING:
•
G UIDE LAMPS (Guide-me-home
lighting),
•
D
IR HEADLAMPS (Directional
headlamps).
-
D
RIVE ASSIST:
•
C
OLLISION ALT (Automatic emergency
b r ak ing),
•
V
IGILANCE ALT (Fatigue Detection
S yste m),
•
A
DVISED SPEED (Speed limit
recognition).
-
COMFORT:
•
R
EAR WIPE REV (Automatic windscreen
wiper when reversing).
For more information on one of these functions,
refer to the corresponding section.
1
Dashboard instruments
Page 34 of 308
32
Monochrome screen C
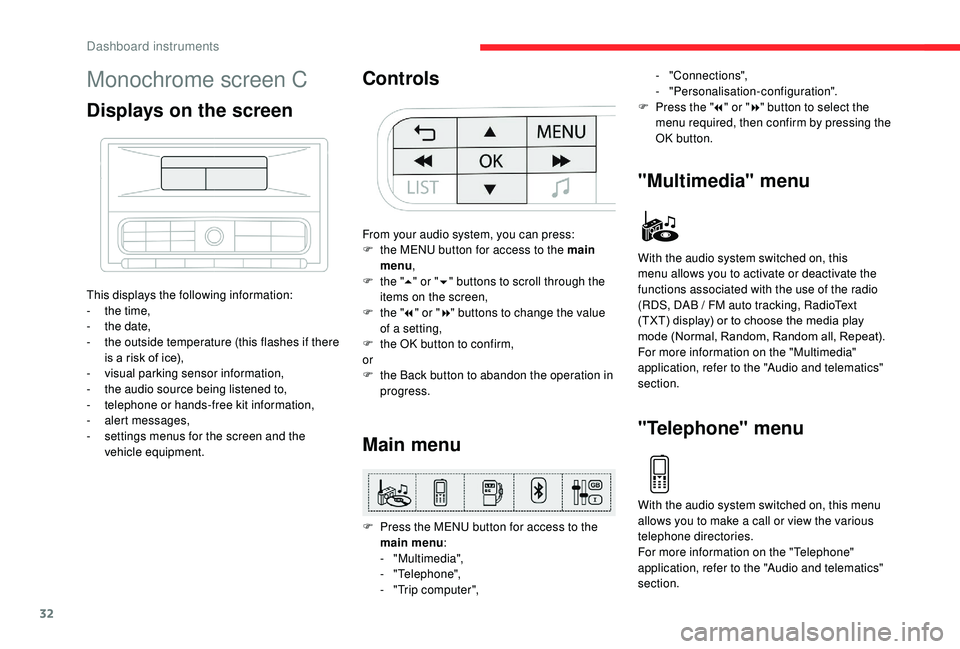
Displays on the screen
This displays the following information:
- t he time,
-
t
he date,
-
t
he outside temperature (this flashes if there
is a risk of ice),
-
v
isual parking sensor information,
-
t
he audio source being listened to,
-
t
elephone or hands-free kit information,
-
a
lert messages,
-
s
ettings menus for the screen and the
vehicle equipment.
Controls
From your audio system, you can press:
F t he MENU button for access to the main
menu ,
F
t
he "5" or " 6" buttons to scroll through the
items on the screen,
F
t
he "7" or " 8" buttons to change the value
of a setting,
F
t
he OK button to confirm,
or
F
t
he Back button to abandon the operation in
progress.
Main menu
F Press the MENU button for access to the main menu :
-
"Multimedia",
-
"Telephone",
-
"
Trip computer",
"Multimedia" menu
With the audio system switched on, this
menu allows you to activate or deactivate the
functions associated with the use of the radio
(RDS, DAB / FM auto tracking, RadioText
(TXT) display) or to choose the media play
mode (Normal, Random, Random all, Repeat).
For more information on the "Multimedia"
application, refer to the "Audio and telematics"
section.
"Telephone" menu
With the audio system switched on, this menu
allows you to make a call or view the various
telephone directories.
For more information on the "Telephone"
application, refer to the "Audio and telematics"
section. -
"Connections",
-
"Personalisation-configuration".
F
P
ress the "
7" or " 8" button to select the
menu required, then confirm by pressing the
OK button.
Dashboard instruments
Page 36 of 308
34
Recommendations
This screen is of the capacitive type.
Use is possible in all temperatures.
Do not use pointed objects on the touch
screen.
Do not touch the touch screen with wet hands.
Use a soft clean cloth to clean the touch
screen.
Principles
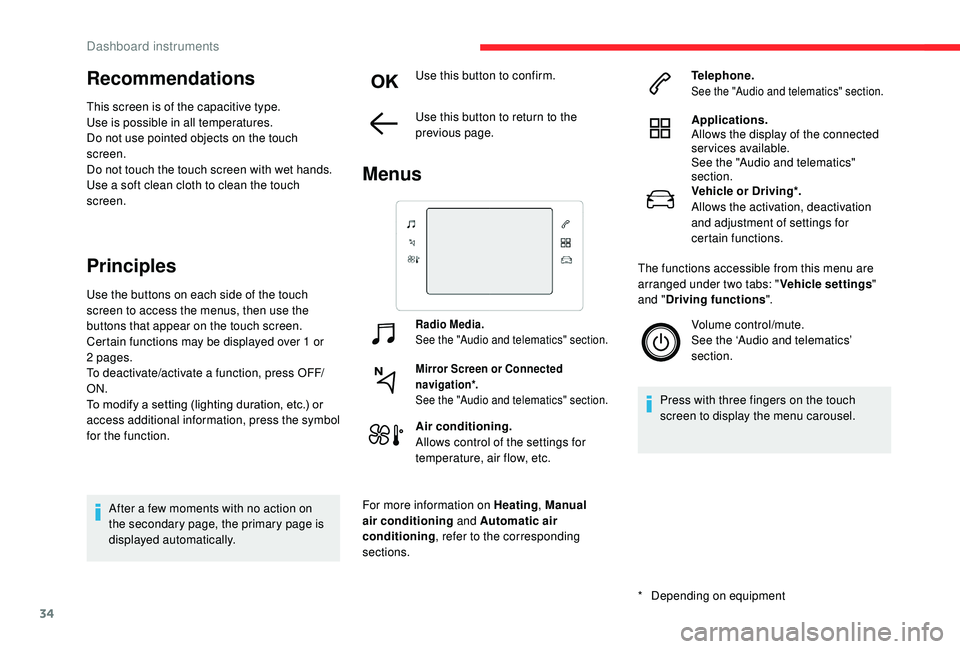
Use the buttons on each side of the touch
screen to access the menus, then use the
buttons that appear on the touch screen.
Certain functions may be displayed over 1 or
2 pages.
To deactivate/activate a function, press OFF/
ON.
To modify a setting (lighting duration, etc.) or
access additional information, press the symbol
for the function.After a few moments with no action on
the secondary page, the primary page is
displayed automatically. Use this button to confirm.
Use this button to return to the
previous page.
Menus
Radio Media.
See the "Audio and telematics" section.
Mirror Screen or Connected
navigation*.
See the "Audio and telematics" section.
Air conditioning.
Allows control of the settings for
temperature, air flow, etc.
For more information on Heating , Manual
air conditioning and Automatic air
conditioning , refer to the corresponding
sections.
*
D
epending on equipment Telephone.
See the "Audio and telematics" section.
Applications.
Allows the display of the connected
services available.
See the "Audio and telematics"
section.
Vehicle or Driving*.
Allows the activation, deactivation
and adjustment of settings for
certain functions.
The functions accessible from this menu are
arranged under two tabs: " Vehicle settings"
and " Driving functions ".
Volume control/mute.
See the ‘Audio and telematics’
section.
Press with three fingers on the touch
screen to display the menu carousel.
Dashboard instruments
Page 41 of 308
39
Distance travelled
(miles or km)Calculated since the last trip
computer reset.
Stop & Star t time counter
(minutes/seconds or hours/minutes)
A time counter calculates the sum of the
periods in STOP mode during a journey.
It resets to zero every time the ignition is
switched on.
Lighting dimmer
Allows manual adjustment of the brightness
of the instrument panel and touch screen
according to the outside lighting.
Only works when the vehicle lamps are on
(except daytime running lamps) and in night
mode.
Two buttons Touch screen
F In the Settings
menu, select "Brightness".
F A djust the brightness by using the arrows or
by moving the cursor.
The brightness can be set differently for
day mode and night mode.
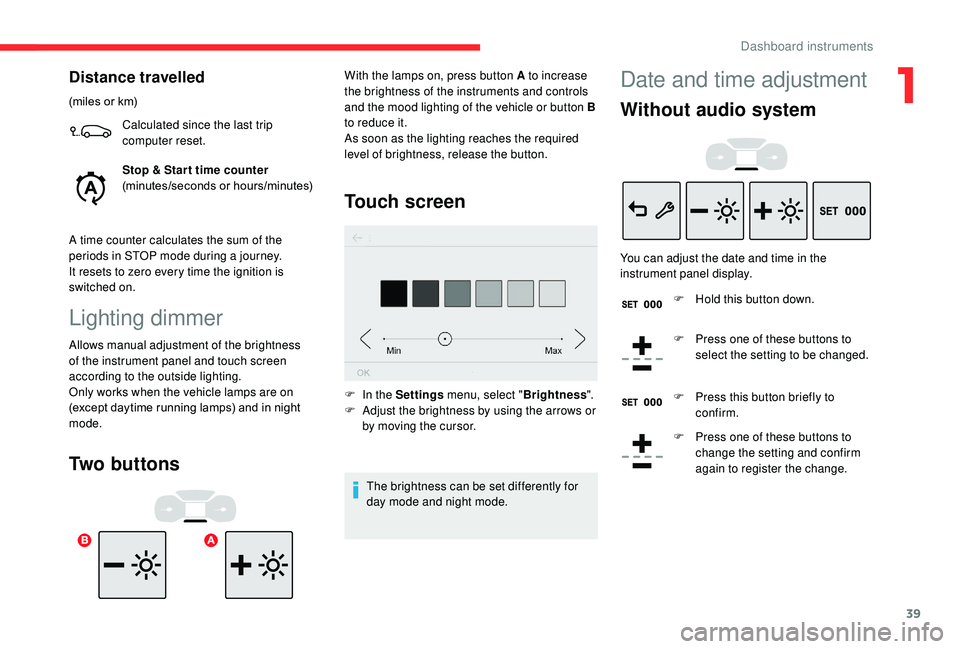
With the lamps on, press button A to increase
the brightness of the instruments and controls
and the mood lighting of the vehicle or button B
to reduce it.
As soon as the lighting reaches the required
level of brightness, release the button.
Date and time adjustment
Without audio system
You can adjust the date and time in the
instrument panel display.
F
H
old this button down.
F
P
ress one of these buttons to
select the setting to be changed.
F
P
ress this button briefly to
confirm.
F
P
ress one of these buttons to
change the setting and confirm
again to register the change.
1
Dashboard instruments
Page 46 of 308
44
As a safety measure (children on board),
never leave the vehicle without taking the
electronic key for the
K
eyless Entry and
Starting system with you, even for a short
period.
Be aware of the risk of theft when the
electronic key for the
K
eyless Entry and
Starting system is in one of the defined
zones with the vehicle unlocked.
In order to preser ve the battery in the
electronic key and the vehicle's battery,
the "hands-free" functions are put into
long-term standby after 21 days without
use. To restore these functions, press
one of the remote control buttons or start
the engine with the electronic key in the
reader.
For more information on Star ting with
K
eyless Entr y and Star ting , refer to the
corresponding section.Locking the vehicle
Normal locking
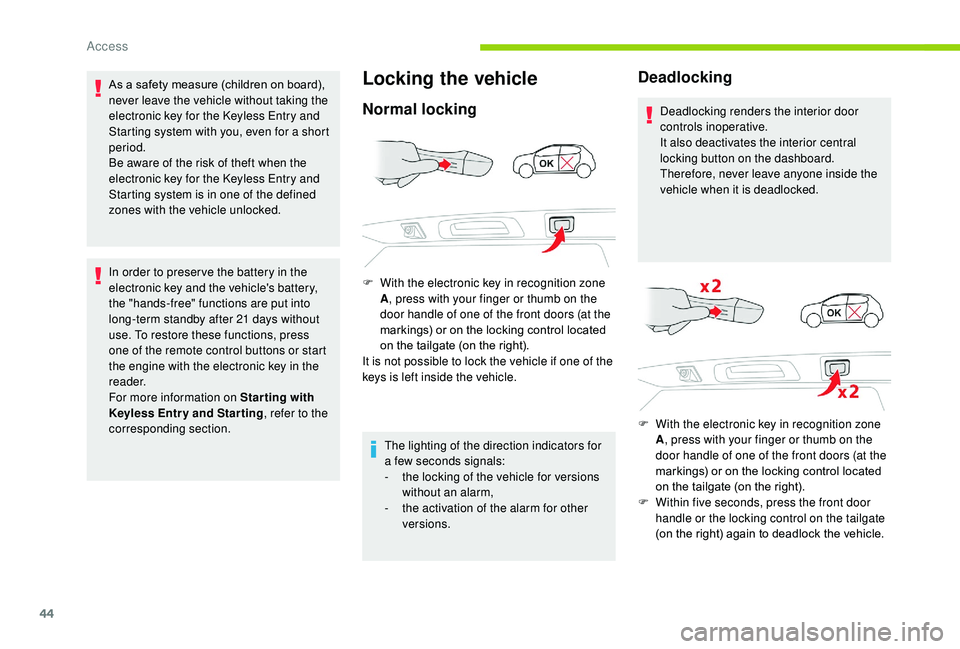
F With the electronic key in recognition zone A, press with your finger or thumb on the
door handle of one of the front doors (at the
markings) or on the locking control located
on the tailgate (on the right).
It is not possible to lock the vehicle if one of the
keys is left inside the vehicle.
The lighting of the direction indicators for
a few seconds signals:
-
t
he locking of the vehicle for versions
without an alarm,
-
t
he activation of the alarm for other
versions.
Deadlocking
Deadlocking renders the interior door
controls inoperative.
It also deactivates the interior central
locking button on the dashboard.
Therefore, never leave anyone inside the
vehicle when it is deadlocked.
F
W
ith the electronic key in recognition zone
A , press with your finger or thumb on the
door handle of one of the front doors (at the
markings) or on the locking control located
on the tailgate (on the right).
F
W
ithin five seconds, press the front door
handle or the locking control on the tailgate
(on the right) again to deadlock the vehicle.
Access
Page 47 of 308
45
Lost keys, remote control, electronic key
Visit a CITROËN dealer with the vehicle's
registration certificate, your personal
identification documents and if possible, the
label bearing the key code.
The CITROËN dealer will be able to retrieve
the key code and the transponder code
required to order a new key.Do not throw away the remote control
batteries, they contain metals which are
harmful to the environment.
Take them to an approved collection
point.
Back-up procedures
Complete unlocking/locking
of the vehicle with the key
These procedures should be used in the
following cases:
-
r
emote control battery flat,
-
r
emote control fault,
-
v
ehicle in an area subject to strong
electromagnetic interference.
In the first case, you can also replace the
remote control battery.
Refer to the corresponding section.
In the second case, you can also reinitialise the
remote control.
Refer to the corresponding section.
Locking the vehicle
Driving with the doors locked may make
access to the passenger compartment by
the emergency ser vices more difficult in an
emergency.
As a safety precaution (with children on
board), remove the key from the ignition or
take the electronic key when you leave the
vehicle, even for a short time. Remote control
The high frequency remote control is a
sensitive system; do not operate it while it is
in your pocket as there is a possibility that
it may unlock the vehicle, without you being
aware of it.
Do not repeatedly press the buttons of your
remote control out of range and out of sight
of your vehicle. The remote control may stop
working and would have to be reinitialised.
The remote control does not operate when
the key is in the ignition, even when the
ignition is switched off.
Electrical interference
The
K
eyless Entry and Starting electronic
key may not operate if close to certain
electronic devices: telephone, laptop
computer, strong magnetic fields, etc.
Anti-theft protection
Do not make any modifications to the
electronic engine immobiliser system; this
could cause malfunctions.
For vehicles with an ignition switch, do
not forget to remove the key and turn the
steering wheel to engage the steering lock.
When purchasing a second-hand vehicle
Have the key codes memorised by a
CITROËN dealer, to ensure that the keys in
your possession are the only ones which can
start the vehicle.
2
Access
Page 55 of 308
53
Panoramic opening sunroof
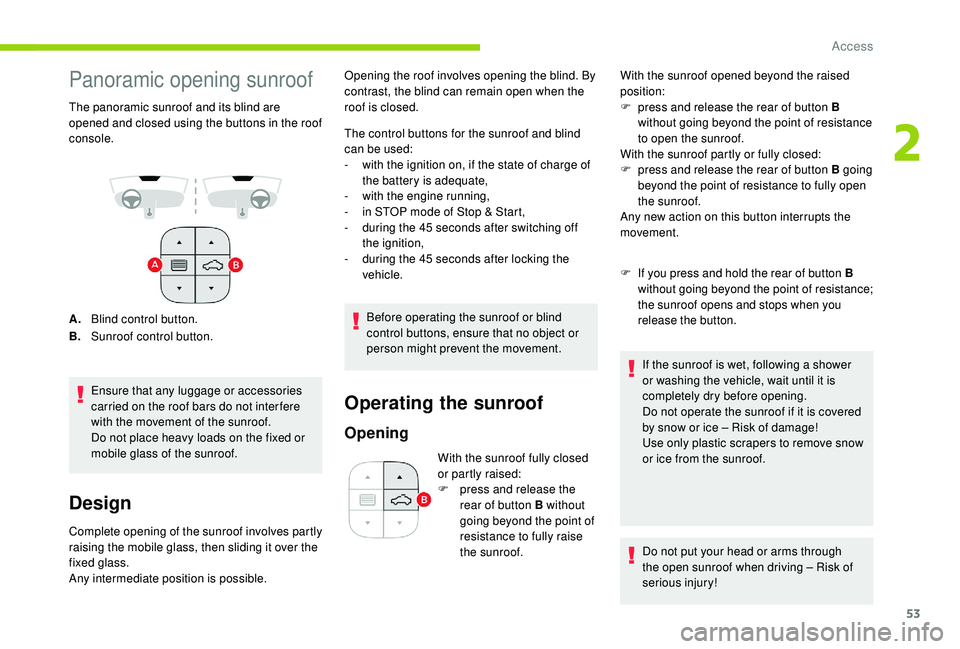
The panoramic sunroof and its blind are
opened and closed using the buttons in the roof
console.
A.Blind control button.
B. Sunroof control button.
Ensure that any luggage or accessories
carried on the roof bars do not inter fere
with the movement of the sunroof.
Do not place heavy loads on the fixed or
mobile glass of the sunroof.
Design
Complete opening of the sunroof involves partly
raising the mobile glass, then sliding it over the
fixed glass.
Any intermediate position is possible. The control buttons for the sunroof and blind
can be used:
-
w
ith the ignition on, if the state of charge of
the battery is adequate,
-
w
ith the engine running,
-
i
n STOP mode of Stop & Start,
-
d
uring the 45 seconds after switching off
the ignition,
-
d
uring the 45 seconds after locking the
vehicle.
Before operating the sunroof or blind
control buttons, ensure that no object or
person might prevent the movement.
Operating the sunroof
Opening
With the sunroof opened beyond the raised
position:
F
p
ress and release the rear of button B
without going beyond the point of resistance
to open the sunroof.
With the sunroof partly or fully closed:
F
p
ress and release the rear of button B going
beyond the point of resistance to fully open
the sunroof.
Any new action on this button interrupts the
movement.
F If you press and hold the rear of button B without going beyond the point of resistance;
the sunroof opens and stops when you
release the button.
If the sunroof is wet, following a shower
or washing the vehicle, wait until it is
completely dry before opening.
Do not operate the sunroof if it is covered
by snow or ice – Risk of damage!
Use only plastic scrapers to remove snow
or ice from the sunroof.
Do not put your head or arms through
the open sunroof when driving – Risk of
serious injury!
Opening the roof involves opening the blind. By
contrast, the blind can remain open when the
roof is closed.
With the sunroof fully closed
or partly raised:
F
p
ress and release the
rear of button B without
going beyond the point of
resistance to fully raise
the sunroof.
2
Access