ESP Citroen C3 PICASSO 2009.5 1.G User Guide
[x] Cancel search | Manufacturer: CITROEN, Model Year: 2009.5, Model line: C3 PICASSO, Model: Citroen C3 PICASSO 2009.5 1.GPages: 198, PDF Size: 9.99 MB
Page 59 of 198

65
VISIBILITY
LIGHTING CONTROLS
System for selection and control of the
various front and rear lamps providing
the vehicle's lighting.
Main lighting
The various front and rear lamps of the
vehicle are designed to adapt the driver's
visibility progressively according to cli-
matic conditions:
- sidelamps, to be seen,
- dipped beam headlamps to see without dazzling other drivers,
- main beam headlamps to see clearly when the road is clear.
Additional lighting
� �O�t�h�e�r� �l�a�m�p�s� �a�r�e� �i�n�s�t�a�l�l�e�d� �t�o� �f�u�l�fi� �l� �t�h�e�
requirements of particular conditions of
visibility:
- a rear foglamp to be seen from afar,
- front foglamps for even better for- ward vision.
Programming
Various automatic lighting control
modes are also available according to
the following options:
- guide-me-home lighting,
- automatic illumination of headlamps. Model without AUTO lighting
Model with AUTO lighting
automatic illumination of
headlamps,
Manual controls
The lighting commands are issued di-
rectly by the driver by means of the
ring
A and the stalk B .
A. Main lighting mode selection ring,
with:
lamps off,
sidelamps only,
B. Stalk for switching headlamps by
pulling: dipped headlamps/main
beam headlamps.
In the lamps off and sidelamps modes,
the driver can switch on the main beam
headlamps temporarily ("headlamp
�fl� �a�s�h�"�)� �b�y� �m�a�i�n�t�a�i�n�i�n�g� �a� �p�u�l�l� �o�n� �t�h�e�
stalk. dipped headlamps or main
beam headlamps.
Displays
Lighting of the corresponding indicator
�l�a�m�p� �o�n� �t�h�e� �i�n�s�t�r�u�m�e�n�t� �p�a�n�e�l� �c�o�n�fi� �r�m�s�
the selective switching on of the lighting
selected.
Page 68 of 198

i
72
VISIBILITY
COURTESY LAMPS
Selection and control of the various
passenger compartment lamps.
1. Front courtesy lamp
2. Map reading lamps
3. Rear courtesy lamp Front and rear courtesy lamps
Map reading lamps
� With the ignition on, press the cor-
responding switch. In permanent lighting mode, differ-
ent lighting times are available:
- with the ignition off, approxi-
mately ten minutes,
- in energy economy mode, ap- proximately thirty seconds,
- with the engine running, unlimited.
In this position, the courtesy
lamp comes on gradually:
Permanently off.
Permanent lighting.
It switches off gradually:
- when the vehicle is locked,
- when the ignition is switched on,
- 30 seconds after the last door is
closed.
- when the vehicle is unlocked,
- when the key is removed from the
ignition,
- when a door is opened,
- when the remote control locking but- ton is activated, in order to locate
your vehicle.
Footwell lighting
These lamps come on at the same time
as the courtesy lamps.
Page 94 of 198

ii
92
DIRECTION INDICATORS
Selection of the left or right direction indi-
cators to signal a change of direction of
the vehicle. If you forget to cancel the direc-
tion indicators for more than twenty
seconds, the volume of the audible
signal will increase if the speed is
above 40 mph (60 km/h).
� Lower the lighting control stalk fully
when moving to the left.
� Raise the lighting control stalk fully
when moving to the right.
HAZARD WARNING LAMPS
� Press this button, the direction indi-
�c�a�t�o�r�s� �fl� �a�s�h�.� �
They can operate with the ignition off.
Automatic operation of hazard warning lamps
When braking in an emergency, de-
pending on the deceleration, the hazard
warning lamps come on automatically.
� �T�h�e�y� �s�w�i�t�c�h� �o�f�f� �a�u�t�o�m�a�t�i�c�a�l�l�y� �t�h�e� �fi� �r�s�t�
time you accelerate.
� You can also switch them off by
pressing the button.
HORN
� Press one of the spokes of the steering
wheel.
Use the horn moderately and only
in the following cases:
- immediate danger,
- overtaking a cyclist or pedestrian,
- when approaching an area where there is no visibility.
Audible warning to alert other road users
to an imminent danger.
"Motorway" function
� �M�o�v�e� �t�h�e� �s�t�a�l�k� �b�r�i�e�fl� �y� �u�p�w�a�r�d�s� �o�r� �d�o�w�n�-
wards, without going beyond the point
of resistance; the corresponding direc-
�t�i�o�n� �i�n�d�i�c�a�t�o�r�s� �w�i�l�l� �fl� �a�s�h� �3� �t�i�m�e�s�.� � A visual warning by means of the direc-
tion indicators to alert other road users to
a vehicle breakdown, towing or accident.
Page 96 of 198

!
94
The ESP/ASR systems offer excep-
tional safety in normal driving, but
this should not encourage the driver
to take extra risks or drive at high
speed.
The correct functioning of these
systems depends on observation
of the manufacturer's recommen-
dations regarding the wheels (tyres
and rims), the braking components,
the electronic components and the
CITROËN assembly and operation
procedures.
After an impact, have these systems
checked by a CITROËN dealer.
Deactivation
In exceptional conditions (starting a vehi-cle which is bogged down, stuck in snow,
on soft ground...), it may be advisable to
deactivate the ASR and ESP systems,
so that the wheels can move freely and
regain grip.
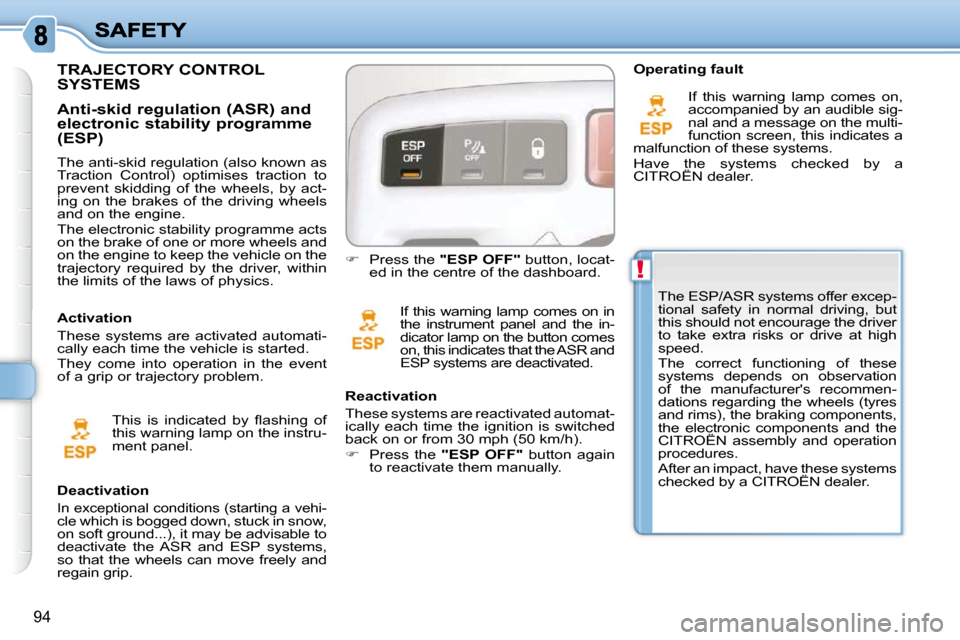
� Press the "ESP OFF" button, locat-
ed in the centre of the dashboard.
If this warning lamp comes on in
the instrument panel and the in-
dicator lamp on the button comes
on, this indicates that the ASR and
ESP systems are deactivated.
Reactivation
These systems are reactivated automat-
ically each time the ignition is switched
�b�a�c�k� �o�n� �o�r� �f�r�o�m� �3�0� �m�p�h� �(�5�0� �k�m�/�h�)�.�
� Press the "ESP OFF" button again
to reactivate them manually. Operating fault
If this warning lamp comes on,
accompanied by an audible sig-
nal and a message on the multi-
function screen, this indicates a
malfunction of these systems.
Have the systems checked by a
CITROËN dealer.
TRAJECTORY CONTROL SYSTEMS
The anti-skid regulation (also known as
Traction Control) optimises traction to
prevent skidding of the wheels, by act-
ing on the brakes of the driving wheels
and on the engine.
The electronic stability programme acts
on the brake of one or more wheels and
on the engine to keep the vehicle on the
trajectory required by the driver, within
the limits of the laws of physics.
Anti-skid regulation (ASR) and electronic stability programme (ESP)
� �T�h�i�s� �i�s� �i�n�d�i�c�a�t�e�d� �b�y� �fl� �a�s�h�i�n�g� �o�f�
this warning lamp on the instru-
ment panel.
Activation
These systems are activated automati-
cally each time the vehicle is started.
They come into operation in the event
of a grip or trajectory problem.
Page 98 of 198

96
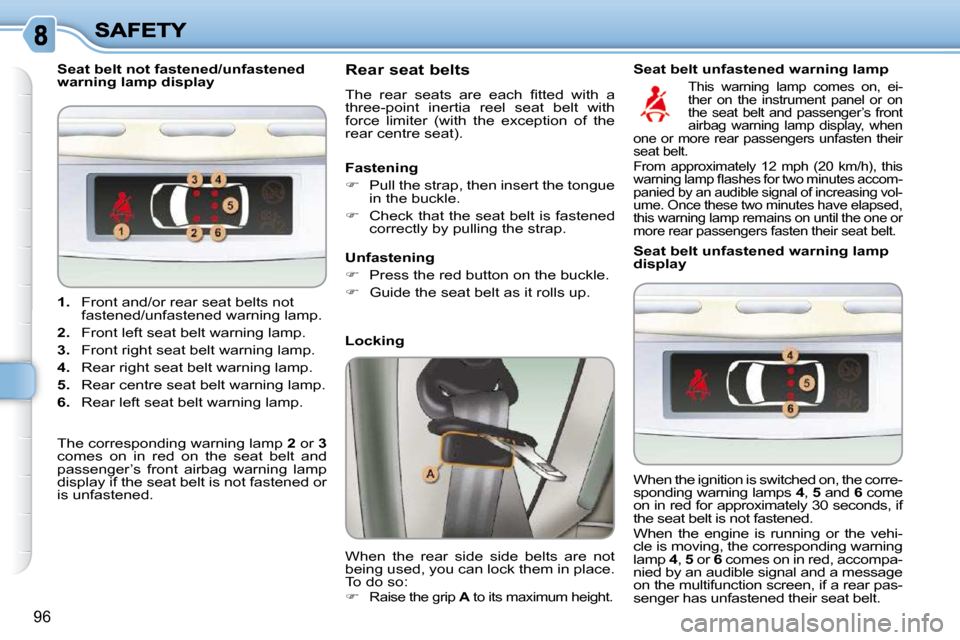
1. Front and/or rear seat belts not
fastened/unfastened warning lamp.
2. Front left seat belt warning lamp.
3. Front right seat belt warning lamp.
4. Rear right seat belt warning lamp.
5. Rear centre seat belt warning lamp.
6. Rear left seat belt warning lamp.
Seat belt not fastened/unfastened
warning lamp display
Rear seat belts
� �T�h�e� �r�e�a�r� �s�e�a�t�s� �a�r�e� �e�a�c�h� �fi� �t�t�e�d� �w�i�t�h� �a�
three-point inertia reel seat belt with
force limiter (with the exception of the
rear centre seat).
Locking
When the rear side side belts are not
being used, you can lock them in place.
To do so:
�
Raise the grip A to its maximum height.
Fastening
� Pull the strap, then insert the tongue
in the buckle.
� Check that the seat belt is fastened
correctly by pulling the strap.
Unfastening
� Press the red button on the buckle.
� Guide the seat belt as it rolls up.
The corresponding warning lamp 2 or 3
comes on in red on the seat belt and
passenger’s front airbag warning lamp
display if the seat belt is not fastened or
is unfastened. Seat belt unfastened warning lamp
This warning lamp comes on, ei-
ther on the instrument panel or on
the seat belt and passenger’s front
airbag warning lamp display, when
one or more rear passengers unfasten their
seat belt.
From approximately 12 mph (20 km/h), this
�w�a�r�n�i�n�g� �l�a�m�p� �fl� �a�s�h�e�s� �f�o�r� �t�w�o� �m�i�n�u�t�e�s� �a�c�c�o�m�-
panied by an audible signal of increasing vol-
ume. Once these two minutes have elapsed,
this warning lamp remains on until the one or
more rear passengers fasten their seat belt.
Seat belt unfastened warning lamp
display
When the ignition is switched on, the corre-
sponding warning lamps 4 , 5 and 6 come
�o�n� �i�n� �r�e�d� �f�o�r� �a�p�p�r�o�x�i�m�a�t�e�l�y� �3�0� �s�e�c�o�n�d�s�,� �i�f�
the seat belt is not fastened.
When the engine is running or the vehi-
cle is moving, the corresponding warning
lamp 4 , 5 or 6 comes on in red, accompa-
nied by an audible signal and a message
on the multifunction screen, if a rear pas-
senger has unfastened their seat belt.
Page 104 of 198

!
101
Lateral airbags
System which protects the driver and
front passenger in the event of a seri-
ous side impact in order to limit the risk
of injury to the chest.
Each lateral airbag is built into the seat
backrest frame, door side.
Activation
The lateral airbags are triggered unilater-
ally in the event of a serious side impact
applied to all or part of the side impact
zone B , perpendicular to the longitudinal
centreline of the vehicle on a horizontal
plane and directed from the outside to-
wards the inside of the vehicle.
Curtain airbags
System which protects the driver and
passengers (with the exception of the
rear centre passenger) in the event of a
serious side impact in order to limit the
risk of injury to the side of the head.
Each curtain airbag is built into the pillars
and the upper passenger compartment
area. Operating fault
Activation
The curtain airbag is triggered at the
same time as the corresponding later-
al airbag in the event of a serious side
impact applied to all or part of the side
impact zone
B , perpendicular to the lon-
gitudinal centreline of the vehicle on a
horizontal plane and directed from the
outside towards the inside of the vehicle.
� �T�h�e� �c�u�r�t�a�i�n� �a�i�r�b�a�g� �i�n�fl� �a�t�e�s� �b�e�t�w�e�e�n� �t�h�e�
front or rear occupant of the vehicle and
the windows.
In the event of a minor impact or
bump on the side of the vehicle or
if the vehicle rolls over, the airbag
may not be triggered.
In the event of a rear or front colli-
sion, the airbag is not triggered.
Impact detection zones
A. Front impact zone.
B. Side impact zone. If this warning lamp comes on
on the instrument panel, accom-
panied by an audible signal and
a message on the multifunction
screen, contact a CITROËN dealer to
have the system checked. The airbags
may no longer be triggered in the event
of a serious impact.
� �T�h�e� �l�a�t�e�r�a�l� �a�i�r�b�a�g� �i�n�fl� �a�t�e�s� �b�e�t�w�e�e�n� �t�h�e�
front occupant of the vehicle and the
corresponding door trim panel.
Page 107 of 198

i
104
DRIVING
SPEED LIMITER
System which prevents the vehicle from
exceeding the speed programmed by
the driver.
When the programmed speed limit is
reached, pressing the accelerator pedal in
the normal manner no longer has any effect.
The controls of this system are grouped
together on stalk A .
1. Speed limiter mode selection thumb
wheel
2. Value decrease button
3. Value increase button
4. Speed limiter on/off button The programmed information is
grouped together on the instrument
panel screen.
5. Speed limiter on/off indication
6.
Speed limiter mode selection indication
7. Programmed speed value
Steering mounted controls Displays on the instrumen
t panel
The speed limiter cannot, in any
circumstances, replace the need
to respect speed limits, nor can it
replace the need for vigilance and
responsibility on the part of the
driver.
The speed limiter is
switched on manu-
ally: it requires a programmed speed of
at least 20 mph (30 km/h).
The speed limiter is switched off by
manual operation of the control.
The programmed speed can be exceeded
temporarily by pressing the accelerator
�fi� �r�m�l�y�.�
To return to the programmed speed,
simply slow down to a speed below the
programmed speed.
The programmed speed remains in the
memory when the ignition is switched
off.
Page 109 of 198

i
106
DRIVING
CRUISE CONTROL
System which automatically maintains
the speed of the vehicle at the value
programmed by the driver, without any
action on the accelerator pedal.
The cruise control is switched on
manually: it requires a minimum vehicle
speed of 25 mph (40 km/h) and the en-
gaging of at least 4th gear.
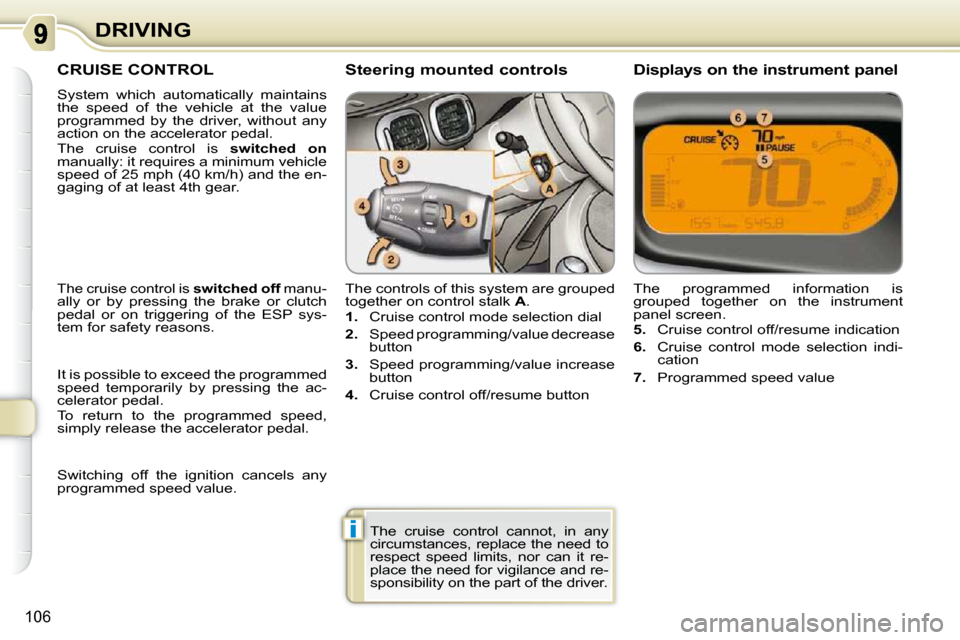
The controls of this system are grouped
together on control stalk A .
1. Cruise control mode selection dial
2. Speed programming/value decrease
button
3. Speed programming/value increase
button
4. Cruise control off/resume button The programmed information is
grouped together on the instrument
panel screen.
5. Cruise control off/resume indication
6. Cruise control mode selection indi-
cation
7. Programmed speed value
Steering mounted controls Displays on the instrumen
t panel
The cruise control cannot, in any
circumstances, replace the need to
respect speed limits, nor can it re-
place the need for vigilance and re-
sponsibility on the part of the driver.
The cruise control is switched off manu-
ally or by pressing the brake or clutch
pedal or on triggering of the ESP sys-
tem for safety reasons.
It is possible to exceed the programmed
speed temporarily by pressing the ac-
celerator pedal.
To return to the programmed speed,
simply release the accelerator pedal.
Switching off the ignition cancels any
programmed speed value.
Page 111 of 198

i
i
108
DRIVING
PARKING SENSORS
System comprising four proximity sen-
sors, located in the rear bumper.
This detects any obstacle (person, vehi-
cle, tree, gate, etc.) behind the vehicle.
Nevertheless, it cannot detect obstacles
located just below the bumper. An object, such as a stake, a road-
works cone or any other similar
object may be detected at the be-
ginning of the manoeuvre, but may
no longer be detected when the ve-
hicle comes close to it. Activation
The system is activated as soon as re-
verse gear is engaged, accompanied
by an audible signal. The proximity in-
formation is given by:
- an audible signal, which becomes
more rapid as the vehicle approaches
the obstacle,
- a graphic on the multifunction screen, with blocks which become
increasingly closer to the vehicle. The parking sensors system can-
not, in any circumstances, take the
place of the vigilance and responsi-
bility of the driver.
Detection zone
When the distance between the rear of
the vehicle and the obstacle is less than
thirty centimetres, the audible signal be-
comes continuous and the "Danger" sym-
bol appears on the multifunction screen.
On completion of the manoeuvre, when
you exit reverse gear, the system be-
comes inactive.
Page 116 of 198

!
114
CHECKS
CHECKING LEVELS Brake fluid level
Oil level The reading will only be correct
if the vehicle is on level ground
and the engine has been off for
more than 15 minutes.
The check is carried out either when the
ignition is switched on using the oil level
indicator on the instrument panel, or
using the dipstick. � �T�h�e� �b�r�a�k�e� �fl� �u�i�d� �l�e�v�e�l� �s�h�o�u�l�d� �b�e�
close to the "MAX" mark. If it is
not, check the brake pad wear.
� � �C�h�a�n�g�i�n�g� �t�h�e� �fl� �u�i�d�
Refer to the Maintenance and Warranty
Guide for details of the interval for this
operation.
Coolant level The coolant level should be
close to the "MAX" mark but
should never exceed it.
When the engine is warm, the
temperature of the coolant is regulated
by the fan. This can operate with the
ignition off.
�O�n� �v�e�h�i�c�l�e�s� �w�h�i�c�h� �a�r�e� �fi� �t�t�e�d� �w�i�t�h� �a�
�p�a�r�t�i�c�l�e� �e�m�i�s�s�i�o�n� �fi� �l�t�e�r�,� �t�h�e� �f�a�n� �m�a�y�
operate after the vehicle has been
�s�w�i�t�c�h�e�d� �o�f�f�,� �e�v�e�n� �i�f� �t�h�e� �e�n�g�i�n�e� �i�s�
cold.
In addition, as the cooling system is
pressurised, wait at least one hour after
switching off the engine before carrying
out any work. � � �F�l�u�i�d� �s�p�e�c�i�fi� �c�a�t�i�o�n�
For optimum cleaning and to avoid
�f�r�e�e�z�i�n�g�,� �t�h�i�s� �fl� �u�i�d� �m�u�s�t� �n�o�t� �b�e� �t�o�p�p�e�d�
up or replaced with water.
Engine oil change
Refer to the Maintenance and Warranty
Guide for details of the interval for this
operation.
In order to maintain the reliability of the
engine and emission control system,
the use of additives in the engine oil is
prohibited.
Oil grade
The oil must be suitable for your engine
and conform to the manufacturer's recom-
mendations. � � �F�l�u�i�d� �s�p�e�c�i�fi� �c�a�t�i�o�n�
� �T�h�e� �b�r�a�k�e� �fl� �u�i�d� �m�u�s�t� �c�o�n�f�o�r�m� �t�o� �t�h�e�
manufacturer's recommendations and
meet the DOT4 standard.
� � �F�l�u�i�d� �s�p�e�c�i�fi� �c�a�t�i�o�n�
The coolant must conform to the manu-
facturer's recommendations.
Changing the coolant
The coolant does not have to be
changed.
Screenwash fluid level
Check all of these levels regularly and
top them up if necessary, unless other-
wise indicated.
� �I�f� �a� �l�e�v�e�l� �d�r�o�p�s� �s�i�g�n�i�fi� �c�a�n�t�l�y�,� �h�a�v�e� �t�h�e�
corresponding system checked by a
CITROËN dealer.
To avoid any risk of scalding, unscrew
the cap by two turns to allow the pres-
sure to drop. When the pressure has
dropped, remove the cap and top up
the level.
Top up the level when necessary.
Take care when carrying out checks under the bonnet as some parts of
the engine can be very hot (risk of
burns).