Fan Citroen C3 PICASSO 2016 1.G User Guide
[x] Cancel search | Manufacturer: CITROEN, Model Year: 2016, Model line: C3 PICASSO, Model: Citroen C3 PICASSO 2016 1.GPages: 292, PDF Size: 8.23 MB
Page 104 of 292
102
C3Picasso_en_Chap07_securite-enfants_ed01-2015
e When a rear ward facing child seat is installed on a front passenger seat , the
passenger's airbag must be deactivated.
O
therwise, the child would risk being
seriously injured or killed during
deployment of the airbag .
W
hen a for ward facing child seat is
installed on the front passenger seat , the
passenger's airbag must remain active.
U:
S
eat suitable for the installation of a
child seat secured using a seat belt and
universally approved, rear ward facing or
forward facing.
X:
S
eat position not suitable for installation of
a child seat for the weight class indicated.
CITROËN recommends that children travel in
the rear seats, with the rear seats in the fully
back position.
Child safety
Page 105 of 292
103
C3Picasso_en_Chap07_securite-enfants_ed01-2015
"ISOFIX" mountings
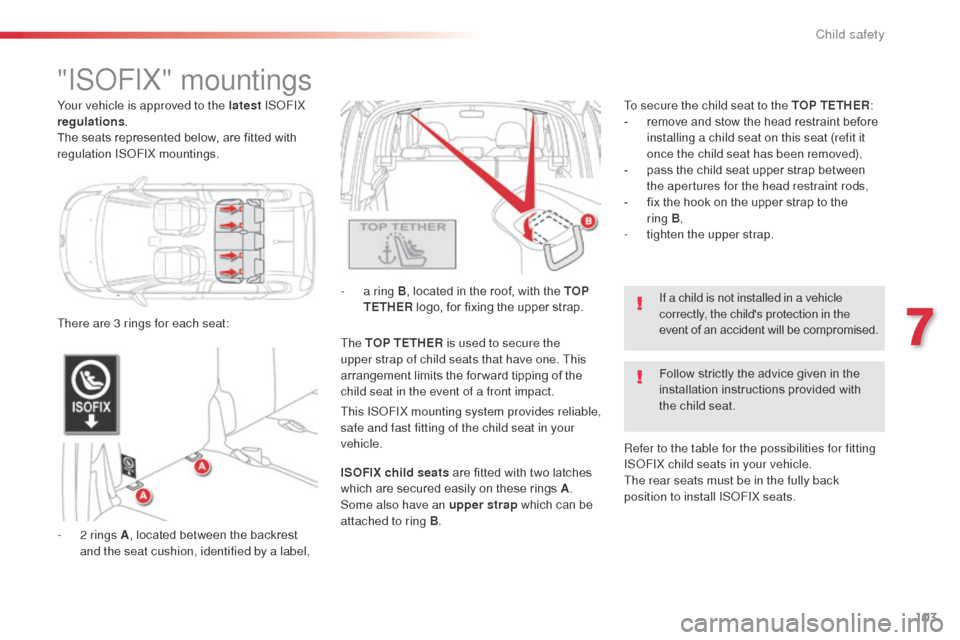
- 2 rings A, located between the backrest
and the seat cushion, identified by a label, -
a r
ing B
, located in the roof, with the TOP
TETHER logo, for fixing the upper strap.
The TOP TETHER is used to secure the
upper strap of child seats that have one. This
arrangement limits the for ward tipping of the
child seat in the event of a front impact. To secure the child seat to the TOP TETHER
:
-
r
emove and stow the head restraint before
installing a child seat on this seat (refit it
once the child seat has been removed),
-
p
ass the child seat upper strap between
the apertures for the head restraint rods,
-
f
ix the hook on the upper strap to the
ring B
,
-
t
ighten the upper strap.
Your vehicle is approved to the latest
ISOFIX
regulations .
The seats represented below, are fitted with
regulation ISOFIX mountings.
If a child is not installed in a vehicle
correctly, the child's protection in the
event of an accident will be compromised.
There are 3 rings for each seat:
Follow strictly the advice given in the
installation instructions provided with
the child seat.
This ISOFIX mounting system provides reliable,
safe and fast fitting of the child seat in your
vehicle.
ISOFIX child seats are fitted with two latches
which are secured easily on these rings A .
Some also have an upper strap which can be
attached to ring B . Refer to the table for the possibilities for fitting
ISOFIX child seats in your vehicle.
The rear seats must be in the fully back
position to install ISOFIX seats.
7
Child safety
Page 106 of 292
104
C3Picasso_en_Chap07_securite-enfants_ed01-2015
ISOFIX child seat recommended by CITROËN and approved for
your vehicle
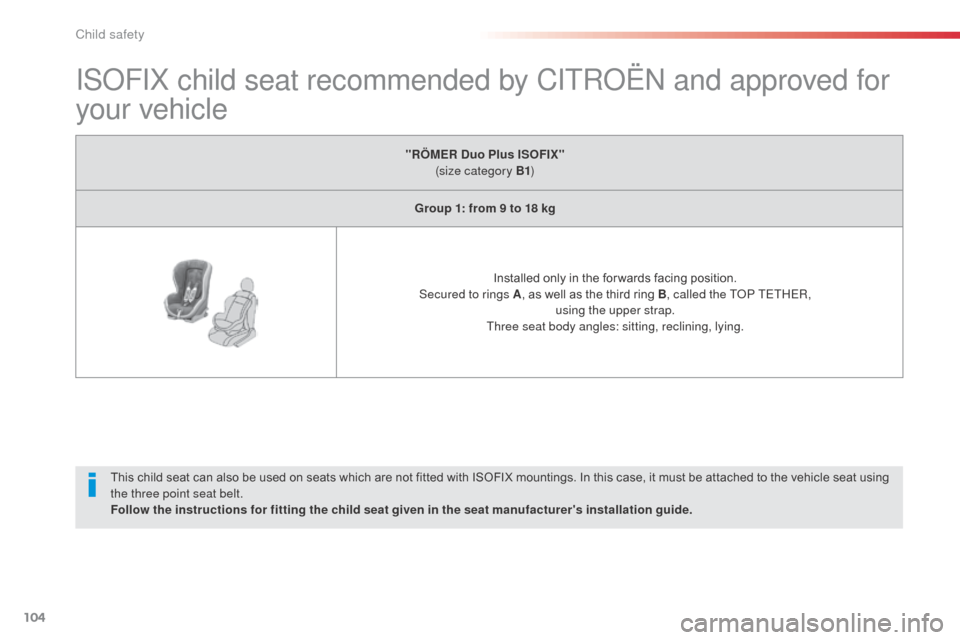
"RÖMER Duo Plus ISOFIX"
(size category B1 )
Group 1: from 9 to 18 kg
Installed only in the for wards facing position.
Secured to rings A , as well as the third ring B, called the TOP TETHER,
using the upper strap.
Three seat body angles: sitting, reclining, lying.
This child seat can also be used on seats which are not fitted with ISOFIX mountings. In this case, it must be attached to the vehicle seat using
the three point seat belt.
Follow the instructions for fitting the child seat given in the seat manufacturer's installation guide.
Child safety
Page 107 of 292
105
C3Picasso_en_Chap07_securite-enfants_ed01-2015
Table of seating positions for ISOFIX child seatsIn accordance with European Regulations, this table indicates the options for installing ISOFIX child seats on seats in the vehicle fitted with ISOFIX
mountings.
In the case of universal and semi-universal ISOFIX child seats, the ISOFIX size category, determined by a letter from A to G, is indicated on the child
seat next to the ISOFIX logo.
I UF:
s
eat suitable for the installation of an I sofix Universal seat, F or wards-facing secured using the
upper strap.
IL- SU: seat suitable for the installation of an I sofix Semi-Universal seat either:
-
r
ear ward facing fitted with an upper strap or a support leg,
-
f
or ward facing fitted with a support leg,
-
a s
hell seat fitted with an upper strap or a support leg.
For advice on securing the top tether belt, refer to the " I
S
OFIX
m
ountings" section.
*
The ISOFIX infant car seat (shell seat), secured on the lower rings of a vehicle ISOFIX seat, occupies two rear seats.
Weight of the child / indicative age
Less than 10 kg (group 0)
Up to approx. 6
months Less than 10 kg
(group 0)
Less than 13 kg (group 0+)
Up to approx. 1 year From 9 to 18 kg (group 1)
From approx. 1 to 3 years
Type of ISOFIX child seat Shellrearward facing rearward facing forward facing
ISOFIX size categor y F G C D E C D A B B1
ISOFIX universal and semi-universal child
seats which can be installed on the outer
rear seats IL- SU
* IL- SU IL- SU IUF
IL- SU
Remove and stow the head restraint
before installing a child seat with a
backrest on a passenger seat. Refit the
head restraint once the child seat has
been removed.
7
Child safety
Page 108 of 292
106
C3Picasso_en_Chap07_securite-enfants_ed01-2015
The incorrect installation of a child seat in a
vehicle compromises the child's protection in
the event of an accident.
Ensure that there is no seat belt or seat belt
buckle under the child seat, as this could
destabilise it.
Remember to fasten the seat belts or the
child seat harnesses keeping the slack
relative to the child's body to a minimum,
even for short journeys.
When installing a child seat using the seat
belt, ensure that the seat belt is tightened
correctly on the child seat and that it secures
the child seat firmly on the seat of your
vehicle. If your passenger seat is adjustable,
move it for wards if necessary.
At rear seating positions, always leave
sufficient space between the front seat and:
-
a r
ear ward facing child seat,
-
t
he child's feet for a child seat fitted
forward facing.
To do this, move the front seat for wards
and, if necessary, move its backrest into the
upright position. For optimum installation of the for ward facing
child seat, ensure that the back of the child
seat is as close as possible to the backrest of
the vehicle's seat, in contact if possible.
You mst remove the head restraint before
installing a child seat with backrest to a
passenger seat.
Ensure that the head restraint is stored or
attached securely to prevent it from being
thrown around the vehicle in the event of
sharp braking. Refit the head restraint when
the child seat is removed.
As a safety precaution, do not leave:
-
a c
hild or children alone and
unsupervised in a vehicle,
-
a c
hild or an animal in a vehicle which
is exposed to the sun, with the windows
closed,
-
t
he keys within reach of children inside
the vehicle.
To prevent accidental opening of the doors
and rear windows, use the child lock.
Take care not to open the rear windows by
more than one third.
To protect young children from the rays of the
sun, fit side blinds on the rear windows.Installing a booster seat
The chest part of the seat belt must be
positioned on the child's shoulder without
touching the neck.
Ensure that the lap part of the seat belt
passes correctly over the child's thighs.
CITROËN recommends the use of a booster
seat which has a back, fitted with a seat belt
guide at shoulder level.
Advice
Children at the front
The legislation on carrying children on the
front passenger seat is specific to each
country. Refer to the legislation in force in
your country.
Deactivate the passenger's front airbag
when a rear ward facing child seat is installed
on the front passenger seat.
Otherwise, the child risks being seriously
injured or killed if the airbag is deployed.
Child safety
Page 109 of 292
107
C3Picasso_en_Chap07_securite-enfants_ed01-2015
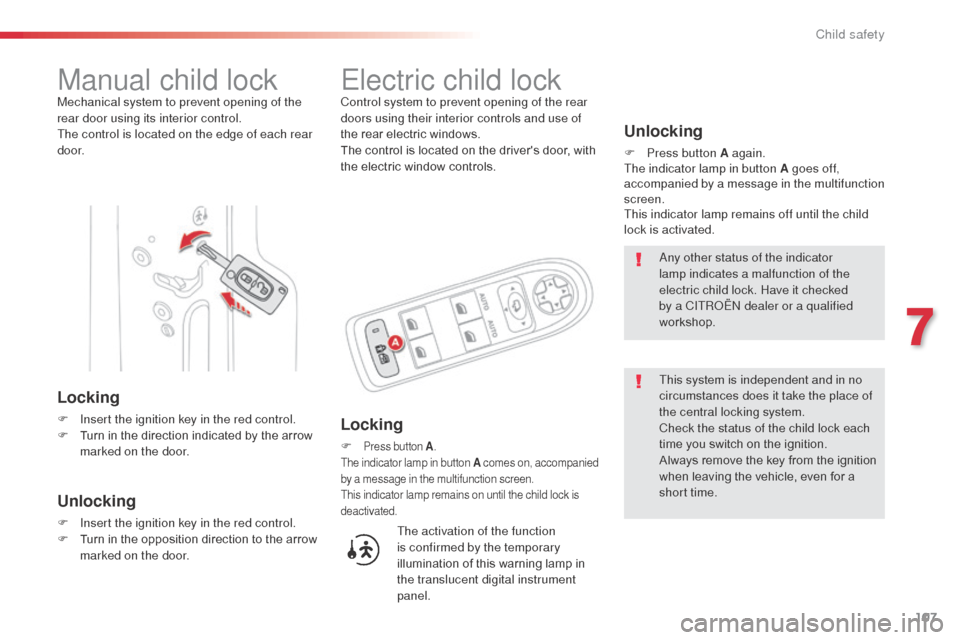
Manual child lockMechanical system to prevent opening of the
rear door using its interior control.
The control is located on the edge of each rear
d o o r.
Locking
F Insert the ignition key in the red control.
F T urn in the direction indicated by the arrow
marked on the door.
Electric child lockControl system to prevent opening of the rear
doors using their interior controls and use of
the rear electric windows.
The control is located on the driver's door, with
the electric window controls.
Locking
F Press button A.
The indicator lamp in button A comes on, accompanied
by a message in the multifunction screen.
This indicator lamp remains on until the child lock is
deactivated.
Unlocking
F Insert the ignition key in the red control.
F T urn in the opposition direction to the arrow
marked on the door.
Unlocking
F Press button A again.
The indicator lamp in button A goes off,
accompanied by a message in the multifunction
screen.
This indicator lamp remains off until the child
lock is activated.
The activation of the function
is confirmed by the temporary
illumination of this warning lamp in
the translucent digital instrument
panel. Any other status of the indicator
lamp indicates a malfunction of the
electric child lock. Have it checked
by a CITROËN dealer or a qualified
workshop.
This system is independent and in no
circumstances does it take the place of
the central locking system.
Check the status of the child lock each
time you switch on the ignition.
Always remove the key from the ignition
when leaving the vehicle, even for a
short time.
7
Child safety
Page 147 of 292
145
C3Picasso_en_Chap10_verification_ed01-2015
Checking levels
Engine oil level
The check is carried out either when
the ignition is switched on using the
oil level indicator in the instrument
panel for vehicles so equipped, or
using the dipstick.
Checking using the dipstick
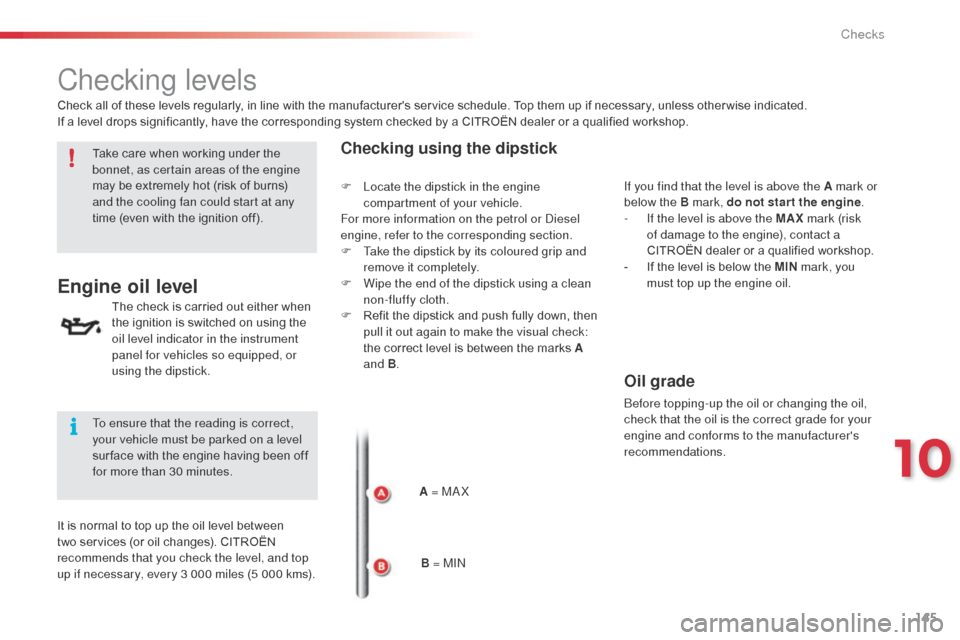
A = MA X
Check all of these levels regularly, in line with the manufacturer's service schedule. Top them up if necessary, unless other wise indicated.
If a level drops significantly, have the corresponding system checked by a CITROËN dealer or a qualified workshop.
Take care when working under the
bonnet, as certain areas of the engine
may be extremely hot (risk of burns)
and the cooling fan could start at any
time (even with the ignition off).
To ensure that the reading is correct,
your vehicle must be parked on a level
sur face with the engine having been off
for more than 30 minutes.
It is normal to top up the oil level between
two services (or oil changes). CITROËN
recommends that you check the level, and top
up if necessary, every 3 000 miles (5 000 kms). B = MINIf you find that the level is above the A mark or
below the B mark, do not star t the engine
.
-
I
f the level is above the MAX
mark (risk
of damage to the engine), contact a
CITROËN dealer or a qualified workshop.
-
I
f the level is below the MIN
mark, you
must top up the engine oil.
Oil grade
Before topping-up the oil or changing the oil,
check that the oil is the correct grade for your
engine and conforms to the manufacturer's
recommendations.
F
L
ocate the dipstick in the engine
compartment of your vehicle.
For more information on the petrol or Diesel
engine, refer to the corresponding section.
F
T
ake the dipstick by its coloured grip and
remove it completely.
F
W
ipe the end of the dipstick using a clean
non-fluffy cloth.
F
R
efit the dipstick and push fully down, then
pull it out again to make the visual check:
the correct level is between the marks A
and B .
10
Checks
Page 149 of 292
147
C3Picasso_en_Chap10_verification_ed01-2015
Coolant level
The coolant level should be close
to the "MA X" mark but should never
exceed it.
Fluid specification
For optimum cleaning and to avoid freezing,
this fluid must not be topped up or replaced
with plain water.
In wintry conditions, it is recommended that you
use an ethyl alcohol or methanol based fluid.
Coolant specification
The coolant must conform to the
manufacturer's recommendations.
Screenwash fluid level
When the engine is warm, the temperature of
the coolant is regulated by the fan.Top up the level when necessary.
The cooling fan may star t after switching
off the engine: take care with ar ticles and
clothing that might be caught by the fan
blades.
In addition, as the cooling system is pressurised,
wait at least one hour after switching off the
engine before carrying out any work.
To avoid any risk of scalding, unscrew the cap
by two turns to allow the pressure to drop. When
the pressure has dropped, remove the cap and
top up the level.
Diesel additive level (Diesel
engine with particle filter) Used products
To p p i n g u p
This additive must be topped up by a CITROËN
dealer or a qualified workshop without delay. Avoid prolonged contact of used oil or
fluids with the skin.
Most of these fluids are harmful to
health or indeed very corrosive.
Do not discard used oil or fluids into
sewers or onto the ground.
Take used oil to a CITROËN dealer or
a qualified workshop (France) or to an
authorised waste disposal site.
The additive reservoir low
level is indicated by fixed
illumination of this warning lamp,
accompanied by an audible
warning and a message in the
multifunction screen.
10
Checks
Page 184 of 292

182
C3Picasso_en_Chap11_informations-pratiques_ed01-2015
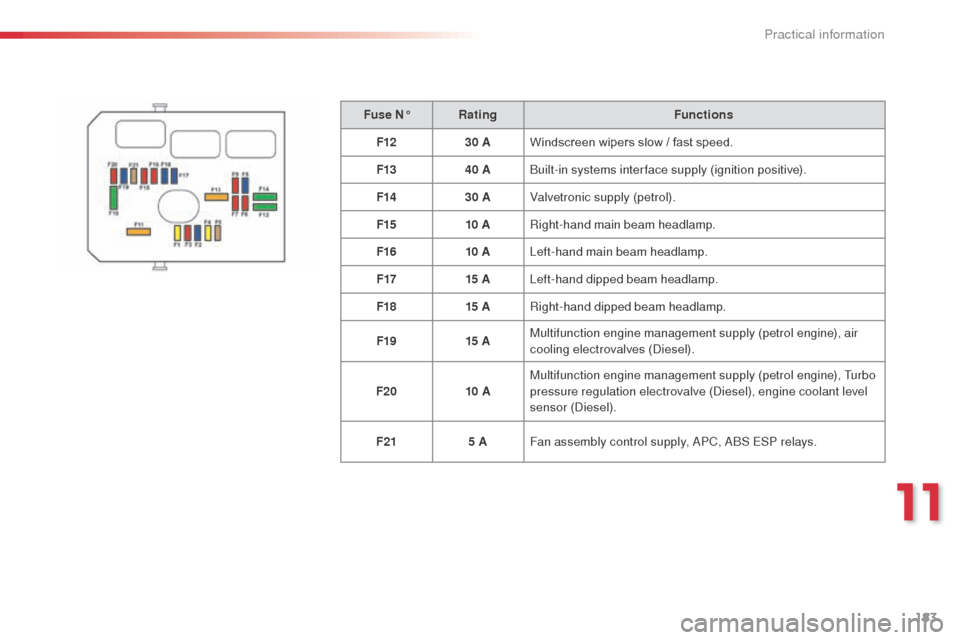
Fuse table
Fuse N°Rating Functions
F1 20 AEngine control unit supply, cooling fan unit control, multifunction
engine control main relay.
F2 15 AHorn.
F3 10 AFront / rear wash-wipe.
F4 20 ADaytime running lamps.
F5 15 ADiesel heater (Diesel engine), fuel pump (petrol engine)
F6 10 AABS/ESP control unit, ABS/ESP cut-off relay, secondary stop
switch.
F7 10 AElectric power steering.
F8 25 AStarter motor control.
F9 10 ASwitching and protection unit (Diesel).
F10 30 ADiesel engine injection pump valve, injectors and ignition coils
(petrol engine)
F11 40 AAir conditioning fan.
Practical information
Page 185 of 292
183
C3Picasso_en_Chap11_informations-pratiques_ed01-2015
Fuse N°Rating Functions
F12 30 AWindscreen wipers slow / fast speed.
F13 40 ABuilt-in systems inter face supply (ignition positive).
F14 30 AValvetronic supply (petrol).
F15 10 ARight-hand main beam headlamp.
F16 10 ALeft-hand main beam headlamp.
F17 15 ALeft-hand dipped beam headlamp.
F18 15 ARight-hand dipped beam headlamp.
F19 15 AMultifunction engine management supply (petrol engine), air
cooling electrovalves (Diesel).
F20 10 AMultifunction engine management supply (petrol engine), Turbo
pressure regulation electrovalve (Diesel), engine coolant level
sensor (Diesel).
F21 5 AFan assembly control supply, APC, ABS ESP relays.
11
Practical information