indicator Citroen C3 PICASSO 2016 1.G Owner's Guide
[x] Cancel search | Manufacturer: CITROEN, Model Year: 2016, Model line: C3 PICASSO, Model: Citroen C3 PICASSO 2016 1.GPages: 292, PDF Size: 8.23 MB
Page 49 of 292
47
C3Picasso_en_Chap03_confort_ed01-2015
4. Air intake / Air recirculation
The intake of exterior air prevents the formation
of mist on the windscreen and side windows.
The recirculation of interior air isolates the
passenger compartment from exterior odours
and smoke.
Return to exterior air intake as soon as possible
to prevent deterioration of the the air quality
and the formation of mist.F
P
ress the button to recirculate
the interior air. The indicator
lamp comes on to confirm this.
F
P
ress the button again to permit the intake
of exterior air. The indicator lamp switches
off to confirm this.
5. Air conditioning On / Off
It enables you to:
- l ower the temperature, in summer,
-
i
ncrease the effectiveness of the demisting
in winter, above 3 °C.
Switching off
F Press the "A /C " button again, the button's
indicator lamp goes off.
Switching off may affect comfort levels
(humidity, condensation). The air conditioning is designed to
operate effectively in all seasons,
with the windows closed.
Switching on
F Press the "A /C "
button, the button's
indicator lamp comes on.
The air conditioning does not operate when the
air flow adjustment control 2 is in position " 0".
To obtain cooled air more quickly, you can use
recirculation of interior air for a few moments.
Then return to fresh air intake.
3
Comfort
Page 50 of 292
48
C3Picasso_en_Chap03_confort_ed01-2015
The air conditioning only operates when the engine is running.The driver and front passenger can
each adjust the temperature to their
requirements.
F
T
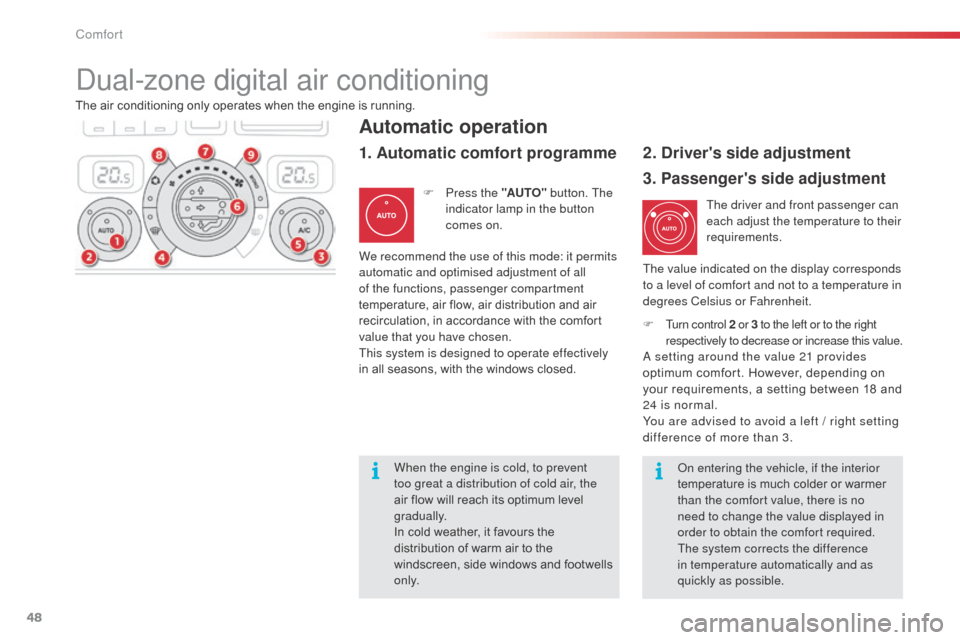
urn control 2 or 3 to the left or to the right
respectively to decrease or increase this value.
A setting around the value 21 provides
optimum comfort. However, depending on
your requirements, a setting between 18 and
24 is normal.
You are advised to avoid a left / right setting
difference of more than 3.
Automatic operation
F Press the "AUTO" button. The
indicator lamp in the button
comes on.
2. Driver's side adjustment
Dual-zone digital air conditioning
We recommend the use of this mode: it permits
automatic and optimised adjustment of all
of the functions, passenger compartment
temperature, air flow, air distribution and air
recirculation, in accordance with the comfort
value that you have chosen.
This system is designed to operate effectively
in all seasons, with the windows closed. The value indicated on the display corresponds
to a level of comfort and not to a temperature in
degrees Celsius or Fahrenheit.
1. Automatic comfort programme
3. Passenger's side adjustment
On entering the vehicle, if the interior
temperature is much colder or warmer
than the comfort value, there is no
need to change the value displayed in
order to obtain the comfort required.
The system corrects the difference
in temperature automatically and as
quickly as possible.
When the engine is cold, to prevent
too great a distribution of cold air, the
air flow will reach its optimum level
gradually.
In cold weather, it favours the
distribution of warm air to the
windscreen, side windows and footwells
o n l y.
Comfort
Page 51 of 292
49
C3Picasso_en_Chap03_confort_ed01-2015
4. Automatic visibility programme
The automatic comfort programme
may not be sufficient to quickly
demist or defrost the windscreen
and side windows (humidity, several
passengers, ice, etc.).
F
T
o switch the system off, press this button
again or press "AUTO" . The indicator lamp
in the button goes off and the indicator
lamp in the "AUTO" button comes on.
F
P
ress this button to activate the automatic
visibility programme. The indicator lamp in
the button comes on.
The system automatically controls the air
conditioning, the air flow and the air intake and
provides optimum distribution of the ventilation
to the windscreen and side windows. If you wish, you can make a different choice
from that offered by the system by changing
a setting. The other functions will still be
controlled automatically.
F
P
ressing the "AUTO" button returns the
system to completely automatic operation.
For maximum cooling or heating of the
passenger compartment, it is possible
to exceed the minimum value 14 or the
maximum value 28.
F
T
urn control 2 or 3 to the left until
"LO" is displayed or to the right
until "HI" is displayed.
Manual operation
F Press this button to switch off
the air conditioning.
5. Air conditioning On / Off
Switching the system off could result in
discomfort (humidity, condensation).
F
P
ress this button again to return to
automatic operation of the air conditioning.
The indicator lamp in the "A /C " button
comes on.
3
Comfort
Page 52 of 292
50
C3Picasso_en_Chap03_confort_ed01-2015
6. Air distribution adjustment
F Press one or more buttons to direct the air flow towards:
7. Air flow adjustment
F Turn this control to the left to decrease the air flow or to the
right to increase the air flow.
8. Air intake / Air recirculationF Turn the air flow control to the left until all of the indicator lamps go off.
This action switches off the air conditioning and
the ventilation.
Temperature related comfort is no longer
guaranteed but a slight flow of air, due to the
movement of the vehicle, can still be felt.
F
T
urn the air flow dial to the right or press the
"AUTO" button to reactivate the system with
the values set before it was switched off.
F
P
ress this button for recirculation
of the interior air. The indicator
lamp in the button comes on.
-
t
he windscreen and side windows
(demisting or defrosting),
-
t
he windscreen, the side windows and the
vents,
-
t
he windscreen, the side windows, the
vents and the footwells,
-
t
he vents and the footwells,
-
t
he vents,
-
t
he footwells,
-
t
he windscreen, the side windows and the
footwells.
The air flow indicator lamps, between the two
fans, come on progressively in relation to the
value requested. F
A
s soon as possible, press this button
again to permit the intake of outside air and
prevent the formation of condensation. The
indicator lamp on the button switches off.
9. Mono-zone / Dual-zone
F Press this button to equalise the comfort value on the
passenger's side with that on
the driver's side (mono zone).
The indicator lamp in the button
comes on.
Air recirculation enables the passenger compartment
to be isolated from exterior odours and smoke.
Avoid prolonged operation in interior
air recirculation mode or driving for
long periods with the system off (risk of
condensation and deterioration of the
air quality).
Switching the system off
Comfort
Page 61 of 292

59
C3Picasso_en_Chap04_ouverture_ed01-2015
Remote control key
System which permits central unlocking or locking of the vehicle using the door lock or from a distance. It is also used to locate and start the vehicle, as
well as providing protection against theft.
Unfolding the key
F First press this button to unfold the key.
Unlocking the vehicle
F Press the open padlock to unlock the vehicle.
Unlocking using the key
F Turn the key to the left in the driver's door lock to unlock the vehicle.
Unlocking is confirmed by rapid flashing of
the direction indicators for approximately
two
seconds.
According to version, the door mirrors unfold
at
the same time.
Unlocking using the remote
control
Locking the vehicle
F Press the closed padlock to lock the vehicle.
Locking using the key
F Turn the key to the right in the driver's door lock to lock the vehicle completely.
Locking using the remote control
If one of the doors or the boot is still
open, the central locking does not take
place.
When the vehicle is locked, if it
is unlocked inadvertently, it will
automatically lock itself again after
thirty seconds unless a door or the boot
is open.
The folding and unfolding of the door
mirrors using the remote control can be
deactivated by a CITROËN dealer or a
qualified workshop.
Locking is confirmed by fixed lighting of
the direction indicators for approximately
two
seconds.
According to version, the door mirrors fold at
the same time.
4
Access
Page 62 of 292
60
C3Picasso_en_Chap04_ouverture_ed01-2015
Remote control problem
Following disconnection of the vehicle battery,
replacement of the remote control battery or in
the event of a remote control fault you can no
longer unlock, lock or locate your vehicle.
F
F
irst of all, use the key in the lock to unlock
or lock your vehicle.
F
T
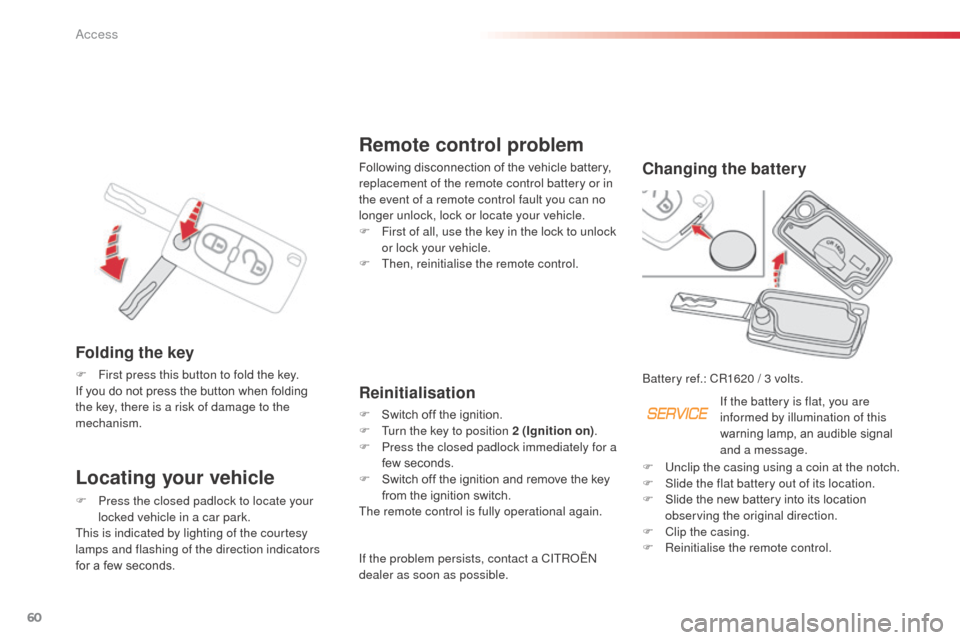
hen, reinitialise the remote control.Changing the battery
Battery ref.: CR1620 / 3 volts.Reinitialisation
F Switch off the ignition.
F T urn the key to position 2 (Ignition on) .
F
P
ress the closed padlock immediately for a
few seconds.
F
S
witch off the ignition and remove the key
from the ignition switch.
The remote control is fully operational again. If the battery is flat, you are
informed by illumination of this
warning lamp, an audible signal
and a message.
F
U
nclip the casing using a coin at the notch.
F
S
lide the flat battery out of its location.
F
S
lide the new battery into its location
observing the original direction.
F
C
lip the casing.
F
R
einitialise the remote control.
If the problem persists, contact a CITROËN
dealer as soon as possible.
Locating your vehicle
F Press the closed padlock to locate your
locked vehicle in a car park.
This is indicated by lighting of the courtesy
lamps and flashing of the direction indicators
for a few seconds.
Folding the key
F First press this button to fold the key.
If you do not press the button when folding
the key, there is a risk of damage to the
mechanism.
Access
Page 65 of 292
63
C3Picasso_en_Chap04_ouverture_ed01-2015
Reinitialisation
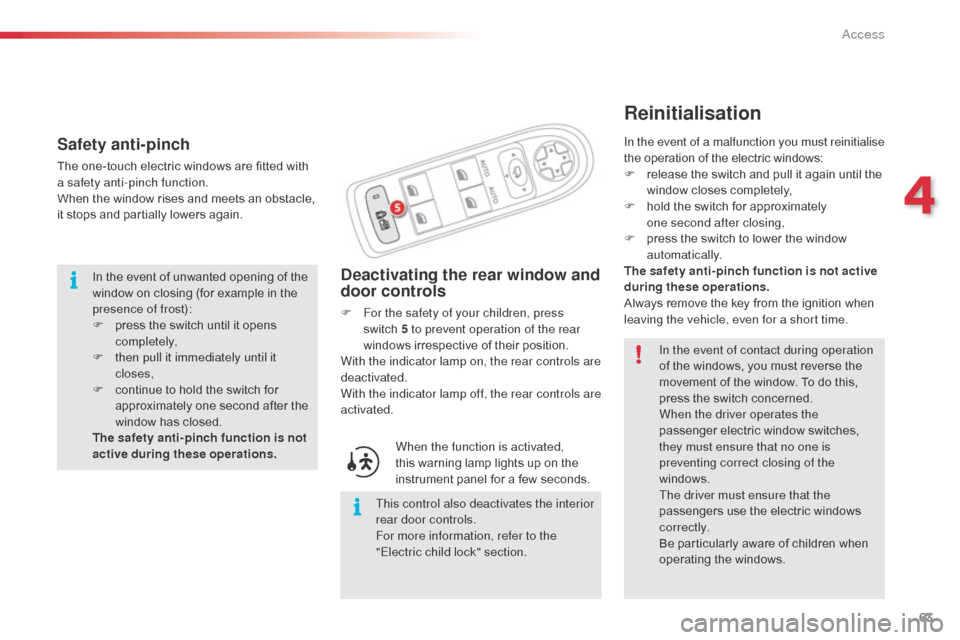
Deactivating the rear window and
door controls
F For the safety of your children, press switch 5 to prevent operation of the rear
windows irrespective of their position.
With the indicator lamp on, the rear controls are
deactivated.
With the indicator lamp off, the rear controls are
activated.
When the function is activated,
this warning lamp lights up on the
instrument panel for a few seconds.
This control also deactivates the interior
rear door controls.
For more information, refer to the
"Electric child lock" section. In the event of contact during operation
of the windows, you must reverse the
movement of the window. To do this,
press the switch concerned.
When the driver operates the
passenger electric window switches,
they must ensure that no one is
preventing correct closing of the
windows.
The driver must ensure that the
passengers use the electric windows
c o r r e c t l y.
Be particularly aware of children when
operating the windows.
Safety anti-pinch
The one-touch electric windows are fitted with
a safety anti-pinch function.
When the window rises and meets an obstacle,
it stops and partially lowers again.
In the event of unwanted opening of the
window on closing (for example in the
presence of frost):
F
p
ress the switch until it opens
completely,
F
t
hen pull it immediately until it
closes,
F
c
ontinue to hold the switch for
approximately one second after the
window has closed.
The safety anti-pinch function is not
active during these operations. In the event of a malfunction you must reinitialise
the operation of the electric windows:
F
r elease the switch and pull it again until the
window closes completely,
F
h
old the switch for approximately
one
second after closing,
F
p
ress the switch to lower the window
automatically.
The safety anti-pinch function is not active
during these operations.
Always remove the key from the ignition when
leaving the vehicle, even for a short time.
4
Access
Page 67 of 292

65
C3Picasso_en_Chap04_ouverture_ed01-2015
Manual central locking
control
System which provides full manual locking or
unlocking of the doors from the inside.
Automatic central locking
System which provides full automatic locking
or unlocking of the doors and the boot while
driving.
You can activate or deactivate this function.
Unlocking
F Above 6 mph (10 km/h), press button A to unlock the doors and the boot temporarily.
Unlocking
F Press button A again to unlock the vehicle.
The red indicator lamp on the button
switches
off.
Locking
When the speed exceeds 6 mph (10 km/h), the
doors and the boot lock automatically.
If the vehicle is locked from the outside,
the red indicator lamp flashes and
button A is inactive.
F
I
n this case, use the remote control
or the key to unlock the vehicle.
If one of the doors is open, central
locking from the inside does not take
place. If one of the doors is open, the
automatic central locking does not take
place.
If the boot is open, the automatic central
locking of the doors is active.
Locking
F Press button A to lock the vehicle.
The red indicator lamp on the button comes on.
Driving with the doors locked can make
access more difficult for the emergency
services in the event an emergency.
4
Access
Page 74 of 292

72
C3Picasso_en_Chap05_visibilite_ed01-2015
Lighting controlsSystem for selection and control of the various front and rear lamps providing the vehicle's lighting.
Main lighting
The various front and rear lamps of the vehicle
are designed to adapt the driver's visibility
progressively according to climatic conditions:
-
s
idelamps, to be seen,
-
d
ipped beam headlamps to see without
dazzling other drivers,
-
m
ain beam headlamps to see clearly when
the road is clear.
Additional lighting
Other lamps are installed to fulfil the
requirements of particular conditions of
visibility:
-
a r
ear foglamp to be seen from afar,
-
f
ront foglamps for even better for ward
vision.
Programming
Various automatic lighting control modes
are also available according to the following
options:
-
gu
ide-me-home lighting,
-
a
utomatic illumination of headlamps.
Model without AUTO lighting
Model with AUTO lighting
Automatic illumination of
headlamps.
Manual controls
Lighting off (ignition off) /Daytime running lamps (engine running).
Sidelamps.
B.
S
talk for switching headlamps: pull the stalk
towards you to switch the lighting between
dipped and main beam headlamps.
In the lamps off and sidelamps modes, the
driver can switch on the main beam headlamps
temporarily ("headlamp flash") by maintaining a
pull on the stalk. Dipped headlamps or main
beam headlamps.
Displays
Illumination of the corresponding indicator
lamp in the instrument panel confirms that the
lighting selected is on. The lighting is controlled directly by the driver
by means of the ring A and the stalk B
.
A.
M
ain lighting mode selection ring: turn it
to position the symbol required facing the
mark.
Visibility
Page 79 of 292

77
C3Picasso_en_Chap05_visibilite_ed01-2015
Cornering lighting
With dipped or main beams, this function
makes use of the beam from a front foglamp
to illuminate the inside of a bend, when the
vehicle speed is below 25 mph (approximately
40 km/h) (urban driving, winding road,
intersections, parking manouevres...).with cornering lighting
without cornering lightingSwitching on
This function starts:
- w hen the corresponding direction indicator
is switched on,
or
-
f
rom a certain angle of rotation of the
steering wheel.
Switching off
The system does not operate:
- b elow a certain angle of rotation of the
steering wheel,
-
a
bove 25 mph (40 km/h),
-
w
hen reverse gear is engaged.
5
Visibility