Citroen C3 PICASSO RHD 2011.5 1.G Owner's Manual
Manufacturer: CITROEN, Model Year: 2011.5, Model line: C3 PICASSO RHD, Model: Citroen C3 PICASSO RHD 2011.5 1.GPages: 244, PDF Size: 8.29 MB
Page 191 of 244
189
05
2 1
3
4
5
TRAFFIC INFORMATION
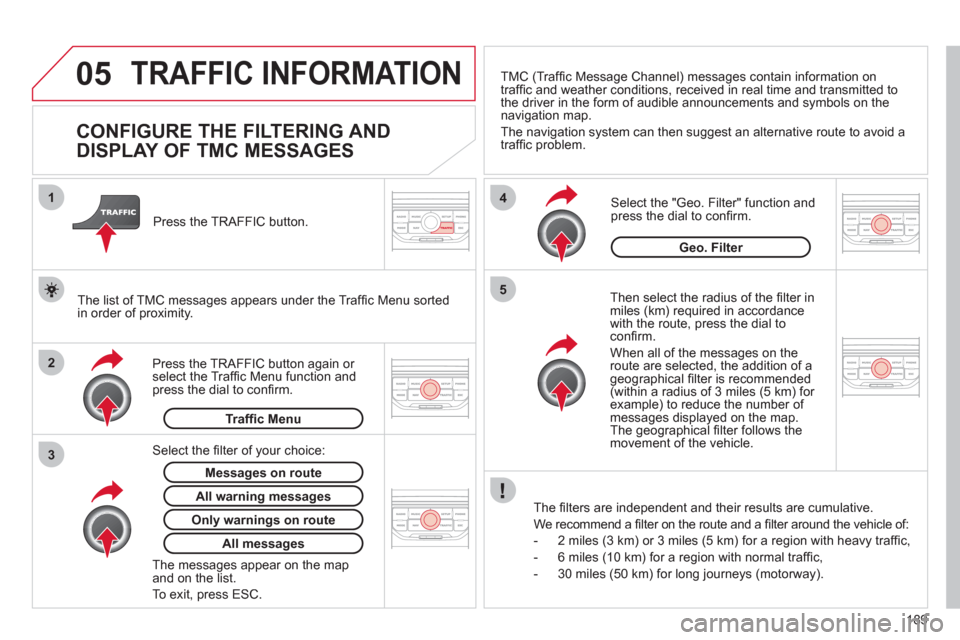
CONFIGURE THE FILTERING AND
DISPLAY OF TMC MESSAGES
Then select the radius of the fi lter in miles (km) required in accordance
with the route, press the dial to confi rm.
When all of the messa
ges on the route are selected, the addition of ageographical fi lter is recommended(within a radius of 3 miles (5 km) for example) to reduce the number of messages displayed on the map.The geographical fi lter follows the movement of the vehicle.
The
fi lters are independent and their results are cumulative.
W
e recommend a fi lter on the route and a fi lter around the vehicle of:
- 2 miles
(3 km) or 3 miles (5 km) for a region with heavy traffi c,
- 6 miles
(10 km) for a region with normal traffi c,
- 30 miles
(50 km) for long journeys (motorway).
Press the TRAFFI
C button again or select the Traffi c Menu function andpress the dial to confi rm. Press the TRAFFI
C button.
TM
C (Traffi c Message Channel) messages contain information on
traffi c and weather conditions, received in real time and transmitted to
the driver in the form of audible announcements and symbols on thenavigation map.
The navi
gation system can then suggest an alternative route to avoid a
traffi c problem.
Select the "Geo. Filter" function and press the dial to confi rm.
Messages on route
The list of TMC messages appears under the Traffi c Menu sorted
in order of proximity.
All warnin
g messages
Traffi c Menu
Select the fi lter of
your choice:
Onl
y warnings on route
All messages
The messages appear on the map and on the list.
To exit, press E
SC.
Geo. Filter
Page 192 of 244
190
05
2 1
3
2 1
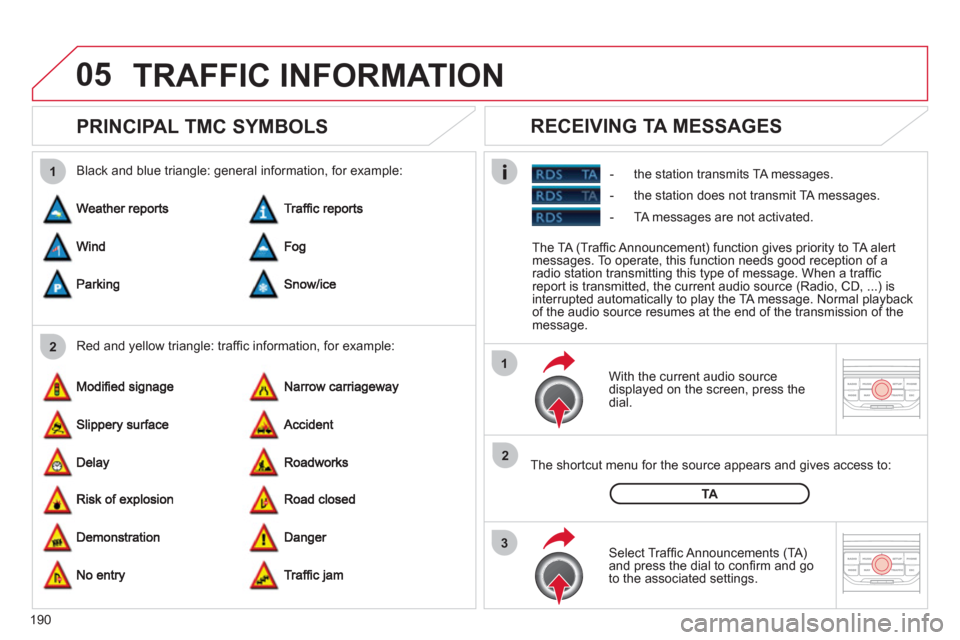
PRINCIPAL TMC SYMBOLS
With the current audio source
displayed on the screen, press the
dial.
The shortcut menu
for the source appears and gives access to:
Select Traffi c Announcements
(TA)and press the dial to confi rm and go
to the associated settings.
TA
- the station transmits TA messages.
RECEIVING TA MESSAGES
Red and yellow triangle: traffi c information, for example: Black and blue triangle: general in
formation, for example:
TRAFFIC INFORMATION
The TA (Traffi c Announcement) function gives priority to TA alert messages. To operate, this function needs good reception of a
radio station transmitting this type of message. When a traffi c
report is transmitted, the current audio source (Radio, CD, ...) is
interrupted automatically to play the TA message. Normal playbackof the audio source resumes at the end of the transmission of themessage.
- the station does not transmit TA messa
ges.
-
TA messages are not activated.
Page 193 of 244
191
06
3 2 1 1
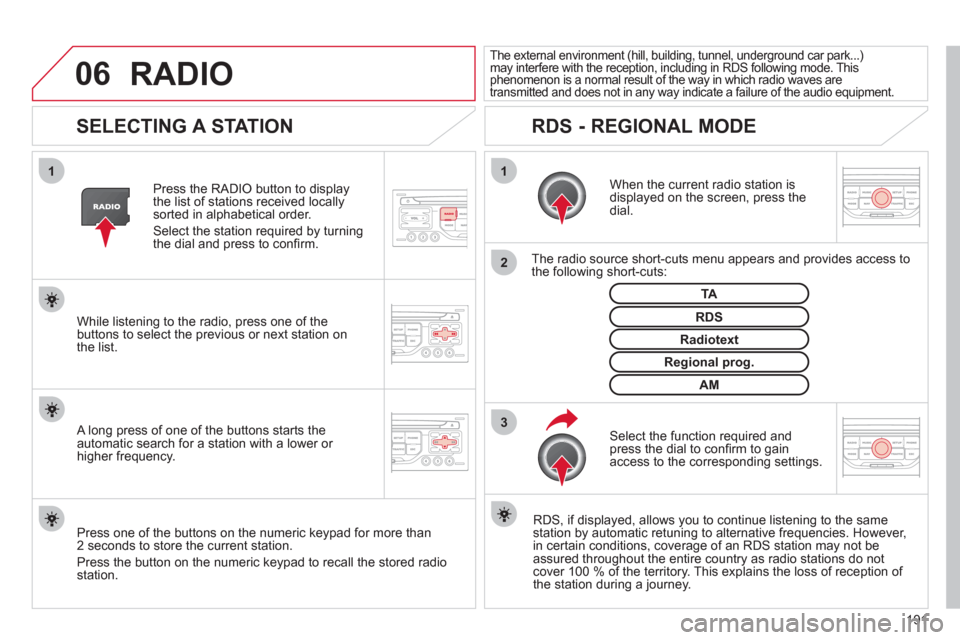
SELECTING A STATION
When the current radio station isdisplayed on the screen, press thedial.
The radio source short-cuts menu appears and provides access to
the following short-cuts:
Select the function re
quired and press the dial to confi rm to gain
access to the corresponding settings.
TA
RDS, if displayed, allows you to continue listening to the same station by automatic retuning to alternative frequencies. However,
in certain conditions, coverage of an RDS station may not be
assured throughout the entire country as radio stations do notcover 100 % of the territory. This explains the loss of reception of
the station during a journey.
The external environment (hill, building, tunnel, underground car park...)may interfere with the reception, including in RDS following mode. Thisphenomenon is a normal result of the way in which radio waves are
transmitted and does not in any way indicate a failure of the audio equipment.
RDS - REGIONAL MODE
Press the RADIO button to display
the list of stations received locally sorted in alphabetical order.
Select the station required by turningthe dial and press to confi rm.
Re
gional prog.
Radiotext
RDSWhile listening to the radio, press one of the
buttons to select the previous or next station on
the list.
Press one o
f the buttons on the numeric keypad for more than
2 seconds to store the current station.
Press the button on the numeric keypad to recall the stored radio
station.
AM
A long press of one of the buttons starts theautomatic search for a station with a lower or
higher frequency.
RADIO
Page 194 of 244
192
07MUSIC MEDIA PLAYERS
CD, MP3/WMA CD
INFORMATION AND ADVICE
In order to be able to play a recorded CDR or CDRW, when recording it is preferable to select the ISO 9660 level 1, 2 or Jolietstandard.
I
f the disc is recorded in another format it may not be playedcorrectly.
It is recommended that the same recordin
g standard is alwaysused for an individual disc, with as low a speed as possible(4x maximum) for optimum sound quality.
In the particular case o
f a multi-session CD, the Joliet standard is recommended.
The M
yWay will only play audio fi les with the extension ".mp3"
with a speed of between 8 Kbps and 320 Kbps and the extension
".wma" with a speed of between 5 Kbps and 384 Kbps.
It also supports the VBR
(Variable Bit Rate) mode.
No other t
ype of fi le (.mp4, .m3u...) can be played. The MP3
format, an abbreviation of MPEG 1, 2 & 2.5 Audio Layer 3 and the WMA format, an abbreviation of Windows Media Audio and
the property of Microsoft, are audio compression standards which permit the recording of several tens of music fi les on a single disc.
It is advisable to restrict fi le names to 20 characters
, without
using special characters (e.g.: " ? ; ù) to avoid any play or display
problems.
Page 195 of 244
193
07
3 2 1
6
4
5
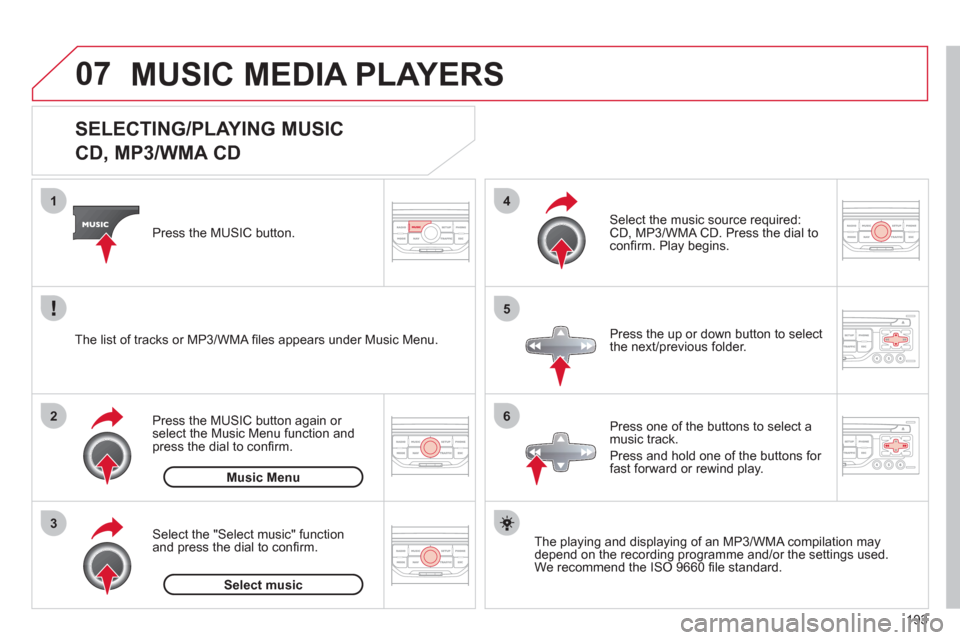
SELECTING/PLAYING MUSIC
CD, MP3/WMA CD
The playing and displaying of an MP3/WMA compilation may
depend on the recording programme and/or the settings used.
We recommend the ISO 9660 fi le standard.
Press the M
USIC button.
Select the "Select music" function
and press the dial to confi rm.
Press the up or down button to select
the next
/previous folder.
Select the music source required:
CD, MP3/WMA CD. Press the dial to
confi rm. Play begins.
Select music Press the MUSIC button a
gain or select the Music Menu function and press the dial to confi rm.
Pr
ess one of the buttons to select amusic track.
Pr
ess and hold one of the buttons for
fast forward or rewind play. Music Menu The list of tracks or MP3/WMA fi les a
ppears under Music Menu.
MUSIC MEDIA PLAYERS
Page 196 of 244
194
07
43 1
2
MUSIC MEDIA PLAYERS
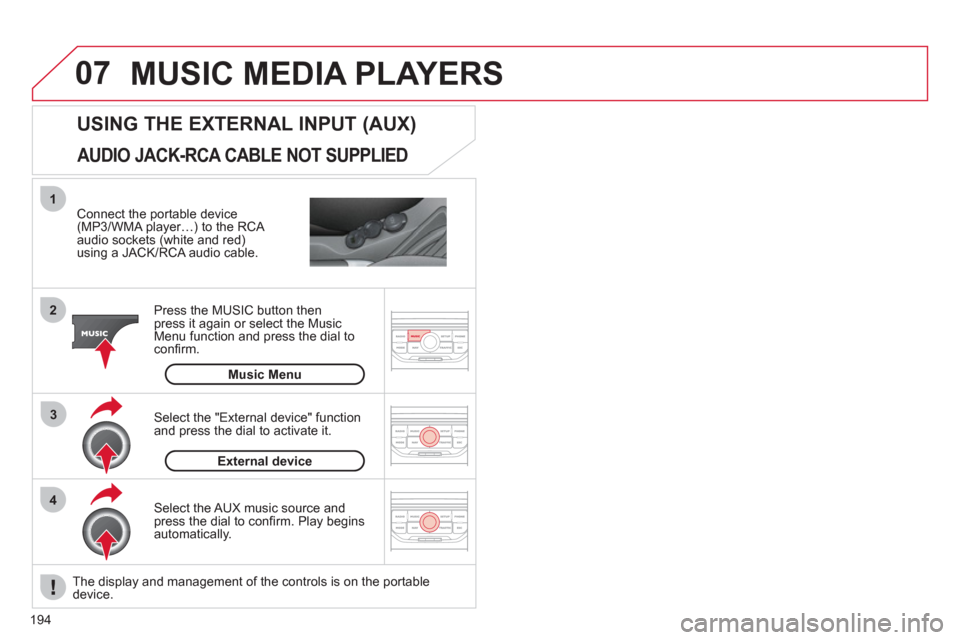
Connect the portable device(MP3/WMA player…) to the RCA
audio sockets (white and red)using a JACK/RCA audio cable.
Press the M
USIC button then
press it again or select the Music Menu function and press the dial to confi rm.
Select the AUX music source and
press the dial to confi rm. Play beginsautomatically.
Select the "External device" functionand press the dial to activate it.
External device
USING THE EXTERNAL INPUT (AUX)
Music Menu
AUDIO JACK-RCA CABLE NOT SUPPLIED
The display and management of the controls is on the portable device.
Page 197 of 244

195
08
1
2
3
4
BLUETOOTH TELEPHONE
*
The services available depend on the network, the SIM card and thecompatibility of the Bluetooth telephone used. Check the telephone
manual and with your network provider for details of the servicesavailable to you.
PAIRING A TELEPHONE
FIRST CONNECTION
For reasons of safety and because they require prolonged attentionon the part of the driver, the operations for pairing the Bluetooth mobile telephone to the hands-free system of the MyWay must be carried out with the vehicle stationary. The ignition must be on.
Activate the telephone's Bluetooth
function
and ensure that it is "visible to all" (refer to the
telephone instructions). Enter the authentication code on the tele
phone.
The code to be entered is displayed on the screen
of the system.
Some telephones offer automatic reconnection o
f
the telephone every time the ignition is switched on.
A messa
ge confi rms the pairing.
To change the telephone connected, press the PHONE button, then select Phone Menu and press the dial toconfi rm.
Once the telephone has been connected, MyWay can synchronise
the address book and the call list. This synchronisation may take a few minutes * . Pairin
g can also be started from the telephone (refer to the
telephone instructions). Visit www.citroen.co.uk
for more information (compatibility, more
help, ...).
Press the PH
ONE button.
For a
fi rst connection, select"Search phone" and press the dial to confi rm. Then select the name of thetelephone.
Search
phone
Page 198 of 244

196
08
1
2
2
1
*
The services available depend on the network, the SIM card and the compatibility of the Bluetooth telephone used. Check the telephone manual and with your network provider for details of the services
available to you.
BLUETOOTH TELEPHONE
CONNECTING A TELEPHONE
For reasons of safety and because they require prolonged attention
on the part of the driver, the operations for pairing the Bluetooth
mobile telephone to the hands-free system of the MyWay must becarried out with the vehicle stationary. The ignition must be on.
Activate the tele
phone's Bluetooth function and ensure that it is "visible to all" (refer to the
telephone instructions).
The last telephone connected is reconnected automatically.
A messa
ge confi rms the connection. When a telephone is alread
yconnected, to change it press the
PHONE button, then select PhoneMenu and press the dial to confi rm.
Once the telephone has been connected, MyWay can synchronise
the address book and the call list. This synchronisation may take afew minutes * .
The list o
f telephones connected previously (4 maximum) appearson the multifunction screen. Select the telephone required for a new connection. Visit www.citroen.co.uk
for more information (compatibility, more
help, ...).
Press the PH
ONE button.Select "Connect
phone". Select the
telephone and press to confi rm.
Connect
phone
Page 199 of 244

197
08
1
3 2
2 1Select the "Yes" tab to accept or "No"
to refuse and confi rm by pressing
the dial.
RECEIVING A CALL
MAKING A CALL
An incoming call is announced by a ring and a superimposed
display on the multifunction screen.
Yes
To han
g up, press the PHONE button
or press the dial and select "End call"then confi rm by pressing the dial.
End callPress the PH
ONE button.
Select "Dial number"
, then dial the
telephone number using the virtualkeypad.
Select the Phone Menu function and
press the dial to confi rm.
The list of the last 2
0 calls made and received in the vehicle
appears under Phone Menu. You can select a number and press
the dial to make the call.
No
It is also possible to select a number from the address book. Youcan select "Dial from address book". The MyWay can record up to
1 000 entries (telephone numbers).
Press the end o
f the steering mounted control for more than twoseconds to gain access to the address book.
Phone Menu
Dial number
It is possible to make a call directl
y from the telephone; park the
vehicle as a safety measure.
BLUETOOTH TELEPHONE
Press the end of the steering mounted control to
accept the call or end the call in progress.To delete a number, press the PHONE button then press and hold
on a call number to display a list of actions including:Delete entryDelete list
Page 200 of 244
198
09
4 3 2 1
65
CONFIGURATION
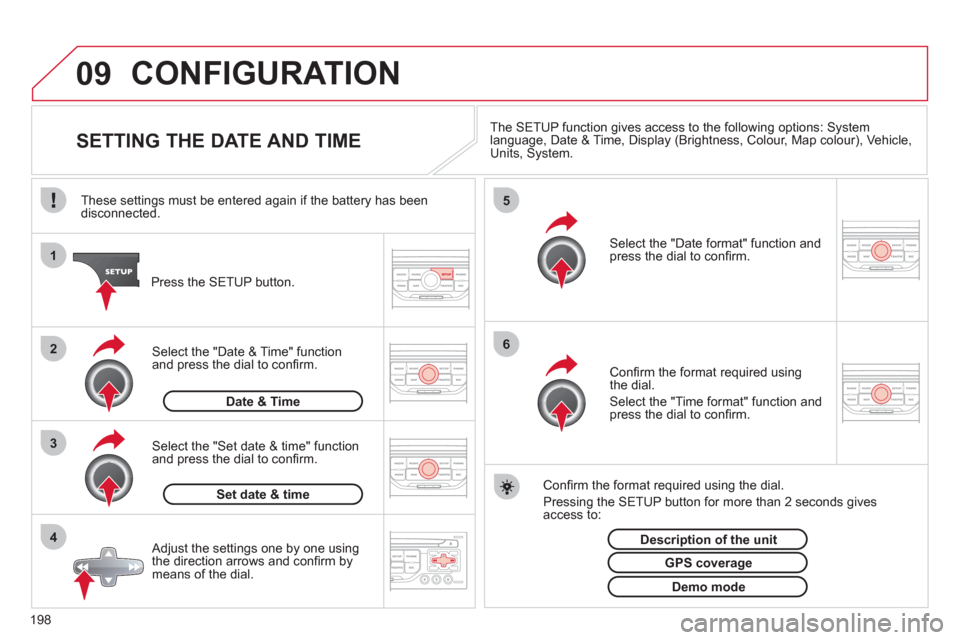
SETTING THE DATE AND TIME The SETUP function gives access to the following options: Systemlanguage, Date & Time, Display (Brightness, Colour, Map colour), Vehicle,Units, System.
Adjust the settings one by one usingthe direction arrows and confi rm bymeans of the dial.
Select the "Date format" function andpress the dial to confi rm.
Select the "Set date
& time" function
and press the dial to confi rm.
Confi rm the format required using the dial.
Pressing the
SETUP button for more than 2 seconds gives access to: These settin
gs must be entered again if the battery has been disconnected.
Pr
ess the SETUP button.
Confi rm the format required usingthe dial.
Select the "Time format" function and press the dial to confi rm.
Set date & tim
e
Select the "Date & Time" function
and press the dial to confi rm.
Demo mode
GPS coverage
Description of the unit
Date & Time