tow Citroen C3 RHD 2017 2.G Owner's Guide
[x] Cancel search | Manufacturer: CITROEN, Model Year: 2017, Model line: C3 RHD, Model: Citroen C3 RHD 2017 2.GPages: 442, PDF Size: 9.75 MB
Page 193 of 442

191
TOTAL & CITROËN
Partners in performance and
protecting the environment
Innovation in the search for
performance
For over 40 years, the TOTAL Research and
Development departments have developed lubricants
for CITROËN, to match the latest technical innovations
on CITROËN vehicles, both for competition and for
everyday motoring.
For you, this is an assurance that you will obtain the
best per formance from your engine.
Optimum protection for
your engine
By having your CITROËN vehicle
serviced with TOTAL lubricants, you are
contributing towards improving the life
and per formance of your engine, while
also protecting the environment.
7
Practical information
Page 194 of 442
192
Fuel tank
Capacity of the tank:
- Pe trol: approximately 45 litres.
-
D
iesel: approximately 42 or 50 litres (depending on version).
Low fuel level Refuelling
When the low fuel level is reached,
this warning lamp in the instrument
panel comes on, accompanied by
an audible warning, a message and
the last bar of the fuel gauge flashes
in red.
To refuel in complete safety:
F
Y
ou must switch off the engine.
F
O
pen the filler flap.
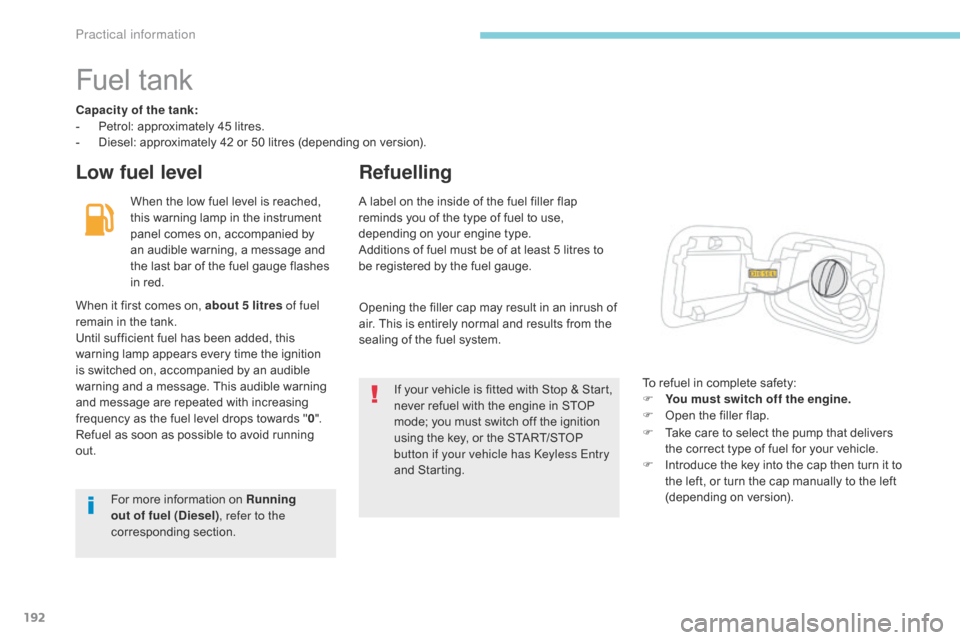
A label on the inside of the fuel filler flap
reminds you of the type of fuel to use,
depending on your engine type.
Additions of fuel must be of at least 5 litres to
be registered by the fuel gauge.
When it first comes on, about 5 litres of fuel
remain in the tank.
Until sufficient fuel has been added, this
warning lamp appears every time the ignition
is switched on, accompanied by an audible
warning and a message. This audible warning
and message are repeated with increasing
frequency as the fuel level drops towards " 0".
Refuel as soon as possible to avoid running
out. Opening the filler cap may result in an inrush of
air. This is entirely normal and results from the
sealing of the fuel system.
If your vehicle is fitted with Stop & Start,
never refuel with the engine in STOP
mode; you must switch off the ignition
using the key, or the START/STOP
button if your vehicle has Keyless Entry
and Starting.
For more information on Running
out of fuel (Diesel) , refer to the
corresponding section. F
T
ake care to select the pump that delivers
the correct type of fuel for your vehicle.
F
I
ntroduce the key into the cap then turn it to
the left, or turn the cap manually to the left
(depending on version).
Practical information
Page 199 of 442
197
You must observe the maximum trailer
weight, indicated on the registration
certificate or in the technical
specification for your vehicle.
Towing a trailer
We recommend the use of genuine
CITROËN towbars and their harnesses
that have been tested and approved
from the design stage of your vehicle,
and that the fitting of the towbar is
entrusted to a CITROËN dealer or a
qualified workshop.
If the towbar is not fitted by a
CITROËN dealer, it must still be
fitted in accordance with the vehicle
manufacturer's instructions.
Your vehicle is primarily designed for
transporting people and luggage, but it may
also be used for towing a trailer.
Driving with a trailer places greater
demands on the towing vehicle and the
driver must take particular care.
For more information on Driving
advice
, particularly when towing, refer
to the corresponding section.
For more information on Weights (and
the towed loads which apply to your
vehicle) refer to the corresponding
section.
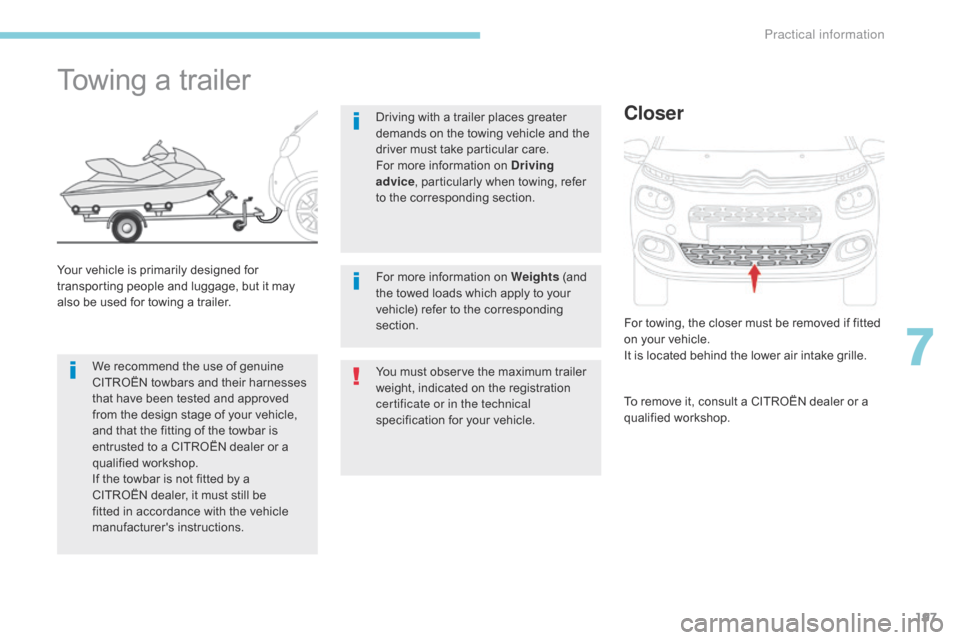
Closer
For towing, the closer must be removed if fitted
on your vehicle.
It is located behind the lower air intake grille.
To remove it, consult a CITROËN dealer or a
qualified workshop.
7
Practical information
Page 203 of 442
201
Bonnet
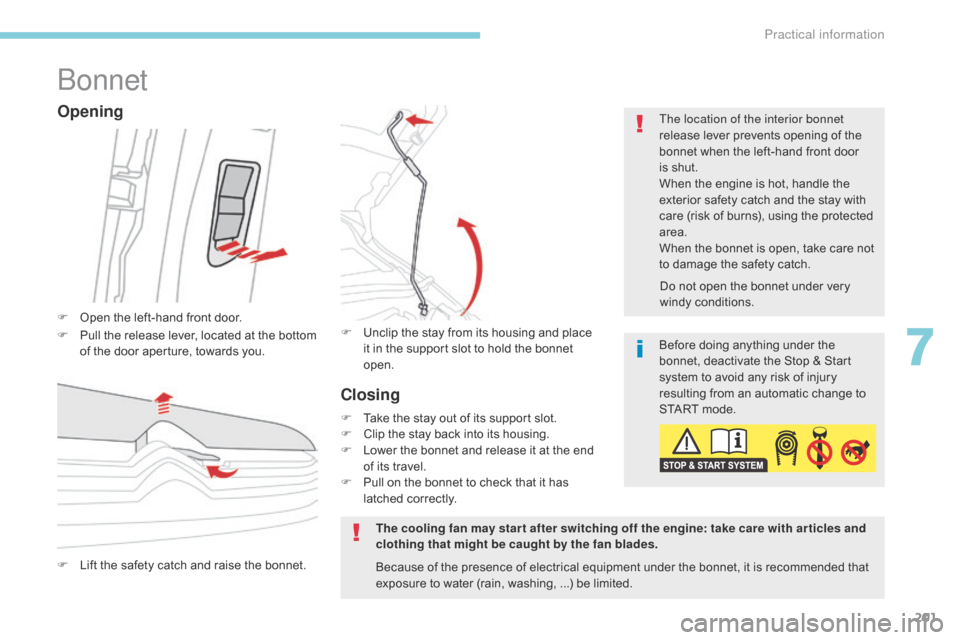
F Open the left-hand front door.The location of the interior bonnet
release lever prevents opening of the
bonnet when the left-hand front door
is shut.
When the engine is hot, handle the
exterior safety catch and the stay with
care (risk of burns), using the protected
area.
When the bonnet is open, take care not
to damage the safety catch.
F
L
ift the safety catch and raise the bonnet. F
U nclip the stay from its housing and place
it in the support slot to hold the bonnet
open.
Opening
F Pull the release lever, located at the bottom of the door aperture, towards you.
The cooling fan may star t after switching off the engine: take care with ar ticles and
clothing that might be caught by the fan blades.Do not open the bonnet under very
windy conditions.
Closing
F Take the stay out of its support slot.
F
C lip the stay back into its housing.
F
L
ower the bonnet and release it at the end
of its travel.
F
P
ull on the bonnet to check that it has
latched correctly.
Because of the presence of electrical equipment under the bonnet, it is recommended that
exposure to water (rain, washing,
...) be limited.Before doing anything under the
bonnet, deactivate the Stop & Start
system to avoid any risk of injury
resulting from an automatic change to
START mode.
7
Practical information
Page 211 of 442
209
Brake wear depends on the style
of driving, particularly in the case
of vehicles used in town, over short
distances. It may be necessary to
Brake pads
For information on checking brake
disc wear, contact a CITROËN dealer
or a qualified workshop.
Brake disc wearOnly use products recommended by
CITROËN or products of equivalent
quality and specification.
In order to optimise the operation of
units as important as those in the
braking system, CITROËN selects and
offers very specific products.
After washing the vehicle, dampness,
or in wintry conditions, ice can form
on the brake discs and pads: braking
efficiency may be reduced. Make light
brake applications to dry and defrost
the brakes.Manual gearbox
The gearbox does not require any
maintenance (no oil change).
Refer to the manufacturer's service
schedule for the checking interval for
this component.
Automatic gearbox
The gearbox does not require any
maintenance (no oil change).
Refer to the manufacturer's service
schedule for the checking interval for
this component.
Parking brake
If excessive travel or a loss of
effectiveness of this system is
noticed, the parking brake must be
checked, even between two services.
Checking this system must be done by a
CITROËN dealer or a qualified workshop.
have the condition of the brakes checked, even
between vehicle services.
Unless there is a leak in the circuit, a drop in
the brake fluid level indicates that the brake
pads are worn.
7
Practical information
Page 219 of 442
217
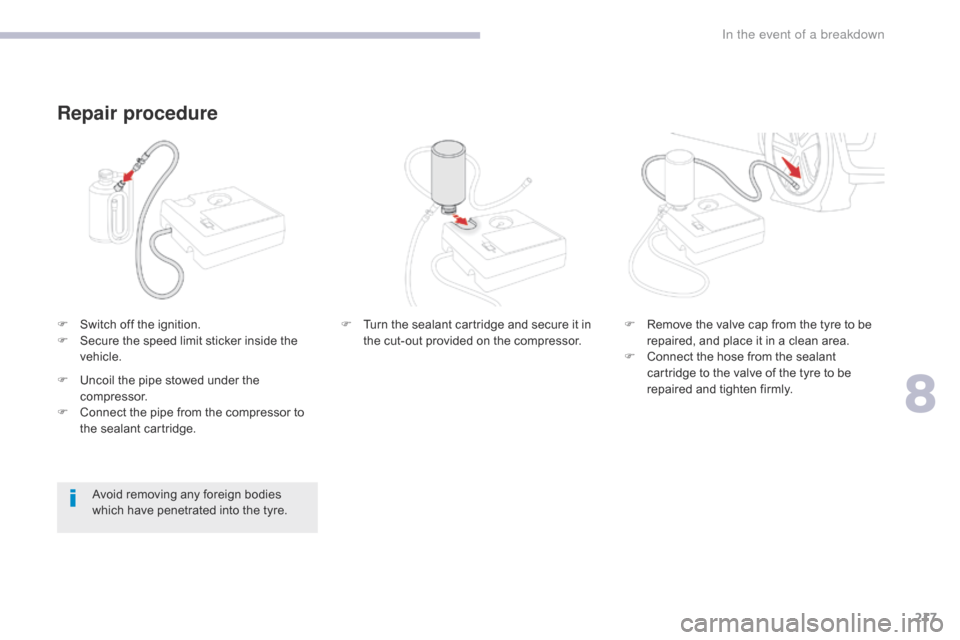
F Switch off the ignition.
F S ecure the speed limit sticker inside the
vehicle.
Repair procedure
Avoid removing any foreign bodies
which have penetrated into the tyre. F
T
urn the sealant cartridge and secure it in
the cut-out provided on the compressor. F
R
emove the valve cap from the tyre to be
repaired, and place it in a clean area.
F
C
onnect the hose from the sealant
cartridge to the valve of the tyre to be
repaired and tighten firmly.
F
U
ncoil the pipe stowed under the
compressor.
F
C
onnect the pipe from the compressor to
the sealant cartridge.
8
In the event of a breakdown
Page 220 of 442
218
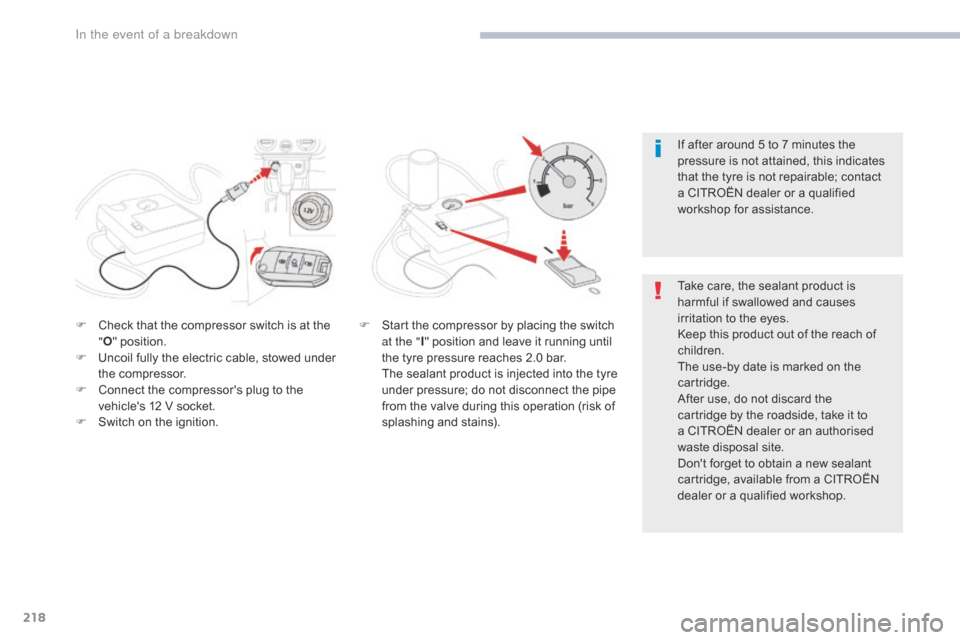
F Check that the compressor switch is at the "O " position.
F
U
ncoil fully the electric cable, stowed under
the compressor.
F
C
onnect the compressor's plug to the
vehicle's 12 V socket.
F
S
witch on the ignition. If after around 5 to 7 minutes the
pressure is not attained, this indicates
that the tyre is not repairable; contact
a CITROËN dealer or a qualified
workshop for assistance.
F S tart the compressor by placing the switch
at the " I" position and leave it running until
the tyre pressure reaches 2.0 bar.
T
he sealant product is injected into the tyre
under pressure; do not disconnect the pipe
from the valve during this operation (risk of
splashing and stains). Take care, the sealant product is
harmful if swallowed and causes
irritation to the eyes.
Keep this product out of the reach of
children.
The use-by date is marked on the
cartridge.
After use, do not discard the
cartridge by the roadside, take it to
a CITROËN
dealer or an authorised
waste disposal site.
Don't forget to obtain a new sealant
cartridge, available from a CITROËN
dealer or a qualified workshop.
In the event of a breakdown
Page 221 of 442
219
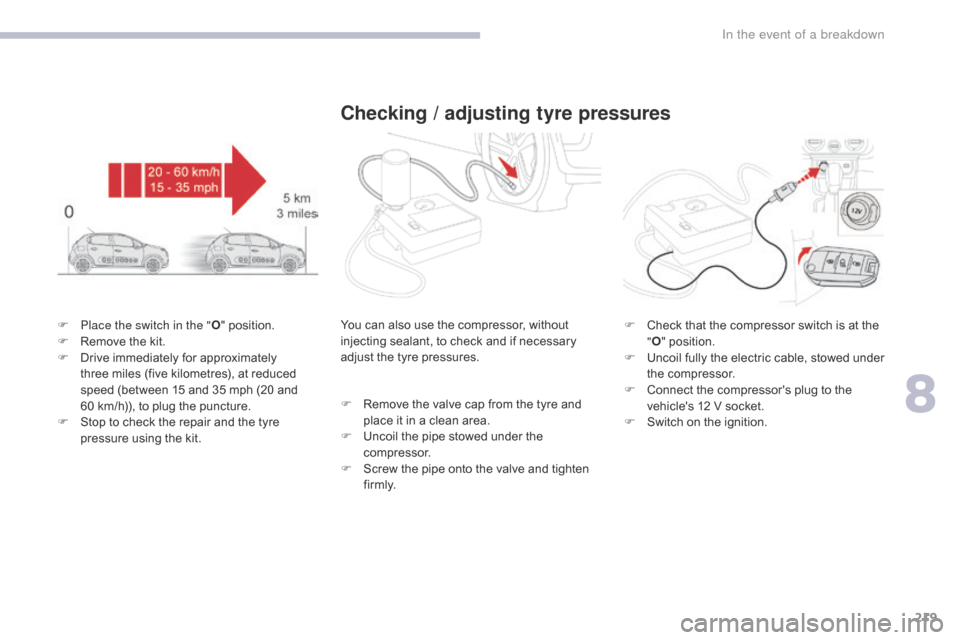
F Place the switch in the "O" position.
F R emove the kit.
F
D
rive immediately for approximately
three miles (five kilometres), at reduced
speed (between 15 and 35 mph (20 and
60
km/h)), to plug the puncture.
F
S
top to check the repair and the tyre
pressure using the kit.
Checking / adjusting tyre pressures
You can also use the compressor, without
injecting sealant, to check and if necessary
adjust the tyre pressures.
F
R
emove the valve cap from the tyre and
place it in a clean area.
F
U
ncoil the pipe stowed under the
compressor.
F
S
crew the pipe onto the valve and tighten
f i r m l y. F
C heck that the compressor switch is at the
" O " position.
F
U
ncoil fully the electric cable, stowed under
the compressor.
F
C
onnect the compressor's plug to the
vehicle's 12 V socket.
F
S
witch on the ignition.
8
In the event of a breakdown
Page 222 of 442
220
Should the pressure of one or more
tyres be adjusted, it is necessary to
reinitialise the under-inflation detection
system.
For more information on Under-
inflation detection, refer to the
corresponding section.
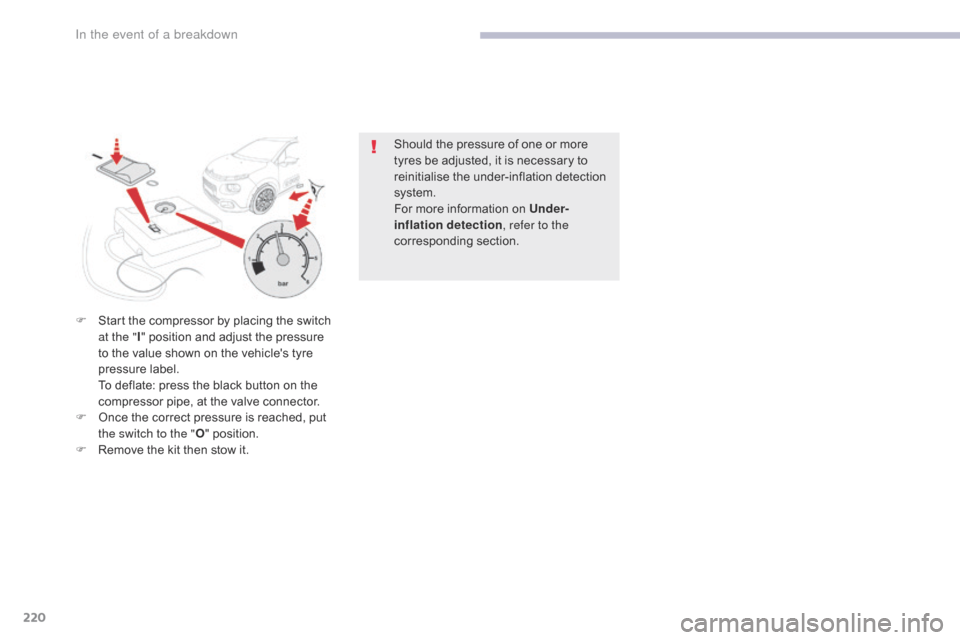
F
S
tart the compressor by placing the switch
at the " I" position and adjust the pressure
to the value shown on the vehicle's tyre
pressure label.
T
o deflate: press the black button on the
compressor pipe, at the valve connector.
F
O
nce the correct pressure is reached, put
the switch to the " O" position.
F
R
emove the kit then stow it.
In the event of a breakdown
Page 223 of 442
221
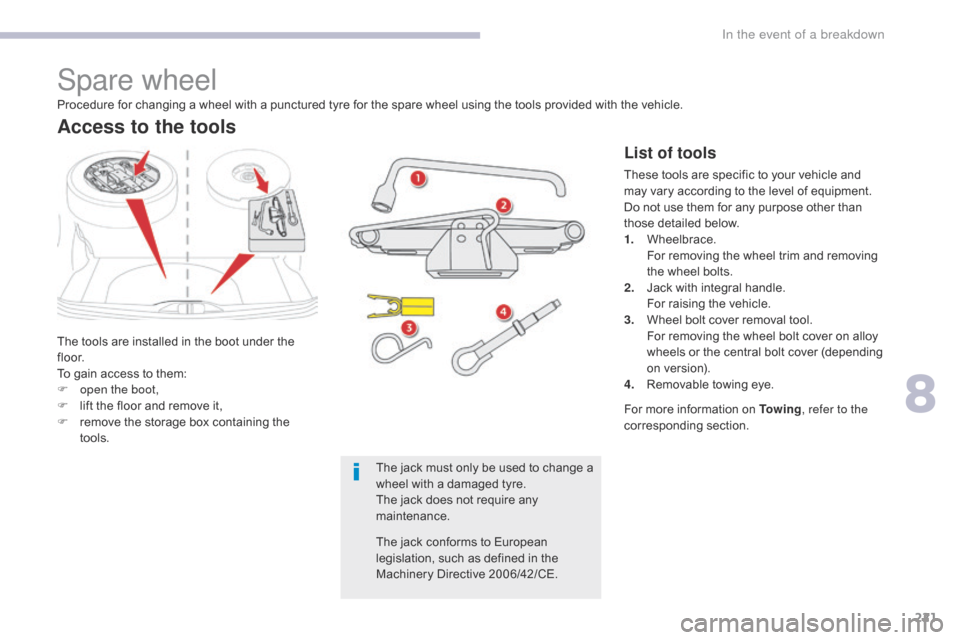
Spare wheel
The tools are installed in the boot under the
f l o o r.
To gain access to them:
F
o
pen the boot,
F
l
ift the floor and remove it,
F
r
emove the storage box containing the
tools.
Access to the tools
List of tools
These tools are specific to your vehicle and
may vary according to the level of equipment.
Do not use them for any purpose other than
those detailed below.
1.
W
heelbrace.
F
or removing the wheel trim and removing
the wheel bolts.
2.
J
ack with integral handle.
F
or raising the vehicle.
3.
W
heel bolt cover removal tool.
F
or removing the wheel bolt cover on alloy
wheels or the central bolt cover (depending
on version).
4.
R
emovable towing eye.
Procedure for changing a wheel with a punctured tyre for the spare wheel using the tools provided with the vehicle.
For more information on To w i n g, refer to the
corresponding section.
The jack must only be used to change a
wheel with a damaged tyre.
The jack does not require any
maintenance.
The jack conforms to European
legislation, such as defined in the
Machinery Directive 2006/42/CE.
8
In the event of a breakdown