check oil Citroen C4 2005 2.G User Guide
[x] Cancel search | Manufacturer: CITROEN, Model Year: 2005, Model line: C4, Model: Citroen C4 2005 2.GPages: 462, PDF Size: 10.48 MB
Page 203 of 462
![Citroen C4 2005 2.G User Guide Downloaded from www.Manualslib.com manuals search engine 197
ENGINE
CHECKING THE VALVE TIMING
Engine: NFU
Tools.
[1]Flywheel setting peg: 4507-T.A Toolkit 4507-T
[2a]Camshaft setting peg: 4533-TA.C1
[ Citroen C4 2005 2.G User Guide Downloaded from www.Manualslib.com manuals search engine 197
ENGINE
CHECKING THE VALVE TIMING
Engine: NFU
Tools.
[1]Flywheel setting peg: 4507-T.A Toolkit 4507-T
[2a]Camshaft setting peg: 4533-TA.C1
[](/img/9/4138/w960_4138-202.png)
Downloaded from www.Manualslib.com manuals search engine 197
ENGINE
CHECKING THE VALVE TIMING
Engine: NFU
Tools.
[1]Flywheel setting peg: 4507-T.A Toolkit 4507-T
[2a]Camshaft setting peg: 4533-TA.C1
[3b]Camshaft setting peg: 4533-TA.C2
IMPERATIVE: Respect the safety and cleanliness requirements.
Checking.
Disconnect the negative terminal of the battery.
Remove:
- The oil filter (1).
- Suspend the engine.
Remove:
- The engine support (2)and the upper timing cover (3).
B1BP2M7C
B1BP381C
C4
Angl.-t2-page135-239-2005 9/01/06 10:14 Page 197
Page 205 of 462
![Citroen C4 2005 2.G User Guide Downloaded from www.Manualslib.com manuals search engine 199
ENGINE
CHECKING AND SETTING THE VALVE TIMING
Engine: NFU
Tools.
[1]Flywheel setting peg: 4507-T.A Toolkit 4507-T
[2a]Camshaft setting peg: Citroen C4 2005 2.G User Guide Downloaded from www.Manualslib.com manuals search engine 199
ENGINE
CHECKING AND SETTING THE VALVE TIMING
Engine: NFU
Tools.
[1]Flywheel setting peg: 4507-T.A Toolkit 4507-T
[2a]Camshaft setting peg:](/img/9/4138/w960_4138-204.png)
Downloaded from www.Manualslib.com manuals search engine 199
ENGINE
CHECKING AND SETTING THE VALVE TIMING
Engine: NFU
Tools.
[1]Flywheel setting peg: 4507-T.A Toolkit 4507-T
[2a]Camshaft setting peg: 4533-TA.C1
[2b]Camshaft setting peg: 4533-TA.C2
[3]Belt retaining pin: 4533-T.AD
[4]Dynamic tensioner roller pin: 4200-T.H
IMPERATIVE: Respect the safety and cleanliness requirements.
Removing.
Raise and support the vehicle, front wheels hanging
Disconnect the battery.
Remove:
- The auxiliaries drive belt (4)
(see corresponding operation).
- The crankshaft pulley (3).
- The oil filter.
Suspend the engine, using a workshop hoist.
Remove the timing cover, the engine support (1), the intermediate support and the timing cover (2).
B1BP382C
C4
Angl.-t2-page135-239-2005 9/01/06 10:14 Page 199
Page 248 of 462
![Citroen C4 2005 2.G User Guide Downloaded from www.Manualslib.com manuals search engine 242
ENGINECHECKING THE VALVE TIMING
Engines: 9HX - 9HY - 9HZ
Checking the timing (continued).
Peg the camshaft at «c», using tool [2]
(oil t Citroen C4 2005 2.G User Guide Downloaded from www.Manualslib.com manuals search engine 242
ENGINECHECKING THE VALVE TIMING
Engines: 9HX - 9HY - 9HZ
Checking the timing (continued).
Peg the camshaft at «c», using tool [2]
(oil t](/img/9/4138/w960_4138-247.png)
Downloaded from www.Manualslib.com manuals search engine 242
ENGINECHECKING THE VALVE TIMING
Engines: 9HX - 9HY - 9HZ
Checking the timing (continued).
Peg the camshaft at «c», using tool [2]
(oil the pegs).
WARNING: The magnetic track should not show any sign of damage and should not be
approached by any other magnetic source.
Peg the crankshaft at «d», using tool [3].
ESSENTIAL: Should it not be possible to peg the camshaft, check that the offset between
the camshaft pinion hole and the pegging hole is not more than 1 mm. If it is more, repeat
the operation to position the timing belt
(see corresponding operation).
Note : The index «e»of the dynamic tensioner roller should be centred in the interval «f».
Check the correct positioning of the index «e».
If it is not correct, repeat the operation to tension the timing belt
(see corresponding operation).
Remove tools [2]and [3].
Refitting.
Peg the flywheel at «b», using tool [1].
Remove the screw (8).
Refit the upper timing cover (11), lower timing cover (10), the accessories drive pulley (9), the screw (8).
Tightening method for the screw (8):
- Pre-tighten to 3 ± 0,3 m.daN.- Angular tighten: 180° ± 5°.
Remove the tool [1]and complete the refitting.
IMPERATIVE: Carry out the operations that are necessary following a reconnection of the battery
(see corresponding operation).
B1EP1HKC
B1EP1E5C
C4
Angl.-t2-page240-282-2005 9/01/06 10:16 Page 242
Page 250 of 462
Downloaded from www.Manualslib.com manuals search engine 244
ENGINECHECKING AND SETTING THE VALVE TIMING
Engines: 9HX - 9HY - 9HZ
Checking and setting the timing (continued).
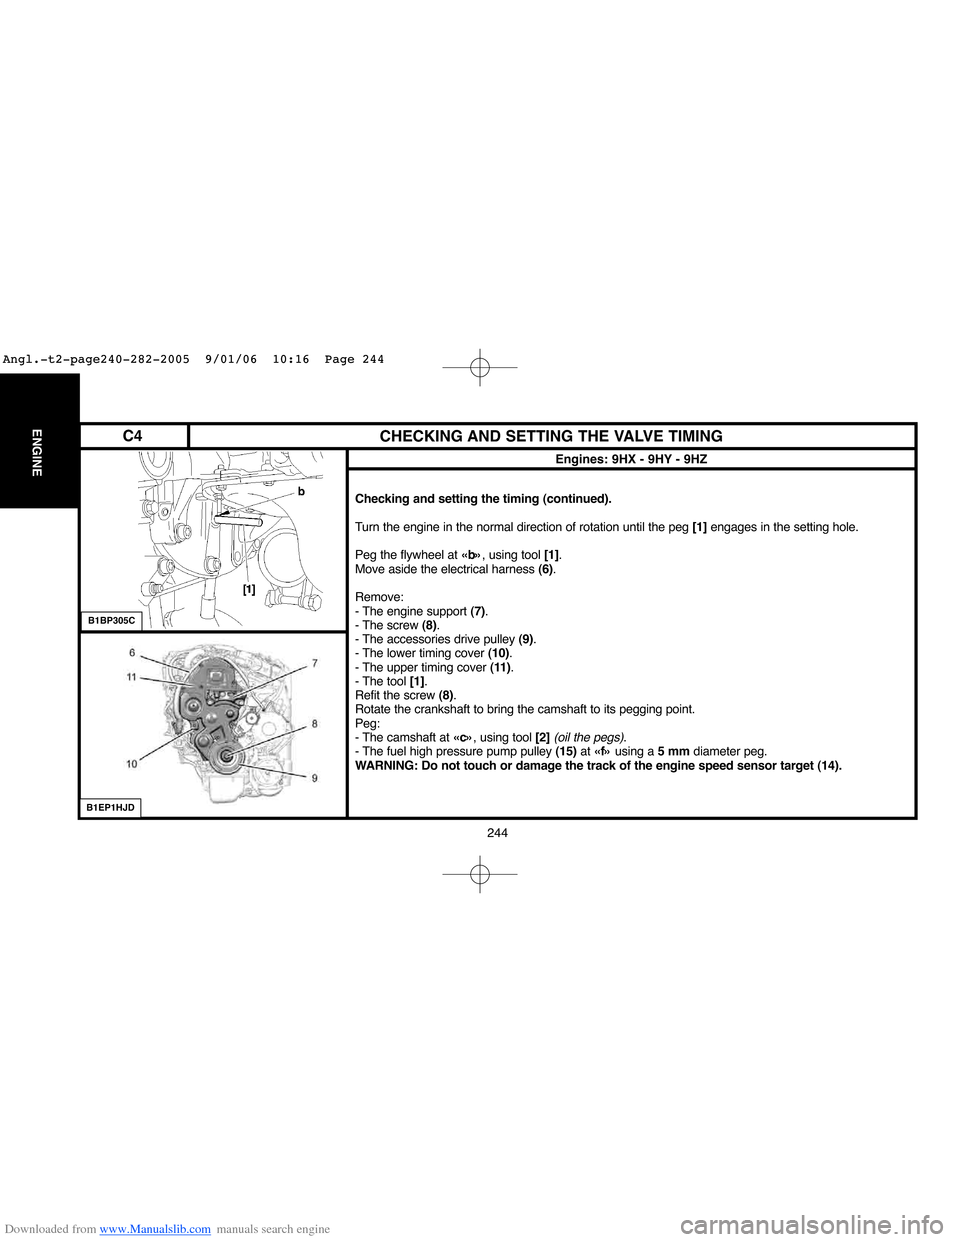
Turn the engine in the normal direction of rotation until the peg [1]engages in the setting hole.
Peg the flywheel at «b», using tool [1].
Move aside the electrical harness (6).
Remove:
- The engine support (7).
- The screw (8).
- The accessories drive pulley (9).
- The lower timing cover (10).
- The upper timing cover (11).
- The tool [1].
Refit the screw (8).
Rotate the crankshaft to bring the camshaft to its pegging point.
Peg:
- The camshaft at «c», using tool [2]
(oil the pegs).
- The fuel high pressure pump pulley (15)at «f»using a 5 mmdiameter peg.
WARNING: Do not touch or damage the track of the engine speed sensor target (14).
B1BP305C
B1EP1HJD
C4
Angl.-t2-page240-282-2005 9/01/06 10:16 Page 244
Page 251 of 462
Downloaded from www.Manualslib.com manuals search engine 245
ENGINE
CHECKING AND SETTING THE VALVE TIMING
Engines: 9HX - 9HY - 9HZ
Checking and setting the timing (continued).
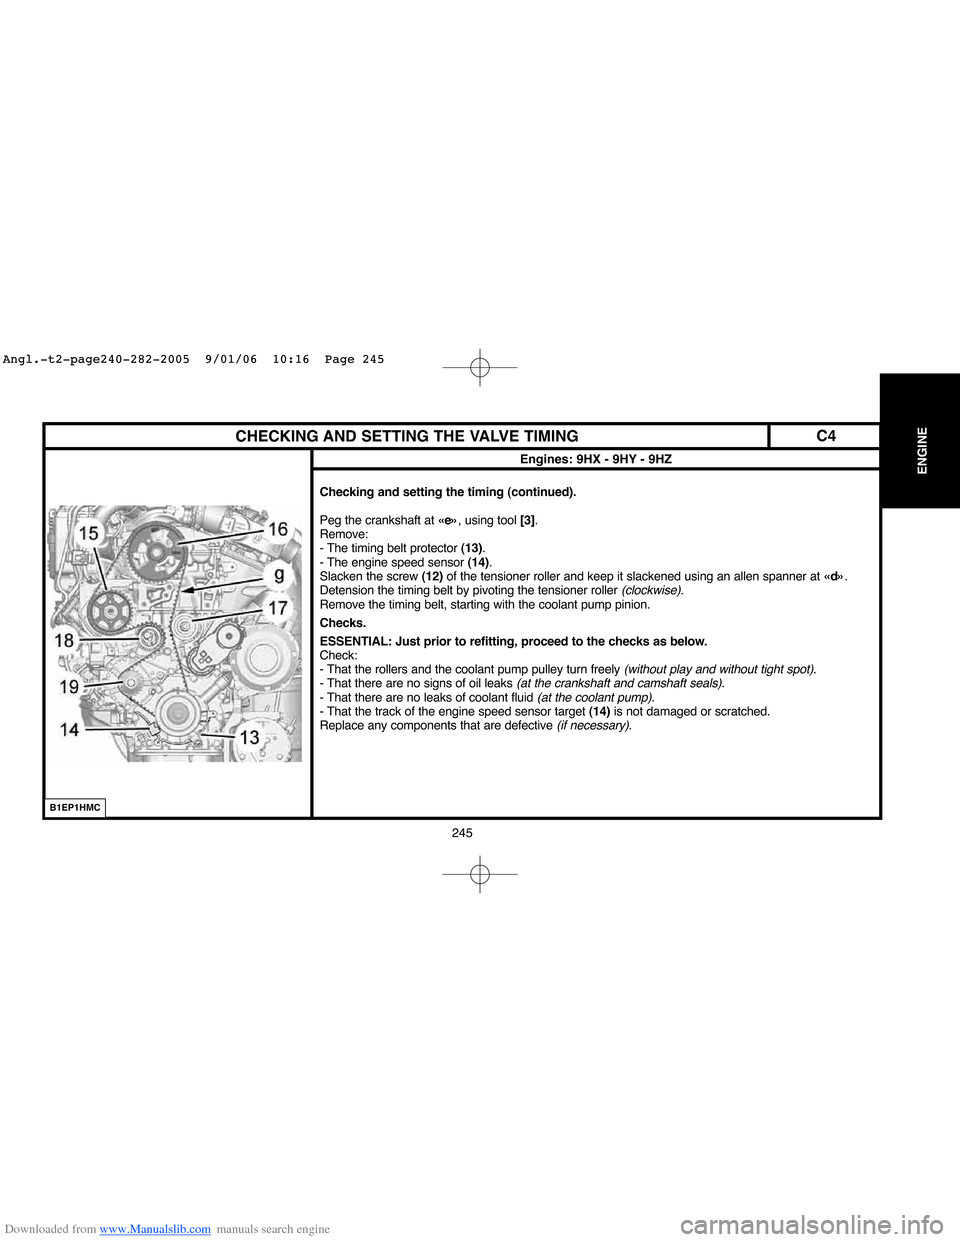
Peg the crankshaft at «e», using tool [3].
Remove:
- The timing belt protector (13).
- The engine speed sensor (14).
Slacken the screw (12)of the tensioner roller and keep it slackened using an allen spanner at «d».
Detension the timing belt by pivoting the tensioner roller
(clockwise).
Remove the timing belt, starting with the coolant pump pinion.
Checks.
ESSENTIAL: Just prior to refitting, proceed to the checks as below.
Check:
- That the rollers and the coolant pump pulley turn freely
(without play and without tight spot).
- That there are no signs of oil leaks (at the crankshaft and camshaft seals).
- That there are no leaks of coolant fluid (at the coolant pump).
- That the track of the engine speed sensor target (14)is not damaged or scratched.
Replace any components that are defective
(if necessary).
B1EP1HMC
C4
Angl.-t2-page240-282-2005 9/01/06 10:16 Page 245
Page 257 of 462
Downloaded from www.Manualslib.com manuals search engine 251
ENGINE
CHECKING AND SETTING THE VALVE TIMING
Engines: 9HZ - 9HY
Refit the screw (10).
Rotate the crankshaft six times
(clockwise).
IMPERATIVE: Never turn it backwards.
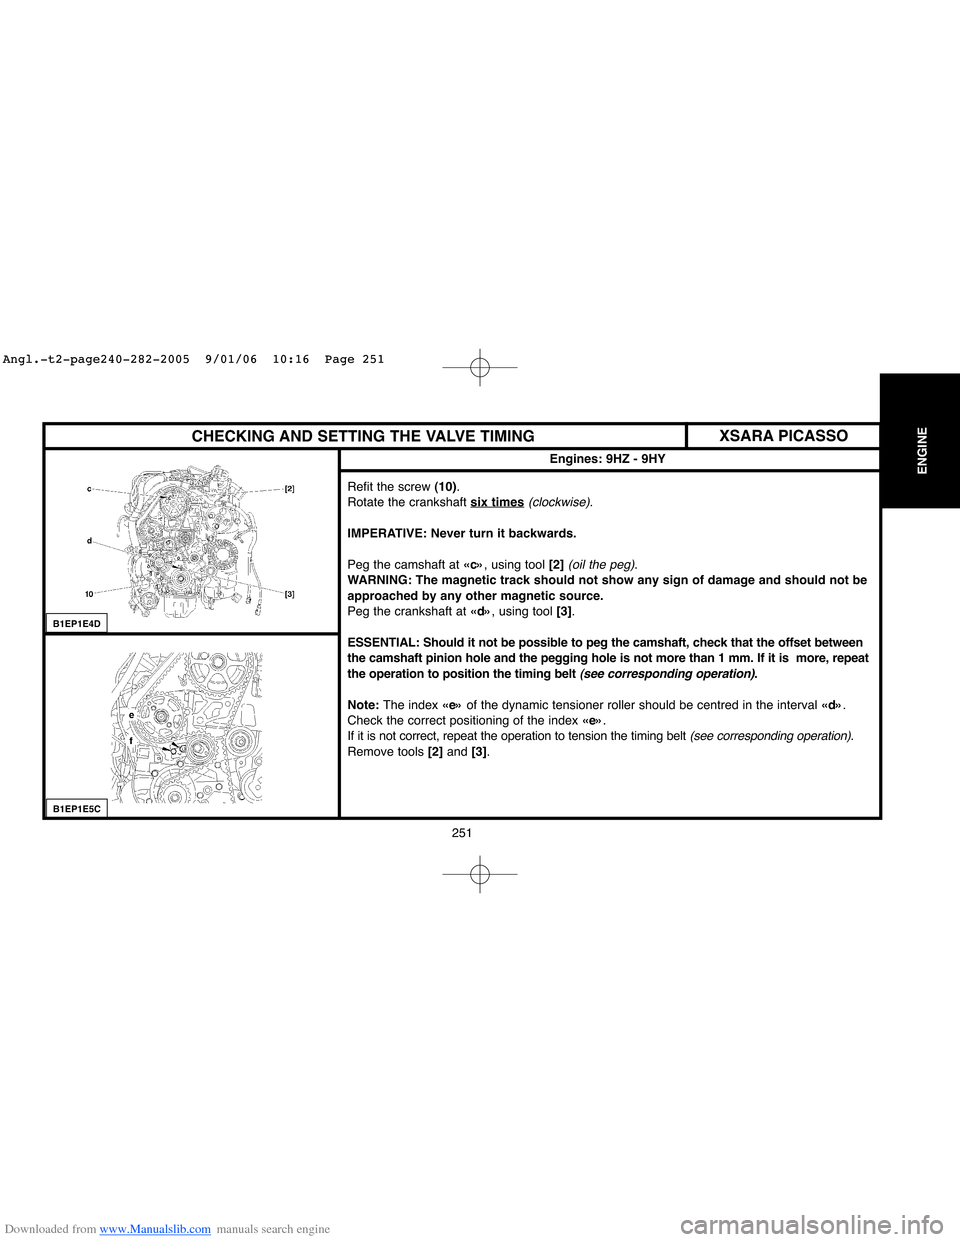
Peg the camshaft at «c», using tool [2]
(oil the peg).
WARNING: The magnetic track should not show any sign of damage and should not be
approached by any other magnetic source.
Peg the crankshaft at «d», using tool [3].
ESSENTIAL: Should it not be possible to peg the camshaft, check that the offset between
the camshaft pinion hole and the pegging hole is not more than 1 mm. If it is more, repeat
the operation to position the timing belt
(see corresponding operation).
Note: The index «e»of the dynamic tensioner roller should be centred in the interval «d».
Check the correct positioning of the index «e».
If it is not correct, repeat the operation to tension the timing belt
(see corresponding operation).
Remove tools [2] and [3].
B1EP1E4D
B1EP1E5C
XSARA PICASSO
Angl.-t2-page240-282-2005 9/01/06 10:16 Page 251
Page 261 of 462
Downloaded from www.Manualslib.com manuals search engine 255
ENGINE
CHECKING AND SETTING THE VALVE TIMING
Engines: 9HZ - 9HY
B1EP1E6D
Refit the screw (10).
Turn the crankshaft to bring the camshaft towards its pegging point.
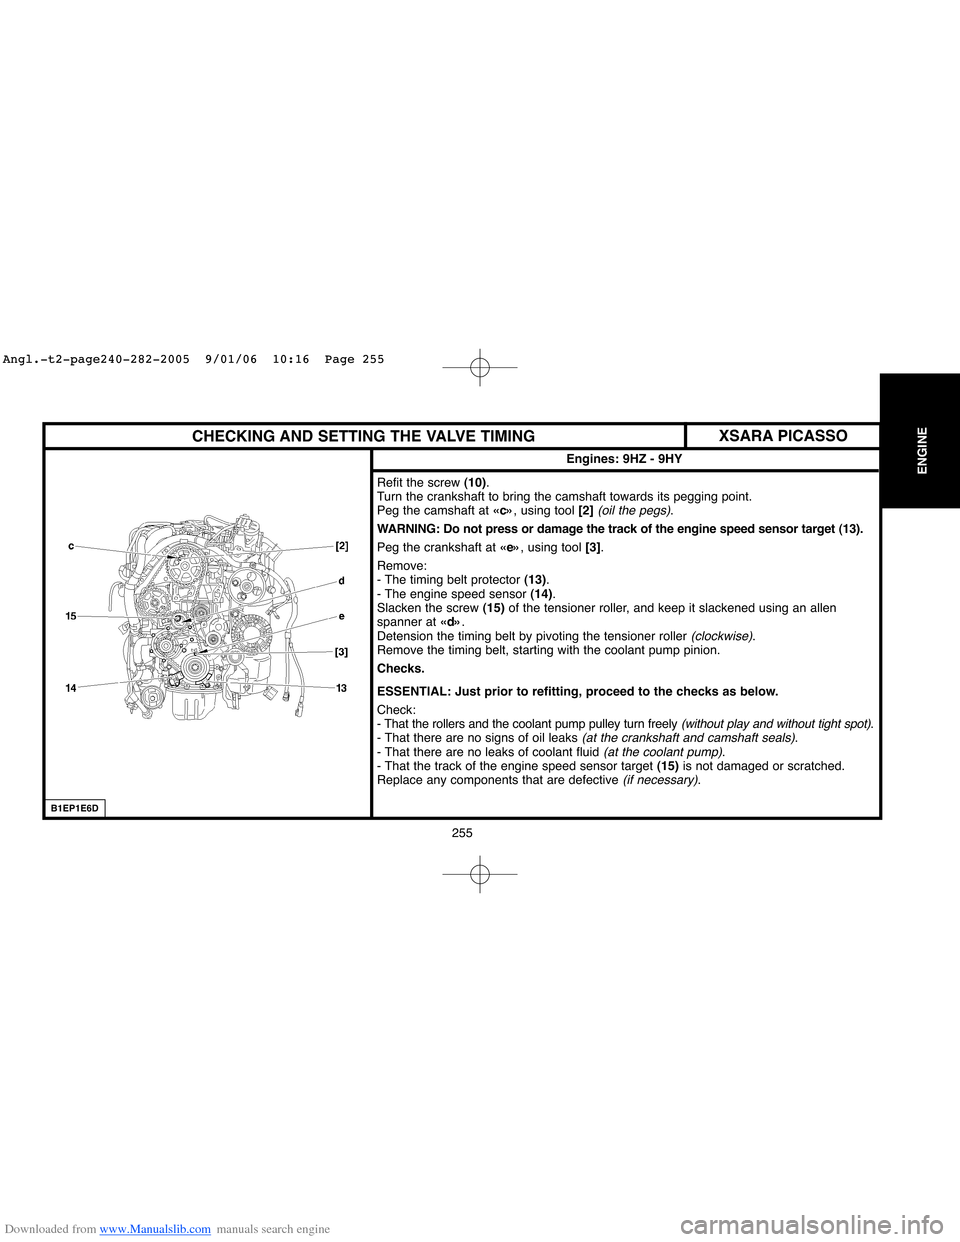
Peg the camshaft at «c», using tool [2]
(oil the pegs).
WARNING: Do not press or damage the track of the engine speed sensor target (13).
Peg the crankshaft at «e», using tool [3].
Remove:
- The timing belt protector (13).
- The engine speed sensor (14).
Slacken the screw (15)of the tensioner roller, and keep it slackened using an allen
spanner at «d».
Detension the timing belt by pivoting the tensioner roller
(clockwise).
Remove the timing belt, starting with the coolant pump pinion.
Checks.
ESSENTIAL: Just prior to refitting, proceed to the checks as below.
Check:
- That the rollers and the coolant pump pulley turn freely
(without play and without tight spot).
- That there are no signs of oil leaks (at the crankshaft and camshaft seals).
- That there are no leaks of coolant fluid (at the coolant pump).
- That the track of the engine speed sensor target (15)is not damaged or scratched.
Replace any components that are defective
(if necessary).
XSARA PICASSO
Angl.-t2-page240-282-2005 9/01/06 10:16 Page 255
Page 273 of 462
Downloaded from www.Manualslib.com manuals search engine 267
ENGINE
CHECKING AND SETTING THE VALVE TIMING
Engines: RHY - RHZ
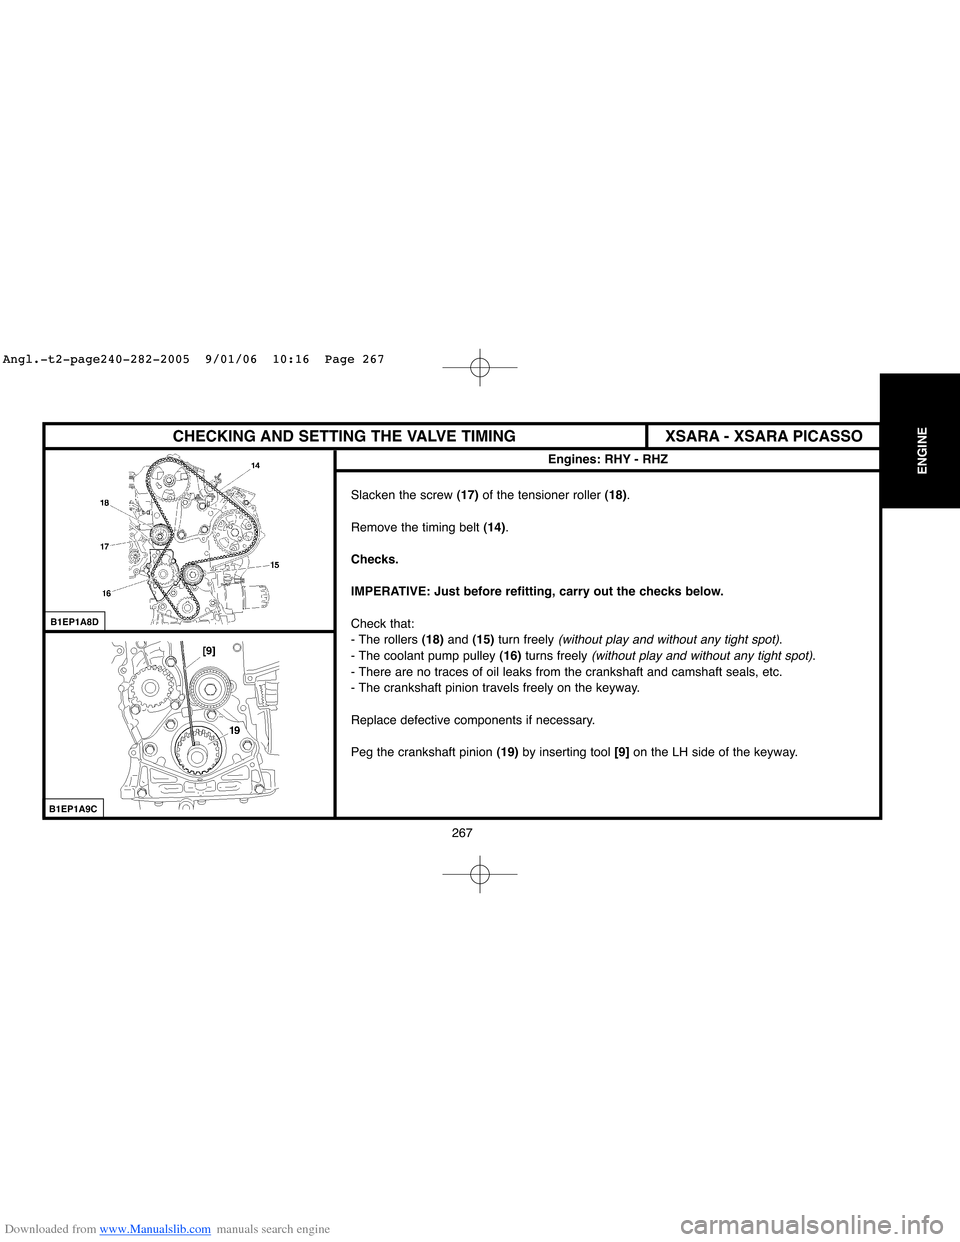
Slacken the screw (17)of the tensioner roller (18).
Remove the timing belt (14).
Checks.
IMPERATIVE: Just before refitting, carry out the checks below.
Check that:
- The rollers (18)and (15)turn freely
(without play and without any tight spot).
- The coolant pump pulley (16)turns freely
(without play and without any tight spot).
- There are no traces of oil leaks from the crankshaft and camshaft seals, etc.
- The crankshaft pinion travels freely on the keyway.
Replace defective components if necessary.
Peg the crankshaft pinion (19)by inserting tool [9]on the LH side of the keyway.
B1EP1A8D
B1EP1A9C
XSARA - XSARA PICASSO
Angl.-t2-page240-282-2005 9/01/06 10:16 Page 267
Page 281 of 462
Downloaded from www.Manualslib.com manuals search engine 275
ENGINE
CHECKING AND SETTING THE VALVE TIMING
Engine: RHR
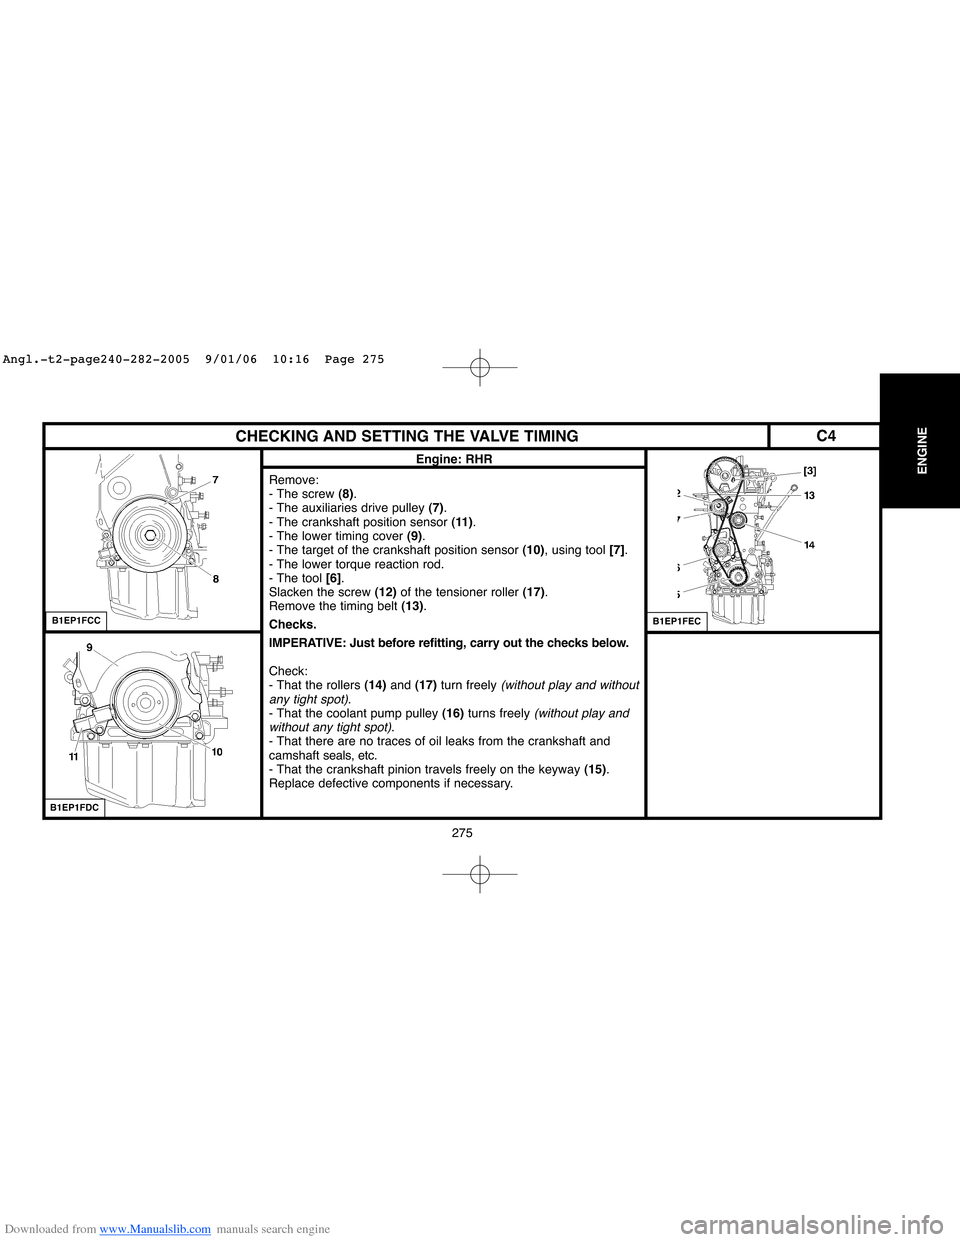
Remove:
- The screw (8).
- The auxiliaries drive pulley (7).
- The crankshaft position sensor (11).
- The lower timing cover (9).
- The target of the crankshaft position sensor (10), using tool [7].
- The lower torque reaction rod.
- The tool [6].
Slacken the screw (12)of the tensioner roller (17).
Remove the timing belt (13).
Checks.
IMPERATIVE: Just before refitting, carry out the checks below.
Check:
- That the rollers (14)and (17)turn freely
(without play and without
any tight spot).
- That the coolant pump pulley (16)turns freely (without play and
without any tight spot).
- That there are no traces of oil leaks from the crankshaft and
camshaftseals, etc.
- That the crankshaft pinion travels freely on the keyway (15).
Replace defective components if necessary.
B1EP1FCC
B1EP1FDC
B1EP1FEC
C4
Angl.-t2-page240-282-2005 9/01/06 10:16 Page 275
Page 285 of 462
Downloaded from www.Manualslib.com manuals search engine ENGINE
279
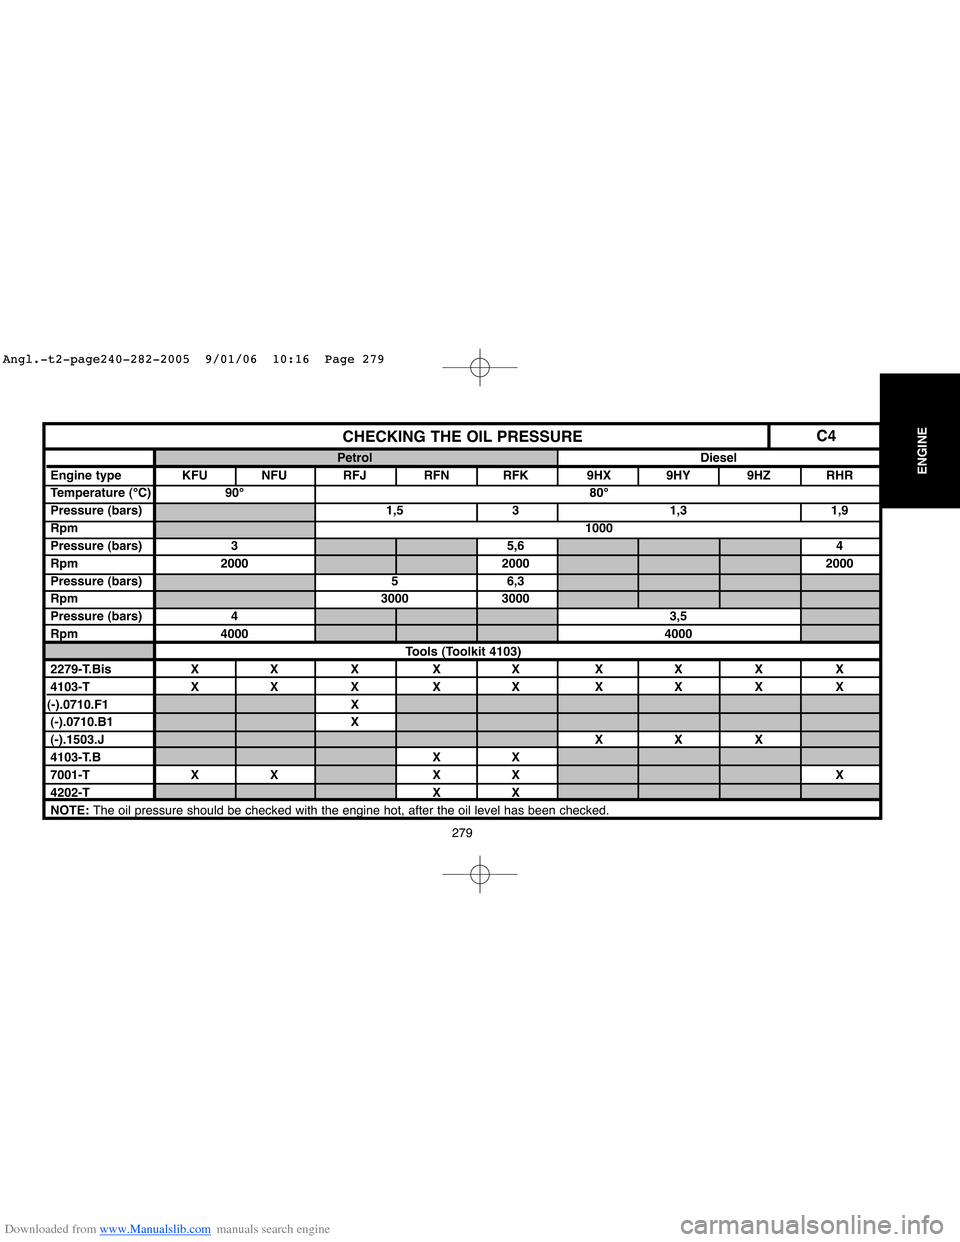
C4CHECKING THE OIL PRESSURE
Petrol Diesel
Engine type KFU NFU RFJ RFN RFK 9HX 9HY 9HZ RHR
Temperature (°C) 90° 80°
Pressure (bars) 1,5 3 1,3 1,9
Rpm1000
Pressure (bars) 3 5,6 4
Rpm 2000 2000 2000
Pressure (bars) 5 6,3
Rpm 3000 3000
Pressure (bars) 43,5
Rpm 40004000
Tools (Toolkit 4103)
2279-T.Bis X X X X X X X X X
4103-T X X X X X X X X X
(-).0710.F1 X
(-).0710.B1 X
(-).1503.JXX X
4103-T.B X X
7001-T X X X X X
4202-T X X
NOTE: The oil pressure should be checked with the engine hot, after the oil level has been checked.
Angl.-t2-page240-282-2005 9/01/06 10:16 Page 279