check engine Citroen C4 2014 2.G Owner's Guide
[x] Cancel search | Manufacturer: CITROEN, Model Year: 2014, Model line: C4, Model: Citroen C4 2014 2.GPages: 340, PDF Size: 28.99 MB
Page 187 of 340
10
CHECKS
185
BONNET
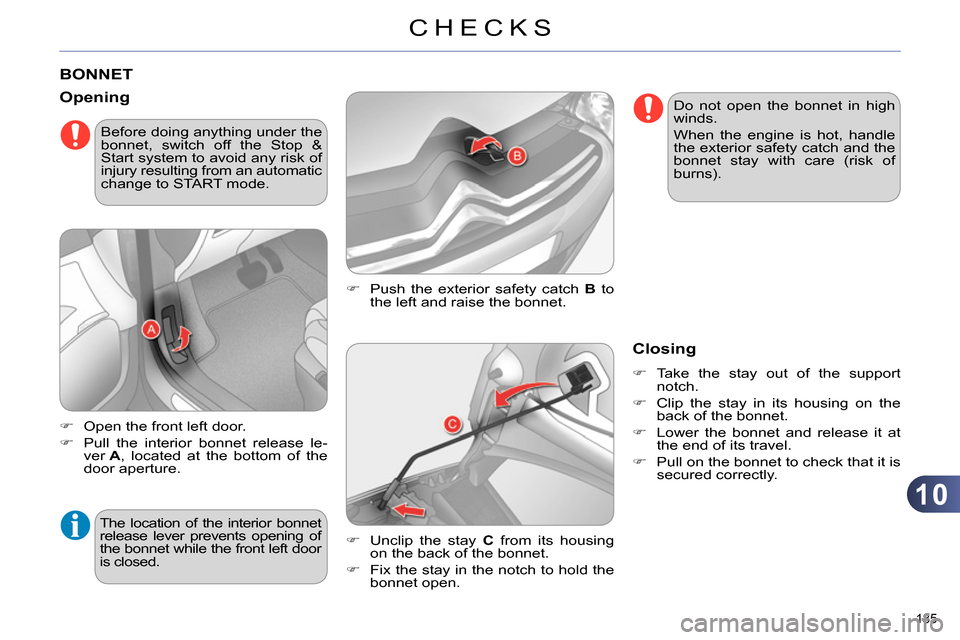
Push the exterior safety catch B
to
the left and raise the bonnet.
Opening
Open the front left door.
Pull the interior bonnet release le-
ver A
, located at the bottom of the
door aperture.
Unclip the stay C
from its housing
on the back of the bonnet.
Fix the stay in the notch to hold the
bonnet open.
The location of the interior bonnet
release lever prevents opening of
the bonnet while the front left door
is closed.
Closing
Take the stay out of the support
notch.
Clip the stay in its housing on the
back of the bonnet.
Lower the bonnet and release it at
the end of its travel.
Pull on the bonnet to check that it is
secured correctly.
Do not open the bonnet in high
winds.
When the engine is hot, handle
the exterior safety catch and the
bonnet stay with care (risk of
burns).
Before doing anything under the
bonnet, switch off the Stop &
Start system to avoid any risk of
injury resulting from an automatic
change to START mode.
Page 188 of 340
10
CHECKS
186
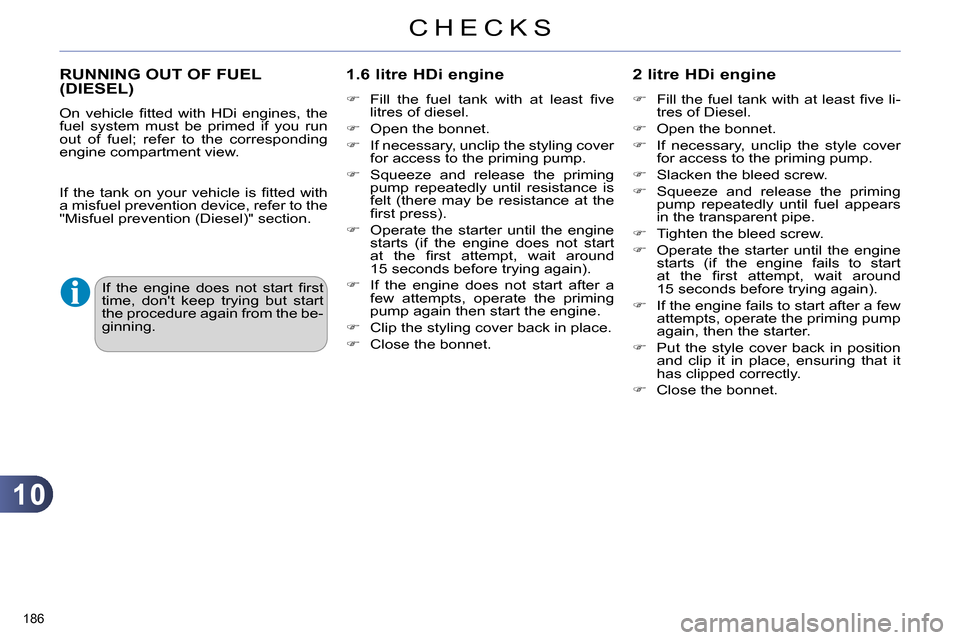
RUNNING OUT OF FUEL
(DIESEL)
1.6 litre HDi engine
Fill the fuel tank with at least fi ve
litres of diesel.
Open the bonnet.
If necessary, unclip the styling cover
for access to the priming pump.
Squeeze and release the priming
pump repeatedly until resistance is
felt (there may be resistance at the
fi rst press).
Operate the starter until the engine
starts (if the engine does not start
at the fi rst attempt, wait around
15 seconds before trying again).
If the engine does not start after a
few attempts, operate the priming
pump again then start the engine.
Clip the styling cover back in place.
Close the bonnet.
2 litre HDi engine
Fill the fuel tank with at least fi ve li-
tres of Diesel.
Open the bonnet.
If necessary, unclip the style cover
for access to the priming pump.
Slacken the bleed screw.
Squeeze and release the priming
pump repeatedly until fuel appears
in the transparent pipe.
Tighten the bleed screw.
Operate the starter until the engine
starts (if the engine fails to start
at the fi rst attempt, wait around
15 seconds before trying again).
If the engine fails to start after a few
attempts, operate the priming pump
again, then the starter.
Put the style cover back in position
and clip it in place, ensuring that it
has clipped correctly.
Close the bonnet.
If the engine does not start fi rst
time, don't keep trying but start
the procedure again from the be-
ginning.
On vehicle fi tted with HDi engines, the
fuel system must be primed if you run
out of fuel; refer to the corresponding
engine compartment view.
If the tank on your vehicle is fi tted with
a misfuel prevention device, refer to the
"Misfuel prevention (Diesel)" section.
Page 189 of 340

10
CHECKS
187
PETROL ENGINES
The various caps and covers allow access for checking the levels of the various fl uids and for replacing certain components.
1.
Power steering reservoir.
2.
Screenwash and headlamp wash
reservoir.
3.
Coolant reservoir.
4.
Brake fl uid reservoir.
5.
Battery/Fuses.
6.
Fusebox.
7.
Air fi lter.
8.
Engine oil dipstick.
9.
Engine oil fi ller cap.
Page 190 of 340

10
CHECKS
188
*
According to engine.
DIESEL ENGINES
The various caps and covers allow access for checking the levels of the various fl uids, for replacing certain components and
for priming the fuel system.
1.
Power steering reservoir.
2.
Screenwash and headlamp wash
reservoir.
3.
Coolant reservoir.
4.
Brake fl uid reservoir.
5.
Battery/Fuses.
6.
Fusebox.
7.
Air fi lter.
8.
Engine oil dipstick.
9.
Engine oil fi ller cap.
10.
Priming pump * .
11 .
Bleed screw * .
Page 191 of 340

10
CHECKS
189
CHECKING LEVELS
Take care when working under
the bonnet, as certain areas of
the engine may be extremely hot
(risk of burns) and the cooling
fan could start at any time (even
with the ignition off).
The check is carried out either
when the ignition is switched
on using the oil level indicator
in the instrument panel, or us-
ing the dipstick.
It will only be correct if the vehicle is on
level ground and the engine has been
off for more than 30 minutes.
It is normal to top up the oil level be-
tween two services (or oil changes).
CITROËN recommends that you check
the level, and top up if necessary, every
3 000 miles (5 000 kms).
After topping up the oil, the check when
switching on the ignition with the oil
level indicator in the instrument panel
is not valid during the 30 minutes after
topping up.
Oil level
Engine oil change
Refer to the maintenance and warranty
guide for details of the interval for this
operation.
In order to maintain the reliability of the
engine and emission control system,
the use of additives in the engine oil is
prohibited.
Brake fluid level
Changing the fl uid
Refer to the maintenance and warranty
guide for details of the interval for this
operation.
Fluid specifi cation
The brake fl uid must conform to the
manufacturer's recommendations.
Power steering fluid level
The power steering fl uid level
should be close to the "MAX"
mark. With the engine cold, un-
screw the cap to check the level.
Coolant level
The coolant level should be
close to the "MAX" mark but
should never exceed it.
When the engine is warm, the
temperature of the coolant is regulated
by the fan.
In addition, as the cooling system is
pressurised, wait at least one hour after
switching off the engine before carrying
out any work.
To avoid any risk of scalding, unscrew
the cap by two turns to allow the pres-
sure to drop. When the pressure has
dropped, remove the cap and top up
the level.
Fluid specifi cation
The coolant must conform to the manu-
facturer's recommendations.
Check all of these levels regularly, in
line with the maintenance and warranty
guide. Top them up if necessary, unless
otherwise indicated.
If a level drops signifi cantly, have the
corresponding system checked by a
CITROËN dealer or a qualifi ed work-
shop.
Oil specifi cation
The oil must be the correct grade for
your engine and conform to the manu-
facturer's recommendations.
The cooling fan may start after
switching off the engine: take
care with articles and clothing
that might become caught by the
fan blades.
The brake fl uid level should be
close to the "MAX" mark. If it is
not, check the brake pad wear.
Page 192 of 340
10
CHECKS
190
Used products
Avoid prolonged contact of used
oil or fl uids with the skin.
Most of these fl uids are harmful
to health or indeed very corro-
sive.
Do not discard used oil or fl uids
into sewers or onto the ground.
Take used oil to a CITROËN
dealer or a qualifi ed workshop
(France) or to an authorised
waste disposal site.
Additive level (Diesel with
particle emissions filter)
The additive reservoir low level is indi-
cated by:
Topping up
The reservoir must be topped up with-
out delay by a CITROËN dealer or a
qualifi ed workshop.
- fi xed illumination of the par-
ticle emissions fi lter warning
lamp, accompanied by an au-
dible signal and a message
that the particle emissions
fi lter additive level is too low.
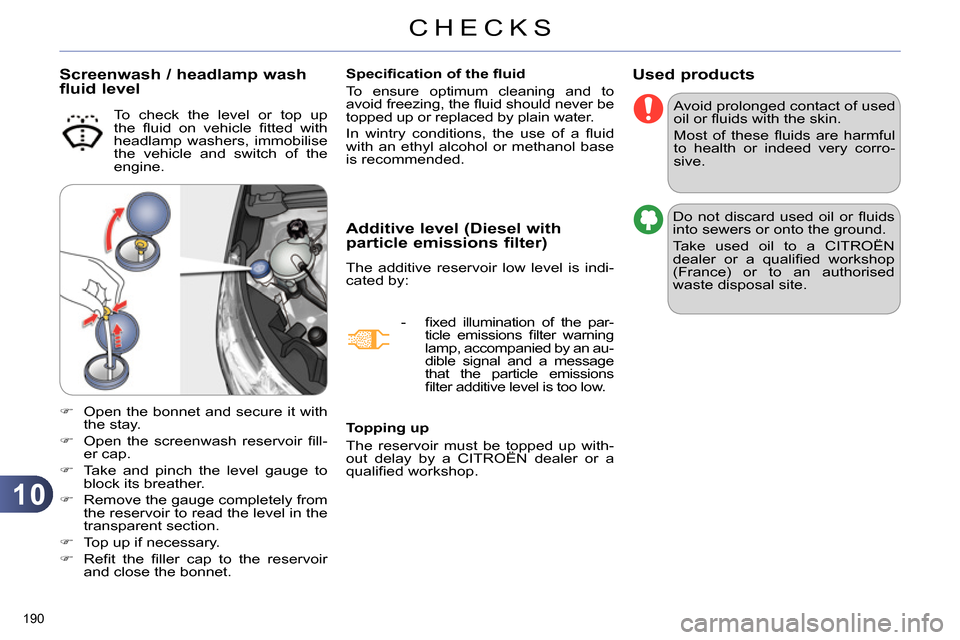
Screenwash / headlamp wash
fluid level
Specifi cation of the fl uid
To ensure optimum cleaning and to
avoid freezing, the fl uid should never be
topped up or replaced by plain water.
In wintry conditions, the use of a fl uid
with an ethyl alcohol or methanol base
is recommended.
To check the level or top up
the fl uid on vehicle fi tted with
headlamp washers, immobilise
the vehicle and switch of the
engine.
Open the bonnet and secure it with
the stay.
Open the screenwash reservoir fi ll-
er cap.
Take and pinch the level gauge to
block its breather.
Remove the gauge completely from
the reservoir to read the level in the
transparent section.
Top up if necessary.
Refi t the fi ller cap to the reservoir
and close the bonnet.
Page 193 of 340
10
CHECKS
191
CHECKS
Particle emission filter (Diesel)
The start of saturation of the particle
emissions fi lter is indicated by:
- fi xed illumination of the par-
ticle emissions fi lter warning
lamp, accompanied by an
audible signal and a message
that there is a risk of blockage
of the particle emissions fi lter.
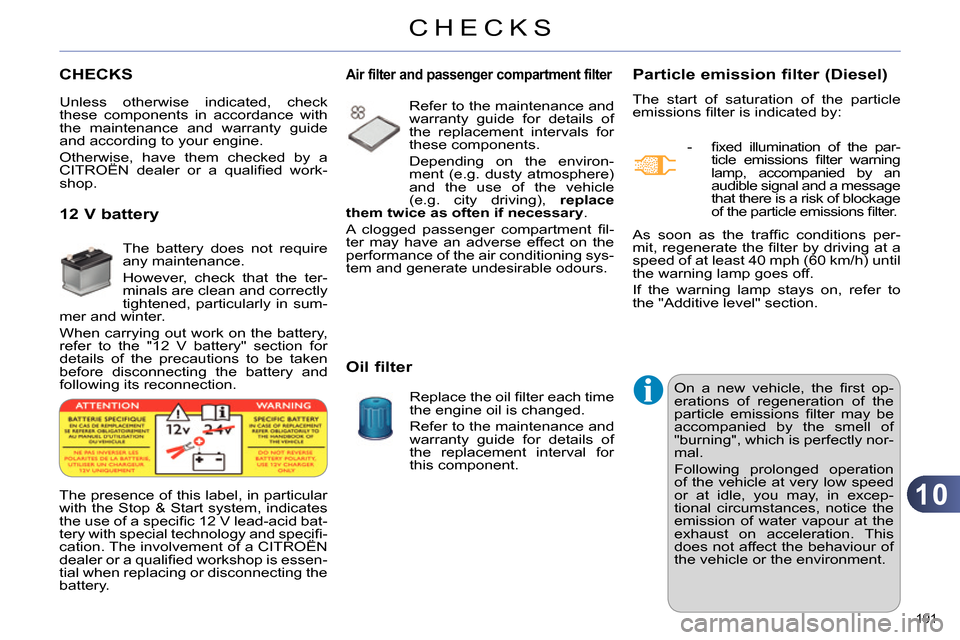
The presence of this label, in particular
with the Stop & Start system, indicates
the use of a specifi c 12 V lead-acid bat-
tery with special technology and specifi -
cation. The involvement of a CITROËN
dealer or a qualifi ed workshop is essen-
tial when replacing or disconnecting the
battery. On a new vehicle, the fi rst op-
erations of regeneration of the
particle emissions fi lter may be
accompanied by the smell of
"burning", which is perfectly nor-
mal.
Following prolonged operation
of the vehicle at very low speed
or at idle, you may, in excep-
tional circumstances, notice the
emission of water vapour at the
exhaust on acceleration. This
does not affect the behaviour of
the vehicle or the environment. As soon as the traffi c conditions per-
mit, regenerate the fi lter by driving at a
speed of at least 40 mph (60 km/h) until
the warning lamp goes off.
If the warning lamp stays on, refer to
the "Additive level" section.
Unless otherwise indicated, check
these components in accordance with
the maintenance and warranty guide
and according to your engine.
Otherwise, have them checked by a
CITROËN dealer or a qualifi ed work-
shop.
Air filter and passenger compartment filter
Refer to the maintenance and
warranty guide for details of
the replacement intervals for
these components.
Depending on the environ-
ment (e.g. dusty atmosphere)
and the use of the vehicle
(e.g. city driving), replace
them twice as often if necessary
.
A clogged passenger compartment fi l-
ter may have an adverse effect on the
performance of the air conditioning sys-
tem and generate undesirable odours.
Oil filter
Replace the oil fi lter each time
the engine oil is changed.
Refer to the maintenance and
warranty guide for details of
the replacement interval for
this component.
12 V battery
The battery does not require
any maintenance.
However, check that the ter-
minals are clean and correctly
tightened, particularly in sum-
mer and winter.
When carrying out work on the battery,
refer to the "12 V battery" section for
details of the precautions to be taken
before disconnecting the battery and
following its reconnection.
Page 199 of 340
11
PRACTICAL INFORMATION
197
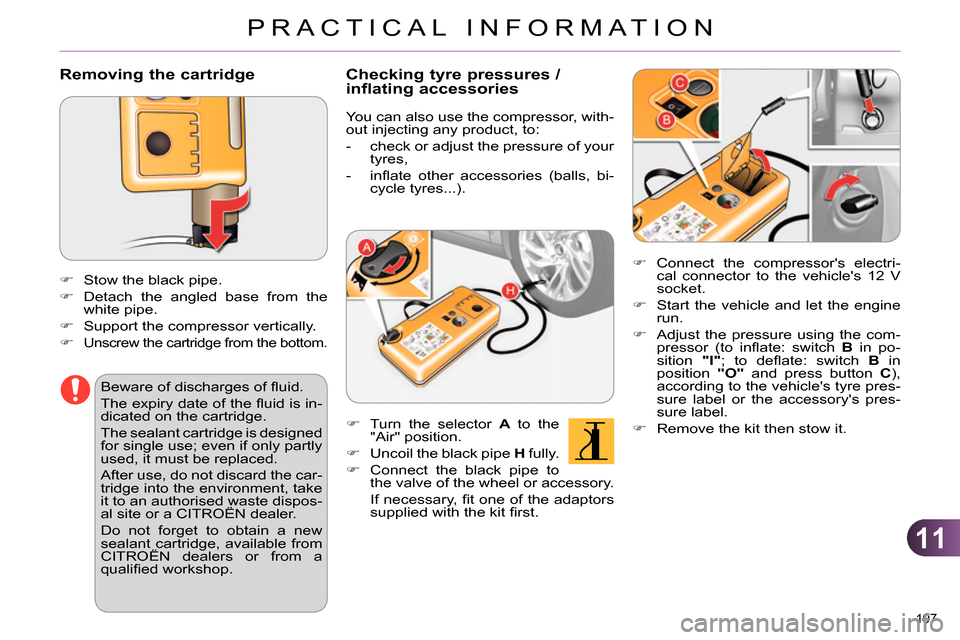
Removing the cartridge
Stow the black pipe.
Detach the angled base from the
white pipe.
Support the compressor vertically.
Unscrew the cartridge from the bottom.
Connect the compressor's electri-
cal connector to the vehicle's 12 V
socket.
Start the vehicle and let the engine
run.
Adjust the pressure using the com-
pressor (to infl ate: switch B
in po-
sition "I"
; to defl ate: switch B
in
position "O"
and press button C
),
according to the vehicle's tyre pres-
sure label or the accessory's pres-
sure label.
Remove the kit then stow it.
Beware of discharges of fl uid.
The expiry date of the fl uid is in-
dicated on the cartridge.
The sealant cartridge is designed
for single use; even if only partly
used, it must be replaced.
After use, do not discard the car-
tridge into the environment, take
it to an authorised waste dispos-
al site or a CITROËN dealer.
Do not forget to obtain a new
sealant cartridge, available from
CITROËN dealers or from a
qualifi ed workshop.
Checking tyre pressures /
inflating accessories
You can also use the compressor, with-
out injecting any product, to:
- check or adjust the pressure of your
tyres,
- infl ate other accessories (balls, bi-
cycle tyres...).
Turn the selector A
to the
"Air" position.
Uncoil the black pipe H
fully.
Connect the black pipe to
the valve of the wheel or accessory.
If necessary, fi t one of the adaptors
supplied with the kit fi rst.
Page 215 of 340
11
PRACTICAL INFORMATION
213
When your vehicle's battery is dis-
charged, the engine can be started
using a slave battery (external or on
another vehicle) and jump lead cables.
Starting using another battery
12 V BATTERY
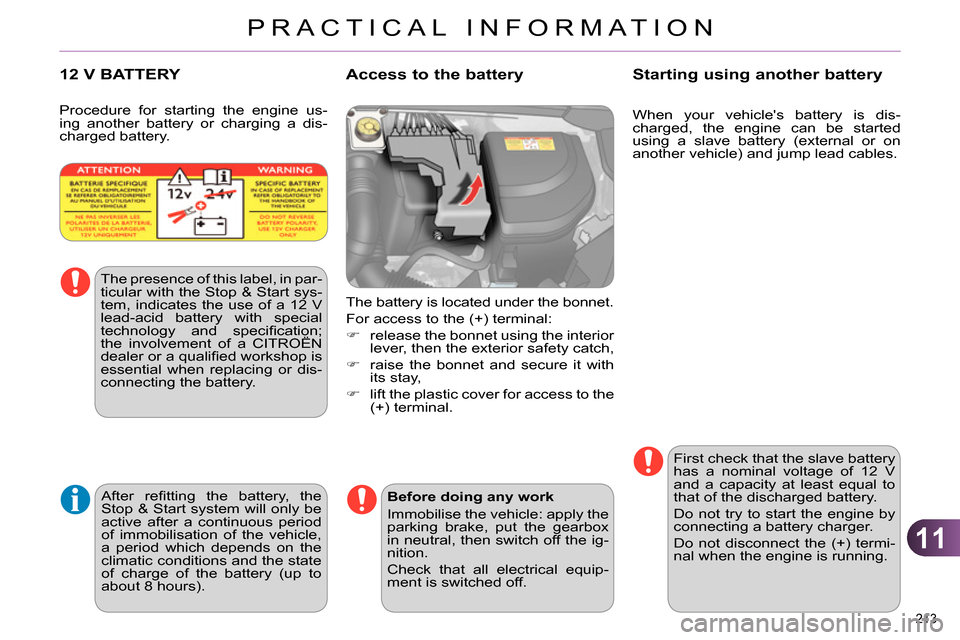
The battery is located under the bonnet.
For access to the (+) terminal:
release the bonnet using the interior
lever, then the exterior safety catch,
raise the bonnet and secure it with
its stay,
lift the plastic cover for access to the
(+) terminal.
Access to the battery
The presence of this label, in par-
ticular with the Stop & Start sys-
tem, indicates the use of a 12 V
lead-acid battery with special
technology and specifi cation;
the involvement of a CITROËN
dealer or a qualifi ed workshop is
essential when replacing or dis-
connecting the battery.
Procedure for starting the engine us-
ing another battery or charging a dis-
charged battery.
After refi tting the battery, the
Stop & Start system will only be
active after a continuous period
of immobilisation of the vehicle,
a period which depends on the
climatic conditions and the state
of charge of the battery (up to
about 8 hours).
First check that the slave battery
has a nominal voltage of 12 V
and a capacity at least equal to
that of the discharged battery.
Do not try to start the engine by
connecting a battery charger.
Do not disconnect the (+) termi-
nal when the engine is running.
Before doing any work
Immobilise the vehicle: apply the
parking brake, put the gearbox
in neutral, then switch off the ig-
nition.
Check that all electrical equip-
ment is switched off.
Page 217 of 340
11
PRACTICAL INFORMATION
215
Charging the battery using a
battery charger
It is advisable to disconnect the
battery if the vehicle is to be left
unused for more than one month.
The batteries contain harmful
substances such as sulphuric
acid and lead. They must be
disposed of in accordance with
regulations and must not, in any
circumstances, be discarded
with household waste.
Take used remote control bat-
teries and vehicle batteries to a
special collection point.
Disconnect the battery from the vehicle.
Follow the instructions for use pro-
vided by the manufacturer of the
charger.
Connect the battery starting with the
negative terminal (-).
Check that the terminals and con-
nectors are clean. If they are covered
with sulphate (whitish or greenish
deposit), remove them and clean
them.
Protect your eyes and face be-
fore handling the battery.
All operations on the battery
must be carried out in a well
ventilated area and away from
naked fl ames and sources of
sparks, so as to avoid the risk of
explosion or fi re.
Do not try to charge a frozen
battery; the battery must fi rst
be thawed out to avoid the risk
of explosion. If the battery has
been frozen, before charging
have it checked by a CITROËN
dealer or a qualifi ed workshop
who will check that the inter-
nal components have not been
damaged and the casing is not
cracked, which could cause a
leak of toxic and corrosive acid.
Do not reverse the polarity and
use only a 12 V charger.
Do not disconnect the terminals
while the engine is running.
Do not charge the batteries with-
out disconnecting the terminals
fi rst.
Wash your hands afterwards.
Reinitialisation after
reconnection
After any reconnection of the battery,
switch on the ignition and wait at least
one minute before starting, to allow
time for the initialisation of the electron-
ic systems.
By referring to the corresponding sec-
tions, you should set or initialise the fol-
lowing systems yourself:
- one-touch electric windows,
- time and date,
- audio and navigation system set-
tings.
Check that no alert message or warn-
ing lamp comes on after switching on
the ignition.
However, if minor problems persist af-
ter carrying out these operations, con-
tact a CITROËN dealer or a qualifi ed
workshop.
Some functions are not available
if the battery is not suffi ciently
charged.
Do not push the vehicle to start
the engine if you have an elec-
tronic or automatic gearbox.
With Stop & Start, the battery
does not have to be disconnect-
ed for charging.