key Citroen C4 2014 2.G Owner's Guide
[x] Cancel search | Manufacturer: CITROEN, Model Year: 2014, Model line: C4, Model: Citroen C4 2014 2.GPages: 340, PDF Size: 28.99 MB
Page 92 of 340
4
ACCESS
90
DOORS
Opening
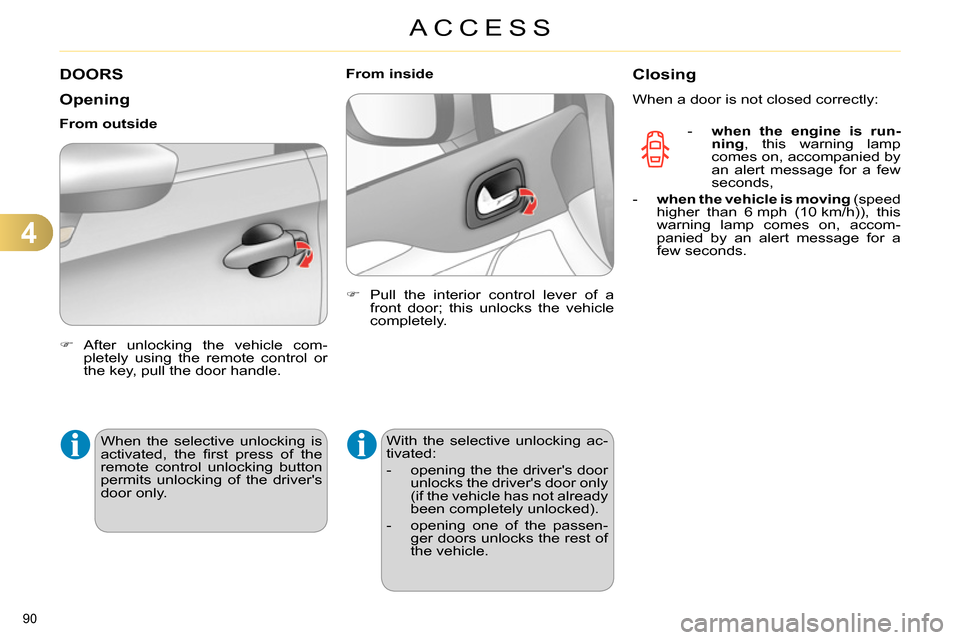
After unlocking the vehicle com-
pletely using the remote control or
the key, pull the door handle.
From outside
When the selective unlocking is
activated, the fi rst press of the
remote control unlocking button
permits unlocking of the driver's
door only.
Pull the interior control lever of a
front door; this unlocks the vehicle
completely.
From inside
With the selective unlocking ac-
tivated:
- opening the the driver's door
unlocks the driver's door only
(if the vehicle has not already
been completely unlocked).
- opening one of the passen-
ger doors unlocks the rest of
the vehicle.
Closing
When a door is not closed correctly:
- when the engine is run-
ning
, this warning lamp
comes on, accompanied by
an alert message for a few
seconds,
- when the vehicle is moving
(speed
higher than 6 mph (10 km/h)), this
warning lamp comes on, accom-
panied by an alert message for a
few seconds.
Page 93 of 340
4
ACCESS
91
BOOT
Opening
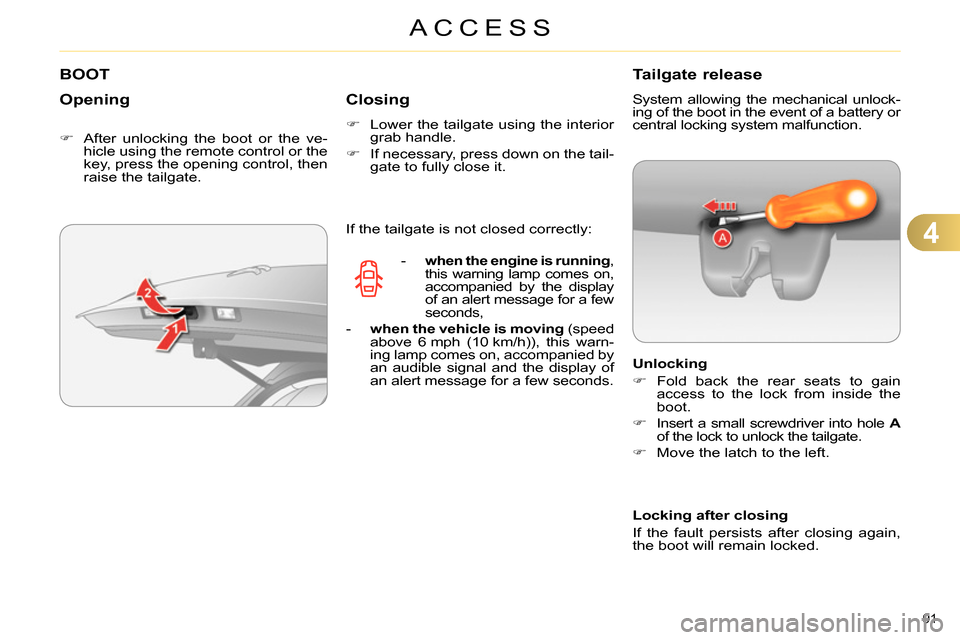
After unlocking the boot or the ve-
hicle using the remote control or the
key, press the opening control, then
raise the tailgate.
Closing
Lower the tailgate using the interior
grab handle.
If necessary, press down on the tail-
gate to fully close it.
Tailgate release
System allowing the mechanical unlock-
ing of the boot in the event of a battery or
central locking system malfunction.
Unlocking
Fold back the rear seats to gain
access to the lock from inside the
boot.
Insert a small screwdriver into hole A
of the lock to unlock the tailgate.
Move the latch to the left.
If the tailgate is not closed correctly:
- when the engine is running
,
this warning lamp comes on,
accompanied by the display
of an alert message for a few
seconds,
- when the vehicle is moving
(speed
above 6 mph (10 km/h)), this warn-
ing lamp comes on, accompanied by
an audible signal and the display of
an alert message for a few seconds.
Locking after closing
If the fault persists after closing again,
the boot will remain locked.
Page 95 of 340
4
ACCESS
93
Reinitialisation
After reconnecting the battery or a fault,
you must be reinitialise the operation of
the electric windows. For each of the
control switches on the driver's side
control panel:
pull the control until the window
stops,
release the control and pull it again
until the window closes fully,
continue to hold the control for ap-
proximately one second after the
window has closed,
press the control to lower the win-
dow automatically to the low posi-
tion,
when the window has reached the
low position, press the control again
for approximately one second.
The safety anti-pinch function is not
operational during these operations.
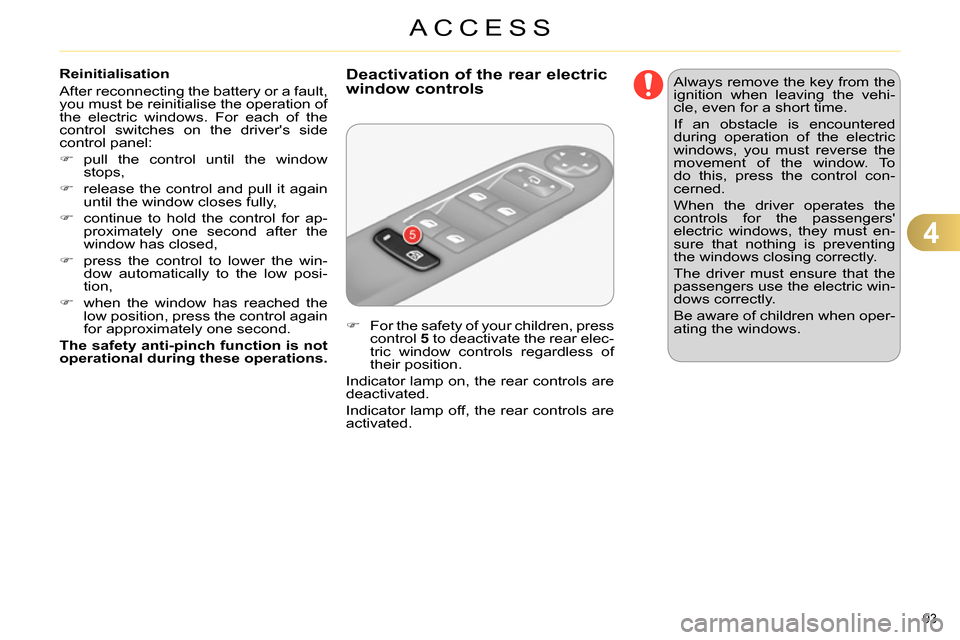
For the safety of your children, press
control 5
to deactivate the rear elec-
tric window controls regardless of
their position.
Indicator lamp on, the rear controls are
deactivated.
Indicator lamp off, the rear controls are
activated.
Deactivation of the rear electric
window controls
Always remove the key from the
ignition when leaving the vehi-
cle, even for a short time.
If an obstacle is encountered
during operation of the electric
windows, you must reverse the
movement of the window. To
do this, press the control con-
cerned.
When the driver operates the
controls for the passengers'
electric windows, they must en-
sure that nothing is preventing
the windows closing correctly.
The driver must ensure that the
passengers use the electric win-
dows correctly.
Be aware of children when oper-
ating the windows.
Page 97 of 340
4
ACCESS
95
FUEL TANK
Capacity of the tank: approximately
60 litres.
When the low fuel level in the
tank is reached, this warning
lamp comes on in the instru-
ment panel, accompanied by an
audible warning and the display
of an alert message. When it
fi rst comes on, around 6 litres
of fuel remain in the tank.
Until suffi cient fuel has been added,
every time the ignition is switched on,
this warning lamp appears, accompa-
nied by an audible signal and an alert
message. When driving, this audible
signal and the display of this alert mes-
sage are repeated with increasing fre-
quency, as the level drops towards 0
.
You must refuel as soon as possible to
avoid running out.
If you run out of fuel (Diesel), refer also
to "Checks".
Low fuel level
Refuelling
Additions of fuel must be of at least
5 litres to be registered by the fuel
gauge.
Opening the fi ller cap may result in an
inrush of air. This vacuum is entirely
normal and results from the sealing of
the fuel system.
If you have put in the wrong
fuel for your vehicle, you must
have
the tank drained and re-
fi lled with the correct fuel be-
fore you start the engine.
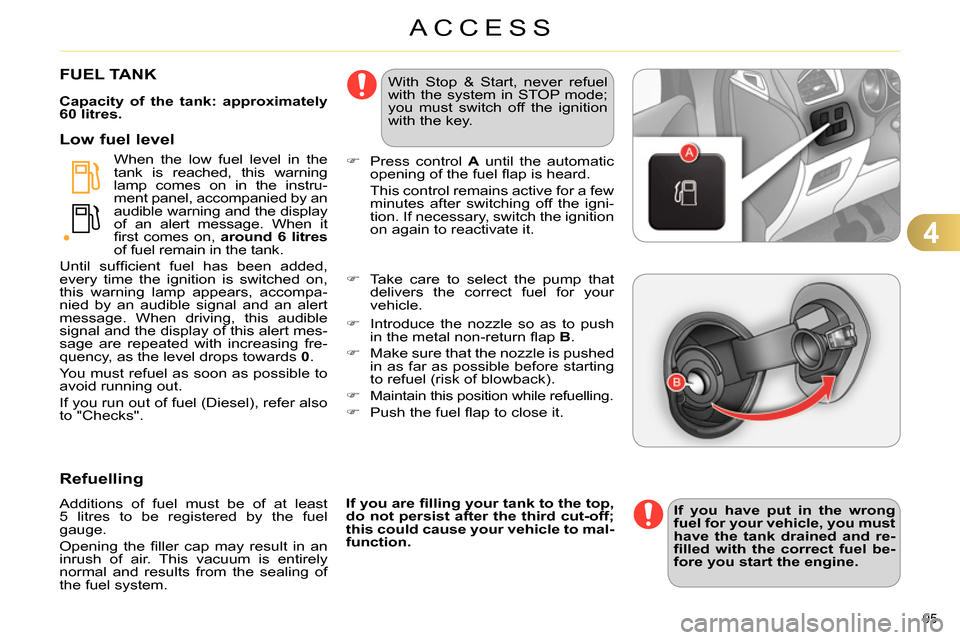
Press control A
until the automatic
opening of the fuel fl ap is heard.
This control remains active for a few
minutes after switching off the igni-
tion. If necessary, switch the ignition
on again to reactivate it.
If you are fi lling your tank to the top,
do not persist after the third cut-off;
this could cause your vehicle to mal-
function.
Take care to select the pump that
delivers the correct fuel for your
vehicle.
With Stop & Start, never refuel
with the system in STOP mode;
you must switch off the ignition
with the key.
Introduce the nozzle so as to push
in the metal non-return fl ap B.
Make sure that the nozzle is pushed
in as far as possible before starting
to refuel (risk of blowback).
Maintain this position while refuelling.
Push the fuel fl ap to close it.
Page 112 of 340
5
VISIBILITY
110
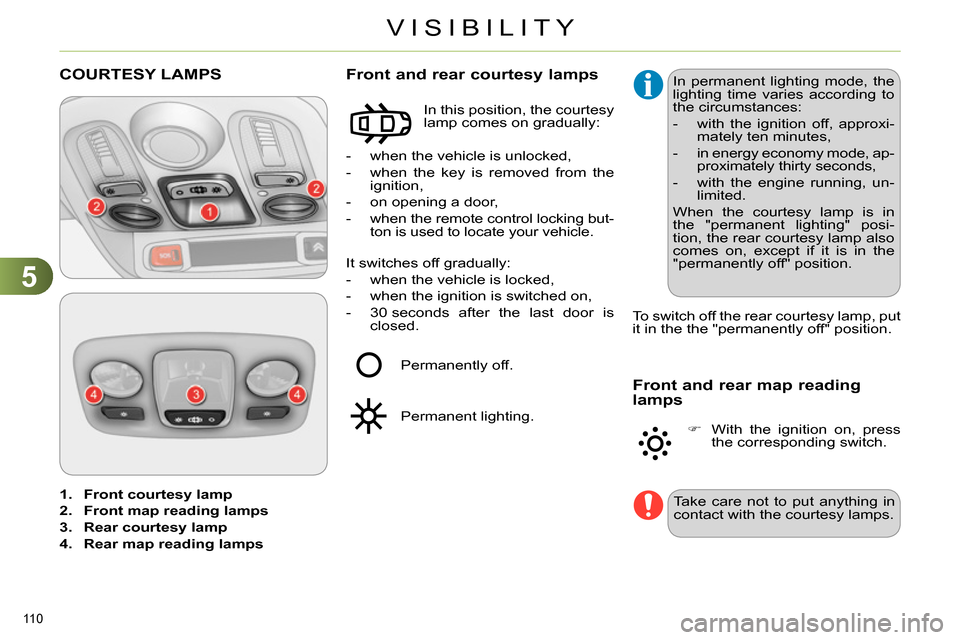
1.
Front courtesy lamp
2.
Front map reading lamps
3.
Rear courtesy lamp
4.
Rear map reading lamps
COURTESY LAMPS
- when the vehicle is unlocked,
- when the key is removed from the
ignition,
- on opening a door,
- when the remote control locking but-
ton is used to locate your vehicle.
Front and rear courtesy lamps
In this position, the courtesy
lamp comes on gradually:
It switches off gradually:
- when the vehicle is locked,
- when the ignition is switched on,
- 30 seconds after the last door is
closed. To switch off the rear courtesy lamp, put
it in the the "permanently off" position.
Permanently off.
Permanent lighting. In permanent lighting mode, the
lighting time varies according to
the circumstances:
- with the ignition off, approxi-
mately ten minutes,
- in energy economy mode, ap-
proximately thirty seconds,
- with the engine running, un-
limited.
When the courtesy lamp is in
the "permanent lighting" posi-
tion, the rear courtesy lamp also
comes on, except if it is in the
"permanently off" position.
Front and rear map reading
lamps
Take care not to put anything in
contact with the courtesy lamps.
With the ignition on, press
the corresponding switch.
Page 124 of 340
6
FITTINGS
122
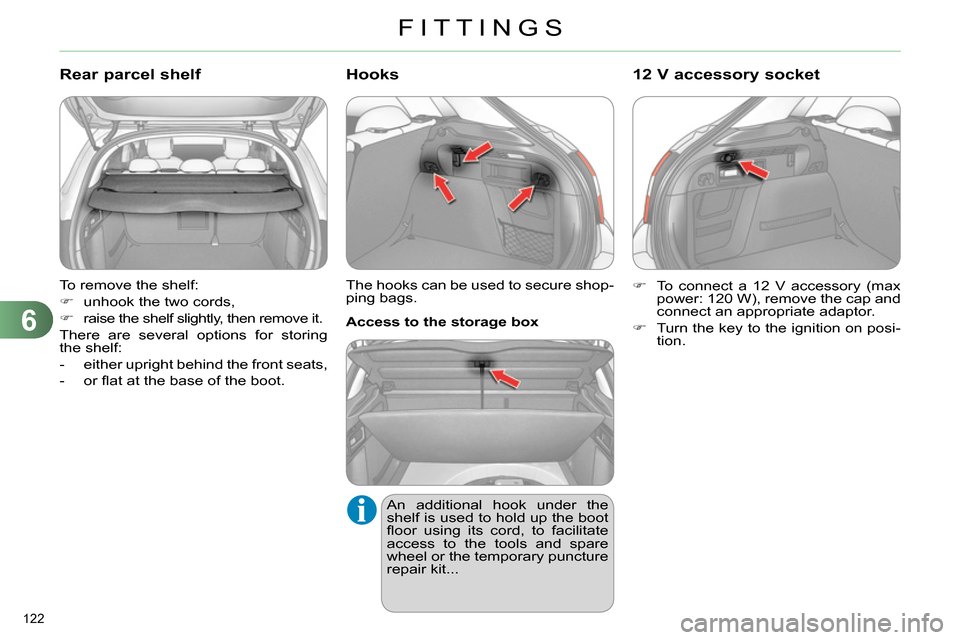
To remove the shelf:
unhook the two cords,
raise the shelf slightly, then remove it.
There are several options for storing
the shelf:
- either upright behind the front seats,
- or fl at at the base of the boot.
Rear parcel shelf
The hooks can be used to secure shop-
ping bags.
Hooks
An additional hook under the
shelf is used to hold up the boot
fl oor using its cord, to facilitate
access to the tools and spare
wheel or the temporary puncture
repair kit...
Access to the storage box
To connect a 12 V accessory (max
power: 120 W), remove the cap and
connect an appropriate adaptor.
Turn the key to the ignition on posi-
tion.
12 V accessory socket
Page 139 of 340
7
CHILD SAFETY
137
For optimum installation of the "for-
ward-facing" child seat, ensure that
the back of the child seat is as close
as possible to the backrest of the ve-
hicle's seat , in contact if possible.
You mst remove the head restraint
before installing a child seat with
backrest to a passenger seat.
Ensure that the head restraint is
stored or attached securely to pre-
vent it from being thrown around the
vehicle in the event of sharp brak-
ing. Refi t the head restraint when the
child seat is removed.
ADVICE ON CHILD SEATS
Installing a booster seat
Children at the front
The incorrect installation of a child
seat in a vehicle compromises the
child's protection in the event of an
accident.
Ensure that there is no seat belt or
seat belt buckle under the child seat,
as this could destabilise it.
Remember to fasten the seat belts or
the child seat harnesses keeping the
slack relative to the child's body to a
minimum, even for short journeys.
When installing a child seat using the
seat belt, ensure that the seat belt is
tightened correctly on the child seat
and that it secures the child seat fi rm-
ly on the seat of your vehicle. If your
passenger seat is adjustable, move it
forwards if necessary.
The legislation on carrying children on
the front passenger seat is specifi c to
each country. Refer to the legislation
in force in your country.
Deactivate the passenger airbag
when a "rearward-facing" child seat
is installed on the front seat.
Otherwise, the child would risk being
seriously injured or killed if the airbag
were to infl ate.
The chest part of the seat belt must
be positioned on the child's shoulder
without touching the neck.
Ensure that the lap part of the seat
belt passes correctly over the child's
thighs.
CITROËN recommends the use of
a booster seat which has a back, fi t-
ted with a seat belt guide at shoulder
level.
As a safety precaution, do not leave:
- a child or children alone and un-
supervised in a vehicle,
- a child or an animal in a vehicle
which is exposed to the sun, with
the windows closed,
- the keys within reach of children
inside the vehicle.
At rear seating positions, always
leave suffi cient space between the
front seat and:
- a "rearwards facing" child seat,
- the child's feet for a child seat fi t-
ted "forwards facing".
To do this, move the front seat for-
wards and, if necessary, move its
backrest into the upright position. To prevent accidental opening of the
doors and rear windows, use the
"Child lock".
Take care not to open the rear win-
dows by more than one third.
To protect young children from the
rays of the sun, fi t side blinds on the
rear windows.
Page 140 of 340
7
CHILD SAFETY
138
MANUAL CHILD LOCK
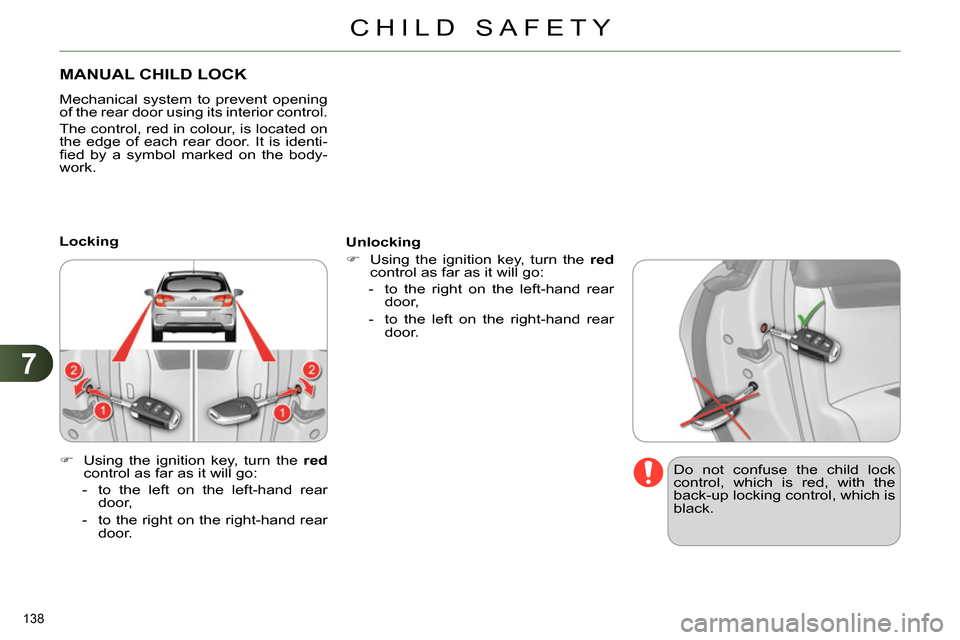
Mechanical system to prevent opening
of the rear door using its interior control.
The control, red in colour, is located on
the edge of each rear door. It is identi-
fi ed by a symbol marked on the body-
work
.
Using the ignition key, turn the red
control as far as it will go:
- to the left on the left-hand rear
door,
- to the right on the right-hand rear
door.
Locking
Unlocking
Using the ignition key, turn the red
control as far as it will go:
- to the right on the left-hand rear
door,
- to the left on the right-hand rear
door.
Do not confuse the child lock
control, which is red, with the
back-up locking control, which is
black.
Page 149 of 340
8
SAFETY
147
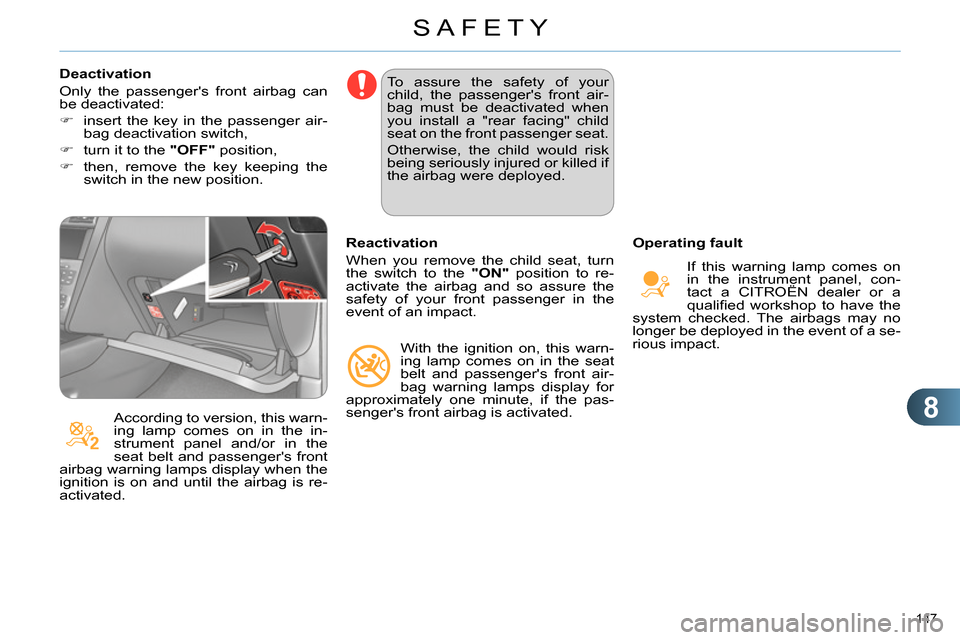
Deactivation
Only the passenger's front airbag can
be deactivated:
insert the key in the passenger air-
bag deactivation switch,
turn it to the "OFF"
position,
then, remove the key keeping the
switch in the new position.
According to version, this warn-
ing lamp comes on in the in-
strument panel and/or in the
seat belt and passenger's front
airbag warning lamps display when the
ignition is on and until the airbag is re-
activated. To assure the safety of your
child, the passenger's front air-
bag must be deactivated when
you install a "rear facing" child
seat on the front passenger seat.
Otherwise, the child would risk
being seriously injured or killed if
the airbag were deployed.
Reactivation
When you remove the child seat, turn
the switch to the "ON"
position to re-
activate the airbag and so assure the
safety of your front passenger in the
event of an impact.
With the ignition on, this warn-
ing lamp comes on in the seat
belt and passenger's front air-
bag warning lamps display for
approximately one minute, if the pas-
senger's front airbag is activated.
Operating fault
If this warning lamp comes on
in the instrument panel, con-
tact a CITROËN dealer or a
qualifi ed workshop to have the
system checked. The airbags may no
longer be deployed in the event of a se-
rious impact.
Page 170 of 340
9
DRIVING
168
STOP & START
The Stop & Start system puts the en-
gine temporarily into standby - STOP
mode - during stops in the traffi c (red
lights, traffi c jams, or other...). The en-
gine restarts automatically - START
mode - as soon as you want to move
off. The restart takes place instantly,
quickly and silently.
Perfect for urban use, the Stop & Start
system reduces fuel consumption and
exhaust emissions as well as the noise
level when stationary.
Operation
Going into engine STOP mode
The "ECO"
warning lamp comes on
in the instrument panel and the en-
gine goes into standby automatically:
- with a manual gearbox
, at speeds
below 12 mph (20 km/h), when you
put the gear lever into neutral and
release the clutch pedal, If your vehicle is fi tted with
the system, a time coun-
ter calculates the sum of
the periods in STOP mode
d uring a journey. It resets itself to zero
every time the ignition is switched on
with the key.
- with an electronic gearbox
, at a
speed below 5 mph (8 km/h), when
you press the brake pedal or put the
gear lever into position N
. With an electronic gearbox, for
your comfort during parking
maoeuvres, STOP mode is not
available for a few seconds after
coming out of reverse gear.
STOP mode does not affect the
functionality of the vehicle, such
as braking, power steering, for
example.
Special cases: STOP mode
unavailable
STOP mode is not invoked when:
- the driver's door is open,
- the driver's seat belt is not fastened,
- the vehicle has not exceeded 6 mph
(10 km/h) since the last engine start
using the key,
- the electric parking brake is applied
or being applied,
- the engine is needed to maintain a
comfortable temperature in the pas-
senger compartment,
- demisting is active,
- some special conditions (battery
charge, engine temperature, brak-
ing assistance, ambient tempera-
ture...) where the engine is needed
to assure control of a system.
In this case, the "ECO"
warn-
ing lamp fl ashes for a few sec-
onds, then goes off. Never refuel with the engine in
STOP mode; you must switch off
the ignition with the key.
This operation is perfectly normal.