seat adjustment Citroen C4 2014.5 2.G Owner's Manual
[x] Cancel search | Manufacturer: CITROEN, Model Year: 2014.5, Model line: C4, Model: Citroen C4 2014.5 2.GPages: 494, PDF Size: 21.47 MB
Page 4 of 494
Lighting controls 115
Automatic illumination of headlamps 1 20
Welcome
lighting
1
21
Headlamp
adj
ustment
1
22
Directional
l
ighting
1
23
Wiper
controls
1
25
Automatic
rain sensitive wipers
1
26
Courtesy
lamps
1
30
Interior
mood lighting
1
31
Boot
lamp
1
31
Visibility
Child seats 132
Deactivating the passenger's front airbag 1 34
ISOFIX
child seats
1
41
Child
lock
1
46
Child safety
Direction indicators 1 47
Hazard warning lamps 1 47
Hor n
14
7
Braking
assistance systems
1
48
Trajectory
control systems
1
49
Emergency
or assistance call
1
50
Front
seat belts
1
51
Airbags
1
55
Safety
Instrument panels 1 2
Rev counter 1 5
Warning
and indicator lamps
1
6
Indicators
2
9
Time
and units
3
4
Customisation
3
6
Monitoring
ove
r view
Monochrome screen A 3
7
Monochrome screen C 3 9
Touch
screen tablet
4
4
Trip
computer
4
9
Multifunction screens
Remote control key 53
"Keyless Entry and Starting" system 5 9
Alarm
6
7
D o o r s
71
Boo
t
7
2
Electric
windows
7
5
Panoramic
sunroof
7
8
access
Ventilation 7 9
Manual a ir c onditioning 8 2
Dual-zone
d
igital
a
ir
c
onditioning
8
4
Front
demist - defrost
8
9
Rear
screen demist - defrost
9
0
Front
seats
9
1
Rear
seats
9
5
Mirrors
97
S
teering wheel adjustment
9
9
Comfort
Front fittings 100
Centre consoles 1 03
Front
armrest
1
06
Rear
fittings
1
10
Boot
fittings
1
11
Fittings
Eco-driving
Contents
Page 93 of 494
91
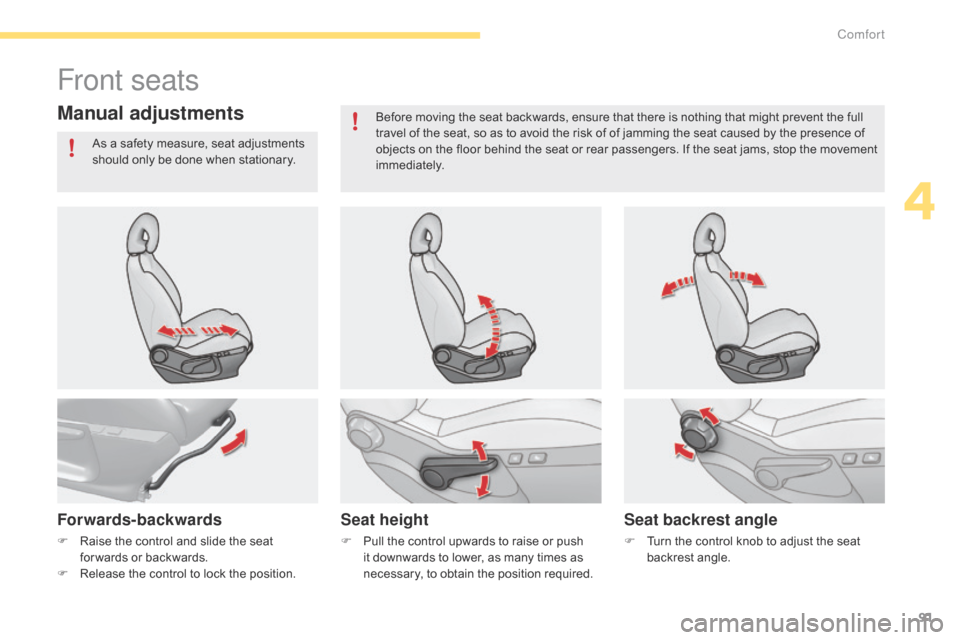
Front seats
Manual adjustments
Forwards-backwardsSeat heightSeat backrest angle
F Raise the control and slide the seat f
or wards or backwards.
F
R
elease the control to lock the position.F
P ull the control upwards to raise or push i
t downwards to lower, as many times as
n
ecessary, to obtain the position required.F
T urn the control knob to adjust the seat b
ackrest angle.
As
a safety measure, seat adjustments
s
hould only be done when stationary.
Before moving the seat backwards, ensure that there is nothing that might prevent the full
t
ravel of the seat, so as to avoid the risk of of jamming the seat caused by the presence of
o
bjects on the floor behind the seat or rear passengers. If the seat jams, stop the movement
i
mmediately.
4
Comfort
Page 94 of 494
92
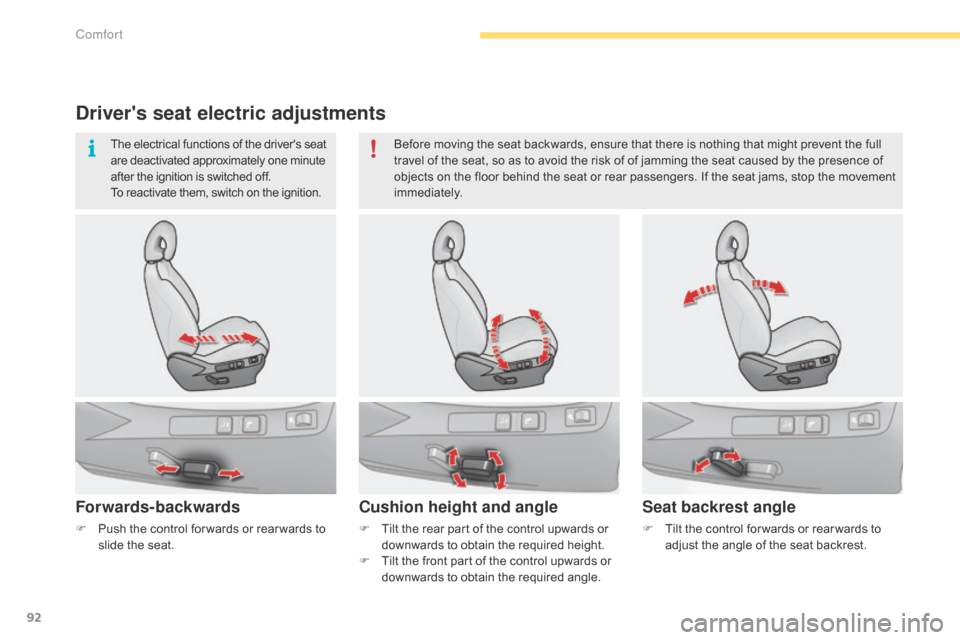
Driver's seat electric adjustments
Forwards-backwards
F Tilt the rear part of the control upwards or d
ownwards to obtain the required height.
F
T
ilt the front part of the control upwards or
d
ownwards to obtain the required angle.
Cushion height and angle
F Tilt the control for wards or rear wards to a
djust the angle of the seat backrest.
Seat backrest angle
F Push the control for wards or rear wards to s
lide the seat. Before
moving the seat backwards, ensure that there is nothing that might prevent the full
t
ravel of the seat, so as to avoid the risk of of jamming the seat caused by the presence of
o
bjects on the floor behind the seat or rear passengers. If the seat jams, stop the movement
i
mmediately.
The electrical functions of the driver's seat
a
re deactivated approximately one minute
a
fter the ignition is switched off.
To reactivate them, switch on the ignition.
Comfort
Page 95 of 494
93
Additional adjustments
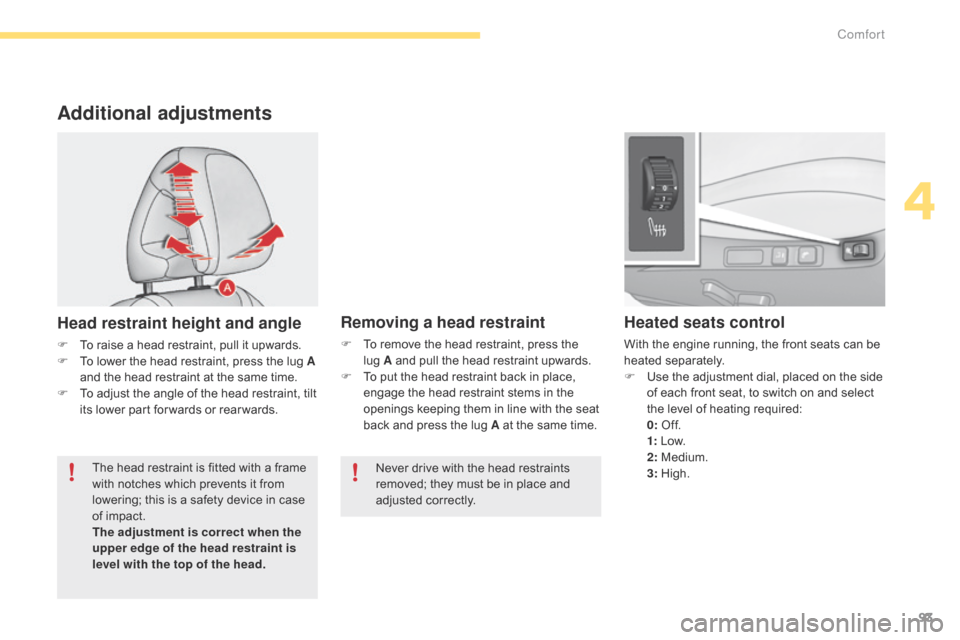
Head restraint height and angle
F To raise a head restraint, pull it upwards.
F T o lower the head restraint, press the lug A
and
the head restraint at the same time.
F
T
o adjust the angle of the head restraint, tilt
i
ts lower part for wards or rear wards.
Heated seats control
With the engine running, the front seats can be heated s eparately.
F
U
se the adjustment dial, placed on the side
o
f each front seat, to switch on and select
t
he level of heating required:
0: O
f f.
1:
L
ow.
2:
Medium.
3:
Hig
h.
Removing a head restraint
F To remove the head restraint, press the l
ug A and pull the head restraint upwards.
F
T
o put the head restraint back in place,
e
ngage the head restraint stems in the
o
penings keeping them in line with the seat
b
ack and press the lug A at the same time.
The
head
restraint
is
fitted
with
a
frame
w
ith
notches
which
prevents
it
from
l
owering;
this
is
a
safety
device
in
case
o
f
impact.
The adjustment is correct when the
upper edge of the head restraint is
level with the top of the head. Never
drive with the head restraints
r
emoved; they must be in place and
adj
usted
c
orrectly.
4
Comfort
Page 124 of 494
122
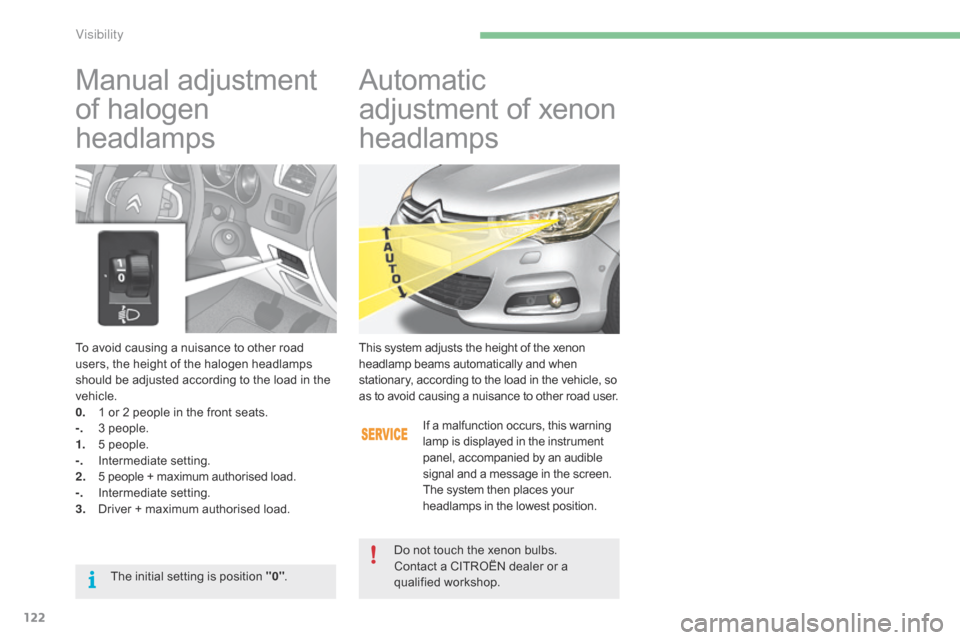
To avoid causing a nuisance to other road users, the height of the halogen headlamps
s
hould be adjusted according to the load in the
v
ehicle.
0.
1
or 2 people in the front seats.
-.
3
people.
1.
5
people.
-.
I
ntermediate
s
etting.
2.
5
people + maximum authorised load.
-.
I
ntermediate
s
etting.
3.
D
river + maximum authorised load.
Manual adjustment
o
f halogen
h
eadlamps Automatic
a djustment of xenon
h
eadlamps
This system adjusts the height of the xenon headlamp beams automatically and when s
tationary, according to the load in the vehicle, so
a
s to avoid causing a nuisance to other road user.
If
a malfunction occurs, this warning
l
amp is displayed in the instrument
p
anel, accompanied by an audible
s
ignal and a message in the screen.
The
system then places your
h
eadlamps in the lowest position.
Do
not touch the xenon bulbs.
Contact
a CITROËN dealer or a
q
ualified
w
orkshop.
The
initial
setting
is
position
"0" .
Visibility
Page 153 of 494
151
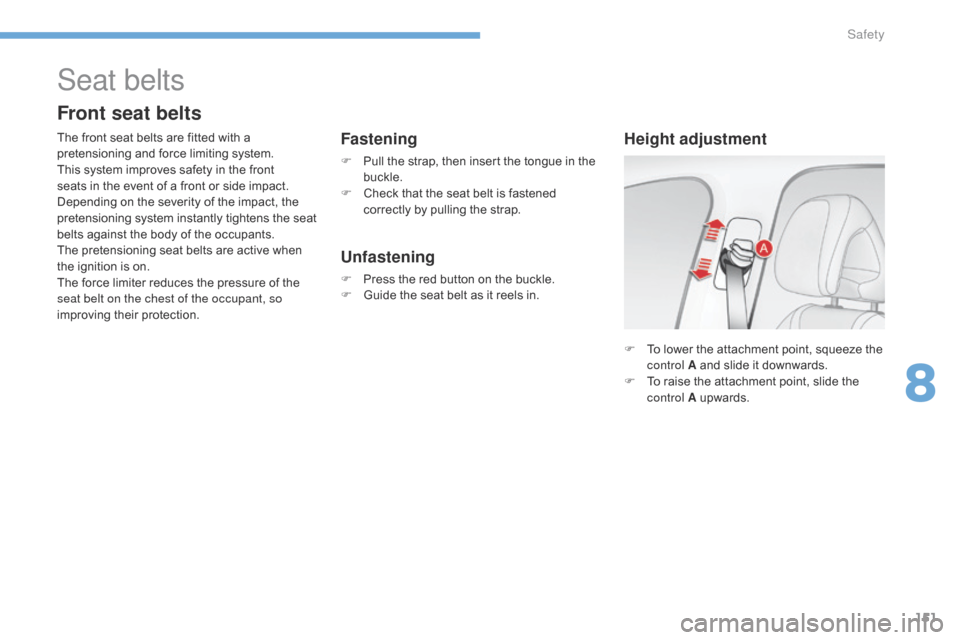
F To lower the attachment point, squeeze the c
ontrol A and slide it downwards.
F
T
o raise the attachment point, slide the
c
ontrol A
up
wards.
Height adjustment
Seat belts
Front seat belts
The front seat belts are fitted with a pretensioning and force limiting system.
This
system improves safety in the front
s
eats in the event of a front or side impact.
D
epending on the severity of the impact, the
p
retensioning system instantly tightens the seat
b
elts against the body of the occupants.
The
pretensioning seat belts are active when
t
he ignition is on.
The
force limiter reduces the pressure of the
s
eat belt on the chest of the occupant, so
improving
their protection.Fastening
F Pull the strap, then insert the tongue in the buc
kle.
F
C
heck that the seat belt is fastened
c
orrectly by pulling the strap.
Unfastening
F Press the red button on the buckle.
F G uide the seat belt as it reels in.
8
Safety
Page 156 of 494
154
The driver must ensure that passengers use the seat belts correctly and that they are all
r
estrained securely before setting off.
Wherever
you are seated in the vehicle,
a
lways fasten your seat belt, even for short
journeys.
Do
not interchange the seat belt buckles as
t
hey will not fulfil their role fully.
The
seat belts are fitted with an inertia reel
p
ermitting automatic adjustment of the length
o
f the strap to your size. The seat belt is
s
towed automatically when not in use.
Before
and after use, ensure that the seat belt
i
s reeled in correctly.
The
lower part of the strap must be positioned
a
s low as possible on the pelvis.
The
upper part must be positioned in the
h
ollow of the shoulder.
The
inertia reels are fitted with an automatic
l
ocking device which comes into operation in
t
he event of a collision, emergency braking
o
r if the vehicle rolls over. You can release
t
he device by pulling the strap firmly and then
r
eleasing it so that it reels in slightly.In
order to be effective, a seat belt must:
- b e tightened as close to the body as
p
ossible,
-
b
e pulled in front of you with a smooth
m
ovement, checking that it does not
t
wist,
-
b
e used to restrain only one person,
-
n
ot bear any trace of cuts or fraying,
-
n
ot be converted or modified to avoid
a
ffecting
it
s
p
erformance.
In
accordance with current safety
r
egulations, for all repairs on your vehicle's
s
eat belts, go to a qualified workshop with
t
he skills and equipment needed, which a
C
ITROËN dealer is able to provide.
Have
your seat belts checked regularly by
a
CITROËN dealer or a qualified workshop,
p
articularly if the straps show signs of
d
amage.
Clean the seat belt straps with soapy
water
or a textile cleaning product, sold by
C
ITROËN dealers.
After
folding or moving a seat or rear bench
s
eat, ensure that the seat belt is positioned
a
nd reeled in correctly.Recommendations for children
Use a suitable child seat if the passenger is less than 12 years old or shorter than one
a
nd a half metres.
Never
use the same seat belt to secure more
t
han one person.
Never
allow a child to travel on your lap.
For
more information, refer to the "Child
sea
ts"
se
ction.
In the event of an impact
Depending on the nature and seriousness
of the impact ,
the pretensioning device may
b
e deployed before and independently of the
a
irbags. Deployment of the pretensioners
i
s accompanied by a slight discharge of
h
armless smoke and a noise, due to the
a
ctivation of the pyrotechnic cartridge
i
ncorporated in the system.
In
all cases, the airbag warning lamp
comes
on.
Following
an impact, have the seat belts
s
ystem checked, and if necessary replaced,
b
y a CITROËN dealer or a qualified
w
orkshop.
Safety
Page 395 of 494
393
Replacing wiper blades........................ 128, 257
Resetting the service
indicator
...............................
........................32
Resetting
the trip recorder
.............................33
R
ev counter
................................................ 1
2-15
Reversing
lam
ps
.......................................... 24
4
Risk
areas (update)
....................................... 3
17
Roof bars
...................................................... 25
8
Roof
blind
...............................
........................78
Routine
checks
..................................... 21
5,
21
6
Running
out of fuel
(
die
sel)
...................................................... 2
07Service i
ndicator ............................................3
0
Service
warning
lamp
...............
..............................................19
Servicing
...............................
.........................10
Setting
the clock
.......................... 3
4, 38, 43, 48
Sidelamps
.....................1
15, 119, 238, 242, 244
Side
r
epeater
..............................
.................243
Ski
flap
..............................
............................11 0
Snow chains
................................................. 2
37
Spare wheel
...............................
..................231
Speakers
(
fitting)
..........................................26
8
Speed
l
imiter
...............................
.........195,
19
7
Speedometer
..............................
...............12-14
Spotlamps,
si
de
...............
......................................121,
2
4 3
Starting
the engine
......................................16
0
Starting
using another
battery
........................................................ 25
3
Steering
mounted
controls
...............
............................... 289, 357
Stop & Start
........................................ 5
2, 85, 89,
189,
204, 208, 215, 252
Storage
................
.. 100, 101, 103, 106, 107, 111
Storage
c
ompartments
........................10
0,
10
3
Storage
d
rawer
..............................
..............109
Storage
n
et
....................................................111
S
towing
r
ings
..............................
..................111
Sun visor
...................................................... 10
1
Switching
off
the
eng
ine
...............................
...................160
Synchronising
the remote
control
.................................................... 5
8, 63
Synthesiser, voice
........................................ 3
27
System
se
ttings
............................................335T
able of weights ................................... 2 73, 277
Tables
of engines ............................... ...271, 275
Tables of fuses
.............................................2
47
Tank,
AdBlue
® additive .........................217, 222
Tank,
fuel
............................... ....................... 206
Technical
da
ta
....................................... 2
71-28 2
Telephone
..................................... 34
2-345,
34
7
Temperature
control
for
heated
seats
........................................... 93
T
emporary
pu
ncture
r
epair
k
it
...............
...................................... 225
Ticket
holder
................................................ 10
0
TMC (Traffic info)
......................................... 32
2
To o l s
................
............................................. 230
To r c h
..............................
............................... 113
Total
distance
recorder
.................................. 33
T
ouch screen .................................... 44- 48,
285
Touch screen tablet ( M e nu s)
...............................
................. 44, 286
To w b a r
................
.......................................... 261
Towbar
with
quickly
detachable
t
owball
..................................... 26
3
Towed
loads
..........................................2
71, 275
Towing
another vehicle
................................ 26
0
Traction control (
aS
R)
................................. 14
9
Traffic
information (TA)
........................ 3
23, 360
Traffic
information (TMC)
..................... 3
22, 323
Tr a i l e r
...............
............................................ 261
Trajectory
control systems
........................... 14
9
Trip
computer
............................................ 4
9-52
Trip
distance
recorder
.................................... 33
T
yre pressures
..............................
...............281
Ty r e s
..............................................................
.10
Tyre
under-inflation detection
......................18
7
Safety
for
children
................. 1
32-146,
154,
156
Screen
menu
map
....... 2
90,
292,
294,
308,
310,
312,
328,
338,
340,
381-383
Screen,
m
onochrome
.......................3
7,
39,
381
Screen,
m
ultifunction
(
with
audio
equipment)
.................. 3
7,
39,
358
Screenwash, front
........................................ 12
7
SCR (Selective Catalytic Reduction)
.................................................. 2
17
Seat
adjustment
...............................
........ 91,
92
Seat belts
..............................1
38,
151,
153,
154
Seats, electric
................................................ 92
S
eats, rear
...................................................... 95
S
erial
number,
vehicle
...............................
......................... 281
S
T
.
alphabetical index